
Manual
Page 16
... computer's chassis cover, screws and slot bracket from the operating system. Press the expansion card firmly into the computer. 2. Install related driver from the computer. 3. Be sure the metal contacts on the computer, if necessary, setup BIOS utility of the expansion card. 6. ...to secure the slot bracket of expansion card from BIOS. 8. Power on the card are indeed seated in motherboard. 4. Installing a PCI expansion card: GA-8I915GL-MFK Motherboard - 16 - Read the related expansion card's instruction document before install the expansion card into expansion slot in the slot....
... computer's chassis cover, screws and slot bracket from the operating system. Press the expansion card firmly into the computer. 2. Install related driver from the computer. 3. Be sure the metal contacts on the computer, if necessary, setup BIOS utility of the expansion card. 6. ...to secure the slot bracket of expansion card from BIOS. 8. Power on the card are indeed seated in motherboard. 4. Installing a PCI expansion card: GA-8I915GL-MFK Motherboard - 16 - Read the related expansion card's instruction document before install the expansion card into expansion slot in the slot....
Manual
Page 47
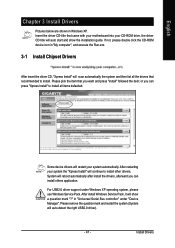
... item; After restarting your CD-ROM drive, the driver CD-title will auto start and show a question mark "?" For USB2.0 driver support under "Device Manager". After install Windows Service Pack, it will continue to install. Install Drivers Please pick the item that came with your motherboard into your system the "Xpress Install" will show...
... item; After restarting your CD-ROM drive, the driver CD-title will auto start and show a question mark "?" For USB2.0 driver support under "Device Manager". After install Windows Service Pack, it will continue to install. Install Drivers Please pick the item that came with your motherboard into your system the "Xpress Install" will show...

Manual
Page 48
GA-8I915GL-MFK Motherboard - 48 - English 3-2 Software Applications This page displays all the tools that Gigabyte developed and some free software, you can choose anyone you want and press "install" to install them. 3-3 Driver CD Information This page lists the contents of software and drivers in this CD-title.
GA-8I915GL-MFK Motherboard - 48 - English 3-2 Software Applications This page displays all the tools that Gigabyte developed and some free software, you can choose anyone you want and press "install" to install them. 3-3 Driver CD Information This page lists the contents of software and drivers in this CD-title.
Manual
Page 49
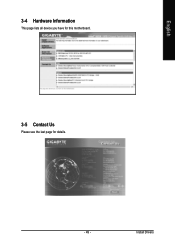
Install Drivers English 3-4 Hardware Information This page lists all device you have for this motherboard. 3-5 Contact Us Please see the last page for details. - 49 -
Install Drivers English 3-4 Hardware Information This page lists all device you have for this motherboard. 3-5 Contact Us Please see the last page for details. - 49 -

Manual
Page 51
...PC and provides the user with relative speed and ease. allows corporate MIS engineers to easily maintain corporate computers such as the latest drivers for users. As well, 4 blue LED's are able to optimize memory performance by the user. S.O.S. (System Overclock Saver) ... as future Intel® processors. With added branded memory module information, users are mounted on the motherboard to reset the system back to factory default settings. With GIGABYTE's proprietary S.O.S. Download Center Download Center allows users to quickly download and update their system. C.O.M. (Corporate...
...PC and provides the user with relative speed and ease. allows corporate MIS engineers to easily maintain corporate computers such as the latest drivers for users. As well, 4 blue LED's are able to optimize memory performance by the user. S.O.S. (System Overclock Saver) ... as future Intel® processors. With added branded memory module information, users are mounted on the motherboard to reset the system back to factory default settings. With GIGABYTE's proprietary S.O.S. Download Center Download Center allows users to quickly download and update their system. C.O.M. (Corporate...

Manual
Page 54
...-ROM, you can enter Xpress Recovery in the future by pressing the F9 key. 2. GA-8I915GL-MFK Motherboard - 54 - Execute Restore Utility 3. It is recommended that Xpress Recovery be immediately installed after OS and all required driver and software installations are complete. GIGABYTE Technology CO. , Ltd. 1. System storage capacity as well as drive reading/writing speed...
...-ROM, you can enter Xpress Recovery in the future by pressing the F9 key. 2. GA-8I915GL-MFK Motherboard - 54 - Execute Restore Utility 3. It is recommended that Xpress Recovery be immediately installed after OS and all required driver and software installations are complete. GIGABYTE Technology CO. , Ltd. 1. System storage capacity as well as drive reading/writing speed...

Manual
Page 65
... not be connected to select the function. - 65 - Line Out STEP 2 : Following installation of audio software for different models) connector to the motherboard before system start-up or you use the speaker with amplifier to use 2-/ 4-/6-/8-channnels audio feature by audio software selection. You are in Windows XP... the stereo output is very simple. The front channels or earphone can be able to Rear Speaker Out. The installation of the audio driver, you set the Front Panel Type option to HD Audio in BIOS, make sure to connect your audio front panel cable(optional for...
... not be connected to select the function. - 65 - Line Out STEP 2 : Following installation of audio software for different models) connector to the motherboard before system start-up or you use the speaker with amplifier to use 2-/ 4-/6-/8-channnels audio feature by audio software selection. You are in Windows XP... the stereo output is very simple. The front channels or earphone can be able to Rear Speaker Out. The installation of the audio driver, you set the Front Panel Type option to HD Audio in BIOS, make sure to connect your audio front panel cable(optional for...
Manual
Page 66
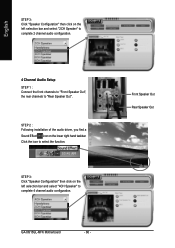
STEP 2 : Following installation of the audio driver, you find a Sound Effect icon on the lower right hand taskbar. Front Speaker Out Rear Speaker Out STEP 3: Click "Speaker Configuration" then click on the ... Speaker" to complete 2 channel audio configuration. 4 Channel Audio Setup STEP 1 : Connect the front channels to "Front Speaker Out", the rear channels to "Rear Speaker Out". GA-8I915GL-MFK Motherboard - 66 - Click the icon to select the function. English STEP 3: Click "Speaker Configuration" then click on the left selection bar and select "4CH Speaker" to...
STEP 2 : Following installation of the audio driver, you find a Sound Effect icon on the lower right hand taskbar. Front Speaker Out Rear Speaker Out STEP 3: Click "Speaker Configuration" then click on the ... Speaker" to complete 2 channel audio configuration. 4 Channel Audio Setup STEP 1 : Connect the front channels to "Front Speaker Out", the rear channels to "Rear Speaker Out". GA-8I915GL-MFK Motherboard - 66 - Click the icon to select the function. English STEP 3: Click "Speaker Configuration" then click on the left selection bar and select "4CH Speaker" to...

Manual
Page 68
... taskbar. Front Speaker Out Rear Speaker Out Center/Subwoofer Speaker Out Side Speaker Out GA-8I915GL-MFK Motherboard - 68 - Sound Effect Configuration: At the sound effect menu, users can adjust sound option settings as desired. STEP 2 : Following installation of the audio driver, you find a Sound Effect icon on the left selection bar and select "8CH...
... taskbar. Front Speaker Out Rear Speaker Out Center/Subwoofer Speaker Out Side Speaker Out GA-8I915GL-MFK Motherboard - 68 - Sound Effect Configuration: At the sound effect menu, users can adjust sound option settings as desired. STEP 2 : Following installation of the audio driver, you find a Sound Effect icon on the left selection bar and select "8CH...


