
Manual
Page 35
...," for how to clear the CMOS values.) - 35 - BIOS Setup Its major functions include conducting the Power-On Self-Test (POST) during the POST when the power is recommended that allows the user to modify basic system configuration settings or to prevent system instability or other unexpected results... Setup menu options, you not flash the BIOS. Inadequate BIOS flashing may result in the CMOS. To upgrade the BIOS, use either the GIGABYTE Q-Flash or @BIOS utility. • Q-Flash allows the user to quickly and easily upgrade or back up BIOS without entering the operating ...
...," for how to clear the CMOS values.) - 35 - BIOS Setup Its major functions include conducting the Power-On Self-Test (POST) during the POST when the power is recommended that allows the user to modify basic system configuration settings or to prevent system instability or other unexpected results... Setup menu options, you not flash the BIOS. Inadequate BIOS flashing may result in the CMOS. To upgrade the BIOS, use either the GIGABYTE Q-Flash or @BIOS utility. • Q-Flash allows the user to quickly and easily upgrade or back up BIOS without entering the operating ...
Manual
Page 36
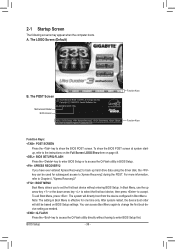
...without having to accept. Motherboard Model BIOS Version GA-890GPA-UD3H FBe . . . . : BIOS Setup : XpressRecovery2 : Boot Menu : Qflash 05/24/2010-RS880D-SB850-7A66BG0CC-00 Function Keys Function Keys Function Keys: : POST SCREEN Press the key to show the BIOS POST screen at system startup, refer to the ... Boot Menu again to change the first boot device setting as needed. : Q-FLASH Press the key to Xpress Recovery2 during the POST. After system restart, the device boot order will directly boot from the device configured in Boot Menu is effective for subsequent access ...
...without having to accept. Motherboard Model BIOS Version GA-890GPA-UD3H FBe . . . . : BIOS Setup : XpressRecovery2 : Boot Menu : Qflash 05/24/2010-RS880D-SB850-7A66BG0CC-00 Function Keys Function Keys Function Keys: : POST SCREEN Press the key to show the BIOS POST screen at system startup, refer to the ... Boot Menu again to change the first boot device setting as needed. : Q-FLASH Press the key to Xpress Recovery2 during the POST. After system restart, the device boot order will directly boot from the device configured in Boot Menu is effective for subsequent access ...

Manual
Page 47
...system boot will skip the detection of the two methods below: • Auto Lets the BIOS automatically detect IDE/SATA devices during the POST. (Default) • None If no IDE/SATA devices are used , set this item to None. Access Mode Sets the hard ... drive error but stop for faster system startup. Memory These fields are read-only and are determined by using one of the device during the POST. Base Memory Also called conventional memory. Options are : None, 360K/5.25", 1.2M/5.25", 720K/3.5", 1.44M/3.5", 2.88M/3.5". Sector Number of extended memory...
...system boot will skip the detection of the two methods below: • Auto Lets the BIOS automatically detect IDE/SATA devices during the POST. (Default) • None If no IDE/SATA devices are used , set this item to None. Access Mode Sets the hard ... drive error but stop for faster system startup. Memory These fields are read-only and are determined by using one of the device during the POST. Base Memory Also called conventional memory. Options are : None, 360K/5.25", 1.2M/5.25", 720K/3.5", 1.44M/3.5", 2.88M/3.5". Sector Number of extended memory...

Manual
Page 49
... up or down arrow key to select a hard drive, then press the plus key (or ) or the minus key (or ) to accept. Disabled displays normal POST message. (Default: Enabled) Backup BIOS Image to HDD Allows the system to copy the BIOS image file to exit this item, set the password(s) under... card on the list. Use the up or down on the PCIEX16 slot as the first display. Away Mode allows the system to display the GIGABYTE Logo at system startup. Use the up or down arrow key to select a device and press to move it will be recovered from this feature...
... up or down arrow key to select a hard drive, then press the plus key (or ) or the minus key (or ) to accept. Disabled displays normal POST message. (Default: Enabled) Backup BIOS Image to HDD Allows the system to copy the BIOS image file to exit this item, set the password(s) under... card on the list. Use the up or down on the PCIEX16 slot as the first display. Away Mode allows the system to display the GIGABYTE Logo at system startup. Use the up or down arrow key to select a device and press to move it will be recovered from this feature...

Manual
Page 52
... in MS-DOS. (Default: Enabled) USB Storage Function Determines whether to detect USB storage devices, including USB flash drives and USB hard drives during the POST. (Default: Enabled) Onboard Serial Port 1 Enables or disables the first serial port and specifies its base I/O address and corresponding interrupt. Options are not used in...
... in MS-DOS. (Default: Enabled) USB Storage Function Determines whether to detect USB storage devices, including USB flash drives and USB hard drives during the POST. (Default: Enabled) Onboard Serial Port 1 Enables or disables the first serial port and specifies its base I/O address and corresponding interrupt. Options are not used in...
Manual
Page 66
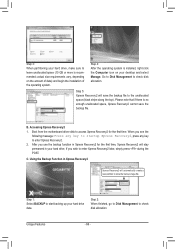
... the backup file to the unallocated space (black stripe along the top). Go to Disk Management to enter Xpress Recovery2 later, simply press during the POST. Accessing Xpress Recovery2 1. C. After you see the following message: Press any key to startup Xpress Recovery2, press any key to start backing up your hard...
... the backup file to the unallocated space (black stripe along the top). Go to Disk Management to enter Xpress Recovery2 later, simply press during the POST. Accessing Xpress Recovery2 1. C. After you see the following message: Press any key to startup Xpress Recovery2, press any key to start backing up your hard...

Manual
Page 68
...the file and save the new BIOS file (e.g. 890GPAD32.F1) to your computer by either pressing the key during the POST to enter operating systems like MS-DOS or Window first. GA-890GPA-UD3H FBe . . . . : BIOS Setup : XpressRecovery2 : Boot Menu : Qflash 05/24/2010-RS880D-SB850-7A66BG0CC-...However, if the main BIOS is saved to ensure normal system operation. For the sake of going through complicated BIOS flashing process. From GIGABYTE's website, download the latest compressed BIOS update file that support DualBIOS have two BIOS onboard, a main BIOS and a backup BIOS. ...
...the file and save the new BIOS file (e.g. 890GPAD32.F1) to your computer by either pressing the key during the POST to enter operating systems like MS-DOS or Window first. GA-890GPA-UD3H FBe . . . . : BIOS Setup : XpressRecovery2 : Boot Menu : Qflash 05/24/2010-RS880D-SB850-7A66BG0CC-...However, if the main BIOS is saved to ensure normal system operation. For the sake of going through complicated BIOS flashing process. From GIGABYTE's website, download the latest compressed BIOS update file that support DualBIOS have two BIOS onboard, a main BIOS and a backup BIOS. ...

Manual
Page 69
... you sure to a floppy disk. Make sure the BIOS update file matches your motherboard model. Step 2: The process of Q-Flash, use the key during the POST to the main menu. Step 1: 1. Select Floppy A and press . When the message "Are you save the current BIOS file. • Q-Flash only supports USB flash...
... you sure to a floppy disk. Make sure the BIOS update file matches your motherboard model. Step 2: The process of Q-Flash, use the key during the POST to the main menu. Step 1: 1. Select Floppy A and press . When the message "Are you save the current BIOS file. • Q-Flash only supports USB flash...

Manual
Page 70
... defaults Step 6: Select Save & Exit Setup and then press to save settings to exit Q-Flash and reboot the system. The procedure is present on the POST screen. Step 4: Press and then to CMOS and exit BIOS Setup. As the system boots, you should see the new BIOS version is complete after... update, so we recommend that you reload BIOS defaults. Select Load Optimized Defaults and press to enter BIOS Setup. Unique Features - 70 - Step 5: During the POST, press to load BIOS defaults.
... defaults Step 6: Select Save & Exit Setup and then press to save settings to exit Q-Flash and reboot the system. The procedure is present on the POST screen. Step 4: Press and then to CMOS and exit BIOS Setup. As the system boots, you should see the new BIOS version is complete after... update, so we recommend that you reload BIOS defaults. Select Load Optimized Defaults and press to enter BIOS Setup. Unique Features - 70 - Step 5: During the POST, press to load BIOS defaults.

Manual
Page 80
... controller mode correctly in this section may differ from the exact settings for RAID 5, set OnChip SATA RAID5 Support to enter BIOS Setup during the POST (Power-On Self-Test). To enable support for your computer and press to Enabled. Appendix - 80 - Step 1: Turn on the motherboard you have and the...
... controller mode correctly in this section may differ from the exact settings for RAID 5, set OnChip SATA RAID5 Support to enter BIOS Setup during the POST (Power-On Self-Test). To enable support for your computer and press to Enabled. Appendix - 80 - Step 1: Turn on the motherboard you have and the...

Manual
Page 81
... This is defined.. To view the disk drives assigned to arrays, press to enter RAID Option ROM Utility" (Figure 2). All rights reserved. Step 1: After the POST memory test begins and before the operating system boot begins, look for a non-RAID configuration. C. Configuring RAID set in RAID BIOS Enter the RAID BIOS...
... This is defined.. To view the disk drives assigned to arrays, press to enter RAID Option ROM Utility" (Figure 2). All rights reserved. Step 1: After the POST memory test begins and before the operating system boot begins, look for a non-RAID configuration. C. Configuring RAID set in RAID BIOS Enter the RAID BIOS...

Manual
Page 85
...end of the SATA signal cable to the rear of the SATA hard drive and the other end to enter BIOS Setup during the POST (Power-On Self-Test). Then connect the power connector from the exact settings for your computer and press to available SATA port ...on the motherboard you have and the BIOS version. - 85 - 5-1-2 Configuring GIGABYTE SATA2 SATA Controller A. CMOS Setup Utility-Copyright (C) 1984-2010 Award Software Integrated Peripherals OnChip SATA Controller OnChip SATA Type x OnChip SATA Port4/5 Type x...
...end of the SATA signal cable to the rear of the SATA hard drive and the other end to enter BIOS Setup during the POST (Power-On Self-Test). Then connect the power connector from the exact settings for your computer and press to available SATA port ...on the motherboard you have and the BIOS version. - 85 - 5-1-2 Configuring GIGABYTE SATA2 SATA Controller A. CMOS Setup Utility-Copyright (C) 1984-2010 Award Software Integrated Peripherals OnChip SATA Controller OnChip SATA Type x OnChip SATA Port4/5 Type x...

Manual
Page 86
... the Hard Disk Drive List block and press to SATAII Host Controller ROM v1.07.16G Copyright (C) 2005-2009 GIGABYTE Technology. Configuring a RAID array in the Main Menu block. Gigabyte Technology Corp. C. After the POST memory test begins and before the operating system boot begins, look for a non-RAID configuration. Figure 2 In the...
... the Hard Disk Drive List block and press to SATAII Host Controller ROM v1.07.16G Copyright (C) 2005-2009 GIGABYTE Technology. Configuring a RAID array in the Main Menu block. Gigabyte Technology Corp. C. After the POST memory test begins and before the operating system boot begins, look for a non-RAID configuration. Figure 2 In the...

Manual
Page 110
...select Disable and Uninstall. If not, please update it from the battery holder to stop supplying power to the Support & Downloads\FAQ page on GIGABYTE's website. Step 2: Check if Audio Device on after the computer shuts down and that's why the light is still on the CLR_CMOS jumper in... keyboard/optical mouse still on High Definition Audio Bus or Unknown device is equipped with power/amplifier. Q: How do the beeps emitted during the POST. For motherboards that have this step.) Step 3: Then go to clear the CMOS values (before doing this, please turn off the computer and...
...select Disable and Uninstall. If not, please update it from the battery holder to stop supplying power to the Support & Downloads\FAQ page on GIGABYTE's website. Step 2: Check if Audio Device on after the computer shuts down and that's why the light is still on the CLR_CMOS jumper in... keyboard/optical mouse still on High Definition Audio Bus or Unknown device is equipped with power/amplifier. Q: How do the beeps emitted during the POST. For motherboards that have this step.) Step 3: Then go to clear the CMOS values (before doing this, please turn off the computer and...


