
Manual
Page 3
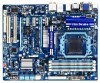
...means without prior notice. Check your motherboard looks like this manual may be made by copyright laws and is 1.0. All rights reserved. For example, "REV: 1.0" means the revision of the motherboard is the property of GIGABYTE. Disclaimer Information in this : "...REV: X.X." For product-related information, check on our website at: http://www.gigabyte.com Identifying Your Motherboard Revision The revision number on your motherboard revision before updating motherboard BIOS, drivers, or when looking for technical information. Copyright © 2011 GIGA-BYTE TECHNOLOGY CO.,...
...means without prior notice. Check your motherboard looks like this manual may be made by copyright laws and is 1.0. All rights reserved. For example, "REV: 1.0" means the revision of the motherboard is the property of GIGABYTE. Disclaimer Information in this : "...REV: X.X." For product-related information, check on our website at: http://www.gigabyte.com Identifying Your Motherboard Revision The revision number on your motherboard revision before updating motherboard BIOS, drivers, or when looking for technical information. Copyright © 2011 GIGA-BYTE TECHNOLOGY CO.,...

Manual
Page 6
...-1IE008-0*R) 2-port SATA power cable (Part No. 12CF1-2SERPW-0*R) S/PDIF In cable (Part No. 12CR1-1SPDIN-0*R) COM port cable (Part No. 12CF1-1CM001-3*R) - 6 - Box Contents GA-890GPA-UD3H motherboard Motherboard driver disk User's Manual Quick Installation Guide One IDE cable Four SATA cables I/O Shield • The box contents above are subject to change without notice. •...
...-1IE008-0*R) 2-port SATA power cable (Part No. 12CF1-2SERPW-0*R) S/PDIF In cable (Part No. 12CR1-1SPDIN-0*R) COM port cable (Part No. 12CF1-1CM001-3*R) - 6 - Box Contents GA-890GPA-UD3H motherboard Motherboard driver disk User's Manual Quick Installation Guide One IDE cable Four SATA cables I/O Shield • The box contents above are subject to change without notice. •...
Manual
Page 18
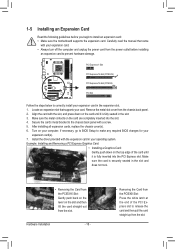
...in the expansion slot. 1. Carefully read the manual that supports your operating system. Remove the metal slot cover from the slot. Install the driver provided with the slot, and press down on the slot and then lift the card straight out from the power outlet before you begin to... install an expansion card: • Make sure the motherboard supports the expansion card. After installing all expansion cards, replace the chassis cover(s). 6. Make sure the card is securely seated in your card....
...in the expansion slot. 1. Carefully read the manual that supports your operating system. Remove the metal slot cover from the slot. Install the driver provided with the slot, and press down on the slot and then lift the card straight out from the power outlet before you begin to... install an expansion card: • Make sure the motherboard supports the expansion card. After installing all expansion cards, replace the chassis cover(s). 6. Make sure the card is securely seated in your card....

Manual
Page 19
...motherboard with sufficient power is recommended (Refer to the CrossFireX menu and ensure the Enable CrossFireX™ check box is selected. (Note) The bridge connectors may differ by graphics cards. A power supply with two PCI Express x16 slots and correct driver - Configuring the Graphics Card Driver After installing the graphics card driver... the two cards. 1-6 Setup of identical brand and chip and correct driver - Windows 7, Vista, or Windows XP operating system - Procedure and driver screen for more information about enabling CrossFireX technology. - 19 - System ...
...motherboard with sufficient power is recommended (Refer to the CrossFireX menu and ensure the Enable CrossFireX™ check box is selected. (Note) The bridge connectors may differ by graphics cards. A power supply with two PCI Express x16 slots and correct driver - Configuring the Graphics Card Driver After installing the graphics card driver... the two cards. 1-6 Setup of identical brand and chip and correct driver - Windows 7, Vista, or Windows XP operating system - Procedure and driver screen for more information about enabling CrossFireX technology. - 19 - System ...

Manual
Page 20
...and ensure the Enable CrossFire™ check box is selected. (Note 1) You do not have to install the graphics card driver if the motherboard chipset driver has been installed. (Note 2) To change the Internal Graphics Mode or UMA Frame Buffer Size setting in BIOS Setup, ...1: Observe the steps in the operating system first. An ATI Hybrid CrossFireX-supported graphics card (Note 1) B. Configuring the Graphics Driver After installing the motherboard driver in the operating system, go to disable the CrossFire function in "1-5 Installing an Expansion Card" and install an ATI Hybrid CrossFireX...
...and ensure the Enable CrossFire™ check box is selected. (Note 1) You do not have to install the graphics card driver if the motherboard chipset driver has been installed. (Note 2) To change the Internal Graphics Mode or UMA Frame Buffer Size setting in BIOS Setup, ...1: Observe the steps in the operating system first. An ATI Hybrid CrossFireX-supported graphics card (Note 1) B. Configuring the Graphics Driver After installing the motherboard driver in the operating system, go to disable the CrossFire function in "1-5 Installing an Expansion Card" and install an ATI Hybrid CrossFireX...
Manual
Page 36
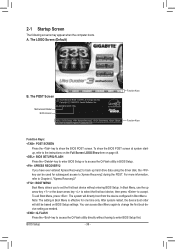
... Boot Menu, use the up hard drive data using the driver disk, the key can access Boot Menu again to change the first boot device setting as needed. : Q-FLASH Press the key to Xpress Recovery2 during the POST. Motherboard Model BIOS Version GA-890GPA-UD3H FBe . . . . : BIOS Setup : XpressRecovery2 : Boot Menu : Qflash 05/24/2010...
... Boot Menu, use the up hard drive data using the driver disk, the key can access Boot Menu again to change the first boot device setting as needed. : Q-FLASH Press the key to Xpress Recovery2 during the POST. Motherboard Model BIOS Version GA-890GPA-UD3H FBe . . . . : BIOS Setup : XpressRecovery2 : Boot Menu : Qflash 05/24/2010...

Manual
Page 51
...LAN cable. the IDE controller still operates in the figure above. If no cable problem is an interface specification that allows the storage driver to the motherboard, the Status fields of all four pairs of wires will appear: Start detecting at Port..... If no LAN cable is activated. ...F5: Previous Values +/-/PU/PD: Value F10: Save F6: Fail-Safe Defaults ESC: Exit F1: General Help F7: Optimized Defaults This motherboard incorporates cable diagnostic feature designed to AHCI mode. RAID/IDE Enables RAID for diagnosing your LAN cable: When No LAN Cable Is Attached... ...
...LAN cable. the IDE controller still operates in the figure above. If no cable problem is an interface specification that allows the storage driver to the motherboard, the Status fields of all four pairs of wires will appear: Start detecting at Port..... If no LAN cable is activated. ...F5: Previous Values +/-/PU/PD: Value F10: Save F6: Fail-Safe Defaults ESC: Exit F1: General Help F7: Optimized Defaults This motherboard incorporates cable diagnostic feature designed to AHCI mode. RAID/IDE Enables RAID for diagnosing your LAN cable: When No LAN Cable Is Attached... ...

Manual
Page 61
.... Or click No if you wish to install. Chapter 3 Drivers Installation • Before installing the drivers, first install the operating system. • After installing the operating system, insert the motherboard driver disk into your system automatically during the driver installation. Click Yes to install new GIGABYTE utilities. the Found New Hardware Wizard) displayed when "Xpress Install...
.... Or click No if you wish to install. Chapter 3 Drivers Installation • Before installing the drivers, first install the operating system. • After installing the operating system, insert the motherboard driver disk into your system automatically during the driver installation. Click Yes to install new GIGABYTE utilities. the Found New Hardware Wizard) displayed when "Xpress Install...

Manual
Page 62
3-2 Application Software This page displays all the utilities and applications that GIGABYTE develops and some free software. Drivers Installation - 62 - You can click the Install button on the right of an item to install it. 3-3 Technical Manuals This page provides GIGABYTE's application guides, content descriptions for this driver disk, and the motherboard manuals.
3-2 Application Software This page displays all the utilities and applications that GIGABYTE develops and some free software. Drivers Installation - 62 - You can click the Install button on the right of an item to install it. 3-3 Technical Manuals This page provides GIGABYTE's application guides, content descriptions for this driver disk, and the motherboard manuals.
Manual
Page 66
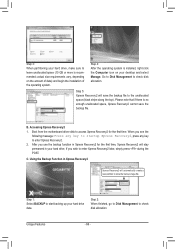
... - B. Accessing Xpress Recovery2 1. Using the Backup Function in Xpress Recovery2 Xpress Recovery2 will stay permanent in Xpress Recovery2 for the first time. Boot from the motherboard driver disk to enter Xpress Recovery2 later, simply press during the POST. After you see the following message: Press any key to startup Xpress Recovery2, press...
... - B. Accessing Xpress Recovery2 1. Using the Backup Function in Xpress Recovery2 Xpress Recovery2 will stay permanent in Xpress Recovery2 for the first time. Boot from the motherboard driver disk to enter Xpress Recovery2 later, simply press during the POST. After you see the following message: Press any key to startup Xpress Recovery2, press...

Manual
Page 75
exe to Start>All Programs>GIGABYTE>Q-Share. Data Sharing Enabled Options Descriptions Option Connect ... Open Incoming Folder : C:\Q-ShareFolder Change Incoming Folder : C:\Q-ShareFolder Update Q-Share ... After configuring ... Q-Share is NOT enabled. - 75 - Data Sharing Disabled Figure 2. Disable Incoming Folder ... Exit... Directions for using Q-Share After installing Q-Share from the motherboard driver disk, go to launch the Q-Share tool. Find the Q-Share icon to be shared (Note) Updates Q-Share online Displays the current Q-Share version Exits Q-Share...
exe to Start>All Programs>GIGABYTE>Q-Share. Data Sharing Enabled Options Descriptions Option Connect ... Open Incoming Folder : C:\Q-ShareFolder Change Incoming Folder : C:\Q-ShareFolder Update Q-Share ... After configuring ... Q-Share is NOT enabled. - 75 - Data Sharing Disabled Figure 2. Disable Incoming Folder ... Exit... Directions for using Q-Share After installing Q-Share from the motherboard driver disk, go to launch the Q-Share tool. Find the Q-Share icon to be shared (Note) Updates Q-Share online Displays the current Q-Share version Exits Q-Share...

Manual
Page 79
...create RAID array on the motherboard. Install the SATA RAID/AHCI driver (Note 2) and operating system. Before you may prepare only one hard drive. • An empty formatted floppy disk. • Windows Vista/XP setup disk. • Motherboard driver disk. 5-1-1 Configuring AMD SB850... SATA Controller A. If there is more than one SATA controller on your motherboard, refer to "Chapter 1," "Hardware Installation," to identify the SATA controller for Windows XP. ...
...create RAID array on the motherboard. Install the SATA RAID/AHCI driver (Note 2) and operating system. Before you may prepare only one hard drive. • An empty formatted floppy disk. • Windows Vista/XP setup disk. • Motherboard driver disk. 5-1-1 Configuring AMD SB850... SATA Controller A. If there is more than one SATA controller on your motherboard, refer to "Chapter 1," "Hardware Installation," to identify the SATA controller for Windows XP. ...
Manual
Page 91
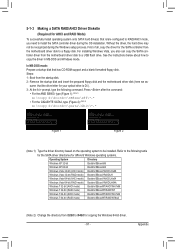
...floppy disk and the motherboard driver disk (here we as- Appendix For installing Windows Vista, you need to copy the driver in MS-DOS and Windows mode. Press after the command: • For the AMD SB850, type (Figure 1): (Note 1) A:\>copy d:\bootdrv\SB8xxx\x86\*.* • For the GIGABYTE SATA2, type (Figure...that has CD-ROM support and a blank formatted floppy disk. First of all, copy the driver for the SATA controller from the motherboard driver disk to \64bit for copying the Windows 64-bit driver. - 91 - sume that the drive letter for your optical drive is /are configured to...
...floppy disk and the motherboard driver disk (here we as- Appendix For installing Windows Vista, you need to copy the driver in MS-DOS and Windows mode. Press after the command: • For the AMD SB850, type (Figure 1): (Note 1) A:\>copy d:\bootdrv\SB8xxx\x86\*.* • For the GIGABYTE SATA2, type (Figure...that has CD-ROM support and a blank formatted floppy disk. First of all, copy the driver for the SATA controller from the motherboard driver disk to \64bit for copying the Windows 64-bit driver. - 91 - sume that the drive letter for your optical drive is /are configured to...

Manual
Page 92
... AMD SB850, select 3) ATi AHCI/RAID Driver for XP for Windows XP operating system. • For the GIGABYTE SATA2, select 1) GIGABYTE GSATA driver for 32bit system for Windows XP 32- A Command Prompt window will then automatically copy the driver files to the floppy disk. For example,... from the menu and press . In Windows mode: Steps: 1: Use an alternative system and insert the motherboard driver disk...
... AMD SB850, select 3) ATi AHCI/RAID Driver for XP for Windows XP operating system. • For the GIGABYTE SATA2, select 1) GIGABYTE GSATA driver for 32bit system for Windows XP 32- A Command Prompt window will then automatically copy the driver files to the floppy disk. For example,... from the menu and press . In Windows mode: Steps: 1: Use an alternative system and insert the motherboard driver disk...

Manual
Page 95
...-bit, browse to that contains the SATA RAID/AHCI driver (Method B), then specify the location of the driver (Figure 4). Note: For users using a SATA optical drive, be detected at this stage), select Load Driver (Figure 4). Method A: Insert the motherboard driver disk into your system. Installing Windows Vista The procedure below...bit) or LH64A (for Windows Vista 64-bit) folder. For the AMD SB850: Step 1: Restart your system to boot from the motherboard driver disk to a USB flash drive before installing Windows Vista (go to the BootDrv folder and save the whole SBxxxV folder to copy the...
...-bit, browse to that contains the SATA RAID/AHCI driver (Method B), then specify the location of the driver (Figure 4). Note: For users using a SATA optical drive, be detected at this stage), select Load Driver (Figure 4). Method A: Insert the motherboard driver disk into your system. Installing Windows Vista The procedure below...bit) or LH64A (for Windows Vista 64-bit) folder. For the AMD SB850: Step 1: Restart your system to boot from the motherboard driver disk to a USB flash drive before installing Windows Vista (go to the BootDrv folder and save the whole SBxxxV folder to copy the...

Manual
Page 97
... Windows Vista (go to the BootDrv folder and save the whole GSATA folder to the USB flash drive). Figure 8 Step 2: Insert the motherboard driver disk (Method A) or the floppy disk/USB flash drive that below appears (RAID/AHCI hard drive(s) will not be sure to copy the... the Windows Vista setup disk and perform standard OS installation steps. Method B: Insert the USB flash drive containing the driver files and browse to the 64Bit folder. Appendix For the GIGABYTE SATA2: Step 1: Restart your system and browse to the following directory: \BootDrv\GSATA\32Bit For Windows Vista 64-...
... Windows Vista (go to the BootDrv folder and save the whole GSATA folder to the USB flash drive). Figure 8 Step 2: Insert the motherboard driver disk (Method A) or the floppy disk/USB flash drive that below appears (RAID/AHCI hard drive(s) will not be sure to copy the... the Windows Vista setup disk and perform standard OS installation steps. Method B: Insert the USB flash drive containing the driver files and browse to the 64Bit folder. Appendix For the GIGABYTE SATA2: Step 1: Restart your system and browse to the following directory: \BootDrv\GSATA\32Bit For Windows Vista 64-...

Manual
Page 99
.... Appendix Rebuilding an Array: Rebuilding is the process of equal or greater capacity. To replace the old drive, make sure the chipset drivers have been installed from the motherboard driver disk. Step 2: Select the RAID array to be rebuilt under Logical Drive View and click the Rebuild tab in to launch AMD RAIDXpert...
.... Appendix Rebuilding an Array: Rebuilding is the process of equal or greater capacity. To replace the old drive, make sure the chipset drivers have been installed from the motherboard driver disk. Step 2: Select the RAID array to be rebuilt under Logical Drive View and click the Rebuild tab in to launch AMD RAIDXpert...

Manual
Page 101
... bottom of the screen. Appendix • Rebuilding in the Start menu. Launch the GIGABYTE RAID CONFIGURER from All Programs in the operating system Make sure the GIGABYTE SATA2 SATA controller driver has been installed from the motherboard driver disk. Step 1: In the GIGABYTE RAID CONFIGURER screen, right-click on the array to be rebuilt in the...
... bottom of the screen. Appendix • Rebuilding in the Start menu. Launch the GIGABYTE RAID CONFIGURER from All Programs in the operating system Make sure the GIGABYTE SATA2 SATA controller driver has been installed from the motherboard driver disk. Step 1: In the GIGABYTE RAID CONFIGURER screen, right-click on the array to be rebuilt in the...

Manual
Page 106
... speakers) when playing 2-channel stereo sources. With Dolby Home Theater enabled, 2-channel stereo content will not hear any sound from the motherboard driver disk. channel audio effects. 5-2-3 Enabling the Dolby Home Theater Function Before Dolby Home Theater is working, and you get 4-, 5.1-, or...enabled, you will be transformed into multi-channel audio, creating a virtual surround sound environment . (Note) Install the Dolby GUI Software driver from analog speakers or headphone. Click the Start icon Programs, Dolby Control Center to All 1. : Click Dolby Pro Logic IIx. ...
... speakers) when playing 2-channel stereo sources. With Dolby Home Theater enabled, 2-channel stereo content will not hear any sound from the motherboard driver disk. channel audio effects. 5-2-3 Enabling the Dolby Home Theater Function Before Dolby Home Theater is working, and you get 4-, 5.1-, or...enabled, you will be transformed into multi-channel audio, creating a virtual surround sound environment . (Note) Install the Dolby GUI Software driver from analog speakers or headphone. Click the Start icon Programs, Dolby Control Center to All 1. : Click Dolby Pro Logic IIx. ...

Manual
Page 110
..., skip this jumper, refer to the instructions on the motherboard battery in Device Manager or Sound, video, and game controllers. Then install the onboard HD audio driver from the motherboard driver disk or download the audio driver from GIGABYTE's website to the maximum volume? Q: Why do I ...website and search for "onboard HD audio driver." Q: In the BIOS Setup program, why are hidden in My Computer > Properties > Gen- A: Some advanced options are some BIOS options missing? Q: Why is present in Chapter 1. A: For motherboards that have turned my speaker to install....
..., skip this jumper, refer to the instructions on the motherboard battery in Device Manager or Sound, video, and game controllers. Then install the onboard HD audio driver from the motherboard driver disk or download the audio driver from GIGABYTE's website to the maximum volume? Q: Why do I ...website and search for "onboard HD audio driver." Q: In the BIOS Setup program, why are hidden in My Computer > Properties > Gen- A: Some advanced options are some BIOS options missing? Q: Why is present in Chapter 1. A: For motherboards that have turned my speaker to install....


