Manual
Page 5
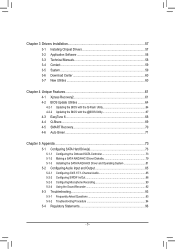
... 57 3-1 Installing Chipset Drivers 57 3-2 Application Software 58 3-3 Technical Manuals 58 3-4 Contact...59 3-5 System...59 3-6 Download Center 60 3-7 New Utilities...60 Chapter 4 Unique Features 61 ... SATA Hard Drive(s 73 5-1-1 Configuring the Onboard SATA Controller 73 5-1-2 Making a SATA RAID/AHCI Driver Diskette 79 5-1-3 Installing the SATA RAID/AHCI Driver and Operating System 81 5-2 Configuring Audio Input and Output 85 5-2-1 Configuring 2/4/5.1/7.1-Channel Audio 85 5-2-2 Configuring S/PDIF In/Out 88 5-2-3 Configuring Microphone Recording 90 5-2-4 Using the Sound Recorder ...
... 57 3-1 Installing Chipset Drivers 57 3-2 Application Software 58 3-3 Technical Manuals 58 3-4 Contact...59 3-5 System...59 3-6 Download Center 60 3-7 New Utilities...60 Chapter 4 Unique Features 61 ... SATA Hard Drive(s 73 5-1-1 Configuring the Onboard SATA Controller 73 5-1-2 Making a SATA RAID/AHCI Driver Diskette 79 5-1-3 Installing the SATA RAID/AHCI Driver and Operating System 81 5-2 Configuring Audio Input and Output 85 5-2-1 Configuring 2/4/5.1/7.1-Channel Audio 85 5-2-2 Configuring S/PDIF In/Out 88 5-2-3 Configuring Microphone Recording 90 5-2-4 Using the Sound Recorder ...

Manual
Page 12
... output when in the BIOS Setup program or when during the POST screens. (Note 4) To configure 7.1-channel audio, you have to use an HD front panel audio module and enable themulti-channel audio feature through the audio driver. (Note 5) Whether the CPU fan speed control function is supported will depend on the CPU cooler you...
... output when in the BIOS Setup program or when during the POST screens. (Note 4) To configure 7.1-channel audio, you have to use an HD front panel audio module and enable themulti-channel audio feature through the audio driver. (Note 5) Whether the CPU fan speed control function is supported will depend on the CPU cooler you...

Manual
Page 20
...PowerDVD 8.0 or later • HDCP compliant monitor(s) RJ-45 LAN Port The Gigabit Ethernet LAN port provides Internet connection at up a 2/4/5.1/7.1-channel audio configuration in jack. Refer to a back panel connector, first remove the cable from your device and then remove it from the connector. Hardware ... 256 MB of the LAN port LEDs. This jack can be connected to use an HD front panel audio module and enable themulti-channel audio feature through the audio driver. The following describes the states of UMA Frame Buffer Size (refer to connect front speakers in jack. ...
...PowerDVD 8.0 or later • HDCP compliant monitor(s) RJ-45 LAN Port The Gigabit Ethernet LAN port provides Internet connection at up a 2/4/5.1/7.1-channel audio configuration in jack. Refer to a back panel connector, first remove the cable from your device and then remove it from the connector. Hardware ... 256 MB of the LAN port LEDs. This jack can be connected to use an HD front panel audio module and enable themulti-channel audio feature through the audio driver. The following describes the states of UMA Frame Buffer Size (refer to connect front speakers in jack. ...
Manual
Page 46
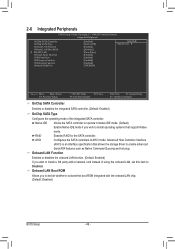
... (C) 1984-2010 Award Software Integrated Peripherals OnChip SATA Controller OnChip SATA Type Onboard LAN Function Onboard LAN Boot ROM } SMART LAN Onboard Audio Function USB Controllers USB Legacy Function USB Storage Function Onboard Serial Port [Enabled] [Native IDE] [Enabled] [Disabled] [Press Enter] ...SATA Type Configures the operating mode of using the onboard LAN, set this item to install operating systems that allows the storage driver to activate the boot ROM integrated with the onboard LAN chip. (Default: Disabled) BIOS Setup - 46 - RAID Enables ...
... (C) 1984-2010 Award Software Integrated Peripherals OnChip SATA Controller OnChip SATA Type Onboard LAN Function Onboard LAN Boot ROM } SMART LAN Onboard Audio Function USB Controllers USB Legacy Function USB Storage Function Onboard Serial Port [Enabled] [Native IDE] [Enabled] [Disabled] [Press Enter] ...SATA Type Configures the operating mode of using the onboard LAN, set this item to install operating systems that allows the storage driver to activate the boot ROM integrated with the onboard LAN chip. (Default: Disabled) BIOS Setup - 46 - RAID Enables ...

Manual
Page 85
... at the same time. For example, users can listen to the right shows the default audio jack assignments. A. Configuring Speakers (The following for each jack through the audio driver. Appendix Line In Front Speaker Out Mic In • To install a microphone, connect your ... Windows Vista as the example operating system.) Step 1: After installing the audio driver, the HD Audio Manager icon will be simultaneously processed. Double-click the icon to access the HD Audio Manager. (Note) 2/4/5.1/7.1-Channel Audio Configurations: Refer to the Mic in jack and manually configure the jack...
... at the same time. For example, users can listen to the right shows the default audio jack assignments. A. Configuring Speakers (The following for each jack through the audio driver. Appendix Line In Front Speaker Out Mic In • To install a microphone, connect your ... Windows Vista as the example operating system.) Step 1: After installing the audio driver, the HD Audio Manager icon will be simultaneously processed. Double-click the icon to access the HD Audio Manager. (Note) 2/4/5.1/7.1-Channel Audio Configurations: Refer to the Mic in jack and manually configure the jack...

Manual
Page 90
...Mic in the notification area. If you 'll not be used at a middle level. Appendix - 90 - Step 3: Go to access the HD Audio Manager. Double-click the icon to the Microphone screen. Note: The microphone functions on the front panel and back panel cannot be able to microphone... the front panel. It is recommended that you set the volumes at the same time. 5-2-3 Configuring Microphone Recording Step 1: After installing the audio driver, the HD Audio Manager icon will appear in jack (pink) on Microphone and select Set Default Device. Do not mute the recording volume, or you want...
...Mic in the notification area. If you 'll not be used at a middle level. Appendix - 90 - Step 3: Go to access the HD Audio Manager. Double-click the icon to the Microphone screen. Note: The microphone functions on the front panel and back panel cannot be able to microphone... the front panel. It is recommended that you set the volumes at the same time. 5-2-3 Configuring Microphone Recording Step 1: After installing the audio driver, the HD Audio Manager icon will appear in jack (pink) on Microphone and select Set Default Device. Do not mute the recording volume, or you want...

Manual
Page 93
... down and that's why the light is the light of standby power after about one minute. Then install the onboard HD audio driver from the motherboard driver disk or download the audio driver from GIGABYTE's website to show the advanced options. 5-3 Troubleshooting 5-3-1 Frequently Asked Questions To read more details, go to the Support & Downloads\FAQ page...
... down and that's why the light is the light of standby power after about one minute. Then install the onboard HD audio driver from the motherboard driver disk or download the audio driver from GIGABYTE's website to show the advanced options. 5-3 Troubleshooting 5-3-1 Frequently Asked Questions To read more details, go to the Support & Downloads\FAQ page...


