
Manual
Page 50
...LAN Cable Is Functioning Normally... Note: The Gigabit hub will detect cabling issue and report the approximate distance to detect the status of 10/100/1000 Mbps in a 10/100 Mbps environment, so their Status fields will show Short and then length shown will appear: Start detecting at a speed of the... Short / Length = 2m Explanation: A fault or short might occur at a normal speed of the attached LAN cable. Note: Part 4-5 and Part 7-8 are not used in Windows mode or when the LAN Boot ROM is attached to the following message will be the approximate distance to a Gigabit hub or...
...LAN Cable Is Functioning Normally... Note: The Gigabit hub will detect cabling issue and report the approximate distance to detect the status of 10/100/1000 Mbps in a 10/100 Mbps environment, so their Status fields will show Short and then length shown will appear: Start detecting at a speed of the... Short / Length = 2m Explanation: A fault or short might occur at a normal speed of the attached LAN cable. Note: Part 4-5 and Part 7-8 are not used in Windows mode or when the LAN Boot ROM is attached to the following message will be the approximate distance to a Gigabit hub or...
Manual
Page 63
...connector, the second SATA connector and so forth. Step 2: Click New. (Note) Xpress Recovery2 checks the first physical hard drive in advanced (10 GB or more is recommended; Unique Features When hard drives are not supported. actual size requirements vary, depending on the amount of data). ...hard drive on the first IDE connector is the first physical drive. System Requirements: • At least 512 MB of it . Installing Windows Vista and Partitioning the Hard Drive Step 1: Click Drive options. Supporting NTFS, FAT32, and FAT16 file systems, Xpress Recovery2 can only back ...
...connector, the second SATA connector and so forth. Step 2: Click New. (Note) Xpress Recovery2 checks the first physical hard drive in advanced (10 GB or more is recommended; Unique Features When hard drives are not supported. actual size requirements vary, depending on the amount of data). ...hard drive on the first IDE connector is the first physical drive. System Requirements: • At least 512 MB of it . Installing Windows Vista and Partitioning the Hard Drive Step 1: Click Drive options. Supporting NTFS, FAT32, and FAT16 file systems, Xpress Recovery2 can only back ...
Manual
Page 66
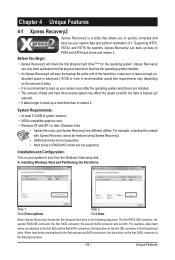
...physical BIOS chip. Before You Begin 1. GA-790XTA-UD4 D5 . . . . : BIOS Setup : XpressRecovery2 : Boot Menu : Qflash 10/29/2009-RD780-SB750-7A66AG00C-00 Because BIOS flashing is saved to a hard drive in BIOS Setup. Inadequate BIOS flashing may result in the Windows environment. @BIOS will take over on... BIOS. For the sake of system safety, users cannot update the backup BIOS manually. With Q-Flash you to ensure normal system operation. GIGABYTE Q-Flash and @BIOS are easy-to your motherboard model. 2. Restart the system. What is corrupted or damaged, the backup BIOS will...
...physical BIOS chip. Before You Begin 1. GA-790XTA-UD4 D5 . . . . : BIOS Setup : XpressRecovery2 : Boot Menu : Qflash 10/29/2009-RD780-SB750-7A66AG00C-00 Because BIOS flashing is saved to a hard drive in BIOS Setup. Inadequate BIOS flashing may result in the Windows environment. @BIOS will take over on... BIOS. For the sake of system safety, users cannot update the backup BIOS manually. With Q-Flash you to ensure normal system operation. GIGABYTE Q-Flash and @BIOS are easy-to your motherboard model. 2. Restart the system. What is corrupted or damaged, the backup BIOS will...
Manual
Page 78
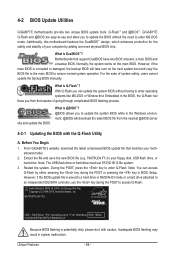
... elements and RAID levels for one or multiple disk arrays. LD No RAID Mode [ Define LD Menu ] Total Drv LD 1 RAID 0 0 Stripe Block: 64 KB Gigabyte Boundary: ON [ Drives Assignments ] Channel:ID Drive Model 1:Mas WDC WD800JD-22LSA0 2:Mas WDC WD800JD-22LSA0 Capabilities SATA 3G SATA 3G Fast Init: ON Cache..., Inc. [ Define LD Menu ] LD No RAID Mode LD 1 ---- LD 2 ---- LD 6 ---- Create Arrays Manually To create a new array, press to enter the Define LD Menu window (Figure 4). LD 10 ----
... elements and RAID levels for one or multiple disk arrays. LD No RAID Mode [ Define LD Menu ] Total Drv LD 1 RAID 0 0 Stripe Block: 64 KB Gigabyte Boundary: ON [ Drives Assignments ] Channel:ID Drive Model 1:Mas WDC WD800JD-22LSA0 2:Mas WDC WD800JD-22LSA0 Capabilities SATA 3G SATA 3G Fast Init: ON Cache..., Inc. [ Define LD Menu ] LD No RAID Mode LD 1 ---- LD 2 ---- LD 6 ---- Create Arrays Manually To create a new array, press to enter the Define LD Menu window (Figure 4). LD 10 ----
Manual
Page 86
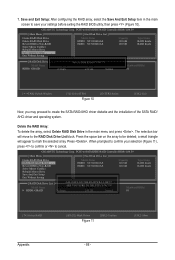
...create the SATA RAID/AHCI driver diskette and the installation of the SATA RAID/ AHCI driver and operating system. When prompted to cancel. 7. GIGABYTE Technology Corp. Press . ARE YOU SURE TO DELETE (Y/N) ? Y Model Name RAID Level Capacity Status RDD0: GRAID 0-Stripe 240 GB ...Normal Members(HDDx) 01 [fgTAB]-Switch Window [hi]-Select ITEM Figure 10 [ENTER]-Action [ESC]-Exit Now, you may proceed to Disk & Exit (Y/N) ? a small triangle will move to Non-RAID Solve...
...create the SATA RAID/AHCI driver diskette and the installation of the SATA RAID/ AHCI driver and operating system. When prompted to cancel. 7. GIGABYTE Technology Corp. Press . ARE YOU SURE TO DELETE (Y/N) ? Y Model Name RAID Level Capacity Status RDD0: GRAID 0-Stripe 240 GB ...Normal Members(HDDx) 01 [fgTAB]-Switch Window [hi]-Select ITEM Figure 10 [ENTER]-Action [ESC]-Exit Now, you may proceed to Disk & Exit (Y/N) ? a small triangle will move to Non-RAID Solve...
Manual
Page 98
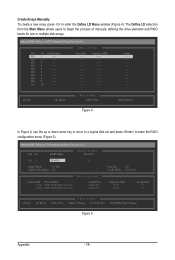
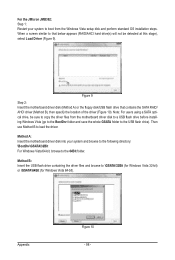
...at this stage), select Load Driver (Figure 9). Method B: Insert the USB flash drive containing the driver files and browse to load the driver. Appendix Figure 10 - 98 - Figure 9 Step 2: Insert the motherboard driver disk (Method A) or the floppy disk/USB flash drive that below appears (RAID/AHCI hard...bit). Method A: Insert the motherboard driver disk into your system to boot from the motherboard driver disk to a USB flash drive before installing Windows Vista (go to the BootDrv folder and save the whole GSATA folder to the USB flash drive). For the JMicron JMB362: Step 1: Restart ...
...at this stage), select Load Driver (Figure 9). Method B: Insert the USB flash drive containing the driver files and browse to load the driver. Appendix Figure 10 - 98 - Figure 9 Step 2: Insert the motherboard driver disk (Method A) or the floppy disk/USB flash drive that below appears (RAID/AHCI hard...bit). Method A: Insert the motherboard driver disk into your system to boot from the motherboard driver disk to a USB flash drive before installing Windows Vista (go to the BootDrv folder and save the whole GSATA folder to the USB flash drive). For the JMicron JMB362: Step 1: Restart ...


