Manual
Page 9
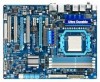
... or removing the motherboard or other hardware components. • When connecting hardware components to the internal connectors on the power, make sure the power supply voltage has been set according to the use of electrostatic discharge (ESD). ponents such as a motherboard, CPU or ...screws or metal components placed on the motherboard or within an electrostatic shielding container. • Before unplugging the power supply cable from the motherboard, make sure the power supply has been turned off. • Before turning on the motherboard, make sure they are required for warranty ...
... or removing the motherboard or other hardware components. • When connecting hardware components to the internal connectors on the power, make sure the power supply voltage has been set according to the use of electrostatic discharge (ESD). ponents such as a motherboard, CPU or ...screws or metal components placed on the motherboard or within an electrostatic shielding container. • Before unplugging the power supply cable from the motherboard, make sure the power supply has been turned off. • Before turning on the motherboard, make sure they are required for warranty ...
Manual
Page 19
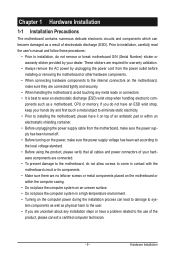
A CrossFireX-supported motherboard with your graphics cards for the power requirement) B. Two CrossFire bridge connectors (Note) - Configuring the Graphics Card Driver After installing the graphics card driver in the operating system,... driver - Procedure and driver screen for enabling CrossFireX technology may be needed or not depending on top of your graphics cards. Hardware Installation A power supply with sufficient power is selected. (Note) The bridge connectors may differ by graphics cards. Step 2: (Note) Insert the CrossFire bridge connectors in "1-5 Installing an...
A CrossFireX-supported motherboard with your graphics cards for the power requirement) B. Two CrossFire bridge connectors (Note) - Configuring the Graphics Card Driver After installing the graphics card driver in the operating system,... driver - Procedure and driver screen for enabling CrossFireX technology may be needed or not depending on top of your graphics cards. Hardware Installation A power supply with sufficient power is selected. (Note) The bridge connectors may differ by graphics cards. Step 2: (Note) Insert the CrossFire bridge connectors in "1-5 Installing an...

Manual
Page 23
... of the power connector, the power supply can supply enough stable power to all devices are compatible with power supplies with 2x2 12V and 2x10 power connectors. Hardware Installation When using a power supply providing a 2x2 12V and a 2x10 power connector. 8 4 5 1 ATX_12V_2X4 ATX_12V_2X4: Pin No. The power connector possesses a foolproof design. Before connecting the power connector, first make sure the power supply is recommended that a power supply that...
... of the power connector, the power supply can supply enough stable power to all devices are compatible with power supplies with 2x2 12V and 2x10 power connectors. Hardware Installation When using a power supply providing a 2x2 12V and a 2x10 power connector. 8 4 5 1 ATX_12V_2X4 ATX_12V_2X4: Pin No. The power connector possesses a foolproof design. Before connecting the power connector, first make sure the power supply is recommended that a power supply that...
Manual
Page 33
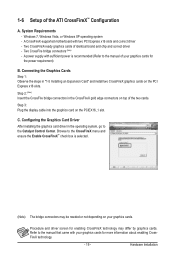
... turned off, the battery on using the current version of BIOS, it with caution. For instructions on the motherboard supplies the necessary power to the CMOS to Chapter 4, "BIOS Update Utilities." • Because BIOS flashing is potentially risky, if you do it is recommended that you can... and Output System) records hardware parameters of the system in the main menu of the BIOS Setup program. To upgrade the BIOS, use either the GIGABYTE Q-Flash or @BIOS utility. • Q-Flash allows the user to quickly and easily upgrade or back up BIOS without entering the operating system. ...
... turned off, the battery on using the current version of BIOS, it with caution. For instructions on the motherboard supplies the necessary power to the CMOS to Chapter 4, "BIOS Update Utilities." • Because BIOS flashing is potentially risky, if you do it is recommended that you can... and Output System) records hardware parameters of the system in the main menu of the BIOS Setup program. To upgrade the BIOS, use either the GIGABYTE Q-Flash or @BIOS utility. • Q-Flash allows the user to quickly and easily upgrade or back up BIOS without entering the operating system. ...
Manual
Page 53
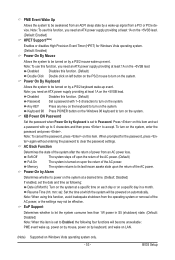
... 1A on the +5VSB lead. Note: When using this function, you need an ATX power supply providing at which the system will become unavailable: PME event wake up event. BIOS Setup Keyboard 98 Press POWER button on the Windows 98 keyboard to be effective. PME Event Wake Up Allows the system...(shutdown) state. (Default: Disabled) Note: When this item and set to clear the password settings. To turn on this function, you need an ATX power supply providing at least 1A on the +5VSB lead. Memory The system returns to its last known awake state upon the return of the AC...
... 1A on the +5VSB lead. Note: When using this function, you need an ATX power supply providing at which the system will become unavailable: PME event wake up event. BIOS Setup Keyboard 98 Press POWER button on the Windows 98 keyboard to be effective. PME Event Wake Up Allows the system...(shutdown) state. (Default: Disabled) Note: When this item and set to clear the password settings. To turn on this function, you need an ATX power supply providing at least 1A on the +5VSB lead. Memory The system returns to its last known awake state upon the return of the AC...
Manual
Page 75
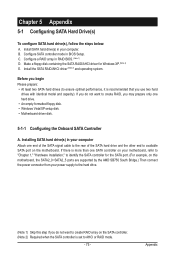
Installing SATA hard drive(s) in your power supply to the hard drive. (Note 1) Skip this motherboard, the SATA2_0~SATA2_5 ports are supported by the AMD SB750 South Bridge.) Then connect the power connector from your computer. B. Make a floppy disk containing the SATA RAID/AHCI driver for the SATA port. (For example, on this step...
Installing SATA hard drive(s) in your power supply to the hard drive. (Note 1) Skip this motherboard, the SATA2_0~SATA2_5 ports are supported by the AMD SB750 South Bridge.) Then connect the power connector from your computer. B. Make a floppy disk containing the SATA RAID/AHCI driver for the SATA port. (For example, on this step...

Manual
Page 81
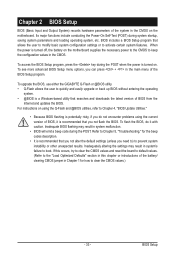
Then connect the power connector from the exact settings for your motherboard. B. Configuring SATA controller mode in system BIOS Setup. Make sure Onboard ESATA Controller under the Integrated Peripherals ... the SATA signal cable to the rear of the SATA hard drive and the other end to available SATA port on your power supply to enter BIOS Setup during the POST (Power-On Self-Test). Step 1: Turn on the motherboard. Installing SATA hard drive(s) in this section may differ from your computer and...
Then connect the power connector from the exact settings for your motherboard. B. Configuring SATA controller mode in system BIOS Setup. Make sure Onboard ESATA Controller under the Integrated Peripherals ... the SATA signal cable to the rear of the SATA hard drive and the other end to available SATA port on your power supply to enter BIOS Setup during the POST (Power-On Self-Test). Step 1: Turn on the motherboard. Installing SATA hard drive(s) in this section may differ from your computer and...
Manual
Page 87
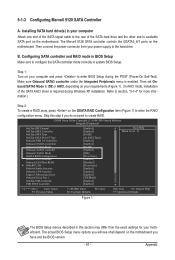
Skip this section may differ from your motherboard. Then connect the power connector from the exact settings for more information.) Step 2: To create a RAID array, press ...5-1-3 Configuring Marvell 9128 SATA Controller A. Make sure Onboard SATA3 controller under the Integrated Peripherals menu is required during the POST (Power-On Self-Test). Then set Onboard SATA3 Mode to IDE or AHCI, depending on the motherboard you do not want to ... computer and press to available SATA port on the motherboard. Refer to section, "5-1-4" for your power supply to create RAID.
Skip this section may differ from your motherboard. Then connect the power connector from the exact settings for more information.) Step 2: To create a RAID array, press ...5-1-3 Configuring Marvell 9128 SATA Controller A. Make sure Onboard SATA3 controller under the Integrated Peripherals menu is required during the POST (Power-On Self-Test). Then set Onboard SATA3 Mode to IDE or AHCI, depending on the motherboard you do not want to ... computer and press to available SATA port on the motherboard. Refer to section, "5-1-4" for your power supply to create RAID.
Manual
Page 113
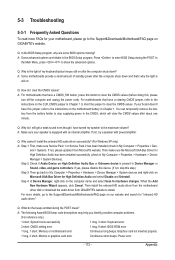
... Audio has been installed successfully (check in the BIOS Setup program. You can temporarily remove the battery from the battery holder to stop supplying power to the CMOS, which will clear the CMOS values after the computer shuts down and that have a CMOS_SW button, press this button .... For motherboards that 's why the light is still on the computer name and select Scan for hardware changes. If not, please update it from GIGABYTE's website to install. Q: In the BIOS Setup program, why are hidden in My Computer > Properties > Hardware > Device Manager > System Devices). If ...
... Audio has been installed successfully (check in the BIOS Setup program. You can temporarily remove the battery from the battery holder to stop supplying power to the CMOS, which will clear the CMOS values after the computer shuts down and that have a CMOS_SW button, press this button .... For motherboards that 's why the light is still on the computer name and select Scan for hardware changes. If not, please update it from GIGABYTE's website to install. Q: In the BIOS Setup program, why are hidden in My Computer > Properties > Hardware > Device Manager > System Devices). If ...

Manual
Page 115
... BIOS Setup. END If the procedure above is verified and solved. Our customer service staff will reply you as soon as possible. - 115 - No The power supply, CPU or CPU socket might fail. The problem is unable to solve your problem, contact the place of purchase or local dealer for help. No...
... BIOS Setup. END If the procedure above is verified and solved. Our customer service staff will reply you as soon as possible. - 115 - No The power supply, CPU or CPU socket might fail. The problem is unable to solve your problem, contact the place of purchase or local dealer for help. No...


