Manual
Page 27
...activate certain system features. To see more advanced BIOS Setup menu options, you not flash the BIOS. To upgrade the BIOS, use either the GIGABYTE Q-Flash or @BIOS utility. •• Q-Flash allows the user to quickly and easily upgrade or back up BIOS without entering the operating... to Chapter 5, "Troubleshooting," for how to keep the configuration values in the CMOS on . Its major functions include conducting the Power-On Self-Test (POST) during the POST. Chapter 2 BIOS Setup BIOS (Basic Input and Output System) records hardware parameters of the system in the CMOS. BIOS...
...activate certain system features. To see more advanced BIOS Setup menu options, you not flash the BIOS. To upgrade the BIOS, use either the GIGABYTE Q-Flash or @BIOS utility. •• Q-Flash allows the user to quickly and easily upgrade or back up BIOS without entering the operating... to Chapter 5, "Troubleshooting," for how to keep the configuration values in the CMOS on . Its major functions include conducting the Power-On Self-Test (POST) during the POST. Chapter 2 BIOS Setup BIOS (Basic Input and Output System) records hardware parameters of the system in the CMOS. BIOS...
Manual
Page 62
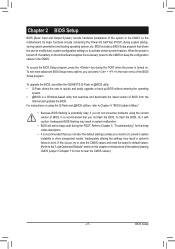
... tune on the next reboot to allow the system to work with the optimum configurations tested to monitor hardware temperature, voltage and fan speed and set . Incorrectly doing overclock/overvoltage may differ by motherboard model. 4-3 EasyTune 6 GIGABYTE's EasyTune 6 is a simple and easy-to-use interface that allows users to fine-tune their...
... tune on the next reboot to allow the system to work with the optimum configurations tested to monitor hardware temperature, voltage and fan speed and set . Incorrectly doing overclock/overvoltage may differ by motherboard model. 4-3 EasyTune 6 GIGABYTE's EasyTune 6 is a simple and easy-to-use interface that allows users to fine-tune their...
Manual
Page 63
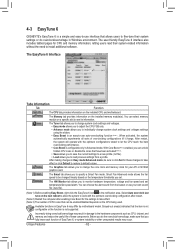
... vary depending on motherboard model. •• CPU Power and Power Scores are for reference only. Meter Mode - Featuring an advanced proprietary software design, GIGABYTE Easy Energy Saver is a revolutionary technology that delivers unparalleled power savings with a click of time. Actual performance may vary based on time) 9 Meter/Timer...CPU Throttling Display 4 CPU Voltage Display 5 3-Level CPU Voltage Switch (Default:1) (Note 2) 6 Current CPU Power Consumption 7 Meter Time 8 Power Saving (Calculate power savings based on testing method. - 63 - Unique Features
... vary depending on motherboard model. •• CPU Power and Power Scores are for reference only. Meter Mode - Featuring an advanced proprietary software design, GIGABYTE Easy Energy Saver is a revolutionary technology that delivers unparalleled power savings with a click of time. Actual performance may vary based on time) 9 Meter/Timer...CPU Throttling Display 4 CPU Voltage Display 5 3-Level CPU Voltage Switch (Default:1) (Note 2) 6 Current CPU Power Consumption 7 Meter Time 8 Power Saving (Calculate power savings based on testing method. - 63 - Unique Features
Manual
Page 70
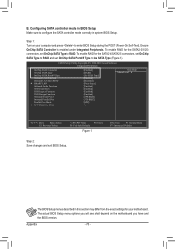
... OnChip SATA Port4/5 Type to RAID. Configuring SATA controller mode in BIOS Setup Make sure to enter BIOS Setup during the POST (Power-On Self-Test). Ensure OnChip SATA Controller is enabled under Integrated Peripherals. The BIOS Setup menus described in system BIOS Setup. B. Step 1: Turn on the motherboard you have...
... OnChip SATA Port4/5 Type to RAID. Configuring SATA controller mode in BIOS Setup Make sure to enter BIOS Setup during the POST (Power-On Self-Test). Ensure OnChip SATA Controller is enabled under Integrated Peripherals. The BIOS Setup menus described in system BIOS Setup. B. Step 1: Turn on the motherboard you have...
Manual
Page 71
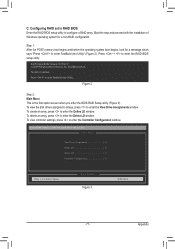
Configuring RAID set in RAID BIOS Enter the RAID BIOS setup utility to enter FastBuild (tm) Utility" (Figure 2). Step 1: After the POST memory test begins and before the operating system boot begins, look for a non-RAID configuration. To create an array, press to Select Option Figure 3 [ESC] Exit - 71 - ...
Configuring RAID set in RAID BIOS Enter the RAID BIOS setup utility to enter FastBuild (tm) Utility" (Figure 2). Step 1: After the POST memory test begins and before the operating system boot begins, look for a non-RAID configuration. To create an array, press to Select Option Figure 3 [ESC] Exit - 71 - ...