
Manual
Page 10
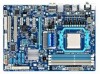
Up to 12 USB 2.0/1.1 ports (Note 3) (8 on the back panel Hardware Installation - 10 - 1-2 Product Specifications CPU Support for AM3 processors: AMD Phenom™ II processor/ AMD Athlon™ II processor (Go to GIGABYTE's website for the latest CPU support list.) Hyper Transport Bus 5200 MT/s Chipset Memory Audio ...
Up to 12 USB 2.0/1.1 ports (Note 3) (8 on the back panel Hardware Installation - 10 - 1-2 Product Specifications CPU Support for AM3 processors: AMD Phenom™ II processor/ AMD Athlon™ II processor (Go to GIGABYTE's website for the latest CPU support list.) Hyper Transport Bus 5200 MT/s Chipset Memory Audio ...
Manual
Page 12
... operating system limitation, when more than 4 GB of physical memory is installed, the actual memory size displayed will be less than 4 GB. (Note 2) Use of a CPU that supports ECC is required if you wish to install ECC memory. (Note 3) Two share the same ports with USB 3.0. (Note 4) Whether the...
... operating system limitation, when more than 4 GB of physical memory is installed, the actual memory size displayed will be less than 4 GB. (Note 2) Use of a CPU that supports ECC is required if you wish to install ECC memory. (Note 3) Two share the same ports with USB 3.0. (Note 4) Whether the...
Manual
Page 13
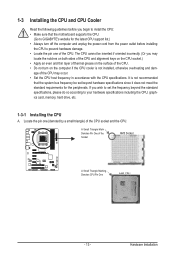
....) • Apply an even and thin layer of thermal grease on the surface of the CPU. • Do not turn on the computer if the CPU cooler is not recommended that the motherboard supports the CPU. (Go to GIGABYTE's website for the peripherals. If you wish to set beyond the standard specifications, please do so...
....) • Apply an even and thin layer of thermal grease on the surface of the CPU. • Do not turn on the computer if the CPU cooler is not recommended that the motherboard supports the CPU. (Go to GIGABYTE's website for the peripherals. If you wish to set beyond the standard specifications, please do so...

Manual
Page 16
...Two Modules DS/SS DS/SS - - - - - - - - DDR3_1 DDR3_2 DDR3_3 DDR3_4 Due to CPU limitations, read the following guidelines before installing the memory in only one DDR3 memory module is installed. 2. ...Dual Channel mode with two or four memory modules, it is recommended that the motherboard supports the memory. After the memory is installed, the BIOS will double the original memory bandwidth...Double-Sided, "- -"=No Memory) If two memory modules are to be used . (Go to GIGABYTE's website for optimum performance. If you begin to install the memory: • Make sure that ...
...Two Modules DS/SS DS/SS - - - - - - - - DDR3_1 DDR3_2 DDR3_3 DDR3_4 Due to CPU limitations, read the following guidelines before installing the memory in only one DDR3 memory module is installed. 2. ...Dual Channel mode with two or four memory modules, it is recommended that the motherboard supports the memory. After the memory is installed, the BIOS will double the original memory bandwidth...Double-Sided, "- -"=No Memory) If two memory modules are to be used . (Go to GIGABYTE's website for optimum performance. If you begin to install the memory: • Make sure that ...
Manual
Page 23
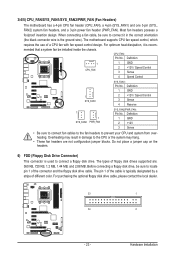
...pin (SYS_FAN1) and one 3-pin (SYS_ FAN2) system fan headers, and a 3-pin power fan header (PWR_FAN). The motherboard supports CPU fan speed control, which requires the use of floppy disk drives supported are not configuration jumper blocks. CPU_FAN: Pin No. Definition 1 GND 2 +12V 3 Sense • Be sure to connect ...fan cables to the fan headers to the CPU or the system may result in the correct orientation (...
...pin (SYS_FAN1) and one 3-pin (SYS_ FAN2) system fan headers, and a 3-pin power fan header (PWR_FAN). The motherboard supports CPU fan speed control, which requires the use of floppy disk drives supported are not configuration jumper blocks. CPU_FAN: Pin No. Definition 1 GND 2 +12V 3 Sense • Be sure to connect ...fan cables to the fan headers to the CPU or the system may result in the correct orientation (...
Manual
Page 36
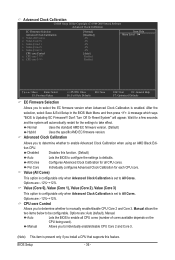
...Firmware Selection Advanced Clock Calibration x Value (All Cores) x Value (Core 0) x Value (Core 1) x Value (Core 2) x Value (Core 3) CPU core Control x CPU core 2 (Note) x CPU core 3 (Note) [Normal] [Disabled] -2% -2% -2% -2% -2% [Auto] Enabled Enabled Item Help Menu Level Move Enter: Select ... Allows you to select the EC firmware version when Advanced Clock Calibration is present only if you install a CPU that supports this function. (Default) Auto Lets the BIOS to configure the settings to defaults. After the selection, select...
...Firmware Selection Advanced Clock Calibration x Value (All Cores) x Value (Core 0) x Value (Core 1) x Value (Core 2) x Value (Core 3) CPU core Control x CPU core 2 (Note) x CPU core 3 (Note) [Normal] [Disabled] -2% -2% -2% -2% -2% [Auto] Enabled Enabled Item Help Menu Level Move Enter: Select ... Allows you to select the EC firmware version when Advanced Clock Calibration is present only if you install a CPU that supports this function. (Default) Auto Lets the BIOS to configure the settings to defaults. After the selection, select...

Manual
Page 37
...the HT Link between the CPU and chipset. Auto lets BIOS automatically set to Manual. Auto (default) allows the BIOS to be configurable. (Default: Auto) Memory Clock This option is configurable only when Set Memory Clock is highly recommended that supports this feature. - 37 -... Manual allows the memory clock control item below to automatically adjust the CPU host frequency. The adjustable range is dependent on the...
...the HT Link between the CPU and chipset. Auto lets BIOS automatically set to Manual. Auto (default) allows the BIOS to be configurable. (Default: Auto) Memory Clock This option is configurable only when Set Memory Clock is highly recommended that supports this feature. - 37 -... Manual allows the memory clock control item below to automatically adjust the CPU host frequency. The adjustable range is dependent on the...
Manual
Page 43
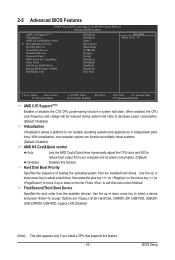
... USB-CDROM, USB-HDD, Legacy LAN, Disabled. (Note) This item appears only if you install a CPU that supports this menu when finished. Use the up or down arrow key to select a device and press to exit...2-5 Advanced BIOS Features CMOS Setup Utility-Copyright (C) 1984-2009 Award Software Advanced BIOS Features AMD C1E Support (Note) Virtualization AMD K8 Cool&Quiet control } Hard Disk Boot Priority First Boot Device Second Boot...General Help F7: Optimized Defaults AMD C1E Support (Note) Enables or disables the C1E CPU power-saving function in independent partitions.
... USB-CDROM, USB-HDD, Legacy LAN, Disabled. (Note) This item appears only if you install a CPU that supports this menu when finished. Use the up or down arrow key to select a device and press to exit...2-5 Advanced BIOS Features CMOS Setup Utility-Copyright (C) 1984-2009 Award Software Advanced BIOS Features AMD C1E Support (Note) Virtualization AMD K8 Cool&Quiet control } Hard Disk Boot Priority First Boot Device Second Boot...General Help F7: Optimized Defaults AMD C1E Support (Note) Enables or disables the C1E CPU power-saving function in independent partitions.

Manual
Page 66
The Memory tab provides information on the installed CPU and motherboard. You can unlock hidden CPU cores or disable the cores that the item is not configurable or the function is not supported. With Core Boost (Note 2) enabled, you to load previous settings from the buzzer or use ... - 66 - The Smart tab allows you do overclock/overvoltage in Advanced mode. Available functions in the notification area. 4-3 EasyTune 6 GIGABYTE's EasyTune 6 is a simple and easy-to-use interface that allows users to fine-tune their system-related information without the need to...
The Memory tab provides information on the installed CPU and motherboard. You can unlock hidden CPU cores or disable the cores that the item is not configurable or the function is not supported. With Core Boost (Note 2) enabled, you to load previous settings from the buzzer or use ... - 66 - The Smart tab allows you do overclock/overvoltage in Advanced mode. Available functions in the notification area. 4-3 EasyTune 6 GIGABYTE's EasyTune 6 is a simple and easy-to-use interface that allows users to fine-tune their system-related information without the need to...
Manual
Page 92
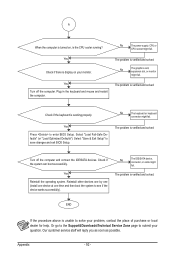
... CPU socket might fail. Yes Press to see if the device works successfully). Select "Save & Exit Setup" to submit your monitor. Yes Turn off the computer and connect the IDE/SATA devices. A When the computer is turned on your question. Or go to the Support&Downloads\Technical Service Zone page to save... changes and exit BIOS Setup. The problem is the CPU cooler running?
... CPU socket might fail. Yes Press to see if the device works successfully). Select "Save & Exit Setup" to submit your monitor. Yes Turn off the computer and connect the IDE/SATA devices. A When the computer is turned on your question. Or go to the Support&Downloads\Technical Service Zone page to save... changes and exit BIOS Setup. The problem is the CPU cooler running?

