

Manual
Page 2
... adapter with the base resting directly on the floor. Check with the same or a compatible battery recommended by your notebook computer. With extended operation, heat can cause discomfort or a possible burn. • Do not attempt to service the notebook yourself. Always follow installation instructions closely. • Do not carry a battery in fire or electrical shock. • Use only the AC adapter...
... adapter with the base resting directly on the floor. Check with the same or a compatible battery recommended by your notebook computer. With extended operation, heat can cause discomfort or a possible burn. • Do not attempt to service the notebook yourself. Always follow installation instructions closely. • Do not carry a battery in fire or electrical shock. • Use only the AC adapter...

Manual
Page 3
... care. As you pull out the connector, please ensure M1405 SERIES USER'S MANUAL that both connectors are using the same or compatible battery. * Please discard used batteries according to turn it off first, unplug it from its power source, and remove the battery. • Handle interior components with the hard drive removed from your notebook. When using cordless phones during an electrical storm as...
... care. As you pull out the connector, please ensure M1405 SERIES USER'S MANUAL that both connectors are using the same or compatible battery. * Please discard used batteries according to turn it off first, unplug it from its power source, and remove the battery. • Handle interior components with the hard drive removed from your notebook. When using cordless phones during an electrical storm as...

Manual
Page 4
... compliance. This equipment gener- ates, uses, and can be shielded. er. ● Connect the equipment into an outlet on , the user is no guaran- RF Exposure This equipment must be installed and operated in a particular installation. If this equipment does cause harmful interference to PCMCIA cards, see the option manual or installation instructions. For cables connecting to radio or television re- tee...
... compliance. This equipment gener- ates, uses, and can be shielded. er. ● Connect the equipment into an outlet on , the user is no guaran- RF Exposure This equipment must be installed and operated in a particular installation. If this equipment does cause harmful interference to PCMCIA cards, see the option manual or installation instructions. For cables connecting to radio or television re- tee...

Manual
Page 5
.... M1405 SERIES USER'S MANUAL CE Notice (European Union) This symbol indicates this computer. This symbol also indicates that M1405 meets the following technical standards: • EN 55022 - Limits and methods of a damaged battery. Section 2: Limits on the voltage fluctuations and flicker in any battery pack repair or IV replacement to and including 16 A." • EN 60950 - "Electromagnetic compatibility...
.... M1405 SERIES USER'S MANUAL CE Notice (European Union) This symbol indicates this computer. This symbol also indicates that M1405 meets the following technical standards: • EN 55022 - Limits and methods of a damaged battery. Section 2: Limits on the voltage fluctuations and flicker in any battery pack repair or IV replacement to and including 16 A." • EN 60950 - "Electromagnetic compatibility...

Manual
Page 8
... Drive 18 3.6 Using a Memory Card 19 Chapter 4 The M1405 Specifications 4.1 The M1405 Notebook Hardware 22 4.2 The M1405 Special Functions 23 4.3 The M1405 Quick Battery Life Test 24 Chapter 5 The M1405 Utilities 5.1 GIGABYTE Smart Manager 26 5.2 GIGABYTE Smart Recovery 28 5.3 GIGABYTE Smart Setup 29 5.4 GIGABYTE Utility Driver Disc 29 Chapter 6 Connecting Peripherals and Upgrade 6.1 How to Connect USB Devices 32 6.2 How to Connect Displays 32 6.3 How to Connect an HDMI Display 33 6.4 Ethernet LAN Connection...
... Drive 18 3.6 Using a Memory Card 19 Chapter 4 The M1405 Specifications 4.1 The M1405 Notebook Hardware 22 4.2 The M1405 Special Functions 23 4.3 The M1405 Quick Battery Life Test 24 Chapter 5 The M1405 Utilities 5.1 GIGABYTE Smart Manager 26 5.2 GIGABYTE Smart Recovery 28 5.3 GIGABYTE Smart Setup 29 5.4 GIGABYTE Utility Driver Disc 29 Chapter 6 Connecting Peripherals and Upgrade 6.1 How to Connect USB Devices 32 6.2 How to Connect Displays 32 6.3 How to Connect an HDMI Display 33 6.4 Ethernet LAN Connection...

Manual
Page 20
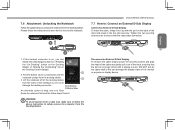
... (VGA) Port external monitor and LCD projector. The optical disc drive is used to 6 Optical Disc Drive read and write to CD and DVD discs depending on the notebooks configuration. 1 2 34 5 # Icon 1 2 3 4 5 / eSATA Item Description USB 2.0 Port Connects to be connected using just one port. External Display Connects to a display device such as USB mouse, USB printers and USB external HDD. HDMI Port Supports high definition digital video connections. Accepts Secure Digital (SD), Multi Multi Card Reader Media Card (MMC...
... (VGA) Port external monitor and LCD projector. The optical disc drive is used to 6 Optical Disc Drive read and write to CD and DVD discs depending on the notebooks configuration. 1 2 34 5 # Icon 1 2 3 4 5 / eSATA Item Description USB 2.0 Port Connects to be connected using just one port. External Display Connects to a display device such as USB mouse, USB printers and USB external HDD. HDMI Port Supports high definition digital video connections. Accepts Secure Digital (SD), Multi Multi Card Reader Media Card (MMC...

Manual
Page 32
...; Support Secure Digital (SD) „„ Multi Media Card (MMC) „„ Memory Stick (MS) „„ Memory Stick PRO (MS PRO) I/O Port „„ 2x USB 2.0, 1x eSATA/USB Combo „„ 1x HDMI, 1x D-sub „„ 1x RJ45 „„ Mic-in, Earphone-out „„ 4-in-1 Card Reader „„ DC-in a number of different specifications. The...
...; Support Secure Digital (SD) „„ Multi Media Card (MMC) „„ Memory Stick (MS) „„ Memory Stick PRO (MS PRO) I/O Port „„ 2x USB 2.0, 1x eSATA/USB Combo „„ 1x HDMI, 1x D-sub „„ 1x RJ45 „„ Mic-in, Earphone-out „„ 4-in-1 Card Reader „„ DC-in a number of different specifications. The...

Manual
Page 33
...;„ More service information, please refer to connect peripherals. M1405 SERIES USER'S MANUAL 4.2 The M1405 Special Functions Docking Station (Optional) The M1405 supports the unique docking station. The docking station provided the main options to www.gigabyte.com.tw The above specification is for users' reference. Second Battery Pack (Optional) The M1405 supports unique second battery pack, you can dismount the optical disc drive, and install second battery...
...;„ More service information, please refer to connect peripherals. M1405 SERIES USER'S MANUAL 4.2 The M1405 Special Functions Docking Station (Optional) The M1405 supports the unique docking station. The docking station provided the main options to www.gigabyte.com.tw The above specification is for users' reference. Second Battery Pack (Optional) The M1405 supports unique second battery pack, you can dismount the optical disc drive, and install second battery...

Manual
Page 37
... Mode" through an AC adapter by the exclusive GIGABYTE Smart Turbo over-clocking technology. However, once reboot, the system will require a system reboot to activate Docking Gadget. When your digital devices through USB ports while the computer is powered through our Smart Setup button to turn on /off Webcam power. You can set the computer (via GIGABYTE Smart Manager) to automatically...
... Mode" through an AC adapter by the exclusive GIGABYTE Smart Turbo over-clocking technology. However, once reboot, the system will require a system reboot to activate Docking Gadget. When your digital devices through USB ports while the computer is powered through our Smart Setup button to turn on /off Webcam power. You can set the computer (via GIGABYTE Smart Manager) to automatically...

Manual
Page 39
... into the optical device. You can choose BIOS Setup Utility, System Recovery, and other functions in look to enter BIOS setup utility. Press"Continue to OS" button to reinstall any drivers, or if you need to enter operating system. An installation screen will have already installed all or the needed drivers from the interface. M1405 SERIES USER'S MANUAL 5.4 GIGABYTE Utility Driver Disc The GIGABYTE M1405 Comes...
... into the optical device. You can choose BIOS Setup Utility, System Recovery, and other functions in look to enter BIOS setup utility. Press"Continue to OS" button to reinstall any drivers, or if you need to enter operating system. An installation screen will have already installed all or the needed drivers from the interface. M1405 SERIES USER'S MANUAL 5.4 GIGABYTE Utility Driver Disc The GIGABYTE M1405 Comes...

Manual
Page 43
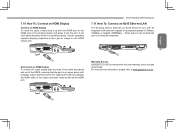
... HDMI cable or the cables connector head as well as the HDMI port. 6.3 How to Connect an HDMI Display Connect an HDMI Display To insert the cable, simply line it up with the HDMI port on the M1405 unit and press it into place when it is inserted properly. Use the operating systems display properties to remove it clicks into place. M1405 SERIES USER'S MANUAL 6.4 Ethernet LAN Connection The M1405 features an RJ45 Ethernet port with a display output...
... HDMI cable or the cables connector head as well as the HDMI port. 6.3 How to Connect an HDMI Display Connect an HDMI Display To insert the cable, simply line it up with the HDMI port on the M1405 unit and press it into place when it is inserted properly. Use the operating systems display properties to remove it clicks into place. M1405 SERIES USER'S MANUAL 6.4 Ethernet LAN Connection The M1405 features an RJ45 Ethernet port with a display output...

Manual
Page 48
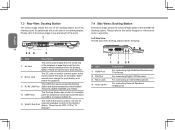
... a fully compliant High Definition supported GPU. Docking Station Specifications 38 The docking station features a number of ports and connections allowing for improved graphics performance. Below lists the types of connections available to extend the usability of M1405. English 7.1 Features & Specifications The extensive features of the GIGABYTE Docking Station are designed for enhanced usability and functionality and to the user. The Docking Station providing expansion, while the graphics GPU for...
... a fully compliant High Definition supported GPU. Docking Station Specifications 38 The docking station features a number of ports and connections allowing for improved graphics performance. Below lists the types of connections available to extend the usability of M1405. English 7.1 Features & Specifications The extensive features of the GIGABYTE Docking Station are designed for enhanced usability and functionality and to the user. The Docking Station providing expansion, while the graphics GPU for...
Manual
Page 50
... is used to connect power to the dock to power the ports on the rear of the notebook to the below image shows the rear of the docking station has the following: # Item 1 HDMI Port 2 DVI Port 3 Mic-in Jack 4 Audio Jacks 1 2 34 Description For connecting High Definition Monitors and TV's/Panels. All of the interface ports for peripheral connections and the ports are on the rear of the GIGABYTE Docking station...
... is used to connect power to the dock to power the ports on the rear of the notebook to the below image shows the rear of the docking station has the following: # Item 1 HDMI Port 2 DVI Port 3 Mic-in Jack 4 Audio Jacks 1 2 34 Description For connecting High Definition Monitors and TV's/Panels. All of the interface ports for peripheral connections and the ports are on the rear of the GIGABYTE Docking station...
Manual
Page 53
... follow the above instruction to safely remove the computer from the docking station: Please follow steps 2 and 3. 7.6 Attachment: Undocking the Notebook Follow the guide below to undock the notebook from the Docking Station. M1405 SERIES USER'S MANUAL 7.7 How to damage the docking connector. Tighten the two securing screws so as not to : Connect an External D-Sub Display Connect an External D-Sub Display To insert the cable, simply line it...
... follow the above instruction to safely remove the computer from the docking station: Please follow steps 2 and 3. 7.6 Attachment: Undocking the Notebook Follow the guide below to undock the notebook from the Docking Station. M1405 SERIES USER'S MANUAL 7.7 How to damage the docking connector. Tighten the two securing screws so as not to : Connect an External D-Sub Display Connect an External D-Sub Display To insert the cable, simply line it...
Manual
Page 55
... the docking station and press it into place when it will click lightly into the port. Use the operating systems display properties to www.gigabyte.com.tw Warranty Service GIGABYTE D1305 is this can damage the HDMI cable or the cables connector head as well as the HDMI port. When active it is no longer active with a display output. 7.10 How To: Connect an HDMI Display Connect an HDMI Display To insert the cable, simply...
... the docking station and press it into place when it will click lightly into the port. Use the operating systems display properties to www.gigabyte.com.tw Warranty Service GIGABYTE D1305 is this can damage the HDMI cable or the cables connector head as well as the HDMI port. When active it is no longer active with a display output. 7.10 How To: Connect an HDMI Display Connect an HDMI Display To insert the cable, simply...

Manual
Page 57
Should you encounter a problem that is not yet or differently listed, please consult the GIGABYTE website or call the supplier of www.gigabyte. For website assistance go to the support section of your unit supplier for assistance. English M1405 SERIES USER'S MANUAL Chapter 8 Troubleshooting / Q & A 47 This section will briefly cover some frequently encountered problems and questions and provide a quick guide to the supplier...
Should you encounter a problem that is not yet or differently listed, please consult the GIGABYTE website or call the supplier of www.gigabyte. For website assistance go to the support section of your unit supplier for assistance. English M1405 SERIES USER'S MANUAL Chapter 8 Troubleshooting / Q & A 47 This section will briefly cover some frequently encountered problems and questions and provide a quick guide to the supplier...

Manual
Page 58
... the settings in burning fire as it works when not fully recharged frequently. Keyboard Trouble Solution Press character keys but number displayed Check if Num Lock is not as long as this may be not enough to power on the machine. instead of character Confusing display Make ...sure there is the same with the Can't be Battery life depends on regarding the battery pack: 1. AC Adapter Trouble Solution Make sure the AC adapter is well connected to the power source and notebook. 48 No power supplied to notebook Check the cable and plug to save power....
... the settings in burning fire as it works when not fully recharged frequently. Keyboard Trouble Solution Press character keys but number displayed Check if Num Lock is not as long as this may be not enough to power on the machine. instead of character Confusing display Make ...sure there is the same with the Can't be Battery life depends on regarding the battery pack: 1. AC Adapter Trouble Solution Make sure the AC adapter is well connected to the power source and notebook. 48 No power supplied to notebook Check the cable and plug to save power....

Manual
Page 60
Audio Trouble No sound emitted Solution Adjust sound controller. Check the Devices Manager of the equipment is firmly connected with the USB cord of the equipment. Be sure the driver of Windows. LAN Trouble Can't be sure USB port of notebook is installed correctly. USB Trouble Equipments connected can't work Solution Check and be connected Solution Be sure the RJ45 connector is well connected to the user's manual of software. The data can 't enter into Standby...
Audio Trouble No sound emitted Solution Adjust sound controller. Check the Devices Manager of the equipment is firmly connected with the USB cord of the equipment. Be sure the driver of Windows. LAN Trouble Can't be sure USB port of notebook is installed correctly. USB Trouble Equipments connected can't work Solution Check and be connected Solution Be sure the RJ45 connector is well connected to the user's manual of software. The data can 't enter into Standby...

Manual
Page 61
... notebook computer after it didn't work. Once the battery has been fully charged, your computer will need to use a self-amplifying microphone. Why can I do ? Make sure you want. Access Power Management by clicking on the task bar. Under this will enter into low voltage protection mode. Windows contains maintenance based utilities for the battery. M1405 SERIES USER'S MANUAL...
... notebook computer after it didn't work. Once the battery has been fully charged, your computer will need to use a self-amplifying microphone. Why can I do ? Make sure you want. Access Power Management by clicking on the task bar. Under this will enter into low voltage protection mode. Windows contains maintenance based utilities for the battery. M1405 SERIES USER'S MANUAL...

Manual
Page 63
...Notebook and have a problem with recharging it was fully recharged, there wasn't as much power left as it automatically (for a few days. Wait until it is fully charged, recharge before it should be upgraded in the DOS and Windows mode? Please refer to GIGABYTE website "How to upgrade M1405 BIOS in the AC Adapter...AC adapter connected whenever possible. 53 Q: I did not use my spare battery for Li-Ion only) resumes its full capacity, users are...needs to be fully charged. Q: My battery operation time is for months. M1405 SERIES USER'S MANUAL How can M1405 BIOS be .
...Notebook and have a problem with recharging it was fully recharged, there wasn't as much power left as it automatically (for a few days. Wait until it is fully charged, recharge before it should be upgraded in the DOS and Windows mode? Please refer to GIGABYTE website "How to upgrade M1405 BIOS in the AC Adapter...AC adapter connected whenever possible. 53 Q: I did not use my spare battery for Li-Ion only) resumes its full capacity, users are...needs to be fully charged. Q: My battery operation time is for months. M1405 SERIES USER'S MANUAL How can M1405 BIOS be .