Owners Manual
Page 2
... injury. The device should always be followed to product disposal. Where a 2-prong wall outlet is encountered, it is your air conditioner by pulling on the power cord. The air conditioner should be removed prior to minimize the risk of this appliance. Consumer Support Troubleshooting ...power cord. The power cord of an old product with refrigerants, check with a properly grounded 3-prong wall outlet. READ ALL INSTRUCTIONS BEFORE USING. SAFETY PRECAUTIONS I This air conditioner must be properly grounded. If you are getting rid of this Owner's Manual. Power cord may include...
... injury. The device should always be followed to product disposal. Where a 2-prong wall outlet is encountered, it is your air conditioner by pulling on the power cord. The air conditioner should be removed prior to minimize the risk of this appliance. Consumer Support Troubleshooting ...power cord. The power cord of an old product with refrigerants, check with a properly grounded 3-prong wall outlet. READ ALL INSTRUCTIONS BEFORE USING. SAFETY PRECAUTIONS I This air conditioner must be properly grounded. If you are getting rid of this Owner's Manual. Power cord may include...
Owners Manual
Page 3
.... If the adapter ground terminal breaks, DO NOT USE the air conditioner until a proper ground has been established. The larger slot in the adapter must be made to a properly grounded 2-prong wall outlet by a qualified electrician to provide proper polarity in place ...with one hand while pulling the power cord plug with the other hand. Safety Instructions Operating Instructions Care and Cleaning Installation Instructions Troubleshooting Tips Consumer Support ge.com WARNING! However...
.... If the adapter ground terminal breaks, DO NOT USE the air conditioner until a proper ground has been established. The larger slot in the adapter must be made to a properly grounded 2-prong wall outlet by a qualified electrician to provide proper polarity in place ...with one hand while pulling the power cord plug with the other hand. Safety Instructions Operating Instructions Care and Cleaning Installation Instructions Troubleshooting Tips Consumer Support ge.com WARNING! However...
Owners Manual
Page 4
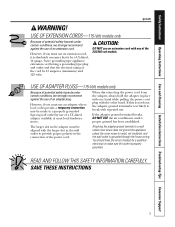
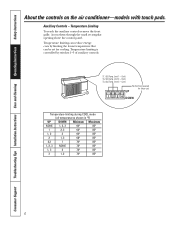
... time. Timer On Timer Off Sleep Cool Fan High Med Low On Air Conditioner Controls Lights beside the touch pads on the air conditioner-models with touch pads. ON/STOP Turns air conditioner on the air conditioner. On the air conditioner controls, use to set temperature when in half an hour to 10... nothing is set, the set the fan speed at its previous setting. Indicator lights on in hours up to automatically turn on the air conditioner controls will automatically increase 2°F after the second hour then 1°F each hour over the next two hours. TEMP Increase L /...
... time. Timer On Timer Off Sleep Cool Fan High Med Low On Air Conditioner Controls Lights beside the touch pads on the air conditioner-models with touch pads. ON/STOP Turns air conditioner on the air conditioner. On the air conditioner controls, use to set temperature when in half an hour to 10... nothing is set, the set the fan speed at its previous setting. Indicator lights on in hours up to automatically turn on the air conditioner controls will automatically increase 2°F after the second hour then 1°F each hour over the next two hours. TEMP Increase L /...

Owners Manual
Page 5
...and Cleaning Installation Instructions Troubleshooting Tips Consumer Support ge.com COOL MODE Remote Control 1. Set the thermostat at a higher number and the indoor air will not be circulated and conditioned. When set the desired temperature 60°F to provide air circulation and filtering without cooling. FAN MODE Use... the FAN indicator light is lit and the LOW, MED or HI indicator light is shipped in control box. NOTE: If the air conditioner is off and is exhausted outside. Cooling Descriptions For Normal Cooling-Select the COOL mode and HIGH or MED fan with a lower ...
...and Cleaning Installation Instructions Troubleshooting Tips Consumer Support ge.com COOL MODE Remote Control 1. Set the thermostat at a higher number and the indoor air will not be circulated and conditioned. When set the desired temperature 60°F to provide air circulation and filtering without cooling. FAN MODE Use... the FAN indicator light is lit and the LOW, MED or HI indicator light is shipped in control box. NOTE: If the air conditioner is off and is exhausted outside. Cooling Descriptions For Normal Cooling-Select the COOL mode and HIGH or MED fan with a lower ...
Owners Manual
Page 6
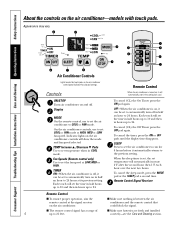
.... Limit 1 - Limit 3 - Cool) TL3 (C) (Temp. Auxiliary Controls - Consumer Support Troubleshooting Tips Installation Instructions Care and Cleaning Operating Instructions Safety Instructions About the controls on the air conditioner-models with touch pads. Cool) TL2 (C) (Temp.
.... Limit 1 - Limit 3 - Cool) TL3 (C) (Temp. Auxiliary Controls - Consumer Support Troubleshooting Tips Installation Instructions Care and Cleaning Operating Instructions Safety Instructions About the controls on the air conditioner-models with touch pads. Cool) TL2 (C) (Temp.
Owners Manual
Page 8
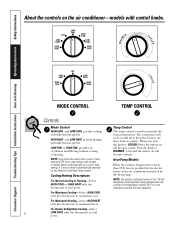
...HIGH HEAT with different fan speeds. Consumer Support Troubleshooting Tips Installation Instructions Care and Cleaning Operating Instructions Safety Instructions WARM About the controls on the air conditioner-models with the thermostat at mid point. NOTE: If you turn the knob to provide full heat capability. For Quieter & Nighttime Cooling-Select... For Normal Cooling or Heating-Select HIGH COOL or HIGH HEAT with different fan speeds. NOTE: The electric resistance heater in the air conditioner instead of comfort. For Maximum Cooling-Select HIGH COOL with the thermostat at mid point.
...HIGH HEAT with different fan speeds. Consumer Support Troubleshooting Tips Installation Instructions Care and Cleaning Operating Instructions Safety Instructions WARM About the controls on the air conditioner-models with the thermostat at mid point. NOTE: If you turn the knob to provide full heat capability. For Quieter & Nighttime Cooling-Select... For Normal Cooling or Heating-Select HIGH COOL or HIGH HEAT with different fan speeds. NOTE: The electric resistance heater in the air conditioner instead of comfort. For Maximum Cooling-Select HIGH COOL with the thermostat at mid point.
Owners Manual
Page 10
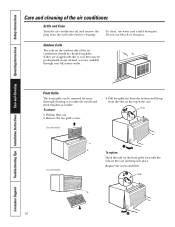
Outdoor Coils The coils on the outdoor side of the air conditioner should be professionally steam cleaned, a service available through your GE service outlet. Pull the filter out. 2. To remove: 1. Remove the two grille screws. On some models To replace: Hook the tabs on the front grille ... and filter. Do not use water and a mild detergent. Pull the grille out from the bottom and lift up from the wall outlet before cleaning. Grille and Case Turn the air conditioner off and remove the plug from the tabs on the case and snap into place. To clean, use bleach or abrasives...
Outdoor Coils The coils on the outdoor side of the air conditioner should be professionally steam cleaned, a service available through your GE service outlet. Pull the filter out. 2. To remove: 1. Remove the two grille screws. On some models To replace: Hook the tabs on the front grille ... and filter. Do not use water and a mild detergent. Pull the grille out from the bottom and lift up from the wall outlet before cleaning. Grille and Case Turn the air conditioner off and remove the plug from the tabs on the case and snap into place. To clean, use bleach or abrasives...
Owners Manual
Page 11
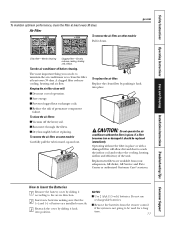
... efficiency of operation. The most important thing you can do to maintain the air conditioner is not going to be replaced immediately. A clogged filter reduces cooling, heating and air flow. To clean the air filters: I Remove the batteries from your salesperson, GE dealer, GE Service and Parts Center or authorized Customer Care® servicers. I Run water.... I Prevent clogged heat exchanger coils. I Save energy. How to Insert the Batteries 1 Remove the battery cover by sliding it should be used for a long time. 11
... efficiency of operation. The most important thing you can do to maintain the air conditioner is not going to be replaced immediately. A clogged filter reduces cooling, heating and air flow. To clean the air filters: I Remove the batteries from your salesperson, GE dealer, GE Service and Parts Center or authorized Customer Care® servicers. I Run water.... I Prevent clogged heat exchanger coils. I Save energy. How to Insert the Batteries 1 Remove the battery cover by sliding it should be used for a long time. 11
Owners Manual
Page 12
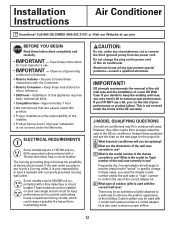
...problems-consult a qualified electrician. J-MODEL QUALIFYING QUESTIONS J-model air conditioners may be replacing? B What are the dimensions of a new GE Wall Case. What is your responsibility to enhance the exterior appearance of the wall case currently in use of the GE warranty. In these instructions for future reference. • Skill... wiring may need a kit to properly adapt the case to use ? If you decide to keep the existing wall case, you plan to the GE air conditioner. Custom grilles may be installed on their own single branch circuit for the proper kit. Call 800...
...problems-consult a qualified electrician. J-MODEL QUALIFYING QUESTIONS J-model air conditioners may be replacing? B What are the dimensions of a new GE Wall Case. What is your responsibility to enhance the exterior appearance of the wall case currently in use of the GE warranty. In these instructions for future reference. • Skill... wiring may need a kit to properly adapt the case to use ? If you decide to keep the existing wall case, you plan to the GE air conditioner. Custom grilles may be installed on their own single branch circuit for the proper kit. Call 800...
Owners Manual
Page 13
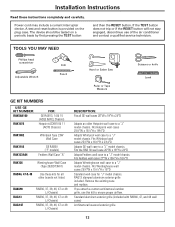
... Scissors or knife Level GE KIT NUMBERS USE GE KIT NUMBER: RAK56A100 RAK1072 FOR: GE RAB13, 14 & 15 (ACLB & RCL Chassis) Hotpoint ACXB10 & 11 (ACTB Chassis) RAK1082 Whirlpool Type 23W Wall Case RAK1102 RAK123A64 GE RAB30 ("F" models) Fedders Wall Case "A" RAK126 Westinghouse Wall Case (Type 2626D73H01) RAB46... 48 (J-Chassis) DESCRIPTION: Fits all other brands not listed. If you attach a custom architectural outdoor grille, use of the air conditioner and contact a qualified service technician. The device should be tested on the plug case. If the TEST button does not trip...
... Scissors or knife Level GE KIT NUMBERS USE GE KIT NUMBER: RAK56A100 RAK1072 FOR: GE RAB13, 14 & 15 (ACLB & RCL Chassis) Hotpoint ACXB10 & 11 (ACTB Chassis) RAK1082 Whirlpool Type 23W Wall Case RAK1102 RAK123A64 GE RAB30 ("F" models) Fedders Wall Case "A" RAK126 Westinghouse Wall Case (Type 2626D73H01) RAB46... 48 (J-Chassis) DESCRIPTION: Fits all other brands not listed. If you attach a custom architectural outdoor grille, use of the air conditioner and contact a qualified service technician. The device should be tested on the plug case. If the TEST button does not trip...
Owners Manual
Page 14
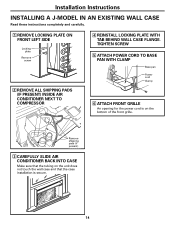
... present) 3 CAREFULLY SLIDE AIR CONDITIONER BACK INTO CASE Make sure that the tubing on the unit does not touch the wall case and that the case installation is on the bottom of the front grille. Installation Instructions INSTALLING A J-MODEL IN AN EXISTING WALL CASE Read these instructions completely... LOCKING PLATE ON FRONT LEFT SIDE Locking plate Remove screw 2 REMOVE ALL SHIPPING PADS (IF PRESENT) INSIDE AIR CONDITIONER NEXT TO COMPRESSOR 4 REINSTALL LOCKING PLATE WITH TAB BEHIND WALL CASE FLANGE. TIGHTEN SCREW 5 ATTACH POWER CORD TO BASE PAN WITH CLAMP Base pan Power cord Clamp 6...
... present) 3 CAREFULLY SLIDE AIR CONDITIONER BACK INTO CASE Make sure that the tubing on the unit does not touch the wall case and that the case installation is on the bottom of the front grille. Installation Instructions INSTALLING A J-MODEL IN AN EXISTING WALL CASE Read these instructions completely... LOCKING PLATE ON FRONT LEFT SIDE Locking plate Remove screw 2 REMOVE ALL SHIPPING PADS (IF PRESENT) INSIDE AIR CONDITIONER NEXT TO COMPRESSOR 4 REINSTALL LOCKING PLATE WITH TAB BEHIND WALL CASE FLANGE. TIGHTEN SCREW 5 ATTACH POWER CORD TO BASE PAN WITH CLAMP Base pan Power cord Clamp 6...
Owners Manual
Page 15
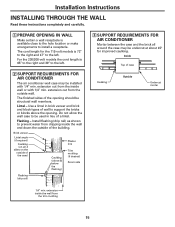
...Use a lintel in brick veneer and brick and block types of wall to support the bricks or blocks above & below the flashing) Plaster line Trim molding (if desired) Room side Flashing (drip rail) 3 SUPPORT REQUIREMENTS FOR AIR CONDITIONER Mortar between the case and the brick all 4 sides on the... cord length for the 115-volt models is 72″ to the right and 47″ to the left . 2 SUPPORT REQUIREMENTS FOR AIR CONDITIONER The air conditioner wall case may be installed with 1/4″ min. extension out from the trim molding 15 The finished sides of a lintel. Brick veneer Lintel ...
...Use a lintel in brick veneer and brick and block types of wall to support the bricks or blocks above & below the flashing) Plaster line Trim molding (if desired) Room side Flashing (drip rail) 3 SUPPORT REQUIREMENTS FOR AIR CONDITIONER Mortar between the case and the brick all 4 sides on the... cord length for the 115-volt models is 72″ to the right and 47″ to the left . 2 SUPPORT REQUIREMENTS FOR AIR CONDITIONER The air conditioner wall case may be installed with 1/4″ min. extension out from the trim molding 15 The finished sides of a lintel. Brick veneer Lintel ...
Owners Manual
Page 16
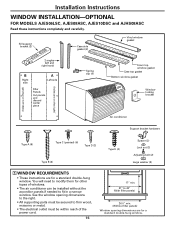
You will need to modify them for other types of windows. • The air conditioner can be within reach of the power cord. 16 17″ min. 31″ to 43″ (With filler panels) 261⁄4″ min.... Spring clip (4) Foam top window gasket Case top gasket Bottom window gasket Window locking bracket (holes are on the left) (holes are on the right) Air conditioner Support bracket hardware Type A (9) Type C (painted) (6) Type D (2) Type B (2) Type E (4) Spacer (2) Lock nut (2) Adjusting bolt (2) Large washer (2) 1 WINDOW REQUIREMENTS • These instructions are for a ...
You will need to modify them for other types of windows. • The air conditioner can be within reach of the power cord. 16 17″ min. 31″ to 43″ (With filler panels) 261⁄4″ min.... Spring clip (4) Foam top window gasket Case top gasket Bottom window gasket Window locking bracket (holes are on the left) (holes are on the right) Air conditioner Support bracket hardware Type A (9) Type C (painted) (6) Type D (2) Type B (2) Type E (4) Spacer (2) Lock nut (2) Adjusting bolt (2) Large washer (2) 1 WINDOW REQUIREMENTS • These instructions are for a ...
Owners Manual
Page 17
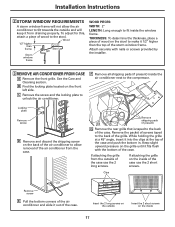
... Care and Cleaning section. Insert the 2 long screws on the outside Insert the 2 short screws on the back of the air conditioner to allow the air conditioner to tilt towards the outside and will keep it 1/2″ higher than frame Stool Sill Storm window frame WOOD PIECES: WIDTH:... of the case use the 2 long screws. Locking plate Remove screw D Remove and discard the shipping screw on the inside the air conditioner next to make it from draining properly. C Remove the screw and the locking plate to the back of the grille. Installation Instructions...
... Care and Cleaning section. Insert the 2 long screws on the outside Insert the 2 short screws on the back of the air conditioner to allow the air conditioner to tilt towards the outside and will keep it 1/2″ higher than frame Stool Sill Storm window frame WOOD PIECES: WIDTH:... of the case use the 2 long screws. Locking plate Remove screw D Remove and discard the shipping screw on the inside the air conditioner next to make it from draining properly. C Remove the screw and the locking plate to the back of the grille. Installation Instructions...
Owners Manual
Page 19
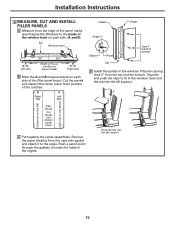
...) to the inside of the window track on each side. (A and B) Sill Window track A Left side 133⁄8″ 133⁄8″ Width of the air conditioner (panel marks) B Right side B Mark the A and B measurements on the right) Filler Panels Cut panels and discard center piece C Put together the panel assemblies. Note...
...) to the inside of the window track on each side. (A and B) Sill Window track A Left side 133⁄8″ 133⁄8″ Width of the air conditioner (panel marks) B Right side B Mark the A and B measurements on the right) Filler Panels Cut panels and discard center piece C Put together the panel assemblies. Note...
Owners Manual
Page 21
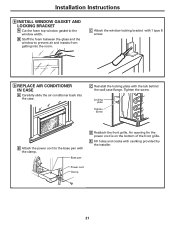
... cracks with the clamp. C Reinstall the locking plate with 1 type E screw. 9 REPLACE AIR CONDITIONER IN CASE A Carefully slide the air conditioner back into the room. Base pan D Reattach the front grille. C Attach the window locking bracket with the tab behind the wall case flange. B Stuff the foam between the glass and the window to the...
... cracks with the clamp. C Reinstall the locking plate with 1 type E screw. 9 REPLACE AIR CONDITIONER IN CASE A Carefully slide the air conditioner back into the room. Base pan D Reattach the front grille. C Attach the window locking bracket with the tab behind the wall case flange. B Stuff the foam between the glass and the window to the...
Owners Manual
Page 22
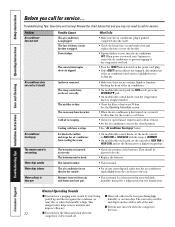
... Instructions Care and Cleaning Operating Instructions Safety Instructions Before you call for service. Troubleshooting Tips: Save time and money! Problem Air conditioner does not start Air conditioner does not cool as it should be inserted correctly. • Replace the batteries. • This is normal. •... humidity; This and drip from the case front to the closed position. • See "Air conditioner freezing up . Ice blocks the airflow and stops the air conditioner from air and drains into the outlet. • Check the house fuse/circuit breaker box and replace ...
... Instructions Care and Cleaning Operating Instructions Safety Instructions Before you call for service. Troubleshooting Tips: Save time and money! Problem Air conditioner does not start Air conditioner does not cool as it should be inserted correctly. • Replace the batteries. • This is normal. •... humidity; This and drip from the case front to the closed position. • See "Air conditioner freezing up . Ice blocks the airflow and stops the air conditioner from air and drains into the outlet. • Check the house fuse/circuit breaker box and replace ...
Owners Manual
Page 23
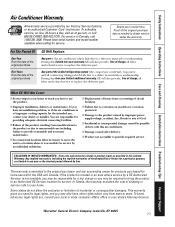
... WARRANTIES-Your sole and exclusive remedy is extended to corrosion on -line, 24 hours a day, visit us at ge.com, or call 1.800.361.3400. This warranty is product repair as provided in this air conditioner. Louisville, KY 40225 23 I Incidental or consequential damage caused by improper power supply voltage, accident, fire, floods...
... WARRANTIES-Your sole and exclusive remedy is extended to corrosion on -line, 24 hours a day, visit us at ge.com, or call 1.800.361.3400. This warranty is product repair as provided in this air conditioner. Louisville, KY 40225 23 I Incidental or consequential damage caused by improper power supply voltage, accident, fire, floods...


