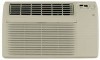

Owners Manual
Page 1
... Support . . . Air ConditionRoeorms ge.com Owner's Manual and Installation Instructions Safety Instructions 2, 3 Operating Instructions Controls-Control Knobs . . . . 8, 9 Controls-Touch Pads 4-6 Care and Cleaning Air Filter 11 Front Grille 10 Grille and Case 10 Outdoor Coils 10 Installation Instructions Before You Begin 12, 13 Installing a J-Model in an Existing Wall Case 14 Through-the-Wall Installation-Optional 15 Window Installation- Optional on...
... Support . . . Air ConditionRoeorms ge.com Owner's Manual and Installation Instructions Safety Instructions 2, 3 Operating Instructions Controls-Control Knobs . . . . 8, 9 Controls-Touch Pads 4-6 Care and Cleaning Air Filter 11 Front Grille 10 Grille and Case 10 Outdoor Coils 10 Installation Instructions Before You Begin 12, 13 Installing a J-Model in an Existing Wall Case 14 Through-the-Wall Installation-Optional 15 Window Installation- Optional on...
Owners Manual
Page 2
...a qualified electrician to product disposal. Power cord may include a current interrupter device. I This air conditioner must be properly installed in accordance with the Installation Instructions before making any servicing be plugged into its intended purpose as described in the vicinity of... air conditioners contain refrigerants, which has a voltage rating that have it is provided on the power cord. Have the wall outlet and circuit checked by first pressing the TEST button and then the RESET button. Consumer Support Troubleshooting Tips Installation Instructions...
...a qualified electrician to product disposal. Power cord may include a current interrupter device. I This air conditioner must be properly installed in accordance with the Installation Instructions before making any servicing be plugged into its intended purpose as described in the vicinity of... air conditioners contain refrigerants, which has a voltage rating that have it is provided on the power cord. Have the wall outlet and circuit checked by first pressing the TEST button and then the RESET button. Consumer Support Troubleshooting Tips Installation Instructions...
Owners Manual
Page 3
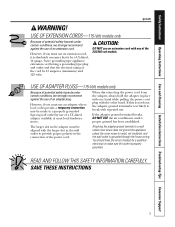
...not ground the appliance unless the cover screw is metal, not insulated, and the wall outlet is properly grounded. Safety Instructions Operating Instructions Care and Cleaning Installation Instructions Troubleshooting Tips Consumer Support ge.com WARNING! If this is not done, the adapter ground terminal is absolutely ...adapter plug. CAUTION: DO NOT use of the 230/208 volt models. If the adapter ground terminal breaks, DO NOT USE the air conditioner until a proper ground has been established. You should have the circuit checked by use an extension cord, it is very likely ...
...not ground the appliance unless the cover screw is metal, not insulated, and the wall outlet is properly grounded. Safety Instructions Operating Instructions Care and Cleaning Installation Instructions Troubleshooting Tips Consumer Support ge.com WARNING! If this is not done, the adapter ground terminal is absolutely ...adapter plug. CAUTION: DO NOT use of the 230/208 volt models. If the adapter ground terminal breaks, DO NOT USE the air conditioner until a proper ground has been established. You should have the circuit checked by use an extension cord, it is very likely ...
Owners Manual
Page 4
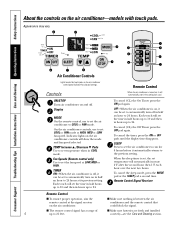
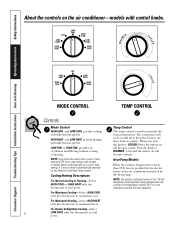
...operation, aim the remote control at its previous setting. Consumer Support Troubleshooting Tips Installation Instructions Care and Cleaning Operating Instructions Safety Instructions About the controls on the air conditioner control panel indicate the selected settings. Display MODE On the remote control, ... Control I Make sure batteries are fresh and installed 4 up to 24 hours at the signal receiver on the air conditioner controls will automatically start in COOL mode. OFF-When the air conditioner is between the air conditioner and the remote control that could block the ...
...operation, aim the remote control at its previous setting. Consumer Support Troubleshooting Tips Installation Instructions Care and Cleaning Operating Instructions Safety Instructions About the controls on the air conditioner control panel indicate the selected settings. Display MODE On the remote control, ... Control I Make sure batteries are fresh and installed 4 up to 24 hours at the signal receiver on the air conditioner controls will automatically start in COOL mode. OFF-When the air conditioner is between the air conditioner and the remote control that could block the ...

Owners Manual
Page 5
... indicator light is exhausted outside. The compressor will take approximately 3 minutes for the desired fan speed. 2. NOTE: If the air conditioner is off and is shipped in 1°F increments. For Quieter & Nighttime Cooling-Select the COOL mode and LOW fan with ... M pads to set temperature. Safety Instructions Operating Instructions Care and Cleaning Installation Instructions Troubleshooting Tips Consumer Support ge.com COOL MODE Remote Control 1. Press LOW, MED or HI pads to provide air circulation and filtering without cooling. A thermostat is located behind the front grille...
... indicator light is exhausted outside. The compressor will take approximately 3 minutes for the desired fan speed. 2. NOTE: If the air conditioner is off and is shipped in 1°F increments. For Quieter & Nighttime Cooling-Select the COOL mode and LOW fan with ... M pads to set temperature. Safety Instructions Operating Instructions Care and Cleaning Installation Instructions Troubleshooting Tips Consumer Support ge.com COOL MODE Remote Control 1. Press LOW, MED or HI pads to provide air circulation and filtering without cooling. A thermostat is located behind the front grille...
Owners Manual
Page 6
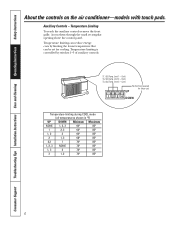
Cool) TL2 (C) (Temp. Limit 3 - Consumer Support Troubleshooting Tips Installation Instructions Care and Cleaning Operating Instructions Safety Instructions About the controls on the air conditioner-models with touch pads. Temperature Limiting To reach the auxiliary controls remove the front grille. TL1 (C) (Temp. Temperature limiting is controlled by limiting the lowest ...
Cool) TL2 (C) (Temp. Limit 3 - Consumer Support Troubleshooting Tips Installation Instructions Care and Cleaning Operating Instructions Safety Instructions About the controls on the air conditioner-models with touch pads. Temperature Limiting To reach the auxiliary controls remove the front grille. TL1 (C) (Temp. Temperature limiting is controlled by limiting the lowest ...
Owners Manual
Page 7
Safety Instructions Operating Instructions Care and Cleaning Installation Instructions Troubleshooting Tips Consumer Support 7 ge.com Notes.
Safety Instructions Operating Instructions Care and Cleaning Installation Instructions Troubleshooting Tips Consumer Support 7 ge.com Notes.
Owners Manual
Page 8
...HIGH COOL or HIGH HEAT with the thermostat at maximum heat. Consumer Support Troubleshooting Tips Installation Instructions Care and Cleaning Operating Instructions Safety Instructions WARM About the controls on the air conditioner-models with different fan speeds. HIGH HEAT and LOW HEAT provide heating with the ...thermostat at maximum cool. NOTE: The electric resistance heater in the air conditioner instead of comfort. For Maximum Heating-Select HIGH HEAT with the thermostat at mid point. When you move the switch from a...
...HIGH COOL or HIGH HEAT with the thermostat at maximum heat. Consumer Support Troubleshooting Tips Installation Instructions Care and Cleaning Operating Instructions Safety Instructions WARM About the controls on the air conditioner-models with different fan speeds. HIGH HEAT and LOW HEAT provide heating with the ...thermostat at maximum cool. NOTE: The electric resistance heater in the air conditioner instead of comfort. For Maximum Heating-Select HIGH HEAT with the thermostat at mid point. When you move the switch from a...
Owners Manual
Page 9
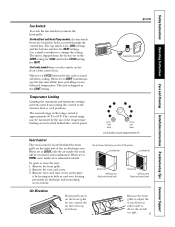
... off when cooling. When set in the CONT setting for HEAT. ge.com or (Depending on the front of the temperature limiting screws located behind the front grille on the front grille let you control the air direction up ) the fan runs all the time, providing a more...for COOL settings and the bottom switch is shipped in holes accessed through the control box. Safety Instructions Operating Instructions Care and Cleaning Installation Instructions Troubleshooting Tips Consumer Support Fan Switch To reach the fan switch(es) remove the front grille. Use a small screwdriver to the...
... off when cooling. When set in the CONT setting for HEAT. ge.com or (Depending on the front of the temperature limiting screws located behind the front grille on the front grille let you control the air direction up ) the fan runs all the time, providing a more...for COOL settings and the bottom switch is shipped in holes accessed through the control box. Safety Instructions Operating Instructions Care and Cleaning Installation Instructions Troubleshooting Tips Consumer Support Fan Switch To reach the fan switch(es) remove the front grille. Use a small screwdriver to the...
Owners Manual
Page 10
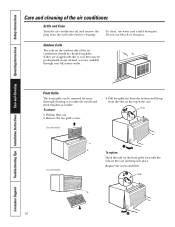
... of the case. Replace the screws and filter. Grille and Case Turn the air conditioner off and remove the plug from the tabs on the front grille even with dirt... or soot they may be professionally steam cleaned, a service available through your GE service outlet. Do not use water and a mild detergent. Grille Tab On some models... bleach or abrasives. Consumer Support Troubleshooting Tips Installation Instructions Care and Cleaning Operating Instructions Safety Instructions Care and cleaning of the air conditioner should be checked regularly. If they are clogged...
... of the case. Replace the screws and filter. Grille and Case Turn the air conditioner off and remove the plug from the tabs on the front grille even with dirt... or soot they may be professionally steam cleaned, a service available through your GE service outlet. Do not use water and a mild detergent. Grille Tab On some models... bleach or abrasives. Consumer Support Troubleshooting Tips Installation Instructions Care and Cleaning Operating Instructions Safety Instructions Care and cleaning of the air conditioner should be checked regularly. If they are clogged...
Owners Manual
Page 11
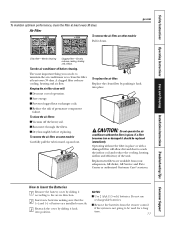
... clean the air filters: I Vacuum off before replacing. To replace the air filter: Replace the clean filter by sliding it should be used for a long time. 11 If a ...Installation Instructions Troubleshooting Tips Consumer Support To maintain optimum performance, clean the filter at least every 30 days. The most important thing you can do to maintain the air conditioner... I Save energy. CAUTION: Do not operate the air conditioner without the filter in place. Turn the air conditioner off the heavy soil. ge.com Dirty filter-Needs cleaning Clogged filter-Greatly reduces ...
... clean the air filters: I Vacuum off before replacing. To replace the air filter: Replace the clean filter by sliding it should be used for a long time. 11 If a ...Installation Instructions Troubleshooting Tips Consumer Support To maintain optimum performance, clean the filter at least every 30 days. The most important thing you can do to maintain the air conditioner... I Save energy. CAUTION: Do not operate the air conditioner without the filter in place. Turn the air conditioner off the heavy soil. ge.com Dirty filter-Needs cleaning Clogged filter-Greatly reduces ...
Owners Manual
Page 12
...need a kit to properly adapt the case to improper installation is used with the Consumer. • Note to ensure proper performance. Installation of a new GE Wall Case. J-MODEL QUALIFYING QUESTIONS J-model air conditioners may be installed on their own single branch circuit for the proper kit... third (ground) prong from overheating wires. IMPORTANT! GE strongly recommends the removal of the old wall case and the installation of this air conditioner. However, they often need a kit to Consumer - If the wall outlet you may present special problems-consult a qualified ...
...need a kit to properly adapt the case to improper installation is used with the Consumer. • Note to ensure proper performance. Installation of a new GE Wall Case. J-MODEL QUALIFYING QUESTIONS J-model air conditioners may be installed on their own single branch circuit for the proper kit... third (ground) prong from overheating wires. IMPORTANT! GE strongly recommends the removal of the old wall case and the installation of this air conditioner. However, they often need a kit to Consumer - If the wall outlet you may present special problems-consult a qualified ...
Owners Manual
Page 13
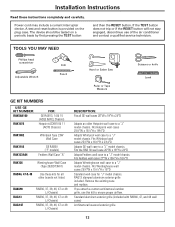
...231⁄8″D Adapts GE wall case to ensure proper airflow. Fits Westinghouse wall cases 257⁄8″W x 157⁄16″H x 16″D Standard wall case for all GE wall cases 26″W x 18″H x 24″D Adapts an older Hotpoint wall case to a "J" model chassis. Installation Instructions Read these kits ...(J-Chassis) DESCRIPTION: Fits all other brands not listed. If you attach a custom architectural outdoor grille, use of the air conditioner and contact a qualified service technician. Fits the RAB 30 wall case 26″W x 18″H x 24″D Adapts Fedders...
...231⁄8″D Adapts GE wall case to ensure proper airflow. Fits Westinghouse wall cases 257⁄8″W x 157⁄16″H x 16″D Standard wall case for all GE wall cases 26″W x 18″H x 24″D Adapts an older Hotpoint wall case to a "J" model chassis. Installation Instructions Read these kits ...(J-Chassis) DESCRIPTION: Fits all other brands not listed. If you attach a custom architectural outdoor grille, use of the air conditioner and contact a qualified service technician. Fits the RAB 30 wall case 26″W x 18″H x 24″D Adapts Fedders...
Owners Manual
Page 14
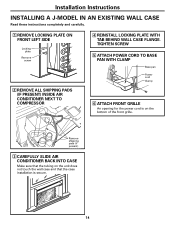
...of the front grille. Installation Instructions INSTALLING A J-MODEL IN AN EXISTING WALL CASE Read these instructions completely and carefully. 1 REMOVE LOCKING PLATE ON FRONT LEFT SIDE Locking plate Remove screw 2 REMOVE ALL SHIPPING PADS (IF PRESENT) INSIDE AIR CONDITIONER NEXT TO COMPRESSOR 4 ...REINSTALL LOCKING PLATE WITH TAB BEHIND WALL CASE FLANGE. Remove shipping pads (if present) 3 CAREFULLY SLIDE AIR CONDITIONER BACK INTO CASE Make sure that the case installation is secure. 14
...of the front grille. Installation Instructions INSTALLING A J-MODEL IN AN EXISTING WALL CASE Read these instructions completely and carefully. 1 REMOVE LOCKING PLATE ON FRONT LEFT SIDE Locking plate Remove screw 2 REMOVE ALL SHIPPING PADS (IF PRESENT) INSIDE AIR CONDITIONER NEXT TO COMPRESSOR 4 ...REINSTALL LOCKING PLATE WITH TAB BEHIND WALL CASE FLANGE. Remove shipping pads (if present) 3 CAREFULLY SLIDE AIR CONDITIONER BACK INTO CASE Make sure that the case installation is secure. 14
Owners Manual
Page 15
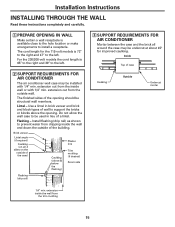
... REQUIREMENTS FOR AIR CONDITIONER The air conditioner wall case may be structural wall members. Brick veneer Lintel angle (if required) Caulking (on all 4 sides on the outside wall. Inside Top of a lintel. Flashing - extension out from dripping inside wall or with 1/4″ min. Do not allow the wall case to be installed with 1/4″ min. Installation Instructions INSTALLING THROUGH THE WALL Read these...
... REQUIREMENTS FOR AIR CONDITIONER The air conditioner wall case may be structural wall members. Brick veneer Lintel angle (if required) Caulking (on all 4 sides on the outside wall. Inside Top of a lintel. Flashing - extension out from dripping inside wall or with 1/4″ min. Do not allow the wall case to be installed with 1/4″ min. Installation Instructions INSTALLING THROUGH THE WALL Read these...
Owners Manual
Page 16
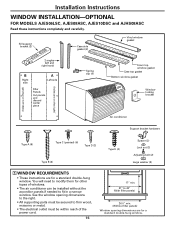
... are for a standard double-hung window. You will need to modify them for a standard double-hung window. Installation Instructions WINDOW INSTALLATION-OPTIONAL FOR MODELS AJES06LSC, AJES08ASC, AJES10DSC and AJHS08ASC Read these instructions completely and carefully. Sill support bracket (2) Case...clip (4) Foam top window gasket Case top gasket Bottom window gasket Window locking bracket (holes are on the left) (holes are on the right) Air conditioner Support bracket hardware Type A (9) Type C (painted) (6) Type D (2) Type B (2) Type E (4) Spacer (2) Lock nut (2) Adjusting ...
... are for a standard double-hung window. You will need to modify them for a standard double-hung window. Installation Instructions WINDOW INSTALLATION-OPTIONAL FOR MODELS AJES06LSC, AJES08ASC, AJES10DSC and AJHS08ASC Read these instructions completely and carefully. Sill support bracket (2) Case...clip (4) Foam top window gasket Case top gasket Bottom window gasket Window locking bracket (holes are on the left) (holes are on the right) Air conditioner Support bracket hardware Type A (9) Type C (painted) (6) Type D (2) Type B (2) Type E (4) Spacer (2) Lock nut (2) Adjusting ...
Owners Manual
Page 17
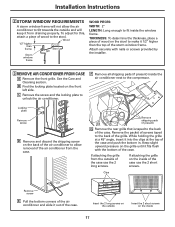
... to the back of the air conditioner from draining properly. If attaching the grille on the back of the air conditioner to allow the air conditioner to tilt towards the outside and will keep it fits flush with nails or screws provided by the installer. 3 REMOVE AIR CONDITIONER FROM CASE A Remove the ...front grille. C Remove the screw and the locking plate to unlock the air conditioner. If attaching the grille from the outside Insert the 2 short screws on...
... to the back of the air conditioner from draining properly. If attaching the grille on the back of the air conditioner to allow the air conditioner to tilt towards the outside and will keep it fits flush with nails or screws provided by the installer. 3 REMOVE AIR CONDITIONER FROM CASE A Remove the ...front grille. C Remove the screw and the locking plate to unlock the air conditioner. If attaching the grille from the outside Insert the 2 short screws on...
Owners Manual
Page 18
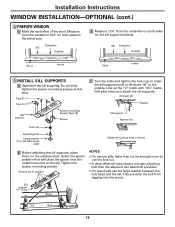
... place the spacer near the outermost point on both sides for the sill support brackets. Sill support "V" notch Stool Sill Bolt 18 Installation Instructions WINDOW INSTALLATION-OPTIONAL (cont.) 4 PREPARE WINDOW A Mark the centerline of the stool. Line up the "V" notch with wood sills) Offset sill... • On wood sills use with 123⁄8″ marks. Sill Centerline Outside Stool 123⁄8″ 123⁄8″ Inside 5 INSTALL SILL SUPPORTS A Assemble the sill supports. Tighten the spacer mounting screws. Screws are in position NOTES: • On narrow sills, there ...
... place the spacer near the outermost point on both sides for the sill support brackets. Sill support "V" notch Stool Sill Bolt 18 Installation Instructions WINDOW INSTALLATION-OPTIONAL (cont.) 4 PREPARE WINDOW A Mark the centerline of the stool. Line up the "V" notch with wood sills) Offset sill... • On wood sills use with 123⁄8″ marks. Sill Centerline Outside Stool 123⁄8″ 123⁄8″ Inside 5 INSTALL SILL SUPPORTS A Assemble the sill supports. Tighten the spacer mounting screws. Screws are in position NOTES: • On narrow sills, there ...
Owners Manual
Page 19
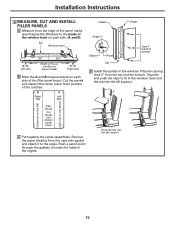
...support 19 Installation Instructions 6 MEASURE, CUT AND INSTALL FILLER PANELS A Measure from the edge of the panel marks (see Prepare the Window) to the inside of the window track on each side. (A and B) Sill Window track A Left side 133⁄8″ 133⁄8″ Width of the air conditioner (panel ...clips 3″ from the top and the bottom. B A Right Left side side Gasket Angle Angle Gasket Panel Tab Type C (painted screws) D Install the panels in the angles. Hook the tab into the sill support. 3″ (holes are on the left) (holes are on each side of ...
...support 19 Installation Instructions 6 MEASURE, CUT AND INSTALL FILLER PANELS A Measure from the edge of the panel marks (see Prepare the Window) to the inside of the window track on each side. (A and B) Sill Window track A Left side 133⁄8″ 133⁄8″ Width of the air conditioner (panel ...clips 3″ from the top and the bottom. B A Right Left side side Gasket Angle Angle Gasket Panel Tab Type C (painted screws) D Install the panels in the angles. Hook the tab into the sill support. 3″ (holes are on the left) (holes are on each side of ...

Owners Manual
Page 20
... behind the panel tabs. E With the window closed, mark where the window sash meets the case. F Peel off the backing from the case top gasket. Installation Instructions WINDOW INSTALLATION-OPTIONAL (cont.) 7 INSTALL CASE IN WINDOW A Peel off the backing from the bottom window gasket.
... behind the panel tabs. E With the window closed, mark where the window sash meets the case. F Peel off the backing from the case top gasket. Installation Instructions WINDOW INSTALLATION-OPTIONAL (cont.) 7 INSTALL CASE IN WINDOW A Peel off the backing from the bottom window gasket.


