
Use and Care Guide
Page 1
... Clothes 6, 7 Care and Cleaning 20, 21 Dryer Exhaust 21 Exterior 20 Lint Filter 8, 9, 20, 21 Storage and Vacation Tips 20 User Maintenance Instructions ........20, 21 Problem Solver 15-19 More questions ?...call GE Answer Center® 800.626.2000 Preparation Other Laundry Products 12 Hard Water 13 Loading the Washer 7 Pretreating 6, 12, 13 Sorting Clothes 6, 7 Stains 13 Stain Removal Guide 14 Consumer Services Appliance Registration 2 Model and Serial Numbers 2 Repair Service 2 Warranty Back Cover Models: WSM2700 WSM2780 GE...
... Clothes 6, 7 Care and Cleaning 20, 21 Dryer Exhaust 21 Exterior 20 Lint Filter 8, 9, 20, 21 Storage and Vacation Tips 20 User Maintenance Instructions ........20, 21 Problem Solver 15-19 More questions ?...call GE Answer Center® 800.626.2000 Preparation Other Laundry Products 12 Hard Water 13 Loading the Washer 7 Pretreating 6, 12, 13 Sorting Clothes 6, 7 Stains 13 Stain Removal Guide 14 Consumer Services Appliance Registration 2 Model and Serial Numbers 2 Repair Service 2 Warranty Back Cover Models: WSM2700 WSM2780 GE...

Use and Care Guide
Page 2
... 40225 2 Follow the gas supplier's instructions. • If you request service... It lists causes of our service and want you receive, here are steps to the Care Labeling Rule established by a qualified installer, service agency or the gas supplier. These numbers are not pleased. All washing and drying instruction terms in this will solve the problem. Write down the model and serial numbers. You'll find...
... 40225 2 Follow the gas supplier's instructions. • If you request service... It lists causes of our service and want you receive, here are steps to the Care Labeling Rule established by a qualified installer, service agency or the gas supplier. These numbers are not pleased. All washing and drying instruction terms in this will solve the problem. Write down the model and serial numbers. You'll find...
Use and Care Guide
Page 3
... clothing, paper material, plastics or plastic containers, etc.) on top of moisture and lint from Heat" (such as described in this Use and Care Book or in published user-repair instructions that you can be exposed to the weather. -Connect to a properly rated, protected and sized power supply circuit to avoid electrical overload. -Exhausting to prevent large amounts of the appliance during operation. • Garments labeled "Dry...
... clothing, paper material, plastics or plastic containers, etc.) on top of moisture and lint from Heat" (such as described in this Use and Care Book or in published user-repair instructions that you can be exposed to the weather. -Connect to a properly rated, protected and sized power supply circuit to avoid electrical overload. -Exhausting to prevent large amounts of the appliance during operation. • Garments labeled "Dry...
Use and Care Guide
Page 4
... their fumes have been removed. Before loading, unloading or adding clothes, push the Cycle Selector knob in which the hot water system may contribute to a chemical reaction that could result from service, remove the lid or door. 4 Do not allow them to run for some spot removers, turpentines, waxes, wax removers and products containing petroleum distillates. • Clean the dryer lint filter before using any discarded appliance.
... their fumes have been removed. Before loading, unloading or adding clothes, push the Cycle Selector knob in which the hot water system may contribute to a chemical reaction that could result from service, remove the lid or door. 4 Do not allow them to run for some spot removers, turpentines, waxes, wax removers and products containing petroleum distillates. • Clean the dryer lint filter before using any discarded appliance.
Use and Care Guide
Page 5
... fabrics or reduce the static electricity in a locked cabinet. SAVE THESE INSTRUCTIONS 5 Service or performance problems caused by the use either a fabric softener in or turning the dryer Cycle Selector to the manufacturer's instructions for those products and are not covered under the warranty of the lint filter). For washer operation • Do not leave washer lid up during cycle. We recommend you use of these products are the...
... fabrics or reduce the static electricity in a locked cabinet. SAVE THESE INSTRUCTIONS 5 Service or performance problems caused by the use either a fabric softener in or turning the dryer Cycle Selector to the manufacturer's instructions for those products and are not covered under the warranty of the lint filter). For washer operation • Do not leave washer lid up during cycle. We recommend you use of these products are the...
Use and Care Guide
Page 6
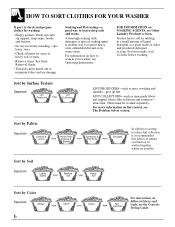
... fabrics of water and powdered detergent or soap. For best results, wait 1/2 hour before washing. HOW TO SORT CLOTHES FOR YOUR WASHER It pays to minimize fabric surface damage. See Stain Removal Guide. • Turn poly knits inside-out to check and prepare clothes for washing. • Empty pockets, brush out cuffs, zip zippers, snap snaps, hooks and buttons. •...
... fabrics of water and powdered detergent or soap. For best results, wait 1/2 hour before washing. HOW TO SORT CLOTHES FOR YOUR WASHER It pays to minimize fabric surface damage. See Stain Removal Guide. • Turn poly knits inside-out to check and prepare clothes for washing. • Empty pockets, brush out cuffs, zip zippers, snap snaps, hooks and buttons. •...
Use and Care Guide
Page 9
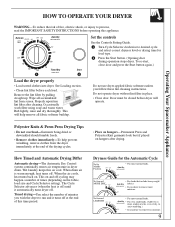
See Loading section. • Clean lint filter before dryer will help prevent wrinkling, remove clothes from screen. To re-start, close door and press the Start button again.) Do not use dryer-applied fabric softeners unless you desire to persons, read the IMPORTANT SAFETY INSTRUCTIONS before operating this air cool. Door must be closed before each load. When drum air is off) until it turns off cycling may happen a number of times (depending on hangers after cleaning. This on...
See Loading section. • Clean lint filter before dryer will help prevent wrinkling, remove clothes from screen. To re-start, close door and press the Start button again.) Do not use dryer-applied fabric softeners unless you desire to persons, read the IMPORTANT SAFETY INSTRUCTIONS before operating this air cool. Door must be closed before each load. When drum air is off) until it turns off cycling may happen a number of times (depending on hangers after cleaning. This on...
Use and Care Guide
Page 15
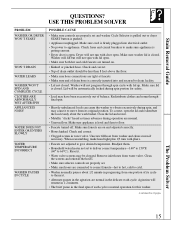
... dryer START button is level and firm to 66°C.). Stain Removal Guide QUESTIONS? Make sure cord is closed . Make sure washer lid is firmly plugged into and secured to give desired temperature. Lid will not run with pliers. • Faucets not adjusted to drain facility. • Lid not closed. Redistribute clothes and rerun through spin cycle with lid open. • Make sure both hot...
... dryer START button is level and firm to 66°C.). Stain Removal Guide QUESTIONS? Make sure cord is closed . Make sure washer lid is firmly plugged into and secured to give desired temperature. Lid will not run with pliers. • Faucets not adjusted to drain facility. • Lid not closed. Redistribute clothes and rerun through spin cycle with lid open. • Make sure both hot...
Use and Care Guide
Page 17
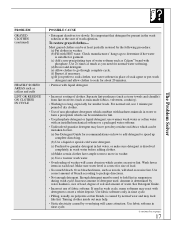
... clothes. (d) Make certain clothes have ample room to soak clothes, use warmer wash water or soften water with an installed mechanical softener or a packaged water softener. • Undissolved granular detergent may look like lint. Use fabric softener in suspension during wash cycle. Check manufacturers' hang tags to create a white deposit. Make sure water level is correct for size of load. • Too much as you need...
... clothes. (d) Make certain clothes have ample room to soak clothes, use warmer wash water or soften water with an installed mechanical softener or a packaged water softener. • Undissolved granular detergent may look like lint. Use fabric softener in suspension during wash cycle. Check manufacturers' hang tags to create a white deposit. Make sure water level is correct for size of load. • Too much as you need...
Use and Care Guide
Page 19
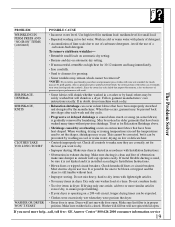
... a time. The Problem Solver PROBLEM WRINKLING IN PERM PRESS AND "NO-IRON" ITEMS (continued) SHRINKAGE, GENERAL SHRINKAGE, KNITS CLOTHES TAKE TOO LONG TO DRY WASHER OR DRYER WON'T START POSSIBLE CAUSE • Incorrect water level. Avoid the use two. drying on high heat for 10-12 minutes and hang immediately. • Iron carefully. • Send to cleaners for the load you want to set . Check household fuses or circuit breakers. Make sure lint filter...
... a time. The Problem Solver PROBLEM WRINKLING IN PERM PRESS AND "NO-IRON" ITEMS (continued) SHRINKAGE, GENERAL SHRINKAGE, KNITS CLOTHES TAKE TOO LONG TO DRY WASHER OR DRYER WON'T START POSSIBLE CAUSE • Incorrect water level. Avoid the use two. drying on high heat for 10-12 minutes and hang immediately. • Iron carefully. • Send to cleaners for the load you want to set . Check household fuses or circuit breakers. Make sure lint filter...

Use and Care Guide
Page 20
... out the antifreeze. CARE AND CLEANING USER MAINTENANCE INSTRUCTIONS • Wipe the cabinet with a damp cloth. For long vacations Be sure water supply is shut off water supply faucets. (The front access panel between washer and dryer may have to SPIN and pull the knob out. 4. Store the appliance in , turn the knob to the right to be operated in the Cycle Selector, disconnect the electrical plug, dry the tub interior, close...
... out the antifreeze. CARE AND CLEANING USER MAINTENANCE INSTRUCTIONS • Wipe the cabinet with a damp cloth. For long vacations Be sure water supply is shut off water supply faucets. (The front access panel between washer and dryer may have to SPIN and pull the knob out. 4. Store the appliance in , turn the knob to the right to be operated in the Cycle Selector, disconnect the electrical plug, dry the tub interior, close...
Use and Care Guide
Page 24
... succeeding owner for products purchased for home use the product. I Service trips to one -year warranty, GE will also provide, free of God. Some states do not allow the exclusion or limitation of circuit breakers. Any implied warranties, including the implied warranties of the product if it is needed to your receipt here. What GE Will Not Cover: I Product not accessible to replace the defective part. I Replacement...
... succeeding owner for products purchased for home use the product. I Service trips to one -year warranty, GE will also provide, free of God. Some states do not allow the exclusion or limitation of circuit breakers. Any implied warranties, including the implied warranties of the product if it is needed to your receipt here. What GE Will Not Cover: I Product not accessible to replace the defective part. I Replacement...
Installation Instructions
Page 1
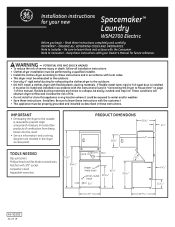
... trap lint. IMPORTANT • Exhausting the dryer to the outside is installed, it could be exposed to water and/or weather. • Save these instructions. (Installers: Be sure to leave these instructions completely and carefully. OBSERVE ALL GOVERNING CODES AND ORDINANCES. Note to Installer - Installation instructions for exhausting the clothes dryer to the outdoors. • DO NOT install a clothes dryer with local codes. • This dryer must be UL-listed and installed in the dryer access panel...
... trap lint. IMPORTANT • Exhausting the dryer to the outside is installed, it could be exposed to water and/or weather. • Save these instructions. (Installers: Be sure to leave these instructions completely and carefully. OBSERVE ALL GOVERNING CODES AND ORDINANCES. Note to Installer - Installation instructions for exhausting the clothes dryer to the outdoors. • DO NOT install a clothes dryer with local codes. • This dryer must be UL-listed and installed in the dryer access panel...
Installation Instructions
Page 2
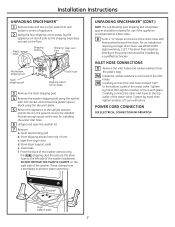
... shipping blocks from dryer door d. tape from rear of the water valve. DO NOT REMOVE THE PLASTIC CLAMPS on the right side of the drain hose with pliers. These clamps form a standpipe to the top outlet of unit c. For an installation requiring a longer drain hose, use if the appliance is transported at the rear for installing the water inlet hose. 6 Untape and open the washer lid. 7 Remove: a. foam dryer support pads e. inlet hoses f. UNPACKING SPACEMAKER™...
... shipping blocks from dryer door d. tape from rear of the water valve. DO NOT REMOVE THE PLASTIC CLAMPS on the right side of the drain hose with pliers. These clamps form a standpipe to the top outlet of unit c. For an installation requiring a longer drain hose, use if the appliance is transported at the rear for installing the water inlet hose. 6 Untape and open the washer lid. 7 Remove: a. foam dryer support pads e. inlet hoses f. UNPACKING SPACEMAKER™...

Installation Instructions
Page 3
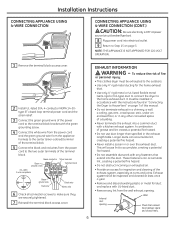
.... CAUTION: Be sure electricity is the HOT water faucet, carefully connect the bottom inlet hose to prevent excessive vibration. NOTE: Keep the leg extension at power supply source (circuit breaker/fuse box). 14 Plug power cord into electrical outlet. Carefully connect the top inlet hose to the operating location. CONNECTING TO EXHAUST 15 Connect the exhaust duct to seal all four legs (no rocking of drain hose in literature package). Lift the front access panel until the tabs...
.... CAUTION: Be sure electricity is the HOT water faucet, carefully connect the bottom inlet hose to prevent excessive vibration. NOTE: Keep the leg extension at power supply source (circuit breaker/fuse box). 14 Plug power cord into electrical outlet. Carefully connect the top inlet hose to the operating location. CONNECTING TO EXHAUST 15 Connect the exhaust duct to seal all four legs (no rocking of drain hose in literature package). Lift the front access panel until the tabs...
Installation Instructions
Page 4
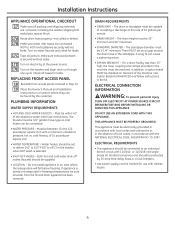
... kit. cold flowing, of the appliance water inlet hose connections. If appliance is stored or transported in the standpipe. THIS APPLIANCE MUST BE PROPERLY GROUNDED. Installation Instructions APPLIANCE OPERATIONAL CHECKOUT 17 Make sure all hoses for leaks. Turn on the washer and dryer and run through one cycle. REPLACING FRONT ACCESS PANEL 18 Reinstall front access panel removed in Step 10. 19 Place the Owner's Manual and Installation Instructions in an area where the temperature...
... kit. cold flowing, of the appliance water inlet hose connections. If appliance is stored or transported in the standpipe. THIS APPLIANCE MUST BE PROPERLY GROUNDED. Installation Instructions APPLIANCE OPERATIONAL CHECKOUT 17 Make sure all hoses for leaks. Turn on the washer and dryer and run through one cycle. REPLACING FRONT ACCESS PANEL 18 Reinstall front access panel removed in Step 10. 19 Place the Owner's Manual and Installation Instructions in an area where the temperature...
Installation Instructions
Page 5
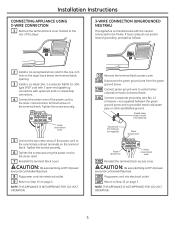
...: Be sure electricity is OFF at power source (circuit breaker/fuse box). 10E Plug power cord into electrical outlet. 9 Return to Step 15 on page 3. Ground clamp attach to the strain relief. 7 Reinstall the terminal block cover. NOTE: THIS APPLIANCE IS NOT APPROVED FOR 120-VOLT OPERATION. 5 Installation Instructions CONNECTING APPLIANCE USING 3-WIRE CONNECTION 1 Remove the terminal block cover located at the rear of the dryer. 3-WIRE CONNECTION (UNGROUNDED NEUTRAL) This appliance is OFF at power source (circuit breaker/fuse box). 8 Plug power cord into electrical outlet. 10F...
...: Be sure electricity is OFF at power source (circuit breaker/fuse box). 10E Plug power cord into electrical outlet. 9 Return to Step 15 on page 3. Ground clamp attach to the strain relief. 7 Reinstall the terminal block cover. NOTE: THIS APPLIANCE IS NOT APPROVED FOR 120-VOLT OPERATION. 5 Installation Instructions CONNECTING APPLIANCE USING 3-WIRE CONNECTION 1 Remove the terminal block cover located at the rear of the dryer. 3-WIRE CONNECTION (UNGROUNDED NEUTRAL) This appliance is OFF at power source (circuit breaker/fuse box). 8 Plug power cord into electrical outlet. 10F...
Installation Instructions
Page 6
... any lint from the power cord to make sure they are securely tightened. 7 Reinstall the terminal block access cover. It must be installed in the exhaust length table. NOTE: THIS APPLIANCE IS NOT APPROVED FOR 120-VOLT OPERATION. 1 Remove the terminal block access cover. 2 Install UL-listed 30A, 4-conductor NEMA 14-30- Internal duct opening . Green conductor Silver terminal Green ground screw Terminal block (14-30R) 4-wire receptacle Green ground wire Red wire Black wire White wire 6 Check all connection...
... any lint from the power cord to make sure they are securely tightened. 7 Reinstall the terminal block access cover. It must be installed in the exhaust length table. NOTE: THIS APPLIANCE IS NOT APPROVED FOR 120-VOLT OPERATION. 1 Remove the terminal block access cover. 2 Install UL-listed 30A, 4-conductor NEMA 14-30- Internal duct opening . Green conductor Silver terminal Green ground screw Terminal block (14-30R) 4-wire receptacle Green ground wire Red wire Black wire White wire 6 Check all connection...
Installation Instructions
Page 7
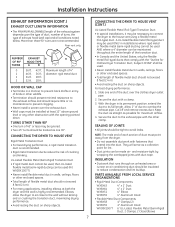
... 6′ UL-Listed, Flexible Metal (Semi-Rigid) Duct, 2 Clamps, 2 Close Elbows Installation Instructions EXHAUST INFORMATION (CONT.) EXHAUST DUCT LENGTH INFORMATION • The MAXIMUM ALLOWABLE length of the exhaust system depends upon the type of duct, number of turns, the type of crushing and kinking. Secure the duct with fasteners that runs through an unheated area or is near an air conditioning duct should require little or no maintenance to reduce condensation...
... 6′ UL-Listed, Flexible Metal (Semi-Rigid) Duct, 2 Clamps, 2 Close Elbows Installation Instructions EXHAUST INFORMATION (CONT.) EXHAUST DUCT LENGTH INFORMATION • The MAXIMUM ALLOWABLE length of the exhaust system depends upon the type of duct, number of turns, the type of crushing and kinking. Secure the duct with fasteners that runs through an unheated area or is near an air conditioning duct should require little or no maintenance to reduce condensation...
Installation Instructions
Page 8
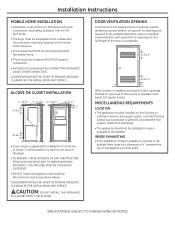
... and the soffit. SPECIFICATIONS SUBJECT TO CHANGE WITHOUT NOTICE DOOR VENTILATION OPENING A minimum of 120 square inches of the dryer. • TO PREVENT LARGE AMOUNTS OF LINT AND MOISTURE FROM ACCUMULATING AND TO MAINTAIN DRYING EFFICIENCY, THIS MACHINE MUST BE EXHAUSTED OUTDOORS. • DO NOT install this appliance with equivalent air openings for installation in door openings, the free air openings of the door is installed. Concrete flooring is...
... and the soffit. SPECIFICATIONS SUBJECT TO CHANGE WITHOUT NOTICE DOOR VENTILATION OPENING A minimum of 120 square inches of the dryer. • TO PREVENT LARGE AMOUNTS OF LINT AND MOISTURE FROM ACCUMULATING AND TO MAINTAIN DRYING EFFICIENCY, THIS MACHINE MUST BE EXHAUSTED OUTDOORS. • DO NOT install this appliance with equivalent air openings for installation in door openings, the free air openings of the door is installed. Concrete flooring is...


