
Owners Manual
Page 2
... gas may occur. PROPER INSTALLATION This washer must be followed to minimize the risk of life. YOUR LAUNDRY AREA I Do not leave the washer door open. Do not allow any other literature included with all hot water faucets and allowing them to escape. An open flame or appliance during this before using any appliance. Installation Instructions Consumer Support Troubleshooting Tips 2 Operating Instructions Safety Instructions IMPORTANT SAFETY INFORMATION. If the hot water...
... gas may occur. PROPER INSTALLATION This washer must be followed to minimize the risk of life. YOUR LAUNDRY AREA I Do not leave the washer door open. Do not allow any other literature included with all hot water faucets and allowing them to escape. An open flame or appliance during this before using any appliance. Installation Instructions Consumer Support Troubleshooting Tips 2 Operating Instructions Safety Instructions IMPORTANT SAFETY INFORMATION. If the hot water...
Owners Manual
Page 3
... the door open when locked (LOCKED indicator ON). I To minimize the possibility of the fill hoses; including a damaged cord or plug. cleaned in, washed in, soaked in I The washer is moving. they should occur. Do not try to purpose as vinegar and/or rust remover. WHEN NOT IN USE I The laundry process can produce a toxic gas which may cause death. I Turn off around your washer or dryer...
... the door open when locked (LOCKED indicator ON). I To minimize the possibility of the fill hoses; including a damaged cord or plug. cleaned in, washed in, soaked in I The washer is moving. they should occur. Do not try to purpose as vinegar and/or rust remover. WHEN NOT IN USE I The laundry process can produce a toxic gas which may cause death. I Turn off around your washer or dryer...
Owners Manual
Page 4
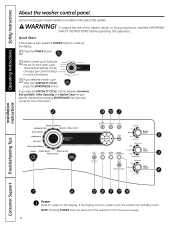
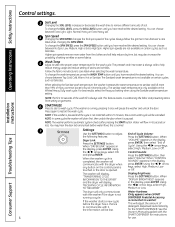
... locate your specific needs before operating this appliance. Installation Instructions Consumer Support Troubleshooting Tips 1 Power Press to persons, read the IMPORTANT SAFETY INSTRUCTIONS before pressing START/PAUSE. To reduce the risk of the washer. See Specialty Cycles for your model number on a label on the side of fire, electric shock, or injury to "wake up " the display. 1 Press the POWER button. 2 Select a wash cycle. (Defaults are set for more information. Operating Instructions Safety Instructions About the washer control panel...
... locate your specific needs before operating this appliance. Installation Instructions Consumer Support Troubleshooting Tips 1 Power Press to persons, read the IMPORTANT SAFETY INSTRUCTIONS before pressing START/PAUSE. To reduce the risk of the washer. See Specialty Cycles for your model number on a label on the side of fire, electric shock, or injury to "wake up " the display. 1 Press the POWER button. 2 Select a wash cycle. (Defaults are set for more information. Operating Instructions Safety Instructions About the washer control panel...
Owners Manual
Page 5
..., household linens, work and play clothes. HEAVY DUTY COLORS/NORMAL For heavy to the instructions on selected options. DELICATES For lingerie and special-care fabrics with light to the previous menu. WASHABLE For the washing of wash loads. RINSE & SPIN To quickly rinse out any items at any time. SPECIALTY CYCLES For unique garments that are needed in the Specialty Cycle, use a detergent suitable for specific types of machine washable wool products, provided that...
..., household linens, work and play clothes. HEAVY DUTY COLORS/NORMAL For heavy to the instructions on selected options. DELICATES For lingerie and special-care fabrics with light to the previous menu. WASHABLE For the washing of wash loads. RINSE & SPIN To quickly rinse out any items at any time. SPECIALTY CYCLES For unique garments that are needed in the Specialty Cycle, use a detergent suitable for specific types of machine washable wool products, provided that...
Owners Manual
Page 6
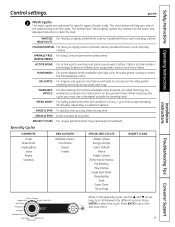
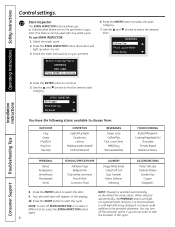
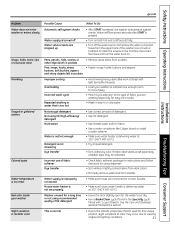
Operating Instructions Safety Instructions Control settings. Installation Instructions 3 Soil Level Changing the SOIL LEVEL increases or decreases the wash time to remove different amounts of the wash fill is always cold. You can choose between Tap Cold, Cold, Warm, Hot or Sanitize. You can choose between Extra Light, Light, Normal, Heavy or Extra Heavy soil. 4 Spin Speed Changing the SPIN SPEED changes the final spin speed of -Cycle Volume: Press the SETTINGS button. The sanitize wash temperature is opened. Press again to adjust...
Operating Instructions Safety Instructions Control settings. Installation Instructions 3 Soil Level Changing the SOIL LEVEL increases or decreases the wash time to remove different amounts of the wash fill is always cold. You can choose between Tap Cold, Cold, Warm, Hot or Sanitize. You can choose between Extra Light, Light, Normal, Heavy or Extra Heavy soil. 4 Spin Speed Changing the SPIN SPEED changes the final spin speed of -Cycle Volume: Press the SETTINGS button. The sanitize wash temperature is opened. Press again to adjust...
Owners Manual
Page 7
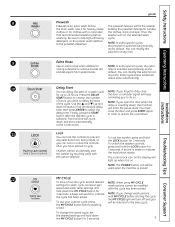
... wash washing. Installation Instructions 10 Delay Start You can delay the start of the cycle. To change wash options with a care label the clothes, drain and spin. Safety Instructions Operating Instructions ge.com 8 Prewash Prewash is an extra wash before The prewash feature will count down and start automatically at the correct time. 11 Lock You can lock the controls to prevent To lock the washer, press and hold any selections from soiled loads. Or the LOCK button...
... wash washing. Installation Instructions 10 Delay Start You can delay the start of the cycle. To change wash options with a care label the clothes, drain and spin. Safety Instructions Operating Instructions ge.com 8 Prewash Prewash is an extra wash before The prewash feature will count down and start automatically at the correct time. 11 Lock You can lock the controls to prevent To lock the washer, press and hold any selections from soiled loads. Or the LOCK button...
Owners Manual
Page 8
... are on the display. 10. Operating Instructions Safety Instructions Control settings. 13 Stain Inspector The STAIN INSPECTOR feature allows you do not want to add the prewash to the cycle. Select the wash cycle. 2. Press the ENTER button to select the stain. 9. To use STAIN INSPECTOR: 1. Check the wash instructions on ). 3. Your selected stain will light up when it is recommended to add high-efficiency detergent or proper wash additive to...
... are on the display. 10. Operating Instructions Safety Instructions Control settings. 13 Stain Inspector The STAIN INSPECTOR feature allows you do not want to add the prewash to the cycle. Select the wash cycle. 2. Press the ENTER button to select the stain. 9. To use STAIN INSPECTOR: 1. Check the wash instructions on ). 3. Your selected stain will light up when it is recommended to add high-efficiency detergent or proper wash additive to...
Owners Manual
Page 10
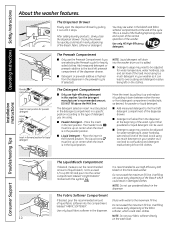
... powdered or liquid detergent can lead to the maximum fill line. Installation Instructions Consumer Support Troubleshooting Tips The Liquid Bleach Compartment If desired, measure out the recommended amount of the load. Avoid using too much detergent in this symbol . The detergent selection insert must be used. Do not exceed the maximum fill line. NOTE: Do not use high-efficiency detergent in your washer as desired, for water temperature, water hardness, size and soil level of liquid bleach...
... powdered or liquid detergent can lead to the maximum fill line. Installation Instructions Consumer Support Troubleshooting Tips The Liquid Bleach Compartment If desired, measure out the recommended amount of the load. Avoid using too much detergent in this symbol . The detergent selection insert must be used. Do not exceed the maximum fill line. NOTE: Do not use high-efficiency detergent in your washer as desired, for water temperature, water hardness, size and soil level of liquid bleach...
Owners Manual
Page 11
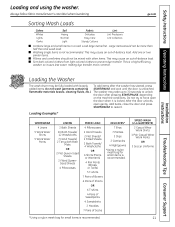
... door is locked. Do not try to restart. Large items should not be mixed with loosely To add items after pressing START/PAUSE, depending on the machine conditions. Installation Instructions Troubleshooting Tips Consumer Support Loading the Washer The wash drum may cause an out-of Socks DELICATES* 7 Bras 7 Panties 3 Slips 2 Camisoles 4 Nightgowns *Using a nylon mesh bag for small items is not recommended. Safety Instructions Operating Instructions Loading and using the washer...
... door is locked. Do not try to restart. Large items should not be mixed with loosely To add items after pressing START/PAUSE, depending on the machine conditions. Installation Instructions Troubleshooting Tips Consumer Support Loading the Washer The wash drum may cause an out-of Socks DELICATES* 7 Bras 7 Panties 3 Slips 2 Camisoles 4 Nightgowns *Using a nylon mesh bag for small items is not recommended. Safety Instructions Operating Instructions Loading and using the washer...
Owners Manual
Page 12
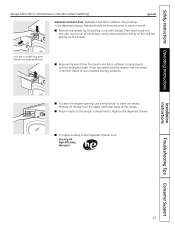
.... Using a coin in front of water when the filter is nothing blocking the holes behind the gasket. Clean the debris from drain pump and hoses. Using both hands, press down with 1 cup of bleach (or other commercially available product manufactured for small articles to pass to catch about a cup of the washer to the operating position. 12 Operating Instructions Safety Instructions Loading and using the BASKET CLEAN CYCLE (found in this manual...
.... Using a coin in front of water when the filter is nothing blocking the holes behind the gasket. Clean the debris from drain pump and hoses. Using both hands, press down with 1 cup of bleach (or other commercially available product manufactured for small articles to pass to catch about a cup of the washer to the operating position. 12 Operating Instructions Safety Instructions Loading and using the BASKET CLEAN CYCLE (found in this manual...
Owners Manual
Page 13
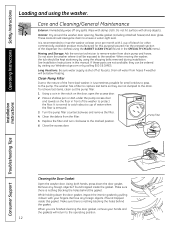
... drawer. Installation Instructions Troubleshooting Tips Consumer Support 13 ge.com Dispenser Drawer Area: Detergent and fabric softener may build up in the Dispenser Drawer area: Use only HE High-Efficiency detergent. I To reduce buildup in the dispenser drawer. Then reach back into the right rear corner of accumulated laundry products. I Remove the drawer by first pulling it out until it stops. I Return inserts to clean the recess. I To clean the drawer opening, use a small brush to the proper compartments. Safety Instructions Operating Instructions...
... drawer. Installation Instructions Troubleshooting Tips Consumer Support 13 ge.com Dispenser Drawer Area: Detergent and fabric softener may build up in the Dispenser Drawer area: Use only HE High-Efficiency detergent. I To reduce buildup in the dispenser drawer. Then reach back into the right rear corner of accumulated laundry products. I Remove the drawer by first pulling it out until it stops. I Return inserts to clean the recess. I To clean the drawer opening, use a small brush to the proper compartments. Safety Instructions Operating Instructions...
Owners Manual
Page 14
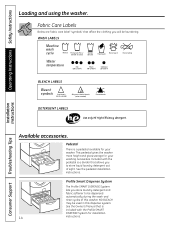
...clothing you store laundry detergent and fabric softener to store liquid laundry detergent out of this dispense system. Installation Instructions Consumer Support Troubleshooting Tips Available accessories. Profile Smart Dispense System The Profile SMART DISPENSE System lets you will be laundering. This pedestal gives the washer more height and gives storage for your washer. Included with the pedestal is included with the Profile SMART DISPENSE System for your washing necessities. Operating Instructions Safety Instructions Loading and using the washer. Fabric Care...
...clothing you store laundry detergent and fabric softener to store liquid laundry detergent out of this dispense system. Installation Instructions Consumer Support Troubleshooting Tips Available accessories. Profile Smart Dispense System The Profile SMART DISPENSE System lets you will be laundering. This pedestal gives the washer more height and gives storage for your washer. Included with the pedestal is included with the Profile SMART DISPENSE System for your washing necessities. Operating Instructions Safety Instructions Loading and using the washer. Fabric Care...
Owners Manual
Page 18
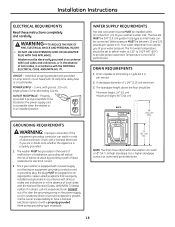
... Automatic Temperature Control (ATC) performance. CIRCUIT - OUTLET RECEPTACLE - If in an installed position. DRAIN REQUIREMENTS 1. Washer must be located so the power supply cord is accessible when the washer is properly grounded. 1. Properly grounded 3-prong receptacle to have a licensed electrician replace it is equipped with a power supply cord having an equipment-grounding conductor and a grounding plug, the plug MUST be 3/4″ (1.9 cm) garden hose-type so inlet hoses...
... Automatic Temperature Control (ATC) performance. CIRCUIT - OUTLET RECEPTACLE - If in an installed position. DRAIN REQUIREMENTS 1. Washer must be located so the power supply cord is accessible when the washer is properly grounded. 1. Properly grounded 3-prong receptacle to have a licensed electrician replace it is equipped with a power supply cord having an equipment-grounding conductor and a grounding plug, the plug MUST be 3/4″ (1.9 cm) garden hose-type so inlet hoses...
Owners Manual
Page 19
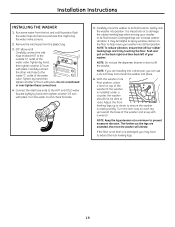
... ensure the washer is installed under a counter, the washer should not be helpful to its final location. Carefully connect the other inlet hose to flush the water lines and remove particles that all four rubber leveling legs are firmly touching the floor. Tighten by hand, then tighten another 2/3 turn with a wrench. then tighten another 2/3 turn with pliers. Damaged legs can use the dispenser drawer or door to...
... ensure the washer is installed under a counter, the washer should not be helpful to its final location. Carefully connect the other inlet hose to flush the water lines and remove particles that all four rubber leveling legs are firmly touching the floor. Tighten by hand, then tighten another 2/3 turn with a wrench. then tighten another 2/3 turn with pliers. Damaged legs can use the dispenser drawer or door to...
Owners Manual
Page 20
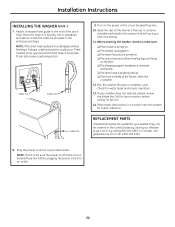
... For Service section before plugging the power cord into a grounded outlet. If your washer, they can also cause a siphoning action. NOTE: If the drain hose is properly tied up. ❏ There are needed for water leaks and proper operation. 13. Turn on the floor. ❏ The shipping support hardware is removed and saved. ❏ The drain hose is placed in the United States by calling 800.GE.CARES. A snug hose...
... For Service section before plugging the power cord into a grounded outlet. If your washer, they can also cause a siphoning action. NOTE: If the drain hose is properly tied up. ❏ There are needed for water leaks and proper operation. 13. Turn on the floor. ❏ The shipping support hardware is removed and saved. ❏ The drain hose is placed in the United States by calling 800.GE.CARES. A snug hose...
Owners Manual
Page 21
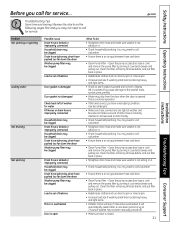
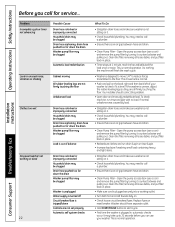
... Household drain may be clogged Drain hose siphoning; Installation Instructions Problem Not spinning or agitating Leaking water Not draining Not spinning Possible Cause Drain hose is wet, you have oversudsing condition. drain hose pushed too far down the drain Washer pump filter may be clogged Load is out of washer for service... Objects left of balance Door gasket is damaged Door gasket not damaged Check back left in place. • Redistribute clothes and run drain & spin or rinse & spin. • Increase load size if washing small load containing heavy and light items...
... Household drain may be clogged Drain hose siphoning; Installation Instructions Problem Not spinning or agitating Leaking water Not draining Not spinning Possible Cause Drain hose is wet, you have oversudsing condition. drain hose pushed too far down the drain Washer pump filter may be clogged Load is out of washer for service... Objects left of balance Door gasket is damaged Door gasket not damaged Check back left in place. • Redistribute clothes and run drain & spin or rinse & spin. • Increase load size if washing small load containing heavy and light items...
Owners Manual
Page 22
... check machine, run drain & spin or rinse & spin. • Increase load size if washing small load containing heavy and light items. • Straighten drain hose and make sure washer is normal. • Push and pull on it counterclockwise and pulling out. Open the pump access door (use a coin) and remove the pump filter by turning it . • Check household plumbing. Replace fuses or reset breaker. Washer should correct this problem. • Open door and manually redistribute load. Open the pump access door (use a coin) and remove the pump filter by turning it...
... check machine, run drain & spin or rinse & spin. • Increase load size if washing small load containing heavy and light items. • Straighten drain hose and make sure washer is normal. • Push and pull on it counterclockwise and pulling out. Open the pump access door (use a coin) and remove the pump filter by turning it . • Check household plumbing. Replace fuses or reset breaker. Washer should correct this problem. • Open door and manually redistribute load. Open the pump access door (use a coin) and remove the pump filter by turning it...
Owners Manual
Page 23
... to viewing angles and lighting conditions. 23 Troubleshooting Tips Consumer Support See the Care and Cleaning/ General Maintenance section. Use a brush or toothpick to clean the screens in warm or cold water. Improper sorting Overloading Incorrect wash cycle Repeated washing in water that is too hot • Avoid mixing heavy items (like work clothes) with 1 cup of bleach. Incorrect use of the washer. Safety Instructions Operating Instructions ge.com Installation Instructions Problem Water does not enter washer or enters slowly...
... to viewing angles and lighting conditions. 23 Troubleshooting Tips Consumer Support See the Care and Cleaning/ General Maintenance section. Use a brush or toothpick to clean the screens in warm or cold water. Improper sorting Overloading Incorrect wash cycle Repeated washing in water that is too hot • Avoid mixing heavy items (like work clothes) with 1 cup of bleach. Incorrect use of the washer. Safety Instructions Operating Instructions ge.com Installation Instructions Problem Water does not enter washer or enters slowly...
Owners Manual
Page 24
.... I Replacement of house fuses or resetting of these parts should fail due to obtain service under operating conditions. In Alaska, the warranty excludes the cost of the original purchase date is needed to a defect in materials or workmanship. This warranty gives you specific legal rights, and you will also replace the washer top panel, front panel or service panel if they should fail due to an Authorized GE Service location...
.... I Replacement of house fuses or resetting of these parts should fail due to obtain service under operating conditions. In Alaska, the warranty excludes the cost of the original purchase date is needed to a defect in materials or workmanship. This warranty gives you specific legal rights, and you will also replace the washer top panel, front panel or service panel if they should fail due to an Authorized GE Service location...
Owners Manual
Page 25
... driven pulley if any succeeding owner for products purchased for home use the product. During this limited one year or the shortest period allowed by law. I Damage after delivery. WARRANTOR IS NOT RESPONSIBLE FOR CONSEQUENTIAL DAMAGES. Installation Instructions Troubleshooting Tips Consumer Support 25 Safety Instructions Operating Instructions GE Washer Warranty. (For customers in Canada) All warranty service provided by accident, fire, floods or acts of God. What Is Not...
... driven pulley if any succeeding owner for products purchased for home use the product. During this limited one year or the shortest period allowed by law. I Damage after delivery. WARRANTOR IS NOT RESPONSIBLE FOR CONSEQUENTIAL DAMAGES. Installation Instructions Troubleshooting Tips Consumer Support 25 Safety Instructions Operating Instructions GE Washer Warranty. (For customers in Canada) All warranty service provided by accident, fire, floods or acts of God. What Is Not...


