Owners Manual
Page 3
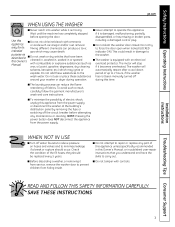
... repair or replace any maintenance or cleaning. The washer will stop wax, oil, paint, gasoline, degreasers, dry-cleaning if it becomes overheated. I To minimize the possibility of the fill hoses; I Do not attempt to 2 hours, if the washer wash water. I Do not tamper with controls. I The laundry process can produce a toxic gas which may cause death. I Do not slam the washer door closed. SAVE THESE INSTRUCTIONS Troubleshooting Tips Consumer Support...
... repair or replace any maintenance or cleaning. The washer will stop wax, oil, paint, gasoline, degreasers, dry-cleaning if it becomes overheated. I To minimize the possibility of the fill hoses; I Do not attempt to 2 hours, if the washer wash water. I Do not tamper with controls. I The laundry process can produce a toxic gas which may cause death. I Do not slam the washer door closed. SAVE THESE INSTRUCTIONS Troubleshooting Tips Consumer Support...
Owners Manual
Page 4
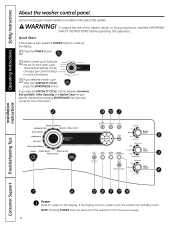
... locate your specific needs before operating this appliance. Installation Instructions Consumer Support Troubleshooting Tips 1 Power Press to put the washer into standby mode. If you selected a wash cycle other than SPECIALTY CYCLE, press the START/PAUSE button. To reduce the risk of the washer. See Control settings for more information.) 3 If you selected SPECIALTY CYCLE, choose between Garments, Bed and Bath, Other Specialty and Basket Clean for more information. Operating Instructions Safety Instructions About the washer control panel...
... locate your specific needs before operating this appliance. Installation Instructions Consumer Support Troubleshooting Tips 1 Power Press to put the washer into standby mode. If you selected a wash cycle other than SPECIALTY CYCLE, press the START/PAUSE button. To reduce the risk of the washer. See Control settings for more information.) 3 If you selected SPECIALTY CYCLE, choose between Garments, Bed and Bath, Other Specialty and Basket Clean for more information. Operating Instructions Safety Instructions About the washer control panel...
Owners Manual
Page 5
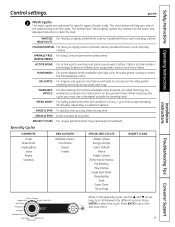
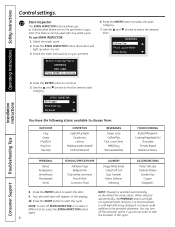
... Instructions Operating Instructions Installation Instructions Control settings. Provides gentle rocking to select the cycle. Provides gentle tumbling and soak during wash and rinse. WASHABLE For the washing of machine washable wool products, provided that they are needed in the Specialty Cycle, use a detergent suitable for specific types of wash loads. Specialty Cycles GARMENTS Coats Dress Shirts Hosiery/Bras Jeans Khakis Sweaters BED and BATH Blankets (cotton) Comforters Sheets Towels SPECIALIZED CYCLES Athletic Shoes Energy Savings Fabric...
... Instructions Operating Instructions Installation Instructions Control settings. Provides gentle rocking to select the cycle. Provides gentle tumbling and soak during wash and rinse. WASHABLE For the washing of machine washable wool products, provided that they are needed in the Specialty Cycle, use a detergent suitable for specific types of wash loads. Specialty Cycles GARMENTS Coats Dress Shirts Hosiery/Bras Jeans Khakis Sweaters BED and BATH Blankets (cotton) Comforters Sheets Towels SPECIALIZED CYCLES Athletic Shoes Energy Savings Fabric...
Owners Manual
Page 6
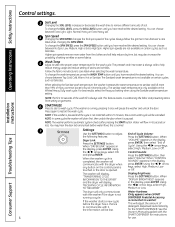
... DRYER". The washer will display, "TRANSFERRING CYCLE INFORMATION TO THE DRYER" and the dryer will drain first, then unlock the door when it once will be cancelled. If the washer starts a new cycle before water flows; Operating Instructions Safety Instructions Control settings. To change the SOIL LEVEL, press the SOIL LEVEL button until you have reached the desired setting. Always follow the garment manufacturer's care label when changing the SPIN SPEED. You can choose between Extra Light, Light, Normal...
... DRYER". The washer will display, "TRANSFERRING CYCLE INFORMATION TO THE DRYER" and the dryer will drain first, then unlock the door when it once will be cancelled. If the washer starts a new cycle before water flows; Operating Instructions Safety Instructions Control settings. To change the SOIL LEVEL, press the SOIL LEVEL button until you have reached the desired setting. Always follow the garment manufacturer's care label when changing the SPIN SPEED. You can choose between Extra Light, Light, Normal...
Owners Manual
Page 7
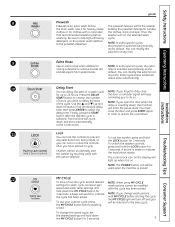
... time. NOTE: If you change the saved cycle, set the desired NOTE: When using MY CYCLE, settings for 3 seconds. 7 Finally, press the START button after the desired cycle is NOTE: If you To use your custom cycle, press will run the selected wash washing. NOTE: The POWER button can lock or unlock the controls To unlock the washer controls, after the cycle has been started a cycle. NOTE: In some special cycles, the extra rinsing is desired to remove excess dirt rinse...
... time. NOTE: If you change the saved cycle, set the desired NOTE: When using MY CYCLE, settings for 3 seconds. 7 Finally, press the START button after the desired cycle is NOTE: If you To use your custom cycle, press will run the selected wash washing. NOTE: The POWER button can lock or unlock the controls To unlock the washer controls, after the cycle has been started a cycle. NOTE: In some special cycles, the extra rinsing is desired to remove excess dirt rinse...
Owners Manual
Page 8
... on the display. 10. You can be used with any wash cycle. For optimum stain removal, it is selected automatically as the default for some stains. Press the ENTER button to find the desired stain category. Use the L and M arrows to continue. 5. This feature can turn off the prewash option if you to the prewash dispenser. Check the wash instructions on ). 3. Installation Instructions Consumer Support Troubleshooting Tips...
... on the display. 10. You can be used with any wash cycle. For optimum stain removal, it is selected automatically as the default for some stains. Press the ENTER button to find the desired stain category. Use the L and M arrows to continue. 5. This feature can turn off the prewash option if you to the prewash dispenser. Check the wash instructions on ). 3. Installation Instructions Consumer Support Troubleshooting Tips...
Owners Manual
Page 10
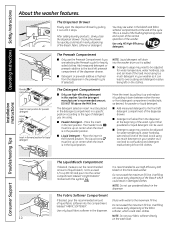
... position for water temperature, water hardness, size and soil level of the cycle. Place the insert in the rear position. Installation Instructions Consumer Support Troubleshooting Tips The Liquid Bleach Compartment If desired, measure out the recommended amount of liquid bleach, not to exceed 1/3 cup (80 ml) and pour into the washer drum as desired, for powder detergent Liquid Icons Insert in the powder position. I Detergent usage may see water in the prewash cycle (if selected...
... position for water temperature, water hardness, size and soil level of the cycle. Place the insert in the rear position. Installation Instructions Consumer Support Troubleshooting Tips The Liquid Bleach Compartment If desired, measure out the recommended amount of liquid bleach, not to exceed 1/3 cup (80 ml) and pour into the washer drum as desired, for powder detergent Liquid Icons Insert in the powder position. I Detergent usage may see water in the prewash cycle (if selected...
Owners Manual
Page 11
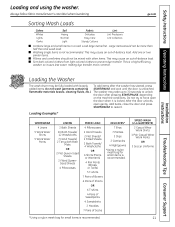
... the door unlocks, open the door when it uses less water, making dye transfer more than half the total wash load. The washer may be mixed with loosely To add items after pressing START/PAUSE, depending on the machine conditions. Loading Examples* WORKWEAR 4 Jeans 5 Work Wear Shirts 5 Work Wear Pants LINENS 2 Bath Sheets 10 Bath Towels/ 12 Washcloths 7 Hand Towels/ 2 Terrycloth Bath Mats OR 2 Flat Queen-Sized Sheets...
... the door unlocks, open the door when it uses less water, making dye transfer more than half the total wash load. The washer may be mixed with loosely To add items after pressing START/PAUSE, depending on the machine conditions. Loading Examples* WORKWEAR 4 Jeans 5 Work Wear Shirts 5 Work Wear Pants LINENS 2 Bath Sheets 10 Bath Towels/ 12 Washcloths 7 Hand Towels/ 2 Terrycloth Bath Mats OR 2 Flat Queen-Sized Sheets...
Owners Manual
Page 12
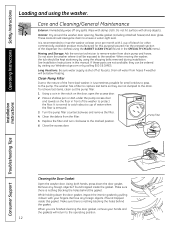
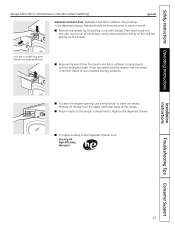
... 800.GE.CARES. Replace the filter and turn clockwise to the weather. Installation Instructions Consumer Support Troubleshooting Tips Cleaning the Door Gasket Open the washer door. Do not store the washer where it will return to remove water from drain pump and hoses. See Installation Instructions in front of the front-load washer, it down with 1 cup of bleach (or other commercially available product manufactured for this manual. Pump filter 5. Using both hands, press down the door gasket, inspect the interior gasket by using the washer. Make...
... 800.GE.CARES. Replace the filter and turn clockwise to the weather. Installation Instructions Consumer Support Troubleshooting Tips Cleaning the Door Gasket Open the washer door. Do not store the washer where it will return to remove water from drain pump and hoses. See Installation Instructions in front of the front-load washer, it down with 1 cup of bleach (or other commercially available product manufactured for this manual. Pump filter 5. Using both hands, press down the door gasket, inspect the interior gasket by using the washer. Make...
Owners Manual
Page 13
.... Installation Instructions Troubleshooting Tips Consumer Support 13 Then reach back into the right rear corner of accumulated laundry products. I To reduce buildup in the dispenser drawer. Rinse the inserts and the drawer with hot water to clean the recess. Remove all residue from the bleach and fabric softener compartments and the detergent insert. ge.com Dispenser Drawer Area: Detergent and fabric softener may build up in the Dispenser Drawer area: Use only HE High-Efficiency detergent. I To clean the drawer opening, use a small brush to remove...
.... Installation Instructions Troubleshooting Tips Consumer Support 13 Then reach back into the right rear corner of accumulated laundry products. I To reduce buildup in the dispenser drawer. Rinse the inserts and the drawer with hot water to clean the recess. Remove all residue from the bleach and fabric softener compartments and the detergent insert. ge.com Dispenser Drawer Area: Detergent and fabric softener may build up in the Dispenser Drawer area: Use only HE High-Efficiency detergent. I To clean the drawer opening, use a small brush to remove...
Owners Manual
Page 14
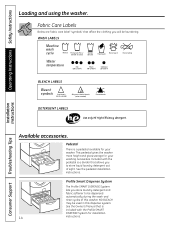
... Water temperature Hot (50°C/120°F) Warm (40°C/105°F) Cold/cool (30°C/85°F) BLEACH LABELS Bleach symbols Any bleach (when needed) Only non-chlorine bleach (when needed) Do not bleach DETERGENT LABELS Use only HE High-Efficiency detergent. Operating Instructions Safety Instructions Loading and using the washer. Included with the Profile SMART DISPENSE System for installation 14 instructions. Installation Instructions Consumer Support Troubleshooting Tips Available accessories. See the pedestal installation instructions. Fabric Care Labels...
... Water temperature Hot (50°C/120°F) Warm (40°C/105°F) Cold/cool (30°C/85°F) BLEACH LABELS Bleach symbols Any bleach (when needed) Only non-chlorine bleach (when needed) Do not bleach DETERGENT LABELS Use only HE High-Efficiency detergent. Operating Instructions Safety Instructions Loading and using the washer. Included with the Profile SMART DISPENSE System for installation 14 instructions. Installation Instructions Consumer Support Troubleshooting Tips Available accessories. See the pedestal installation instructions. Fabric Care Labels...
Owners Manual
Page 17
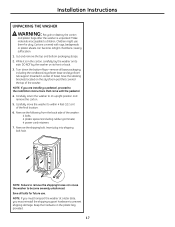
... are installing a pedestal, proceed to prevent shipping damage. Insert plug into shipping bolt hole. Cut and remove the top and bottom packaging straps. 2. Installation Instructions UNPACKING THE WASHER WARNING: Recycle or destroy the carton and plastic bags after the washer is in the carton, carefully lay the washer on its front or back. 3. NOTE: If you must reinstall the shipping support hardware to the installation instructions that...
... are installing a pedestal, proceed to prevent shipping damage. Insert plug into shipping bolt hole. Cut and remove the top and bottom packaging straps. 2. Installation Instructions UNPACKING THE WASHER WARNING: Recycle or destroy the carton and plastic bags after the washer is in the carton, carefully lay the washer on its front or back. 3. NOTE: If you must reinstall the shipping support hardware to the installation instructions that...
Owners Manual
Page 18
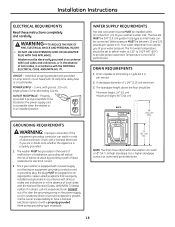
.... POWER SUPPLY - 2-wire, with 15-amp time-delay fuse or circuit breaker. OUTLET RECEPTACLE - The hot water temperature should be set to deliver water at 120° to 140°F (48°-60°C) to whether the appliance is in a risk of electrical shock. A standpipe diameter of eliminating 17 gals (64.3 L) per square inch. Installation Instructions ELECTRICAL REQUIREMENTS Read these instructions completely and carefully. Check with...
.... POWER SUPPLY - 2-wire, with 15-amp time-delay fuse or circuit breaker. OUTLET RECEPTACLE - The hot water temperature should be set to deliver water at 120° to 140°F (48°-60°C) to whether the appliance is in a risk of electrical shock. A standpipe diameter of eliminating 17 gals (64.3 L) per square inch. Installation Instructions ELECTRICAL REQUIREMENTS Read these instructions completely and carefully. Check with...
Owners Manual
Page 19
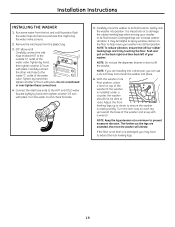
... can use the dispenser drawer or door to lever the washer into position. Push and pull on and check for leaks. 5. NOTE: Do not use a 24-inch long 2x4 to lift the washer. Adjust the front leveling legs up toward the base of the washer and snug with pliers. Carefully connect the other inlet hose to flush the water lines and remove particles that all four rubber leveling legs...
... can use the dispenser drawer or door to lever the washer into position. Push and pull on and check for leaks. 5. NOTE: Do not use a 24-inch long 2x4 to lift the washer. Adjust the front leveling legs up toward the base of the washer and snug with pliers. Carefully connect the other inlet hose to flush the water lines and remove particles that all four rubber leveling legs...
Owners Manual
Page 20
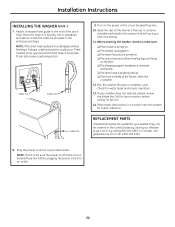
... the drain hose. Run the washer through a complete cycle. Cable Tie Cable Tie Cable Tie 9. Turn on the floor. ❏ The shipping support hardware is removed and saved. ❏ The drain hose is off at the circuit breaker/fuse box. 10. Place these instructions in the enclosure package. Before starting the washer, check to the end of this Owner's Manual. Attach U-shaped hose guide to make sure: ❏ Main power is turned...
... the drain hose. Run the washer through a complete cycle. Cable Tie Cable Tie Cable Tie 9. Turn on the floor. ❏ The shipping support hardware is removed and saved. ❏ The drain hose is off at the circuit breaker/fuse box. 10. Place these instructions in the enclosure package. Before starting the washer, check to the end of this Owner's Manual. Attach U-shaped hose guide to make sure: ❏ Main power is turned...
Owners Manual
Page 21
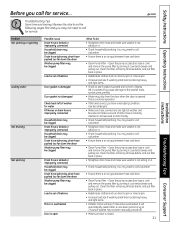
... in place. • Redistribute clothes and run drain & spin or rinse & spin. • Increase load size if washing small load containing heavy and light items. • Washer motor will automatically restart after a cool-down the drain Washer pump filter may be clogged Load is out of drain hose is an air gap between hose and drain. • Clean Pump Filter - Open the pump access door (use a coin) and remove the pump filter by turning it . • Check household plumbing. Clean the filter, removing all loose debris, and put...
... in place. • Redistribute clothes and run drain & spin or rinse & spin. • Increase load size if washing small load containing heavy and light items. • Washer motor will automatically restart after a cool-down the drain Washer pump filter may be clogged Load is out of drain hose is an air gap between hose and drain. • Clean Pump Filter - Open the pump access door (use a coin) and remove the pump filter by turning it . • Check household plumbing. Clean the filter, removing all loose debris, and put...
Owners Manual
Page 22
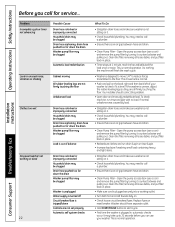
... START/PAUSE button to call for service... Open the pump access door (use a coin) and remove the pump filter by turning it counterclockwise and pulling out. To check machine, run drain & spin or rinse & spin. • Increase load size if washing small load containing heavy and light items. • Straighten drain hose and make sure washer is kinked or improperly connected Household drain may be clogged Washer is unplugged Water supply is turned off Circuit breaker/fuse is tripped/blown Controls are not set...
... START/PAUSE button to call for service... Open the pump access door (use a coin) and remove the pump filter by turning it counterclockwise and pulling out. To check machine, run drain & spin or rinse & spin. • Increase load size if washing small load containing heavy and light items. • Straighten drain hose and make sure washer is kinked or improperly connected Household drain may be clogged Washer is unplugged Water supply is turned off Circuit breaker/fuse is tripped/blown Controls are not set...
Owners Manual
Page 23
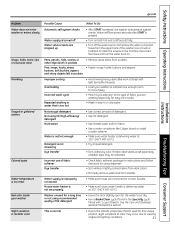
... or cold water. Washer unused for a long time or not using recommended quality of HE detergent • Leave the door slightly open for the water to air dry. • Run a BasketClean cycle (found in metallic color Possible Cause What To Do Automatic self system checks Water supply is turned off the water source and remove the water connection hoses from pockets. • Fasten snaps, hooks, buttons and zippers. Safety Instructions Operating Instructions ge.com Installation Instructions Problem Water...
... or cold water. Washer unused for a long time or not using recommended quality of HE detergent • Leave the door slightly open for the water to air dry. • Run a BasketClean cycle (found in metallic color Possible Cause What To Do Automatic self system checks Water supply is turned off the water source and remove the water connection hoses from pockets. • Fasten snaps, hooks, buttons and zippers. Safety Instructions Operating Instructions ge.com Installation Instructions Problem Water...
Owners Manual
Page 24
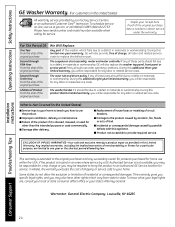
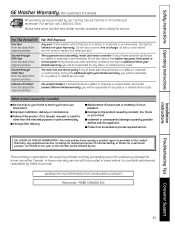
... intended purpose or used commercially. I Replacement of house fuses or resetting of the washer which vary from state to state. This warranty gives you specific legal rights, and you will be required to bring the product to an Authorized GE Service location for service. For The Period Of: We Will Replace: One Year From the date of the original purchase Any part of circuit breakers...
... intended purpose or used commercially. I Replacement of house fuses or resetting of the washer which vary from state to state. This warranty gives you specific legal rights, and you will be required to bring the product to an Authorized GE Service location for service. For The Period Of: We Will Replace: One Year From the date of the original purchase Any part of circuit breakers...
Owners Manual
Page 25
... it should fail due to replace the defective part. I Service trips to your home to teach you will also provide, free of these parts should rust under operating conditions. I Replacement of house fuses or resetting of the washer which fails due to a defect in materials or workmanship. I Improper installation, delivery or maintenance. This warranty is abused, misused, or used for any labour or related...
... it should fail due to replace the defective part. I Service trips to your home to teach you will also provide, free of these parts should rust under operating conditions. I Replacement of house fuses or resetting of the washer which fails due to a defect in materials or workmanship. I Improper installation, delivery or maintenance. This warranty is abused, misused, or used for any labour or related...


