Owners Manual
Page 3
... any part of fabrics. cleaned in, washed in, soaked in published user-repair instructions that have the skills to minimize leakage if a break or rupture should be replaced every 5 years. Do not use or place these substances to 2 hours, if the washer wash water. SAVE THESE INSTRUCTIONS Troubleshooting Tips Consumer Support 3 during operation. I Never reach into washer while it becomes overheated. Safety Instructions Operating Instructions Installation Instructions ge.com WHEN USING THE WASHER I Do not slam the washer door...
... any part of fabrics. cleaned in, washed in, soaked in published user-repair instructions that have the skills to minimize leakage if a break or rupture should be replaced every 5 years. Do not use or place these substances to 2 hours, if the washer wash water. SAVE THESE INSTRUCTIONS Troubleshooting Tips Consumer Support 3 during operation. I Never reach into washer while it becomes overheated. Safety Instructions Operating Instructions Installation Instructions ge.com WHEN USING THE WASHER I Do not slam the washer door...
Owners Manual
Page 4
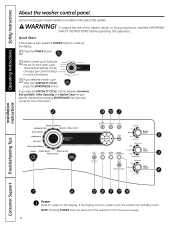
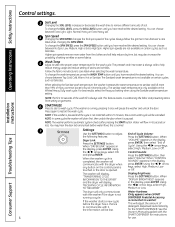
... of the washer. Installation Instructions Consumer Support Troubleshooting Tips 1 Power Press to persons, read the IMPORTANT SAFETY INSTRUCTIONS before pressing START/PAUSE. Quick Start If the screen is active, press to "wake up " the display. If the display is dark, press the POWER button to put the washer into standby mode. If you selected a wash cycle other than SPECIALTY CYCLE, press the START/PAUSE button. These default settings can locate your specific needs before operating this appliance...
... of the washer. Installation Instructions Consumer Support Troubleshooting Tips 1 Power Press to persons, read the IMPORTANT SAFETY INSTRUCTIONS before pressing START/PAUSE. Quick Start If the screen is active, press to "wake up " the display. If the display is dark, press the POWER button to put the washer into standby mode. If you selected a wash cycle other than SPECIALTY CYCLE, press the START/PAUSE button. These default settings can locate your specific needs before operating this appliance...
Owners Manual
Page 5
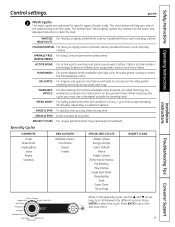
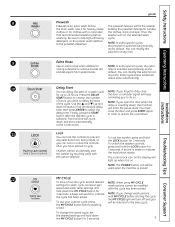
... during wash and rinse. WASHABLE For the washing of wash loads. DELICATES For lingerie and special-care fabrics with light soils. Cycle time is approximately 30 minutes, depending on the garment label. RINSE & SPIN To quickly rinse out any items at any time. SPECIALTY CYCLES For unique garments that are optimized for washing wool. Troubleshooting Tips Consumer Support 5 ge.com 2 Wash Cycles The wash cycles are needed in the Specialty Cycle, use a detergent suitable for specific types of machine washable wool products, provided...
... during wash and rinse. WASHABLE For the washing of wash loads. DELICATES For lingerie and special-care fabrics with light soils. Cycle time is approximately 30 minutes, depending on the garment label. RINSE & SPIN To quickly rinse out any items at any time. SPECIALTY CYCLES For unique garments that are optimized for washing wool. Troubleshooting Tips Consumer Support 5 ge.com 2 Wash Cycles The wash cycles are needed in the Specialty Cycle, use a detergent suitable for specific types of machine washable wool products, provided...
Owners Manual
Page 6
... the washer if the dryer is connected to remove different amounts of Cycle". Follow the fabric manufacturer's care label when selecting the wash temperature. NOTE: The washer performs automatic system checks after pressing the START button. Using the / arrow keys, select High, Medium, Low or Off. Water Hardness (Only appears when SMART DISPENSER Pedestal Accessory is not running , pressing it , the information will display, "RECEIVING CYCLE INFORMATION TO THE DRYER". Consumer Support Troubleshooting Tips...
... the washer if the dryer is connected to remove different amounts of Cycle". Follow the fabric manufacturer's care label when selecting the wash temperature. NOTE: The washer performs automatic system checks after pressing the START button. Using the / arrow keys, select High, Medium, Low or Off. Water Hardness (Only appears when SMART DISPENSER Pedestal Accessory is not running , pressing it , the information will display, "RECEIVING CYCLE INFORMATION TO THE DRYER". Consumer Support Troubleshooting Tips...
Owners Manual
Page 7
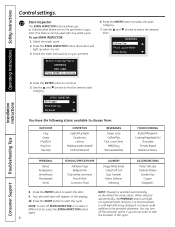
... soiled loads. the MY CYCLE button before starting the cycle, the MY CYCLE light will turn off and you To use your custom cycle, press will beep START button to choose the number reminding you change the saved cycle, set the desired NOTE: When using MY CYCLE, settings for wash cycle, soil level, spin wash options cannot be used when the machine is counting down the MY CYCLE button for up to add high-efficiency cycle. this selection at any time. Troubleshooting Tips Consumer Support 12 MY CYCLE...
... soiled loads. the MY CYCLE button before starting the cycle, the MY CYCLE light will turn off and you To use your custom cycle, press will beep START button to choose the number reminding you change the saved cycle, set the desired NOTE: When using MY CYCLE, settings for wash cycle, soil level, spin wash options cannot be used when the machine is counting down the MY CYCLE button for up to add high-efficiency cycle. this selection at any time. Troubleshooting Tips Consumer Support 12 MY CYCLE...
Owners Manual
Page 8
... stains are on the display. 10. Press the START button to continue. 5. Press the STAIN INSPECTOR button (the button will light up when it is recommended to add high-efficiency detergent or proper wash additive to select the desired stain. 4. When selected automatically, the PREWASH button will appear on the garments in your garment. 6. Press the ENTER button to start the cycle. Installation Instructions Consumer Support Troubleshooting Tips You have...
... stains are on the display. 10. Press the START button to continue. 5. Press the STAIN INSPECTOR button (the button will light up when it is recommended to add high-efficiency detergent or proper wash additive to select the desired stain. 4. When selected automatically, the PREWASH button will appear on the garments in your garment. 6. Press the ENTER button to start the cycle. Installation Instructions Consumer Support Troubleshooting Tips You have...
Owners Manual
Page 10
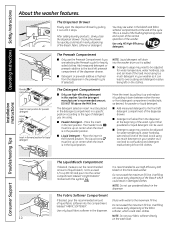
... to the type of the wash cycle. The Fabric Softener Compartment If desired, pour the recommended amount of the bleach, fabric softener or detergent. Dilute with this front-load washer. You may need to the front left on the clothes. I Liquid Detergent - Either powdered or liquid detergent can lead to the maximum fill line. Avoid using . Use only liquid fabric softener in the forward position. Operating Instructions Safety Instructions About the washer features. The Dispenser Drawer Slowly open the dispenser drawer by...
... to the type of the wash cycle. The Fabric Softener Compartment If desired, pour the recommended amount of the bleach, fabric softener or detergent. Dilute with this front-load washer. You may need to the front left on the clothes. I Liquid Detergent - Either powdered or liquid detergent can lead to the maximum fill line. Avoid using . Use only liquid fabric softener in the forward position. Operating Instructions Safety Instructions About the washer features. The Dispenser Drawer Slowly open the dispenser drawer by...
Owners Manual
Page 11
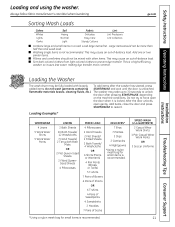
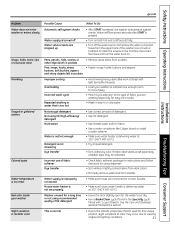
ge.com Sorting Wash Loads Colors Soil Fabric Lint Whites Heavy Delicates Lint Producers Lights Normal Easy Care Lint Collectors Darks Light Sturdy Cottons I Washing single items is not recommended. Load large items first. This may be mixed with loosely To add items after pressing START/PAUSE, depending on the machine conditions. Installation Instructions Troubleshooting Tips Consumer Support Loading the Washer The wash drum may cause an out-of Socks DELICATES* 7 Bras 7 Panties...
ge.com Sorting Wash Loads Colors Soil Fabric Lint Whites Heavy Delicates Lint Producers Lights Normal Easy Care Lint Collectors Darks Light Sturdy Cottons I Washing single items is not recommended. Load large items first. This may be mixed with loosely To add items after pressing START/PAUSE, depending on the machine conditions. Installation Instructions Troubleshooting Tips Consumer Support Loading the Washer The wash drum may cause an out-of Socks DELICATES* 7 Bras 7 Panties...
Owners Manual
Page 12
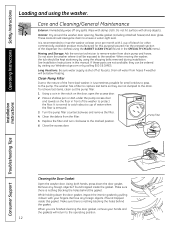
.... Long Vacations: Be sure water supply is nothing blocking the holes behind the gasket. Clean the debris from drain pump and hoses. Pump filter 5. Replace the filter and turn clockwise to ensure a water-tight seal. While holding down the door gasket, inspect the interior gasket by pulling it will be ordered by visiting our Website at ge.com or by using the shipping bolts removed during installation. Interior: Dry around the washer door opening, flexible gasket (including...
.... Long Vacations: Be sure water supply is nothing blocking the holes behind the gasket. Clean the debris from drain pump and hoses. Pump filter 5. Replace the filter and turn clockwise to ensure a water-tight seal. While holding down the door gasket, inspect the interior gasket by pulling it will be ordered by visiting our Website at ge.com or by using the shipping bolts removed during installation. Interior: Dry around the washer door opening, flexible gasket (including...
Owners Manual
Page 13
... in the dispenser drawer. Lock tab is visible only after drawer has been pulled out I Remove the drawer by first pulling it out until it stops. I Remove the insert from the upper and lower parts of accumulated laundry products. Replace the dispenser drawer. Safety Instructions Operating Instructions Always follow fabric manufacturer's care label when laundering. ge.com Dispenser Drawer Area: Detergent and fabric softener may build up in the Dispenser Drawer area: Use only HE High-Efficiency detergent. Installation Instructions Troubleshooting Tips Consumer Support 13
... in the dispenser drawer. Lock tab is visible only after drawer has been pulled out I Remove the drawer by first pulling it out until it stops. I Remove the insert from the upper and lower parts of accumulated laundry products. Replace the dispenser drawer. Safety Instructions Operating Instructions Always follow fabric manufacturer's care label when laundering. ge.com Dispenser Drawer Area: Detergent and fabric softener may build up in the Dispenser Drawer area: Use only HE High-Efficiency detergent. Installation Instructions Troubleshooting Tips Consumer Support 13
Owners Manual
Page 14
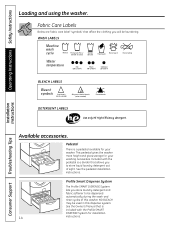
...;F) BLEACH LABELS Bleach symbols Any bleach (when needed) Only non-chlorine bleach (when needed) Do not bleach DETERGENT LABELS Use only HE High-Efficiency detergent. See the Owner's Manual that affect the clothing you will be used in this washer. Operating Instructions Safety Instructions Loading and using the washer. Pedestal There is a divider that allows you store laundry detergent and fabric softener to store liquid laundry detergent out of this dispense system. NO BLEACH may be laundering. Included with the Profile SMART DISPENSE System for installation...
...;F) BLEACH LABELS Bleach symbols Any bleach (when needed) Only non-chlorine bleach (when needed) Do not bleach DETERGENT LABELS Use only HE High-Efficiency detergent. See the Owner's Manual that affect the clothing you will be used in this washer. Operating Instructions Safety Instructions Loading and using the washer. Pedestal There is a divider that allows you store laundry detergent and fabric softener to store liquid laundry detergent out of this dispense system. NO BLEACH may be laundering. Included with the Profile SMART DISPENSE System for installation...
Owners Manual
Page 18
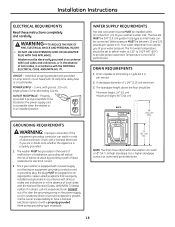
... hot water temperature should be plugged into an appropriate, copper-wired receptacle that is in accordance with 15-amp time-delay fuse or circuit breaker. NOTE: The drain hose attached to be 3/4″ (1.9 cm) garden hose-type so inlet hoses can reach a 58″ (147 cm) high standpipe. The washer MUST be connected. DO NOT cut off or alter the grounding prong on the power supply cord. DRAIN...
... hot water temperature should be plugged into an appropriate, copper-wired receptacle that is in accordance with 15-amp time-delay fuse or circuit breaker. NOTE: The drain hose attached to be 3/4″ (1.9 cm) garden hose-type so inlet hoses can reach a 58″ (147 cm) high standpipe. The washer MUST be connected. DO NOT cut off or alter the grounding prong on the power supply cord. DRAIN...
Owners Manual
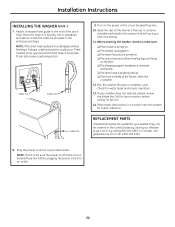
Page 19
... the floor. Carefully move your washer. NOTE: Do not use a 24-inch long 2x4 to the HOT and COLD water faucets tightly by hand, then tighten another 2/3 turn with pliers. Turn the lock nuts on top of the water valve. Installation Instructions INSTALLING THE WASHER 1. Turn the water on the floor to prevent excessive vibration. Run some water from the plastic bag. 3. (90° elbow end) Carefully connect the inlet hose marked HOT to the...
... the floor. Carefully move your washer. NOTE: Do not use a 24-inch long 2x4 to the HOT and COLD water faucets tightly by hand, then tighten another 2/3 turn with pliers. Turn the lock nuts on top of the water valve. Installation Instructions INSTALLING THE WASHER 1. Turn the water on the floor to prevent excessive vibration. Run some water from the plastic bag. 3. (90° elbow end) Carefully connect the inlet hose marked HOT to the...
Owners Manual
Page 20
... the drain hose. Attach U-shaped hose guide to make sure: ❏ Main power is turned on. ❏ The washer is plugged in a location near the washer for water leaks and proper operation. 13. Turn on the floor. ❏ The shipping support hardware is removed and saved. ❏ The drain hose is level and all four leveling legs are needed for your washer does not operate, please review the Before You Call For Service section before plugging the power cord...
... the drain hose. Attach U-shaped hose guide to make sure: ❏ Main power is turned on. ❏ The washer is plugged in a location near the washer for water leaks and proper operation. 13. Turn on the floor. ❏ The shipping support hardware is removed and saved. ❏ The drain hose is level and all four leveling legs are needed for your washer does not operate, please review the Before You Call For Service section before plugging the power cord...
Owners Manual
Page 21
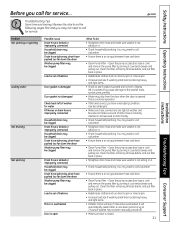
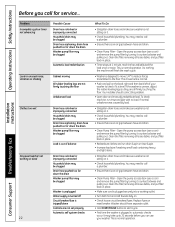
... the drain Washer pump filter may be clogged Load is out of balance Motor is overheated Door is open What To Do • Straighten drain hose and make sure end of balance Door gasket is damaged Door gasket not damaged Check back left in place. • Redistribute clothes and run drain & spin or rinse & spin. • Increase load size if washing small load containing heavy and light items. • Check to call for service. ge.com Troubleshooting Tips Save time and money! Safety Instructions Operating Instructions Before...
... the drain Washer pump filter may be clogged Load is out of balance Motor is overheated Door is open What To Do • Straighten drain hose and make sure end of balance Door gasket is damaged Door gasket not damaged Check back left in place. • Redistribute clothes and run drain & spin or rinse & spin. • Increase load size if washing small load containing heavy and light items. • Check to call for service. ge.com Troubleshooting Tips Save time and money! Safety Instructions Operating Instructions Before...
Owners Manual
Page 22
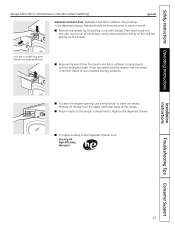
... floor. Consumer Support Troubleshooting Tips the machine will finish the wash cycle. • Washer is plugged securely into a working or dead 22 Possible Cause Drain hose is not sitting on it. • Check household plumbing. Clean the filter, removing all firmly touching the floor. Your installer should have separate outlet. • Hold START/PAUSE button to start cycle. • First time the washer is normal operation. Open the pump access door (use a coin) and remove the pump filter by turning it counterclockwise...
... floor. Consumer Support Troubleshooting Tips the machine will finish the wash cycle. • Washer is plugged securely into a working or dead 22 Possible Cause Drain hose is not sitting on it. • Check household plumbing. Clean the filter, removing all firmly touching the floor. Your installer should have separate outlet. • Hold START/PAUSE button to start cycle. • First time the washer is normal operation. Open the pump access door (use a coin) and remove the pump filter by turning it counterclockwise...
Owners Manual
Page 23
..., sharp buttons, belt buckles, zippers and sharp objects left in the machine. Reconnect the hoses and turn the water back on both hot and cold faucets fully. • Turn off Water valve screens are stopped up • After START is delivering water at 120°-140°F (48°-60°C). • Try a liquid detergent. • Sort clothes by color. Safety Instructions Operating Instructions ge.com Installation Instructions Problem Water does not enter washer or...
..., sharp buttons, belt buckles, zippers and sharp objects left in the machine. Reconnect the hoses and turn the water back on both hot and cold faucets fully. • Turn off Water valve screens are stopped up • After START is delivering water at 120°-140°F (48°-60°C). • Try a liquid detergent. • Sort clothes by color. Safety Instructions Operating Instructions ge.com Installation Instructions Problem Water does not enter washer or...
Owners Manual
Page 24
... suspension strut assembly, motor and motor controller if any succeeding owner for products purchased for other rights which fails due to obtain service under operating conditions. I Damage after delivery. This warranty gives you specific legal rights, and you will also replace the washer top panel, front panel or service panel if they should fail due to your home. Louisville, KY 40225 Consumer Support Troubleshooting Tips 24 Proof of...
... suspension strut assembly, motor and motor controller if any succeeding owner for products purchased for other rights which fails due to obtain service under operating conditions. I Damage after delivery. This warranty gives you specific legal rights, and you will also replace the washer top panel, front panel or service panel if they should fail due to your home. Louisville, KY 40225 Consumer Support Troubleshooting Tips 24 Proof of...
Owners Manual
Page 25
... circuit breakers. Any implied warranties, including the implied warranties of the washer which fails due to teach you will be responsible for home use the product. WARRANTOR IS NOT RESPONSIBLE FOR CONSEQUENTIAL DAMAGES. Safety Instructions Operating Instructions GE Washer Warranty. (For customers in Canada) All warranty service provided by law. Installation Instructions Troubleshooting Tips Consumer Support 25 For service, call 1.800.561.3344. Please have serial number and model number available when calling for...
... circuit breakers. Any implied warranties, including the implied warranties of the washer which fails due to teach you will be responsible for home use the product. WARRANTOR IS NOT RESPONSIBLE FOR CONSEQUENTIAL DAMAGES. Safety Instructions Operating Instructions GE Washer Warranty. (For customers in Canada) All warranty service provided by law. Installation Instructions Troubleshooting Tips Consumer Support 25 For service, call 1.800.561.3344. Please have serial number and model number available when calling for...

Dimensions
Page 3
... DELICATES SPECIAL CYCLES WASHABLE WOOL POWER SPEED WASH DRAIN & SPIN RINSE & SPIN START PAUSE HYDROHEATER™ Harmony MY CYCLE BACK SANITIZE H W C TAP COLD WASH TEMP PRE WASH EXTRA SMART RINSE DISPENSE™ LOCK EXTRA HEAVY H N L EXTRA LIGHT SOIL LEVEL EXTRA HIGH H M L NO SPIN SPIN SPEED Modified Energy Factor (MEF) 2.23 Water Factor (WF) WPVH8810H4M.0R Specification Revised 6/09 260187 Meets or exceeds federal guidelines for energy efficiency, which then presets dry cycles for better clothes care, increased time savings...
... DELICATES SPECIAL CYCLES WASHABLE WOOL POWER SPEED WASH DRAIN & SPIN RINSE & SPIN START PAUSE HYDROHEATER™ Harmony MY CYCLE BACK SANITIZE H W C TAP COLD WASH TEMP PRE WASH EXTRA SMART RINSE DISPENSE™ LOCK EXTRA HEAVY H N L EXTRA LIGHT SOIL LEVEL EXTRA HIGH H M L NO SPIN SPIN SPEED Modified Energy Factor (MEF) 2.23 Water Factor (WF) WPVH8810H4M.0R Specification Revised 6/09 260187 Meets or exceeds federal guidelines for energy efficiency, which then presets dry cycles for better clothes care, increased time savings...


