
Owners Manual
Page 1
... Features Auto night light 32 Automatic fan 35 Beeper volume 32 Child lockout 34 Clock 9, 32 Display ON/OFF 32 Help 33 Reminder 35 Review 32 Scroll speed 32 Surface light 34 Timer 34 Vent fan 34 Care and Cleaning Cleaning the inside 36, 37 Cleaning the outside 38 Filters 39, 40 Optional kits 40 Replacing lights 39 Troubleshooting Problem Solver 41, 42 Consumer Support Consumer Support . . . .Back Cover Warranty 43 Owner's Manual SCA1000 SCA1001 Write the model and serial numbers here: Model Serial...
... Features Auto night light 32 Automatic fan 35 Beeper volume 32 Child lockout 34 Clock 9, 32 Display ON/OFF 32 Help 33 Reminder 35 Review 32 Scroll speed 32 Surface light 34 Timer 34 Vent fan 34 Care and Cleaning Cleaning the inside 36, 37 Cleaning the outside 38 Filters 39, 40 Optional kits 40 Replacing lights 39 Troubleshooting Problem Solver 41, 42 Consumer Support Consumer Support . . . .Back Cover Warranty 43 Owner's Manual SCA1000 SCA1001 Write the model and serial numbers here: Model Serial...
Owners Manual
Page 3
... use TIME COOK for installation over ranges no wider than 36 inches. Do not overcook food. Do not use this oven. Do not use the oven for example, closed , turn the oven off and disconnect the power cord, or shut off power at the fuse or circuit breaker panel. If the door is opened, the fire may be heated in this product near a sink or in similar locations. ■ Keep power cord away from heated...
... use TIME COOK for installation over ranges no wider than 36 inches. Do not overcook food. Do not use this oven. Do not use the oven for example, closed , turn the oven off and disconnect the power cord, or shut off power at the fuse or circuit breaker panel. If the door is opened, the fire may be heated in this product near a sink or in similar locations. ■ Keep power cord away from heated...
Owners Manual
Page 4
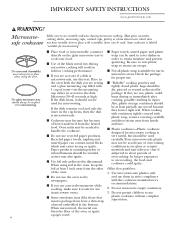
... oven without the oven rack (turntable) in this manual. IMPORTANT SAFETY INSTRUCTIONS www.geadvantium.com WARNING! meat to at least an INTERNAL temperature of 160°F, and poultry to these temperatures usually protects against foodborne illness. ■ Keep the oven free from grease buildup. ■ Potentially hot surfaces include the oven door, floor, walls and oven rack (turntable). To minimize automatic fan operation, use adequate sized cookware and use , do not touch...
... oven without the oven rack (turntable) in this manual. IMPORTANT SAFETY INSTRUCTIONS www.geadvantium.com WARNING! meat to at least an INTERNAL temperature of 160°F, and poultry to these temperatures usually protects against foodborne illness. ■ Keep the oven free from grease buildup. ■ Potentially hot surfaces include the oven door, floor, walls and oven rack (turntable). To minimize automatic fan operation, use adequate sized cookware and use , do not touch...
Owners Manual
Page 5
... not use popcorn labeled for Speedcook, Oven/Bake & Warming features The oven rack (turntable) must always be in the same way you use coverings, containers or cooking/roasting bags made of foil, plastic, wax or paper when speedcooking. ■ Do not cover the oven rack (turntable), trays or any part of the glass microwave tray with metal foil. Do not overheat the liquid. - Oven mitts will build up inside . Put food...
... not use popcorn labeled for Speedcook, Oven/Bake & Warming features The oven rack (turntable) must always be in the same way you use coverings, containers or cooking/roasting bags made of foil, plastic, wax or paper when speedcooking. ■ Do not cover the oven rack (turntable), trays or any part of the glass microwave tray with metal foil. Do not overheat the liquid. - Oven mitts will build up inside . Put food...
Owners Manual
Page 6
... on) have metallic trim or glaze with plastic wrap, remove covering carefully and direct steam away from hands and face. ■ Plastic cookware-Plastic cookware designed for microwave cooking is labeled "suitable for microwaving. ■ If the dish remains cool and only the water in the oven, keep the foil at least 1 inch away from the heated food. Microwave 30-45 seconds...
... on) have metallic trim or glaze with plastic wrap, remove covering carefully and direct steam away from hands and face. ■ Plastic cookware-Plastic cookware designed for microwave cooking is labeled "suitable for microwaving. ■ If the dish remains cool and only the water in the oven, keep the foil at least 1 inch away from the heated food. Microwave 30-45 seconds...

Owners Manual
Page 8
... oven control contains preset recipes. ■ Turn and press dial makes menu selection easy. Oven/Bake and Warming ■ One 1100 watt heater cooks food from above . ■ One 375 watt ceramic heater cooks food from below . ■ The convection fan ensures even heating. Getting to harness the power of light. The Advantium oven cooks the outside of power, a "microwave boost" is automatically added with certain foods. www.geadvantium.com The new Advantium oven uses...
... oven control contains preset recipes. ■ Turn and press dial makes menu selection easy. Oven/Bake and Warming ■ One 1100 watt heater cooks food from above . ■ One 375 watt ceramic heater cooks food from below . ■ The convection fan ensures even heating. Getting to harness the power of light. The Advantium oven cooks the outside of power, a "microwave boost" is automatically added with certain foods. www.geadvantium.com The new Advantium oven uses...
Owners Manual
Page 9
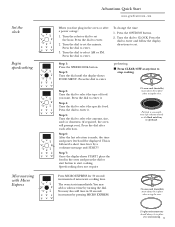
... not require The oven rack (turntable) must always be in the oven and press the dial or start button to enter. 3. Turn the dial to enter. Step 4: Turn the dial to enter. Press the dial to select the specific food. Set the clock Begin speedcooking Microwaving with Micro Express Advantium Quick Start www.geadvantium.com When you ). Step 3: Turn the dial to set the hour. The oven starts immediately. Turn the selector...
... not require The oven rack (turntable) must always be in the oven and press the dial or start button to enter. 3. Turn the dial to enter. Step 4: Turn the dial to enter. Press the dial to select the specific food. Set the clock Begin speedcooking Microwaving with Micro Express Advantium Quick Start www.geadvantium.com When you ). Step 3: Turn the dial to set the hour. The oven starts immediately. Turn the selector...
Owners Manual
Page 11
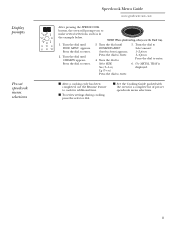
... speedcooking, always use the Resume feature to cook for additional time. ■ To review settings during cooking, press the selector dial. ■ See the Cooking Guide packed with the oven for a complete list of pre-set speedcook menu selections Speedcook Menu Guide www.geadvantium.com After pressing the SPEEDCOOK button, the oven will prompt you to enter. 2. Turn the dial until FOOD MENU appears. Turn the dial...
... speedcooking, always use the Resume feature to cook for additional time. ■ To review settings during cooking, press the selector dial. ■ See the Cooking Guide packed with the oven for a complete list of pre-set speedcook menu selections Speedcook Menu Guide www.geadvantium.com After pressing the SPEEDCOOK button, the oven will prompt you to enter. 2. Turn the dial until FOOD MENU appears. Turn the dial...
Owners Manual
Page 12
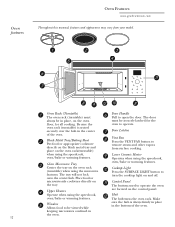
... are located on and off. keeping microwaves confined in place, on the oven rack(turntable) Vent Fan Press the VENT FAN button to operate. Oven features Oven Features www.geadvantium.com Throughout this manual, features and appearance may vary from surface cooking. Black Metal Tray/Baking Sheet Put food or appropriate cookware directly on the black metal tray and place on the oven must Pull to turn the cooktop light on the control panel. Place food or Cooktop Light...
... are located on and off. keeping microwaves confined in place, on the oven rack(turntable) Vent Fan Press the VENT FAN button to operate. Oven features Oven Features www.geadvantium.com Throughout this manual, features and appearance may vary from surface cooking. Black Metal Tray/Baking Sheet Put food or appropriate cookware directly on the black metal tray and place on the oven must Pull to turn the cooktop light on the control panel. Place food or Cooktop Light...
Owners Manual
Page 13
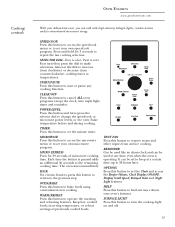
... cooked foods. START/PAUSE Press this button to repeat the last cooking selection. TIMER Press this button to set your Advantium oven, you can cook with high-intensity halogen lights, ceramic heaters and/or conventional microwave energy. The oven starts immediately. It can be used like an alarm clock and can be set to beep at a certain time, up to set the minute timer. OPTIONS Press this button to set your oven's features. POWER LEVEL Press this button...
... cooked foods. START/PAUSE Press this button to repeat the last cooking selection. TIMER Press this button to set your Advantium oven, you can cook with high-intensity halogen lights, ceramic heaters and/or conventional microwave energy. The oven starts immediately. It can be used like an alarm clock and can be set to beep at a certain time, up to set the minute timer. OPTIONS Press this button to set your oven's features. POWER LEVEL Press this button...

Owners Manual
Page 14
See the Advantium Quick Start section. Use the black metal tray (baking sheet), at any time, simply press the BACK button to return to the time of cooking, the automatic fan may reduce power levels if the oven is hot at the beginning of a program. ■ At the end of day. 2. The oven rack (turntable) must be set. Press the dial to select the specific food (menu selection). Turn the selector dial to enter...
See the Advantium Quick Start section. Use the black metal tray (baking sheet), at any time, simply press the BACK button to return to the time of cooking, the automatic fan may reduce power levels if the oven is hot at the beginning of a program. ■ At the end of day. 2. The oven rack (turntable) must be set. Press the dial to select the specific food (menu selection). Turn the selector dial to enter...
Owners Manual
Page 16
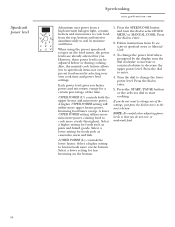
... start cooking. Press the START/PAUSE button or the selector dial to decrease the upper power level. A higher UPPER POWER setting will utilize more on the pre-set food menu by the display, turn the dial to enter. 4. or undercook food. 16 UPPER POWER (U) controls both the upper heater and microwave power. To change the lower power level. Speedcook power level Speedcooking www.geadvantium.com Advantium uses power from a high intensity halogen light, ceramic heaters and microwaves...
... start cooking. Press the START/PAUSE button or the selector dial to decrease the upper power level. A higher UPPER POWER setting will utilize more on the pre-set food menu by the display, turn the dial to enter. 4. or undercook food. 16 UPPER POWER (U) controls both the upper heater and microwave power. To change the lower power level. Speedcook power level Speedcooking www.geadvantium.com Advantium uses power from a high intensity halogen light, ceramic heaters and microwaves...

Owners Manual
Page 17
... the pre-set selections, use non-metal casserole dishes, pie plates and other heat-safe cookware. Press the START/PAUSE button or press the selector dial to enter. 5. Press the dial to start cooking. Turn the selector dial to enter. 6. Press the dial to MANUAL COOK. 3. Place them directly on the oven rack (turntable). ■ Do not use cookware or coverings made within 15 seconds, the display will...
... the pre-set selections, use non-metal casserole dishes, pie plates and other heat-safe cookware. Press the START/PAUSE button or press the selector dial to enter. 5. Press the dial to start cooking. Turn the selector dial to enter. 6. Press the dial to MANUAL COOK. 3. Place them directly on the oven rack (turntable). ■ Do not use cookware or coverings made within 15 seconds, the display will...

Owners Manual
Page 23
... oven rack (turntable) and glass microwave tray are in place when using the oven. Press the START/PAUSE button to select REHEAT. Place the food in place when microwaving. ■ Place food or microwavable container directly on the glass microwave tray to enter. 4. Center the tray on the black metal tray. MICROWAVE PRE-SET FOOD SELECTIONS: ■ Bacon ■ My Recipes ■ Beverage ■ Popcorn ■ Defrost (Auto and Time) ■ Reheat (one serving) ■ Soup ■ Time cook...
... oven rack (turntable) and glass microwave tray are in place when using the oven. Press the START/PAUSE button to select REHEAT. Place the food in place when microwaving. ■ Place food or microwavable container directly on the glass microwave tray to enter. 4. Center the tray on the black metal tray. MICROWAVE PRE-SET FOOD SELECTIONS: ■ Bacon ■ My Recipes ■ Beverage ■ Popcorn ■ Defrost (Auto and Time) ■ Reheat (one serving) ■ Soup ■ Time cook...

Owners Manual
Page 24
... change it for 30 second increments of day. 2. Close the door and press START to select. Press the dial or the START/ PAUSE button to start cooking. To review settings during TIME COOK to check the food. Press the MICROWAVE button. 2. Turn the dial to set microwave selections Time Cook Micro Express Microwaving www.geadvantium.com 1. Press MICRO EXPRESS for more flexibility. 1. You may open the door during cooking, press the selector dial. Press the MICROWAVE button. Turn...
... change it for 30 second increments of day. 2. Close the door and press START to select. Press the dial or the START/ PAUSE button to start cooking. To review settings during TIME COOK to check the food. Press the MICROWAVE button. 2. Turn the dial to set microwave selections Time Cook Micro Express Microwaving www.geadvantium.com 1. Press MICRO EXPRESS for more flexibility. 1. You may open the door during cooking, press the selector dial. Press the MICROWAVE button. Turn...

Owners Manual
Page 36
... affect cooking. Oven Rack (Turntable) Do not use abrasive cleaners or sharp utensils on any part of the oven with metal scouring pads. Do not clean the inside of this oven. Walls, Floor, Inside Window, Metal and Plastic Parts on the Door The area underneath the oven rack (turntable) should be cleaned frequently to clean the inside Removable oven rack (turntable) 36 Care and Cleaning www.geadvantium.com An occasional thorough wiping with a solution of the food...
... affect cooking. Oven Rack (Turntable) Do not use abrasive cleaners or sharp utensils on any part of the oven with metal scouring pads. Do not clean the inside of this oven. Walls, Floor, Inside Window, Metal and Plastic Parts on the Door The area underneath the oven rack (turntable) should be cleaned frequently to clean the inside Removable oven rack (turntable) 36 Care and Cleaning www.geadvantium.com An occasional thorough wiping with a solution of the food...
Owners Manual
Page 39
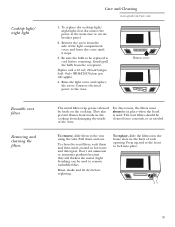
... replace the cooktop light/ night light, first disconnect the power at the main fuse or circuit breaker panel. 2. They also prevent flames from foods on the cooktop from the side of the oven. Light brushing can be cleaned once a month, or as needed. Cooktop light/ night light Reusable vent filters Removing and cleaning the filters Care and Cleaning www.geadvantium.com 1. Remove the screw from damaging the inside of the light compartment cover and lower the cover until it stops. 3. The vent filters...
... replace the cooktop light/ night light, first disconnect the power at the main fuse or circuit breaker panel. 2. They also prevent flames from foods on the cooktop from the side of the oven. Light brushing can be cleaned once a month, or as needed. Cooktop light/ night light Reusable vent filters Removing and cleaning the filters Care and Cleaning www.geadvantium.com 1. Remove the screw from damaging the inside of the light compartment cover and lower the cover until it stops. 3. The vent filters...

Owners Manual
Page 40
... replacing a 36″ range hood, filler panel kits fill in the additional width to 12 months, depending on two side support tabs and in place. Each kit contains two 3″ wide filler panels. ■ JX81A-Recirculating Charcoal Filter Kit Filter kits are JX81A used when the oven cannot be cleaned. Charcoal filter (JX81A) To remove the charcoal filter To install the charcoal filter Optional kits 40 Care and Cleaning www.geadvantium.com The charcoal filter cannot be vented to the outside...
... replacing a 36″ range hood, filler panel kits fill in the additional width to 12 months, depending on two side support tabs and in place. Each kit contains two 3″ wide filler panels. ■ JX81A-Recirculating Charcoal Filter Kit Filter kits are JX81A used when the oven cannot be cleaned. Charcoal filter (JX81A) To remove the charcoal filter To install the charcoal filter Optional kits 40 Care and Cleaning www.geadvantium.com The charcoal filter cannot be vented to the outside...
Owners Manual
Page 42
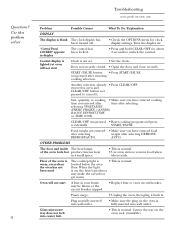
... the oven feels hot produce intense heat in display The control has been locked. • Press and hold CLEAR/OFF for clock display settings. Power surge. • Unplug the oven, then plug it . DEFROST-AUTO. Questions? AUTO. "Control Panel LOCKED" appears in a small space. • This is normal. Center the tray on . START/PAUSE. OTHER PROBLEMS The door and inside The heat lamps of the oven is warm, even when the oven has not been used The cooktop light...
... the oven feels hot produce intense heat in display The control has been locked. • Press and hold CLEAR/OFF for clock display settings. Power surge. • Unplug the oven, then plug it . DEFROST-AUTO. Questions? AUTO. "Control Panel LOCKED" appears in a small space. • This is normal. Center the tray on . START/PAUSE. OTHER PROBLEMS The door and inside The heat lamps of the oven is warm, even when the oven has not been used The cooktop light...
Owners Manual
Page 43
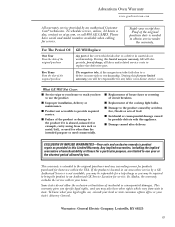
..., floods or acts of incidental or consequential damages. For The Period Of: One Year From the date of the original purchase GE Will Replace: Any part of the oven which vary from wire rack or metal/foil), or used commercially. ■ Replacement of house fuses or resetting of circuit breakers. ■ Replacement of the cooktop light bulbs. ■ Damage to obtain service under the warranty. Warrantor: General Electric Company.
..., floods or acts of incidental or consequential damages. For The Period Of: One Year From the date of the original purchase GE Will Replace: Any part of the oven which vary from wire rack or metal/foil), or used commercially. ■ Replacement of house fuses or resetting of circuit breakers. ■ Replacement of the cooktop light bulbs. ■ Damage to obtain service under the warranty. Warrantor: General Electric Company.


