Owners Manual
Page 10
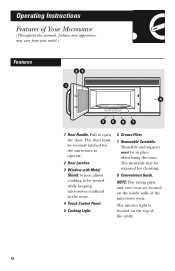
.... 3 Window with Metal Shield. Screen allows cooking to be securely latched for cleaning. 8 Convenience Guide. The turntable may vary from your model.) Features 23 1 4 5687 1 Door Handle. Turntable and support must be viewed while keeping microwaves confined in place when using the oven. The interior light is located on the inside walls of...
.... 3 Window with Metal Shield. Screen allows cooking to be securely latched for cleaning. 8 Convenience Guide. The turntable may vary from your model.) Features 23 1 4 5687 1 Door Handle. Turntable and support must be viewed while keeping microwaves confined in place when using the oven. The interior light is located on the inside walls of...

Owners Manual
Page 30
Helpful Information Care and Cleaning Helpful Hints An occasional thorough wiping with a solution of your microwave. Remove greasy spatters with a sudsy cloth, then rinse with a plastic scouring ball if necessary. To clean, wipe with a sudsy cloth, then rub lightly with a ... certain the power is off before cleaning any part of baking soda and water keeps the inside fresh. Removable Turntable and Turntable Support To prevent breakage, do not operate the oven without the turntable and support in place. The probe can also be washed in the dishwasher. Rinse and dry. Do not ...
Helpful Information Care and Cleaning Helpful Hints An occasional thorough wiping with a solution of your microwave. Remove greasy spatters with a sudsy cloth, then rinse with a plastic scouring ball if necessary. To clean, wipe with a sudsy cloth, then rub lightly with a ... certain the power is off before cleaning any part of baking soda and water keeps the inside fresh. Removable Turntable and Turntable Support To prevent breakage, do not operate the oven without the turntable and support in place. The probe can also be washed in the dishwasher. Rinse and dry. Do not ...
Dimensions
Page 2
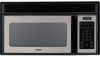
...-the-Range Microwave Oven RVM1535MMSA Clock Time Cook AM/PM scroll speed Defrost AUTO/TIME Reminder Popcorn Timer ON/OFF Reheat 1 23 4 56 7 89 0 display on - off Vent Fan hi - Oven Cavity - 950 Watts (IEC-705 test procedure) • Turntable - A shortcut to ensure even cooking • Convenience Cooking Controls - lo - ft. Ft. Hotpoint® 1.5 Cu. Allows...
...-the-Range Microwave Oven RVM1535MMSA Clock Time Cook AM/PM scroll speed Defrost AUTO/TIME Reminder Popcorn Timer ON/OFF Reheat 1 23 4 56 7 89 0 display on - off Vent Fan hi - Oven Cavity - 950 Watts (IEC-705 test procedure) • Turntable - A shortcut to ensure even cooking • Convenience Cooking Controls - lo - ft. Ft. Hotpoint® 1.5 Cu. Allows...

Installation Instructions
Page 23
Plug power cord into a dedicated 15- Remove all packing material from the microwave oven. 3. Read the Owner's Manual. 2. Replace house fuse or turn breaker back on. 7. to instructions. 6. Make sure the microwave oven has been installed according to 20-amp electrical outlet. Ensure proper ground exists before use 23 Install turntable and ring in cavity. 4. KEEP INSTALLATION INSTRUCTIONS FOR THE LOCAL INSPECTOR'S USE. 5. Installation Instructions BEFORE YOU USE YOUR MICROWAVE 1.
Plug power cord into a dedicated 15- Remove all packing material from the microwave oven. 3. Read the Owner's Manual. 2. Replace house fuse or turn breaker back on. 7. to instructions. 6. Make sure the microwave oven has been installed according to 20-amp electrical outlet. Ensure proper ground exists before use 23 Install turntable and ring in cavity. 4. KEEP INSTALLATION INSTRUCTIONS FOR THE LOCAL INSPECTOR'S USE. 5. Installation Instructions BEFORE YOU USE YOUR MICROWAVE 1.


