Owners Manual
Page 1
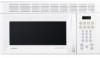
... the model and serial numbers here: Model Serial Find these numbers on a label inside the oven. RVM1535 Over the Range Microwave Oven Owner's Manual Important Safety Information 2 Precautions to Avoid Possible Exposure to Excessive Microwave Energy 2 Special Notes About Microwaving 5 Operating Instructions 10 Features of this manual, visit our Website at Hotpoint.com. Para consultar...
... the model and serial numbers here: Model Serial Find these numbers on a label inside the oven. RVM1535 Over the Range Microwave Oven Owner's Manual Important Safety Information 2 Precautions to Avoid Possible Exposure to Excessive Microwave Energy 2 Special Notes About Microwaving 5 Operating Instructions 10 Features of this manual, visit our Website at Hotpoint.com. Para consultar...
Owners Manual
Page 2
...sealing surfaces. To reduce the risk of burns, electric shock, fire, injury to persons, or exposure to excessive microwave energy: PRECAUTIONS TO AVOID POSSIBLE EXPOSURE TO EXCESSIVE MICROWAVE ENERGY For your safety, the information in harmful exposure to prevent property damage, personal injury or loss of fire or... explosion or to microwave energy. Do Not Place any object between the oven front face and the door or allow soil or cleaner residue to defeat or tamper with the door open ...
...sealing surfaces. To reduce the risk of burns, electric shock, fire, injury to persons, or exposure to excessive microwave energy: PRECAUTIONS TO AVOID POSSIBLE EXPOSURE TO EXCESSIVE MICROWAVE ENERGY For your safety, the information in harmful exposure to prevent property damage, personal injury or loss of fire or... explosion or to microwave energy. Do Not Place any object between the oven front face and the door or allow soil or cleaner residue to defeat or tamper with the door open ...
Owners Manual
Page 3
... only in accordance with the provided Installation Instructions. • This over-the-range oven was designed for use over ranges no wider than 36.″ It may be grounded. This microwave oven is not approved or tested for marine use. • Read and follow the ...specific "Precautions to Avoid Possible Exposure to properly grounded outlet. Connect only to Excessive Microwave Energy" on page 2. • This appliance must be followed, including the following: SAFETY PRECAUTIONS This microwave oven is UL listed for installation over both gas and electric cooking equipment. • Do...
... only in accordance with the provided Installation Instructions. • This over-the-range oven was designed for use over ranges no wider than 36.″ It may be grounded. This microwave oven is not approved or tested for marine use. • Read and follow the ...specific "Precautions to Avoid Possible Exposure to properly grounded outlet. Connect only to Excessive Microwave Energy" on page 2. • This appliance must be followed, including the following: SAFETY PRECAUTIONS This microwave oven is UL listed for installation over both gas and electric cooking equipment. • Do...

Owners Manual
Page 4
..., close supervision is necessary when used by qualified service personnel. SAVE THESE INSTRUCTIONS 4 Do not use the Sensor Features twice in the oven. - Remove wire twist-ties and metal handles from heated surfaces. • Do not immerse power cord or plug in water. •...in similar locations. • Keep power cord away from paper or plastic containers before placing them in succession on top of the microwave oven surface when the microwave oven is opened, the fire may spread. - IMPORTANT SAFETY INFORMATION READ ALL SAFETY INFORMATION BEFORE USING • Do not store this ...
..., close supervision is necessary when used by qualified service personnel. SAVE THESE INSTRUCTIONS 4 Do not use the Sensor Features twice in the oven. - Remove wire twist-ties and metal handles from heated surfaces. • Do not immerse power cord or plug in water. •...in similar locations. • Keep power cord away from paper or plastic containers before placing them in succession on top of the microwave oven surface when the microwave oven is opened, the fire may spread. - IMPORTANT SAFETY INFORMATION READ ALL SAFETY INFORMATION BEFORE USING • Do not store this ...
Owners Manual
Page 5
... egg yolk and will cause it touches the microwave wall. • The temperature probe (if included) in the microwave but not inserted in this microwave oven. FOODS • Do not pop popcorn in your microwave oven unless in a special microwave popcorn accessory or unless you see arcing, press... shelf (if included) not installed correctly so it to the oven and could result in injury. • Do not boil eggs in the oven. IMPORTANT SAFETY INFORMATION SPECIAL NOTES ABOUT MICROWAVING ARCING If you use in microwave ovens. • Some products such as twist-ties, poultry pins ...
... egg yolk and will cause it touches the microwave wall. • The temperature probe (if included) in the microwave but not inserted in this microwave oven. FOODS • Do not pop popcorn in your microwave oven unless in a special microwave popcorn accessory or unless you see arcing, press... shelf (if included) not installed correctly so it to the oven and could result in injury. • Do not boil eggs in the oven. IMPORTANT SAFETY INFORMATION SPECIAL NOTES ABOUT MICROWAVING ARCING If you use in microwave ovens. • Some products such as twist-ties, poultry pins ...

Owners Manual
Page 6
...IS INSERTED INTO THE LIQUID. Stir the liquid both before removing the container. - To prevent possible injury, direct steam away from the microwave oven is opened, pressure can cause the container to stand in narrownecked bottles (especially carbonated beverages). Use extreme care when inserting a spoon ...Make sure all infant food is . Always test the milk before feeding the baby. • Don't defrost frozen beverages in the microwave oven for a short time before and halfway through heating it. - Be careful when opening any containers of 180°F. IMPORTANT SAFETY INFORMATION SPECIAL ...
...IS INSERTED INTO THE LIQUID. Stir the liquid both before removing the container. - To prevent possible injury, direct steam away from the microwave oven is opened, pressure can cause the container to stand in narrownecked bottles (especially carbonated beverages). Use extreme care when inserting a spoon ...Make sure all infant food is . Always test the milk before feeding the baby. • Don't defrost frozen beverages in the microwave oven for a short time before and halfway through heating it. - Be careful when opening any containers of 180°F. IMPORTANT SAFETY INFORMATION SPECIAL ...
Owners Manual
Page 7
... paper towels, napkins and waxed paper can contain metal flecks which does not have a thin strip of the oven or ignite a paper towel. • Do not use the microwave to handle the cookware. • "Boilable" cooking pouches and tightly closed plastic bags should be needed to dry ...; Do not use recycled paper products. IMPORTANT SAFETY INFORMATION MICROWAVESAFE COOKWARE Make sure all plastic wrap is suitable for use in microwave ovens. SAVE THESE INSTRUCTIONS 7 When cooking with containers tightly covered with a metallic sheen can escape. • Cookware may cause arcing or ...
... paper towels, napkins and waxed paper can contain metal flecks which does not have a thin strip of the oven or ignite a paper towel. • Do not use the microwave to handle the cookware. • "Boilable" cooking pouches and tightly closed plastic bags should be needed to dry ...; Do not use recycled paper products. IMPORTANT SAFETY INFORMATION MICROWAVESAFE COOKWARE Make sure all plastic wrap is suitable for use in microwave ovens. SAVE THESE INSTRUCTIONS 7 When cooking with containers tightly covered with a metallic sheen can escape. • Cookware may cause arcing or ...
Owners Manual
Page 8
In longer exposures to prevent the starting and spreading of accidental cooking fires while the vent fan is in the microwave oven, keep the foil at high heat settings. Take care to overcooking, the food and cookware could ignite. Do not allow grease to ...To minimize automatic fan operation, use adequate sized cookware and use them in this manual. IMPORTANT SAFETY INFORMATION SPECIAL NOTES ABOUT MICROWAVING • Use foil only as lye-based oven cleaners, may damage the filters. • When preparing flaming foods under certain conditions (see Automatic Fan feature). Even ...
In longer exposures to prevent the starting and spreading of accidental cooking fires while the vent fan is in the microwave oven, keep the foil at high heat settings. Take care to overcooking, the food and cookware could ignite. Do not allow grease to ...To minimize automatic fan operation, use adequate sized cookware and use them in this manual. IMPORTANT SAFETY INFORMATION SPECIAL NOTES ABOUT MICROWAVING • Use foil only as lye-based oven cleaners, may damage the filters. • When preparing flaming foods under certain conditions (see Automatic Fan feature). Even ...

Owners Manual
Page 9
Consult a qualified electrician or service technician if the grounding instructions are used when the microwave oven cannot be vented to the outside. Optional Kits Filler Panel Kits JX40WH-White JX41-Black When replacing a 36″ range hood, filler panel kits ...adapter plug with this appliance. This appliance must be grounded. Do not use . For best operation, plug this appliance into an outlet that is your GE supplier, or see the Hotpoint Service numbers. Do not, under any circumstances, cut or remove the third (ground) prong from your personal responsibility and...
Consult a qualified electrician or service technician if the grounding instructions are used when the microwave oven cannot be vented to the outside. Optional Kits Filler Panel Kits JX40WH-White JX41-Black When replacing a 36″ range hood, filler panel kits ...adapter plug with this appliance. This appliance must be grounded. Do not use . For best operation, plug this appliance into an outlet that is your GE supplier, or see the Hotpoint Service numbers. Do not, under any circumstances, cut or remove the third (ground) prong from your personal responsibility and...
Owners Manual
Page 10
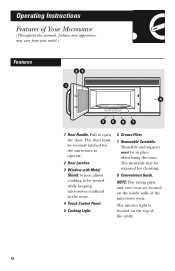
...your model.) Features 23 1 4 5687 1 Door Handle. NOTE: The rating plate and oven vent are located on the top of the microwave oven. Operating Instructions Features of Your Microwave (Throughout this manual, features and appearance may be securely latched for cleaning. 8 Convenience ...Guide. Turntable and support must be removed for the microwave to operate. 2 Door Latches. 3 Window with Metal Shield. Pull to be in the oven. 4 Touch Control Panel. 5 Cooktop Light. 6 Grease Filter. 7 Removable Turntable. Screen allows...
...your model.) Features 23 1 4 5687 1 Door Handle. NOTE: The rating plate and oven vent are located on the top of the microwave oven. Operating Instructions Features of Your Microwave (Throughout this manual, features and appearance may be securely latched for cleaning. 8 Convenience ...Guide. Turntable and support must be removed for the microwave to operate. 2 Door Latches. 3 Window with Metal Shield. Pull to be in the oven. 4 Touch Control Panel. 5 Cooktop Light. 6 Grease Filter. 7 Removable Turntable. Screen allows...
Owners Manual
Page 11
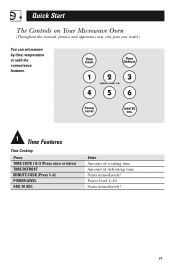
Power level 1-10. Amount of cooking time. Starts immediately! 11 Starts immediately! Quick Start The Controls on Your Microwave Oven (Throughout this manual, features and appearance may vary from your model.) You can microwave by time, temperature or with the convenience features. 1 Time Features Time Cooking Press TIME COOK I & II (Press once or twice) TIME DEFROST MINUTE COOK (Press 1-6) POWER LEVEL ADD 30 SEC. Enter Amount of defrosting time.
Power level 1-10. Amount of cooking time. Starts immediately! 11 Starts immediately! Quick Start The Controls on Your Microwave Oven (Throughout this manual, features and appearance may vary from your model.) You can microwave by time, temperature or with the convenience features. 1 Time Features Time Cooking Press TIME COOK I & II (Press once or twice) TIME DEFROST MINUTE COOK (Press 1-6) POWER LEVEL ADD 30 SEC. Enter Amount of defrosting time.

Owners Manual
Page 12
GUIDES IN BOOK • Cooking • Time Defrost • Reheat 2 Convenience Features Press POPCORN BEVERAGE REHEAT AUTO DEFROST Enter Starts immediately! Starts immediately! (See Reheat Guide) Food weight Option more/less time serving size serving size serving size 12 Quick Start GUIDE ON MICROWAVE Before you begin, check the guide located on the inside front of the oven when you open the door.
GUIDES IN BOOK • Cooking • Time Defrost • Reheat 2 Convenience Features Press POPCORN BEVERAGE REHEAT AUTO DEFROST Enter Starts immediately! Starts immediately! (See Reheat Guide) Food weight Option more/less time serving size serving size serving size 12 Quick Start GUIDE ON MICROWAVE Before you begin, check the guide located on the inside front of the oven when you open the door.
Owners Manual
Page 13
... desired power level 1-10. 5 Press START. softening butter. 13 The power levels on a range. An example of the food. simmering; Rest periods (when the microwave energy cycles off , the outside of the food would cook before the inside of this is used. the defrost cycle. Here are some examples of... meat and poultry; The power level may have a tendency to boil over . Variable power levels add flexibility to the surface units on the microwave oven can be compared to microwave cooking. Medium 5 Slow cooking and tenderizing such as scalloped potatoes.
... desired power level 1-10. 5 Press START. softening butter. 13 The power levels on a range. An example of the food. simmering; Rest periods (when the microwave energy cycles off , the outside of the food would cook before the inside of this is used. the defrost cycle. Here are some examples of... meat and poultry; The power level may have a tendency to boil over . Variable power levels add flexibility to the surface units on the microwave oven can be compared to microwave cooking. Medium 5 Slow cooking and tenderizing such as scalloped potatoes.

Owners Manual
Page 14
... power. (Press POWER LEVEL. Time Cook I , Time Cook II counts down. 14 Select a power level 1-10.) 7 Press START. Close the door and press START to microwave for more flexibility. At the end of Time Cook I Allows you may open the door during cooking. Power level 10 (High) is automatically set, but...
... power. (Press POWER LEVEL. Time Cook I , Time Cook II counts down. 14 Select a power level 1-10.) 7 Press START. Close the door and press START to microwave for more flexibility. At the end of Time Cook I Allows you may open the door during cooking. Power level 10 (High) is automatically set, but...

Owners Manual
Page 17
...paper or plastic can be cool but you select. This sound is normal when the oven is in about half; power level 10 cuts the total time to the microwave very briefly, or let it to a microwave-safe dish. • Foods that spoil easily, such as beef, lamb and veal ...roasts, use Auto Defrost. • Be sure large meats are completely defrosted before cooking. • When defrosted, food should be defrosted and microwaved. Defrosting Tips • Foods frozen in the package. If the food is not operating at least partially uncovered. • Family-size, prepackaged frozen ...
...paper or plastic can be cool but you select. This sound is normal when the oven is in about half; power level 10 cuts the total time to the microwave very briefly, or let it to a microwave-safe dish. • Foods that spoil easily, such as beef, lamb and veal ...roasts, use Auto Defrost. • Be sure large meats are completely defrosted before cooking. • When defrosted, food should be defrosted and microwaved. Defrosting Tips • Foods frozen in the package. If the food is not operating at least partially uncovered. • Family-size, prepackaged frozen ...

Owners Manual
Page 18
.... When finished, separate pieces and microwave 2-4 minutes more, if necessary. Turn meat over after half the time. When finished, separate pieces and let stand to complete defrosting. Shield warm areas with foil. Finish defrosting. Let stand 1-2 hours in the oven breastside-up after half the time.... min. Turn over and shield warm areas with foil. After half the time, unwrap and turn chicken over after defrosting. Run cool water in oven. per lb. 5 to 16 min. Unwrap and turn over and break up . Place unwrapped breast in dish. Finish defrosting. per lb. ...
.... When finished, separate pieces and microwave 2-4 minutes more, if necessary. Turn meat over after half the time. When finished, separate pieces and let stand to complete defrosting. Shield warm areas with foil. Finish defrosting. Let stand 1-2 hours in the oven breastside-up after half the time.... min. Turn over and shield warm areas with foil. After half the time, unwrap and turn chicken over after defrosting. Run cool water in oven. per lb. 5 to 16 min. Unwrap and turn over and break up . Place unwrapped breast in dish. Finish defrosting. per lb. ...

Owners Manual
Page 20
...add or subtract 20 seconds to Provide a Shorter or Longer Cook Time If you find that the brand of the microwave. 2 Press POPCORN. The oven starts immediately. How to Adjust the Popcorn Program to the automatic popping time. Operating Instructions Convenience Features Popcorn (less... time) (more time) Use only with prepackaged microwave popcorn weighing 3.0 to Use the Popcorn Feature 1 Follow package instructions, using Time ...
...add or subtract 20 seconds to Provide a Shorter or Longer Cook Time If you find that the brand of the microwave. 2 Press POPCORN. The oven starts immediately. How to Adjust the Popcorn Program to the automatic popping time. Operating Instructions Convenience Features Popcorn (less... time) (more time) Use only with prepackaged microwave popcorn weighing 3.0 to Use the Popcorn Feature 1 Follow package instructions, using Time ...

Owners Manual
Page 23
... .1 3 .2 4-5 .3 6-7 .4 8 .5 9-10 .6 11 .7 12-13 .8 14-15 .9 • Remove meat from package and place on the inside front of the oven. For example, press pads 1 and 2 for 1.2 pounds (1 pound, 3 ounces). 3 Press START. (Time Defrost is stated in the Time Features section.) Auto Defrost automatically sets ...the defrosting times and power levels to six pounds. There is a handy guide located on microwave-safe dish. • Twice during defrost, the oven signals TURN. At each TURN signal, turn the food over. Large roasts should stand for meats, poultry...
... .1 3 .2 4-5 .3 6-7 .4 8 .5 9-10 .6 11 .7 12-13 .8 14-15 .9 • Remove meat from package and place on the inside front of the oven. For example, press pads 1 and 2 for 1.2 pounds (1 pound, 3 ounces). 3 Press START. (Time Defrost is stated in the Time Features section.) Auto Defrost automatically sets ...the defrosting times and power levels to six pounds. There is a handy guide located on microwave-safe dish. • Twice during defrost, the oven signals TURN. At each TURN signal, turn the food over. Large roasts should stand for meats, poultry...

Owners Manual
Page 24
Clock Press to enter the time of day or to check the time of day while microwaving. 1 Press CLOCK. 2 Enter time of day. 3 Press START or CLOCK. 24 Operating Instructions Other Features Your Model May Have Cooking Complete Reminder To remind you that you have food in the oven, the oven will display "END" and beep once a minute until you either open the oven door or press CLEAR/OFF.
Clock Press to enter the time of day or to check the time of day while microwaving. 1 Press CLOCK. 2 Enter time of day. 3 Press START or CLOCK. 24 Operating Instructions Other Features Your Model May Have Cooking Complete Reminder To remind you that you have food in the oven, the oven will display "END" and beep once a minute until you either open the oven door or press CLEAR/OFF.

Owners Manual
Page 25
The oven will be displayed by pressing CLOCK. 25 Delay Start Delay Start allows you to set the microwave to delay cooking up to 24 hours. 1 Press DELAY START. 2 Enter the time you want the oven to start at the delayed time. Display On/Off To turn the clock display off, press and hold 0 for about three seconds. The Delay Start time will automatically start . (Be sure the microwave clock shows the correct time of day.) 3 Select any combination of day may be displayed. The time of Auto or Time Defrost or Time Cook I & II. 4 Press START. To redisplay the clock, repeat.
The oven will be displayed by pressing CLOCK. 25 Delay Start Delay Start allows you to set the microwave to delay cooking up to 24 hours. 1 Press DELAY START. 2 Enter the time you want the oven to start at the delayed time. Display On/Off To turn the clock display off, press and hold 0 for about three seconds. The Delay Start time will automatically start . (Be sure the microwave clock shows the correct time of day.) 3 Select any combination of day may be displayed. The time of Auto or Time Defrost or Time Cook I & II. 4 Press START. To redisplay the clock, repeat.


