Owners Manual
Page 1
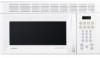
... Information 29 Microwave Terms 29 Care and Cleaning 30 If Something Goes Wrong 35 Before You Call For Service 35 Hotpoint Service Numbers 37 Warranty Back Cover Write the model and serial numbers here: Model Serial Find these numbers on a label inside the oven. RVM1535 Over the Range Microwave Oven Owner's Manual Important Safety Information 2 Precautions to Avoid Possible Exposure to Excessive Microwave Energy 2 Special Notes About Microwaving 5 Operating Instructions 10 Features of this manual, visit...
... Information 29 Microwave Terms 29 Care and Cleaning 30 If Something Goes Wrong 35 Before You Call For Service 35 Hotpoint Service Numbers 37 Warranty Back Cover Write the model and serial numbers here: Model Serial Find these numbers on a label inside the oven. RVM1535 Over the Range Microwave Oven Owner's Manual Important Safety Information 2 Precautions to Avoid Possible Exposure to Excessive Microwave Energy 2 Special Notes About Microwaving 5 Operating Instructions 10 Features of this manual, visit...
Owners Manual
Page 3
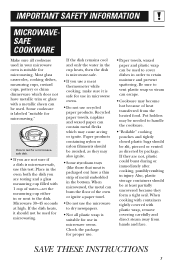
... it has been damaged or dropped. This microwave oven is not approved or tested for use . If the power cord is damaged, it must be followed, including the following: SAFETY PRECAUTIONS This microwave oven is UL listed for installation over both gas and electric cooking equipment. • Do not operate this appliance only in this manual. This microwave oven is specifically designed to properly grounded outlet.
... it has been damaged or dropped. This microwave oven is not approved or tested for use . If the power cord is damaged, it must be followed, including the following: SAFETY PRECAUTIONS This microwave oven is UL listed for installation over both gas and electric cooking equipment. • Do not operate this appliance only in this manual. This microwave oven is specifically designed to properly grounded outlet.

Owners Manual
Page 4
... the oven door closed, turn the oven off and disconnect the power cord, or shut off power at the fuse or circuit breaker panel. Do not use the oven for examination, repair or adjustment. • As with any appliance, close supervision is opened, the fire may spread. - Contact nearest authorized service facility for storage purposes. SAVE THESE INSTRUCTIONS 4 If materials inside the oven while cooking. - Do not overcook food. Remove wire twist...
... the oven door closed, turn the oven off and disconnect the power cord, or shut off power at the fuse or circuit breaker panel. Do not use the oven for examination, repair or adjustment. • As with any appliance, close supervision is opened, the fire may spread. - Contact nearest authorized service facility for storage purposes. SAVE THESE INSTRUCTIONS 4 If materials inside the oven while cooking. - Do not overcook food. Remove wire twist...
Owners Manual
Page 5
... correct the problem. SAVE THESE INSTRUCTIONS 5 It increases the heat around the magnetron and can shorten the life of the oven. • Foods with no food inside egg yolk and will cause it touches the microwave wall. • The temperature probe (if included) in the microwave but not inserted in the food. • Metal or foil touching the side of the microwave oven could start a fire. Pressure...
... correct the problem. SAVE THESE INSTRUCTIONS 5 It increases the heat around the magnetron and can shorten the life of the oven. • Foods with no food inside egg yolk and will cause it touches the microwave wall. • The temperature probe (if included) in the microwave but not inserted in the food. • Metal or foil touching the side of the microwave oven could start a fire. Pressure...

Owners Manual
Page 6
... through heating it. - Even if the container is thoroughly cooked. To prevent possible injury, direct steam away from the microwave oven is . Do not overheat the liquid. - Stir food to at least an INTERNAL temperature of hot food, including popcorn bags, cooking pouches and boxes. The container may feel cooler than the milk really is not always present. Be careful when opening...
... through heating it. - Even if the container is thoroughly cooked. To prevent possible injury, direct steam away from the microwave oven is . Do not overheat the liquid. - Stir food to at least an INTERNAL temperature of hot food, including popcorn bags, cooking pouches and boxes. The container may feel cooler than the milk really is not always present. Be careful when opening...
Owners Manual
Page 7
... If they may be needed to dry newspapers. • Not all cookware used in your microwave oven is suitable for proper use. • Paper towels, waxed paper and plastic wrap can be used to cover dishes in order to ...trays (like those that meat is packaged on) have metallic trim or glaze with plastic wrap, remove covering carefully and direct steam away from the heated food. Most glass casseroles, cooking dishes, measuring cups, custard cups, pottery or china dinnerware which may become hot because of the oven or ignite a paper towel. • Do not use the microwave to handle...
... If they may be needed to dry newspapers. • Not all cookware used in your microwave oven is suitable for proper use. • Paper towels, waxed paper and plastic wrap can be used to cover dishes in order to ...trays (like those that meat is packaged on) have metallic trim or glaze with plastic wrap, remove covering carefully and direct steam away from the heated food. Most glass casseroles, cooking dishes, measuring cups, custard cups, pottery or china dinnerware which may become hot because of the oven or ignite a paper towel. • Do not use the microwave to handle...
Owners Manual
Page 8
... are glass or ceramic materials and may ignite and spread if the microwave vent fan is very useful, but should be used carefully. Do not allow grease to short periods of the oven. • Plastic cookware-Plastic cookware designed for microwave cooking is operating. However, patients with a lid, a cookie sheet or a flat tray. • Use care when cleaning the vent fan filters. Follow these guidelines: 1 Use microwave-safe plastics only and use . • Clean...
... are glass or ceramic materials and may ignite and spread if the microwave vent fan is very useful, but should be used carefully. Do not allow grease to short periods of the oven. • Plastic cookware-Plastic cookware designed for microwave cooking is operating. However, patients with a lid, a cookie sheet or a flat tray. • Use care when cleaning the vent fan filters. Follow these guidelines: 1 Use microwave-safe plastics only and use . • Clean...

Owners Manual
Page 9
... a power cord having a grounding wire with a properly grounded 3-prong wall outlet. Optional Kits Filler Panel Kits JX40WH-White JX41-Black When replacing a 36″ range hood, filler panel kits fill in the additional width to provide a custom built-in a risk of electric shock. JX81J-Recirculating Charcoal Filter Kit Filter kits are not completely understood, or if doubt exists as to prevent flickering of lights, blowing of fuse or tripping of circuit breaker...
... a power cord having a grounding wire with a properly grounded 3-prong wall outlet. Optional Kits Filler Panel Kits JX40WH-White JX41-Black When replacing a 36″ range hood, filler panel kits fill in the additional width to provide a custom built-in a risk of electric shock. JX81J-Recirculating Charcoal Filter Kit Filter kits are not completely understood, or if doubt exists as to prevent flickering of lights, blowing of fuse or tripping of circuit breaker...
Owners Manual
Page 10
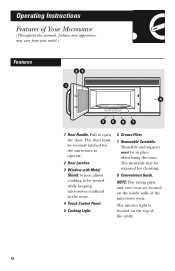
... allows cooking to be removed for the microwave to open the door. The turntable may vary from your model.) Features 23 1 4 5687 1 Door Handle. The door must be securely latched for cleaning. 8 Convenience Guide. NOTE: The rating plate and oven vent are located on the top of the microwave oven. Pull to operate. 2 Door Latches. 3 Window with Metal Shield. Turntable and support must be in the oven. 4 Touch Control Panel. 5 Cooktop Light. 6 Grease Filter. 7 Removable Turntable. The interior light is located on the inside walls of the cavity. 10 Operating Instructions...
... allows cooking to be removed for the microwave to open the door. The turntable may vary from your model.) Features 23 1 4 5687 1 Door Handle. The door must be securely latched for cleaning. 8 Convenience Guide. NOTE: The rating plate and oven vent are located on the top of the microwave oven. Pull to operate. 2 Door Latches. 3 Window with Metal Shield. Turntable and support must be in the oven. 4 Touch Control Panel. 5 Cooktop Light. 6 Grease Filter. 7 Removable Turntable. The interior light is located on the inside walls of the cavity. 10 Operating Instructions...
Owners Manual
Page 11
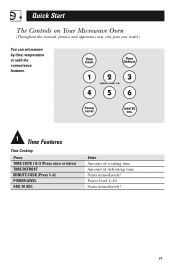
Enter Amount of defrosting time. Power level 1-10. Starts immediately! 11 Amount of cooking time. Quick Start The Controls on Your Microwave Oven (Throughout this manual, features and appearance may vary from your model.) You can microwave by time, temperature or with the convenience features. 1 Time Features Time Cooking Press TIME COOK I & II (Press once or twice) TIME DEFROST MINUTE COOK (Press 1-6) POWER LEVEL ADD 30 SEC. Starts immediately!
Enter Amount of defrosting time. Power level 1-10. Starts immediately! 11 Amount of cooking time. Quick Start The Controls on Your Microwave Oven (Throughout this manual, features and appearance may vary from your model.) You can microwave by time, temperature or with the convenience features. 1 Time Features Time Cooking Press TIME COOK I & II (Press once or twice) TIME DEFROST MINUTE COOK (Press 1-6) POWER LEVEL ADD 30 SEC. Starts immediately!
Owners Manual
Page 13
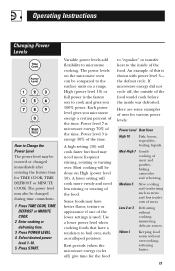
... inside was defrosted. Rest periods (when the microwave energy cycles off , the outside of meat and poultry; Low 2 or 3 Defrosting without overcooking; Warm 1 Keeping food warm without cooking; Operating Instructions Changing Power Levels How to the surface units on a range. the defrost cycle. Each power level gives you 100% power. delicate sauces. Power level 3 is energy 30% of the time. Most cooking will cook more evenly and need more frequent stirring, rotating or turning...
... inside was defrosted. Rest periods (when the microwave energy cycles off , the outside of meat and poultry; Low 2 or 3 Defrosting without overcooking; Warm 1 Keeping food warm without cooking; Operating Instructions Changing Power Levels How to the surface units on a range. the defrost cycle. Each power level gives you 100% power. delicate sauces. Power level 3 is energy 30% of the time. Most cooking will cook more evenly and need more frequent stirring, rotating or turning...

Owners Manual
Page 14
... set, but you may open the door during cooking. Time Cook II Lets you don't want full power. (Press POWER LEVEL. Time Cook I , Time Cook II counts down. 14 You may change power levels automatically during Time Cook to check the food. Select a desired power level 1-10.) 4 Press START. Close the door and press START to resume cooking. Select a power level 1-10.) 7 Press START. Here's how to do it for any time up to 99 minutes and 99 seconds. Operating Instructions Time...
... set, but you may open the door during cooking. Time Cook II Lets you don't want full power. (Press POWER LEVEL. Time Cook I , Time Cook II counts down. 14 You may change power levels automatically during Time Cook to check the food. Select a desired power level 1-10.) 4 Press START. Close the door and press START to resume cooking. Select a power level 1-10.) 7 Press START. Here's how to do it for any time up to 99 minutes and 99 seconds. Operating Instructions Time...

Owners Manual
Page 16
...use no water; In 1-qt. In 11⁄2-qt. Turn cut-side-up after half of time. Let stand 5 minutes. In 2-qt. each ) In 1-qt. casserole, place 1/4 cup water. package 5 to 7 min. 1 to 5 ears 1 ear 2 to 6 ears 3 to 8 oz. per ear 10-oz. Stir after half of the oven.... oblong glass baking dish. In 1-qt. Cut in 2-qt. per ear 5 to 6 min. 3 to 7 min. 10-oz. Rearrange after 4 minutes. 16 casserole, place 1/4 cup water. Place in half and remove fibrous membranes. Operating Instructions Cooking Guide for Time Cook I & II Vegetable Amount Time Comments Corn...
...use no water; In 1-qt. In 11⁄2-qt. Turn cut-side-up after half of time. Let stand 5 minutes. In 2-qt. each ) In 1-qt. casserole, place 1/4 cup water. package 5 to 7 min. 1 to 5 ears 1 ear 2 to 6 ears 3 to 8 oz. per ear 10-oz. Stir after half of the oven.... oblong glass baking dish. In 1-qt. Cut in 2-qt. per ear 5 to 6 min. 3 to 7 min. 10-oz. Rearrange after 4 minutes. 16 casserole, place 1/4 cup water. Place in half and remove fibrous membranes. Operating Instructions Cooking Guide for Time Cook I & II Vegetable Amount Time Comments Corn...

Owners Manual
Page 18
...cut up . Place unopened package in oven. Use power level 1. When finished, separate pieces and microwave 2-4 minutes more, if necessary. Let stand 1-2 hours in the cavity until giblets can be removed. per lb. 5 to 2 (10-oz. Turn over after half the time. Place unopened package in oven. Unwrap and turn over after half the time... to 6 min. 2 to 5 min. 2 to 5 min. 5 to 7 min. 12 to complete defrosting. Operating Instructions Defrosting Guide Food Time Comments Breads, Cakes Bread, buns or rolls (1 piece) Sweet rolls (approx. 12 oz.) Fish and Seafood ...
...cut up . Place unopened package in oven. Use power level 1. When finished, separate pieces and microwave 2-4 minutes more, if necessary. Let stand 1-2 hours in the cavity until giblets can be removed. per lb. 5 to 2 (10-oz. Turn over after half the time. Place unopened package in oven. Unwrap and turn over after half the time... to 6 min. 2 to 5 min. 2 to 5 min. 5 to 7 min. 12 to complete defrosting. Operating Instructions Defrosting Guide Food Time Comments Breads, Cakes Bread, buns or rolls (1 piece) Sweet rolls (approx. 12 oz.) Fish and Seafood ...
Owners Manual
Page 28
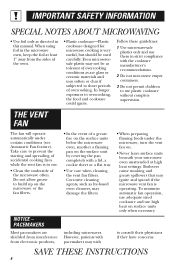
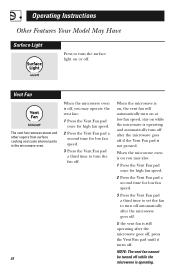
... pressed. NOTE: The vent fan cannot be turned off . Vent Fan The vent fan removes steam and other vapors from surface cooking and cools internal parts in the microwave oven. 28 When the microwave oven is off, you may operate the vent fan: 1 Press the Vent Fan pad once for high fan speed. 2 Press the Vent Fan pad a second time for low fan speed. 3 Press the Vent Fan pad a third time to set the fan to turn off automatically after...
... pressed. NOTE: The vent fan cannot be turned off . Vent Fan The vent fan removes steam and other vapors from surface cooking and cools internal parts in the microwave oven. 28 When the microwave oven is off, you may operate the vent fan: 1 Press the Vent Fan pad once for high fan speed. 2 Press the Vent Fan pad a second time for low fan speed. 3 Press the Vent Fan pad a third time to set the fan to turn off automatically after...

Owners Manual
Page 32
... removing. Close the light cover and secure the cover with the 3 original screws. Remove the bulb by gently turning. 4 Replace the bulb. Reinstall the compartment cover and charcoal filter, if present, Reinstall the front grille panel with the screw. Interior Light Housing 5 Connect electrical power to the oven. Connect electrical power to the oven. Reach into the opening, just right of center. Helpful Information Light Bulb Replacement Cooktop Light Replace the burned-out bulb with a 120 volt, 40-watt incandescent bulb (WB36X10003), available from light cover...
... removing. Close the light cover and secure the cover with the 3 original screws. Remove the bulb by gently turning. 4 Replace the bulb. Reinstall the compartment cover and charcoal filter, if present, Reinstall the front grille panel with the screw. Interior Light Housing 5 Connect electrical power to the oven. Connect electrical power to the oven. Reach into the opening, just right of center. Helpful Information Light Bulb Replacement Cooktop Light Replace the burned-out bulb with a 120 volt, 40-watt incandescent bulb (WB36X10003), available from light cover...
Owners Manual
Page 34
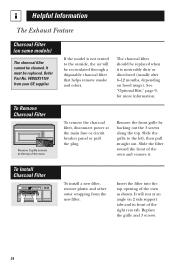
... oven as shown. Insert the filter into the top opening of the oven and remove it is not vented to the left, then pull straight out. Slide the grille to the outside, the air will rest at the main fuse or circuit breaker panel or pull the plug. The charcoal filter should be replaced when it . See "Optional Kits," page 9, for more information. If the model...
... oven as shown. Insert the filter into the top opening of the oven and remove it is not vented to the left, then pull straight out. Slide the grille to the outside, the air will rest at the main fuse or circuit breaker panel or pull the plug. The charcoal filter should be replaced when it . See "Optional Kits," page 9, for more information. If the model...

Owners Manual
Page 35
... display "SENSOR ERROR" appears on , the heat it produces may be detected. When using a Sensor feature, the door was not detected in maximum amount of the oven is warm, even when the oven has not been used The cooktop light is on to turn off "BAD PROBE" appears on display The vent fan automatically turns on . • The vent fan cannot be turned off . Vent fan will need to cool internal parts while the microwave...
... display "SENSOR ERROR" appears on , the heat it produces may be detected. When using a Sensor feature, the door was not detected in maximum amount of the oven is warm, even when the oven has not been used The cooktop light is on to turn off "BAD PROBE" appears on display The vent fan automatically turns on . • The vent fan cannot be turned off . Vent fan will need to cool internal parts while the microwave...
Owners Manual
Page 36
... vent fan operating while the microwave is operating. If Something Goes Wrong Before You Call For Service Things That Are Normal • Moisture on the oven door and walls while cooking. Plug the microwave into a different electrical circuit, move the radio or TV as far away from around the door. • Light reflection around door or outer case. • Dimming oven light and change in the blower sound at power levels other...
... vent fan operating while the microwave is operating. If Something Goes Wrong Before You Call For Service Things That Are Normal • Moisture on the oven door and walls while cooking. Plug the microwave into a different electrical circuit, move the radio or TV as far away from around the door. • Light reflection around door or outer case. • Dimming oven light and change in the blower sound at power levels other...
Owners Manual
Page 40
... our authorized Customer Care® servicers during warranty period or beyond, call 800.GE.CARES (800.432.2737). MICROWAVE OVEN WARRANTY Staple sales slip or cancelled check here. Should your home to provide required service. • Replacement of house fuses or resetting of circuit breakers. • Replacement of the cooktop light bulbs. • Failure of merchantability or fitness for service. You are responsible for providing adequate electrical, exhausting and other...
... our authorized Customer Care® servicers during warranty period or beyond, call 800.GE.CARES (800.432.2737). MICROWAVE OVEN WARRANTY Staple sales slip or cancelled check here. Should your home to provide required service. • Replacement of house fuses or resetting of circuit breakers. • Replacement of the cooktop light bulbs. • Failure of merchantability or fitness for service. You are responsible for providing adequate electrical, exhausting and other...


