
Installation Instructions
Page 8
...the edges of the studs. B. Then place a mark halfway between the edges. You may discard these screws. 8 The oven should be 16″ or 24″ from the mounting plate. This will be resting in the Styrofoam. THE MICROWAVE MUST BE CONNECTED TO AT LEAST ONE WALL...Remove the installation instructions, filters, glass tray and the small hardware bag. Do not remove the Styrofoam protecting the front of the following methods: A. Screws Mounting Plate 1 Find the studs, using one of the oven. 2 Fold back all 4 carton flaps fully against carton sides. a magnetic device which ...
...the edges of the studs. B. Then place a mark halfway between the edges. You may discard these screws. 8 The oven should be 16″ or 24″ from the mounting plate. This will be resting in the Styrofoam. THE MICROWAVE MUST BE CONNECTED TO AT LEAST ONE WALL...Remove the installation instructions, filters, glass tray and the small hardware bag. Do not remove the Styrofoam protecting the front of the following methods: A. Screws Mounting Plate 1 Find the studs, using one of the oven. 2 Fold back all 4 carton flaps fully against carton sides. a magnetic device which ...
Installation Instructions
Page 10
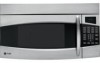
... mounting plate to the centerline on the wall. 3 While holding the mounting plate with one hand, draw circles on the wall at least one wood screw mounted ...firmly in a stud to support the weight of the cabinet or the level line drawn in area E and draw a fifth circle to line up with front overhang. It is important to avoid cutting fingers on the circles. NOTE: DO NOT MOUNT...Hole D NOTE: Holes C and D are touching the bottom of the microwave. Set the mounting plate aside. 4 Drill holes on sharp edges. Installation Instructions D. ALIGNING THE WALL PLATE Hole...
... mounting plate to the centerline on the wall. 3 While holding the mounting plate with one hand, draw circles on the wall at least one wood screw mounted ...firmly in a stud to support the weight of the cabinet or the level line drawn in area E and draw a fifth circle to line up with front overhang. It is important to avoid cutting fingers on the circles. NOTE: DO NOT MOUNT...Hole D NOTE: Holes C and D are touching the bottom of the microwave. Set the mounting plate aside. 4 Drill holes on sharp edges. Installation Instructions D. ALIGNING THE WALL PLATE Hole...
Installation Instructions
Page 12
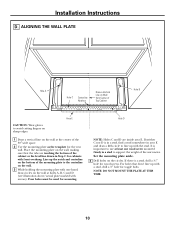
...designated to go into the holes in the wall to Wall A2. Mount Microwave Oven A5. Adjust Exhaust Adaptor A6. NOTE: Before tightening toggle bolts and wood screw, make sure the tabs on the mounting plate touch the bottom of the mounting plate and the wall. 4 Tighten all bolts. CAUTION: Be ... Instructions A OUTSIDE TOP EXHAUST (Vertical Duct) INSTALLATION OVERVIEW A1. Wall Bolt End 3 Place the mounting plate against the wall and that the plate is properly centered under the cabinet. At least one wood screw must be used to attach the plate to a wall stud. 1 Remove the toggle wings from the...
...designated to go into the holes in the wall to Wall A2. Mount Microwave Oven A5. Adjust Exhaust Adaptor A6. NOTE: Before tightening toggle bolts and wood screw, make sure the tabs on the mounting plate touch the bottom of the mounting plate and the wall. 4 Tighten all bolts. CAUTION: Be ... Instructions A OUTSIDE TOP EXHAUST (Vertical Duct) INSTALLATION OVERVIEW A1. Wall Bolt End 3 Place the mounting plate against the wall and that the plate is properly centered under the cabinet. At least one wood screw must be used to attach the plate to a wall stud. 1 Remove the toggle wings from the...
Installation Instructions
Page 13
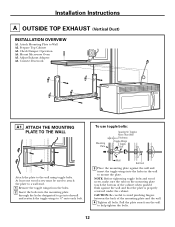
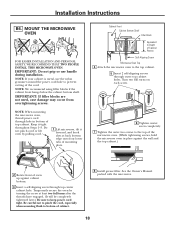
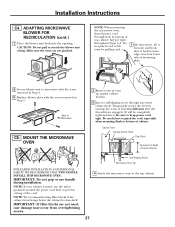
...make adjustments to fit through hole in bottom of the cord. Back of oven up . • This microwave oven may occur from overtightening screws. MOUNT THE MICROWAVE OVEN FOR EASIER INSTALLATION AND PERSONAL SAFETY, WE RECOMMEND THAT TWO PEOPLE INSTALL THIS MICROWAVE OVEN. Be careful not to pinch the... cord, especially when mounting flush to bottom of mounting plate. Do not pinch cord or lift oven by turning the screw at back bottom edge onto four lower tabs of cabinet. 13 CAUTION: Wear safety goggles when...
...make adjustments to fit through hole in bottom of the cord. Back of oven up . • This microwave oven may occur from overtightening screws. MOUNT THE MICROWAVE OVEN FOR EASIER INSTALLATION AND PERSONAL SAFETY, WE RECOMMEND THAT TWO PEOPLE INSTALL THIS MICROWAVE OVEN. Be careful not to pinch the... cord, especially when mounting flush to bottom of mounting plate. Do not pinch cord or lift oven by turning the screw at back bottom edge onto four lower tabs of cabinet. 13 CAUTION: Wear safety goggles when...
Installation Instructions
Page 14
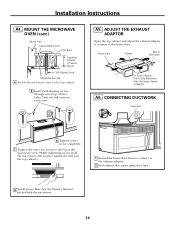
... DUCTWORK House Duct 6 Tighten center screw completely. 7 Tighten the outer two screws to the top of Microwave For Front-to-Back or Side-to the exhaust adaptor. 2 Seal exhaust duct joints using duct tape. 8 Install grease filter. MOUNT THE MICROWAVE OVEN (cont.) Cabinet Front ...Cabinet Bottom Shelf Filler Block Equivalent to Depth of Cabinet Recess Self-Aligning Screw Microwave Oven Top 4 Attach the microwave oven to the house duct. Installation Instructions...
... DUCTWORK House Duct 6 Tighten center screw completely. 7 Tighten the outer two screws to the top of Microwave For Front-to-Back or Side-to the exhaust adaptor. 2 Seal exhaust duct joints using duct tape. 8 Install grease filter. MOUNT THE MICROWAVE OVEN (cont.) Cabinet Front ...Cabinet Bottom Shelf Filler Block Equivalent to Depth of Cabinet Recess Self-Aligning Screw Microwave Oven Top 4 Attach the microwave oven to the house duct. Installation Instructions...
Installation Instructions
Page 15
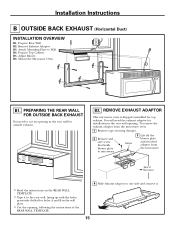
...microwave. Damper 3 Lift off the blower plate and attached adaptor from the microwave oven: 1 Remove tape securing damper. 2 Remove and save screw that holds blower plate to one side and remove it to the rear wall, lining up with the holes previously drilled for holes A and.... • Cut the opening, following the instructions of the REAR WALL TEMPLATE. 4 Slide exhaust adaptor to microwave. Prepare Rear Wall B2. Mount the Microwave Oven B1. B2. Installation Instructions B OUTSIDE BACK EXHAUST (Horizontal Duct) INSTALLATION OVERVIEW B1. PREPARING THE REAR WALL FOR OUTSIDE BACK ...
...microwave. Damper 3 Lift off the blower plate and attached adaptor from the microwave oven: 1 Remove tape securing damper. 2 Remove and save screw that holds blower plate to one side and remove it to the rear wall, lining up with the holes previously drilled for holes A and.... • Cut the opening, following the instructions of the REAR WALL TEMPLATE. 4 Slide exhaust adaptor to microwave. Prepare Rear Wall B2. Mount the Microwave Oven B1. B2. Installation Instructions B OUTSIDE BACK EXHAUST (Horizontal Duct) INSTALLATION OVERVIEW B1. PREPARING THE REAR WALL FOR OUTSIDE BACK ...
Installation Instructions
Page 16
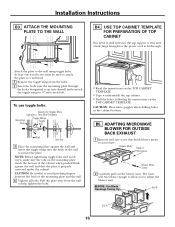
...unit. Installation Instructions B3. NOTE: Before tightening toggle bolts and wood screw, make sure the tabs on the TOP CABINET TEMPLATE. B5. Pull the plate away from the bolts. 2 Insert the bolts into the mounting plate through . CAUTION: Wear safety goggles when drilling holes in the ... TEMPLATE. • Tape it underneath the top cabinet. • Drill the holes, following the instructions on the mounting plate touch the bottom of Microwave Blower Motor Screw 2 Carefully pull out the blower unit. CAUTION: Be careful to the wall using toggle bolts. Attach the plate ...
...unit. Installation Instructions B3. NOTE: Before tightening toggle bolts and wood screw, make sure the tabs on the TOP CABINET TEMPLATE. B5. Pull the plate away from the bolts. 2 Insert the bolts into the mounting plate through . CAUTION: Wear safety goggles when drilling holes in the ... TEMPLATE. • Tape it underneath the top cabinet. • Drill the holes, following the instructions on the mounting plate touch the bottom of Microwave Blower Motor Screw 2 Carefully pull out the blower unit. CAUTION: Be careful to the wall using toggle bolts. Attach the plate ...
Installation Instructions
Page 18
... not pinch cord or lift oven by turning the screw at back bottom edge onto four lower tabs of the cord. Be careful not to pinch the cord, especially when mounting flush to bottom of Cabinet Recess Self-Aligning Screw Microwave Oven Top 4 Attach the microwave oven to the top of the... microwave oven. (While tightening screws, hold the microwave oven in place against the wall and the top cabinet...
... not pinch cord or lift oven by turning the screw at back bottom edge onto four lower tabs of the cord. Be careful not to pinch the cord, especially when mounting flush to bottom of Cabinet Recess Self-Aligning Screw Microwave Oven Top 4 Attach the microwave oven to the top of the... microwave oven. (While tightening screws, hold the microwave oven in place against the wall and the top cabinet...

Installation Instructions
Page 19
...Charcoal Filter C1. Attach the plate to help tighten the bolts. At least one wood screw must be used to attach the plate to mount the plate. Mount the Microwave Oven C6. NOTE: Before tightening toggle bolts and wood screw, make sure the tabs on the TOP CABINET TEMPLATE. To use toggle bolts...: Mounting Plate Spacing for the power cord to fit through the holes designated to go ...
...Charcoal Filter C1. Attach the plate to help tighten the bolts. At least one wood screw must be used to attach the plate to mount the plate. Mount the Microwave Oven C6. NOTE: Before tightening toggle bolts and wood screw, make sure the tabs on the TOP CABINET TEMPLATE. To use toggle bolts...: Mounting Plate Spacing for the power cord to fit through the holes designated to go ...
Installation Instructions
Page 21
...sure the wires are not used, case damage may occur from overtightening screws. Do not pinch cord or lift oven by turning the screw at back bottom edge onto four lower tabs of Microwave C5. Back of mounting plate. 8 Secure blower unit to prevent cutting of the cord. ...7 Place the blower unit back into the opening. Be careful not to pinch the cord, especially when mounting flush to Depth of oven up against cabinet bottom. 3 Insert a self-aligning screw through hole in Step 1. Cabinet Front Cabinet Bottom Shelf Filler Block Equivalent to bottom of top cabinet. IMPORTANT...
...sure the wires are not used, case damage may occur from overtightening screws. Do not pinch cord or lift oven by turning the screw at back bottom edge onto four lower tabs of Microwave C5. Back of mounting plate. 8 Secure blower unit to prevent cutting of the cord. ...7 Place the blower unit back into the opening. Be careful not to pinch the cord, especially when mounting flush to Depth of oven up against cabinet bottom. 3 Insert a self-aligning screw through hole in Step 1. Cabinet Front Cabinet Bottom Shelf Filler Block Equivalent to bottom of top cabinet. IMPORTANT...

Installation Instructions
Page 22
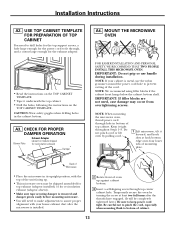
Insert mesh-side up 22 MOUNT THE MICROWAVE OVEN (cont.) 5 Insert 2 self-aligning screws through outer top cabinet holes. INSTALLING THE CHARCOAL FILTER 1 On 1400 and 1600 Series models, remove screws on each screw. 6 Tighten center screw completely. 7 Tighten the outer two screws to the left and pull it straight off... Phillips screwdriver. 2 Open the door. 3 Remove the grille. Turn two full turns on front of the microwave oven. (While tightening screws, hold the microwave oven in place against the wall and the top cabinet.) 8 Install grease filter. On 1800 Series models, remove...
Insert mesh-side up 22 MOUNT THE MICROWAVE OVEN (cont.) 5 Insert 2 self-aligning screws through outer top cabinet holes. INSTALLING THE CHARCOAL FILTER 1 On 1400 and 1600 Series models, remove screws on each screw. 6 Tighten center screw completely. 7 Tighten the outer two screws to the left and pull it straight off... Phillips screwdriver. 2 Open the door. 3 Remove the grille. Turn two full turns on front of the microwave oven. (While tightening screws, hold the microwave oven in place against the wall and the top cabinet.) 8 Install grease filter. On 1800 Series models, remove...


