Use and Care Manual
Page 10
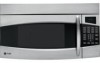
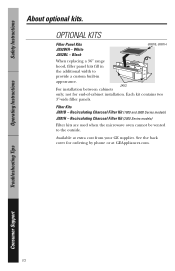
... kits fill in appearance. See the back cover for end-of-cabinet installation. Operating Instructions Troubleshooting Tips Consumer Support 10 Recirculating Charcoal Filter Kit (1800 and 3600 Series models) JX81H - Filter Kits JX81B - Safety Instructions About optional kits. Each kit contains two ... cost from your GE supplier. Recirculating Charcoal Filter Kit (2000 Series models) Filter kits are used when the microwave oven cannot be vented to provide a custom built-in the additional width to the outside. White JX52BL - JX52 For installation between cabinets only;...
... kits fill in appearance. See the back cover for end-of-cabinet installation. Operating Instructions Troubleshooting Tips Consumer Support 10 Recirculating Charcoal Filter Kit (1800 and 3600 Series models) JX81H - Filter Kits JX81B - Safety Instructions About optional kits. Each kit contains two ... cost from your GE supplier. Recirculating Charcoal Filter Kit (2000 Series models) Filter kits are used when the microwave oven cannot be vented to provide a custom built-in the additional width to the outside. White JX52BL - JX52 For installation between cabinets only;...
Use and Care Manual
Page 38
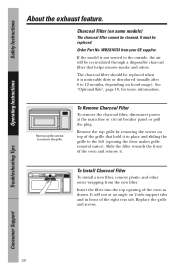
... and remove it is not vented to the left (opening of the grille that helps remove smoke and odors. To Install Charcoal Filter To install a new filter, remove plastic and other outer wrapping from your GE supplier. It will be cleaned. See "Optional Kits", page 10, for more information. Troubleshooting Tips Consumer Support 38 Slide...
... and remove it is not vented to the left (opening of the grille that helps remove smoke and odors. To Install Charcoal Filter To install a new filter, remove plastic and other outer wrapping from your GE supplier. It will be cleaned. See "Optional Kits", page 10, for more information. Troubleshooting Tips Consumer Support 38 Slide...
Quick Specs
Page 2
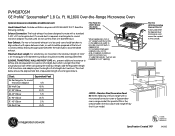
... of all transitions and adaptors plus the lengths of some typical ducts. Ft. For installation between studs, or wall should not exceed 140 equivalent feet. Roof Cap 24 ft....replacing a 36" or 42" range hood, this panel kit fills in appearance. PVM1870SM GE Profile™ Spacemaker® 1.8 Cu. Two kits are equivalent to mate with space ...a section of 3-1/4" x 10" rectangular or 6" diameter round duct should be used . Filter Kits JX81B-Recirculating Charcoal Filter Kit To be prepared at additional cost) Hood Exhaust Duct: Outside ventilation requires a HOOD ...
... of all transitions and adaptors plus the lengths of some typical ducts. Ft. For installation between studs, or wall should not exceed 140 equivalent feet. Roof Cap 24 ft....replacing a 36" or 42" range hood, this panel kit fills in appearance. PVM1870SM GE Profile™ Spacemaker® 1.8 Cu. Two kits are equivalent to mate with space ...a section of 3-1/4" x 10" rectangular or 6" diameter round duct should be used . Filter Kits JX81B-Recirculating Charcoal Filter Kit To be prepared at additional cost) Hood Exhaust Duct: Outside ventilation requires a HOOD ...

Installation Instructions
Page 2
... Cabinet 19 Check Microwave Assembly 20 Adapting Microwave Blower for Recirculation 20, 21 Mount the Microwave Oven ..........21, 22 Installing the Charcoal Filter 22 Before You Use Your Microwave 23 Step-by-step installation guide Placement of Mounting Plate 8-10 Removing the Mounting Plate 8 Finding the Wall Studs 8 Determining Wall Plate Location 9 Aligning...
... Cabinet 19 Check Microwave Assembly 20 Adapting Microwave Blower for Recirculation 20, 21 Mount the Microwave Oven ..........21, 22 Installing the Charcoal Filter 22 Before You Use Your Microwave 23 Step-by-step installation guide Placement of Mounting Plate 8-10 Removing the Mounting Plate 8 Finding the Wall Studs 8 Determining Wall Plate Location 9 Aligning...
Installation Instructions
Page 6
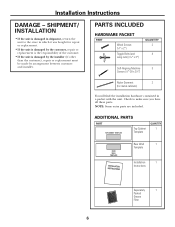
... these parts. NOTE: Some extra parts are included. ADDITIONAL PARTS PART Top Cabinet Template QUANTITY 1 Rear Wall 1 Template Installation 1 Instructions Separately 1 Packed Grease Filter 6 SHIPMENT/ INSTALLATION • If the unit is damaged by the installer (if other than the customer), repair or replacement must be made by the customer, repair or replacement is the...
... these parts. NOTE: Some extra parts are included. ADDITIONAL PARTS PART Top Cabinet Template QUANTITY 1 Rear Wall 1 Template Installation 1 Instructions Separately 1 Packed Grease Filter 6 SHIPMENT/ INSTALLATION • If the unit is damaged by the installer (if other than the customer), repair or replacement must be made by the customer, repair or replacement is the...

Installation Instructions
Page 8
... studs should be used as the rear wall template and for mounting. REMOVING THE MICROWAVE OVEN FROM THE CARTON/ REMOVING THE MOUNTING PLATE 1 Remove the installation instructions, filters, glass tray and the small hardware bag. B. Stud finder - Use a hammer to tap lightly across the mounting surface to find a solid sound. This plate...
... studs should be used as the rear wall template and for mounting. REMOVING THE MICROWAVE OVEN FROM THE CARTON/ REMOVING THE MOUNTING PLATE 1 Remove the installation instructions, filters, glass tray and the small hardware bag. B. Stud finder - Use a hammer to tap lightly across the mounting surface to find a solid sound. This plate...

Installation Instructions
Page 11
...See page 15 C RECIRCULATING (NON-VENTED DUCTLESS) See page 19 11 A Charcoal Filter Accessory Kit is designed for adaptation to that section. Outside Back Exhaust (Horizontal Duct) C. Installation Instructions 2 INSTALLATION TYPES (Choose A, B or C) This microwave oven is required for the nonvented... exhaust. (See your installation and proceed to the following three types of ventilation required for ...
...See page 15 C RECIRCULATING (NON-VENTED DUCTLESS) See page 19 11 A Charcoal Filter Accessory Kit is designed for adaptation to that section. Outside Back Exhaust (Horizontal Duct) C. Installation Instructions 2 INSTALLATION TYPES (Choose A, B or C) This microwave oven is required for the nonvented... exhaust. (See your installation and proceed to the following three types of ventilation required for ...
Installation Instructions
Page 14
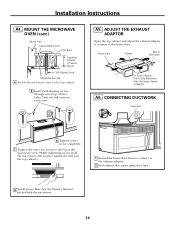
...Plate Damper Back of Microwave For Front-to-Back or Side-to the exhaust adaptor. 2 Seal exhaust duct joints using duct tape. 8 Install grease filter. Turn two full turns on each screw. CONNECTING DUCTWORK House Duct 6 Tighten center screw completely. 7 Tighten the outer two screws to the...top cabinet and adjust the exhaust adaptor to connect to the top cabinet. 5 Insert 2 self-aligning screws through outer top cabinet holes. Installation Instructions A4. MOUNT THE MICROWAVE OVEN (cont.) Cabinet Front Cabinet Bottom Shelf Filler Block Equivalent to Depth of the microwave oven. (While ...
...Plate Damper Back of Microwave For Front-to-Back or Side-to the exhaust adaptor. 2 Seal exhaust duct joints using duct tape. 8 Install grease filter. Turn two full turns on each screw. CONNECTING DUCTWORK House Duct 6 Tighten center screw completely. 7 Tighten the outer two screws to the...top cabinet and adjust the exhaust adaptor to connect to the top cabinet. 5 Insert 2 self-aligning screws through outer top cabinet holes. Installation Instructions A4. MOUNT THE MICROWAVE OVEN (cont.) Cabinet Front Cabinet Bottom Shelf Filler Block Equivalent to Depth of the microwave oven. (While ...
Installation Instructions
Page 18
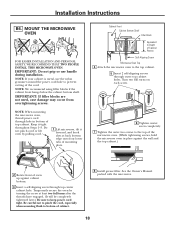
...cabinet holes. Do not pinch cord or lift oven by turning the screw at back bottom edge onto four lower tabs of cabinet. 8 Install grease filter. NOTE: We recommend using filler blocks if the cabinet front hangs below the cabinet bottom shelf. IMPORTANT: If filler blocks are not used... secure the oven by pulling cord. 1 Lift microwave, tilt it tight throughout Steps 1-3. See the Owner's Manual packed with the microwave. 18 Installation Instructions B6. Keep it forward, and hook slots at least two full turns after the threads have engaged. (It will be completely tightened later.)...
...cabinet holes. Do not pinch cord or lift oven by turning the screw at back bottom edge onto four lower tabs of cabinet. 8 Install grease filter. NOTE: We recommend using filler blocks if the cabinet front hangs below the cabinet bottom shelf. IMPORTANT: If filler blocks are not used... secure the oven by pulling cord. 1 Lift microwave, tilt it tight throughout Steps 1-3. See the Owner's Manual packed with the microwave. 18 Installation Instructions B6. Keep it forward, and hook slots at least two full turns after the threads have engaged. (It will be completely tightened later.)...

Installation Instructions
Page 19
... (Non-Vented Ductless) INSTALLATION OVERVIEW C1. Attach Mounting Plate to the wall using toggle bolts. Mount the Microwave Oven C6. Attach the plate to Wall C2. USE TOP CABINET ... Wings Toggle Bolt Wall Bolt End C2. CAUTION: Wear safety goggles when drilling holes in the wall to help tighten the bolts. Adjust Blower C5. Install Charcoal Filter C1. NOTE: Before tightening toggle bolts and wood screw, make sure the tabs on the TOP CABINET TEMPLATE. At least one wood screw must...
... (Non-Vented Ductless) INSTALLATION OVERVIEW C1. Attach Mounting Plate to the wall using toggle bolts. Mount the Microwave Oven C6. Attach the plate to Wall C2. USE TOP CABINET ... Wings Toggle Bolt Wall Bolt End C2. CAUTION: Wear safety goggles when drilling holes in the wall to help tighten the bolts. Adjust Blower C5. Install Charcoal Filter C1. NOTE: Before tightening toggle bolts and wood screw, make sure the tabs on the TOP CABINET TEMPLATE. At least one wood screw must...

Installation Instructions
Page 22
... 1400 and 1600 Series models, remove screws on front of grille using a #1 Phillips screwdriver. Charcoal Filter 4 Install the charcoal filter. On 1400 and 1600 Series models, pull the grille straight off . See the Owner's Manual packed with the microwave. C6. On 1800 Series models,... wire mesh of the microwave oven. (While tightening screws, hold the microwave oven in place against the wall and the top cabinet.) 8 Install grease filter. Insert mesh-side up 22 MOUNT THE MICROWAVE OVEN (cont.) 5 Insert 2 self-aligning screws through outer top cabinet holes. Turn two full turns ...
... 1400 and 1600 Series models, remove screws on front of grille using a #1 Phillips screwdriver. Charcoal Filter 4 Install the charcoal filter. On 1400 and 1600 Series models, pull the grille straight off . See the Owner's Manual packed with the microwave. C6. On 1800 Series models,... wire mesh of the microwave oven. (While tightening screws, hold the microwave oven in place against the wall and the top cabinet.) 8 Install grease filter. Insert mesh-side up 22 MOUNT THE MICROWAVE OVEN (cont.) 5 Insert 2 self-aligning screws through outer top cabinet holes. Turn two full turns ...


