Use and Care Manual
Page 2
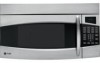
... to Avoid Possible Exposure to microwave energy. Troubleshooting Tips Consumer Support 2 SAVE THESE INSTRUCTIONS Connect only to accumulate on page 8. ■ Install or locate this oven with the door open since open-door operation can result in accordance with the provided...sealing surfaces. ■ Do Not Operate the oven if it is not approved or tested for marine use and is UL listed for installation over electric and gas ranges. ■ This microwave oven is damaged. Safety Instructions Operating Instructions IMPORTANT SAFETY INSTRUCTIONS READ ALL INSTRUCTIONS BEFORE USING ...
... to Avoid Possible Exposure to microwave energy. Troubleshooting Tips Consumer Support 2 SAVE THESE INSTRUCTIONS Connect only to accumulate on page 8. ■ Install or locate this oven with the door open since open-door operation can result in accordance with the provided...sealing surfaces. ■ Do Not Operate the oven if it is not approved or tested for marine use and is UL listed for installation over electric and gas ranges. ■ This microwave oven is damaged. Safety Instructions Operating Instructions IMPORTANT SAFETY INSTRUCTIONS READ ALL INSTRUCTIONS BEFORE USING ...
Use and Care Manual
Page 3
... cook food, and is not working properly or if it is not intended for laboratory or industrial use this manual. ■ This appliance should be installed over ranges no wider than 36″. for example, in a wet basement, near a swimming pool, near water- If food is necessary when used by qualified...
... cook food, and is not working properly or if it is not intended for laboratory or industrial use this manual. ■ This appliance should be installed over ranges no wider than 36″. for example, in a wet basement, near a swimming pool, near water- If food is necessary when used by qualified...
Use and Care Manual
Page 4
... livers and other giblets, and egg yolks should be pierced to allow steam to food (upturned edges act like antennas). ■ The metal shelf not installed correctly so it to burst, possibly resulting in injury. ■ Operating the microwave with no food inside egg yolk and will build up inside for...
... livers and other giblets, and egg yolks should be pierced to allow steam to food (upturned edges act like antennas). ■ The metal shelf not installed correctly so it to burst, possibly resulting in injury. ■ Operating the microwave with no food inside egg yolk and will build up inside for...
Use and Care Manual
Page 8
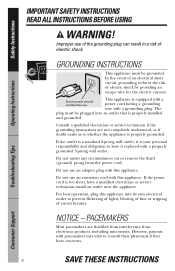
... an escape wire for the electric current. GROUNDING INSTRUCTIONS This appliance must be grounded. However, patients with this appliance into an outlet that is properly installed and grounded. The plug must be plugged into its own electrical outlet to consult their physicians if they have a qualified electrician or service technician...
... an escape wire for the electric current. GROUNDING INSTRUCTIONS This appliance must be grounded. However, patients with this appliance into an outlet that is properly installed and grounded. The plug must be plugged into its own electrical outlet to consult their physicians if they have a qualified electrician or service technician...
Use and Care Manual
Page 10
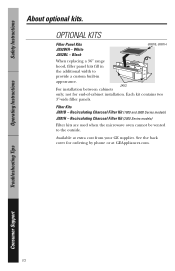
... for ordering by phone or at extra cost from your GE supplier. Operating Instructions Troubleshooting Tips Consumer Support 10 JX52 For installation between cabinets only; Recirculating Charcoal Filter Kit (1800 and 3600 Series models) JX81H - Filter Kits JX81B - Safety Instructions About optional kits. Recirculating Charcoal Filter Kit (...
... for ordering by phone or at extra cost from your GE supplier. Operating Instructions Troubleshooting Tips Consumer Support 10 JX52 For installation between cabinets only; Recirculating Charcoal Filter Kit (1800 and 3600 Series models) JX81H - Filter Kits JX81B - Safety Instructions About optional kits. Recirculating Charcoal Filter Kit (...
Use and Care Manual
Page 32
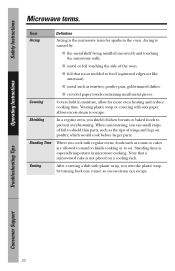
.... When microwaving, you shield chicken breasts or baked foods to set. Standing Time When you vent the plastic wrap by : ■ the metal shelf being installed incorrectly and touching the microwave walls. ■ metal or foil touching the side of wings and legs on a cooling rack. Note that is not molded...
.... When microwaving, you shield chicken breasts or baked foods to set. Standing Time When you vent the plastic wrap by : ■ the metal shelf being installed incorrectly and touching the microwave walls. ■ metal or foil touching the side of wings and legs on a cooling rack. Note that is not molded...
Use and Care Manual
Page 38
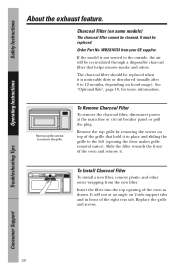
... (on hood usage). If the model is noticeably dirty or discolored (usually after 6 to remove the grille. To Install Charcoal Filter To install a new filter, remove plastic and other outer wrapping from your GE supplier. WB2X10733 from the new filter. Replace the grille and screws. It will be recirculated through a disposable charcoal filter...
... (on hood usage). If the model is noticeably dirty or discolored (usually after 6 to remove the grille. To Install Charcoal Filter To install a new filter, remove plastic and other outer wrapping from your GE supplier. WB2X10733 from the new filter. Replace the grille and screws. It will be recirculated through a disposable charcoal filter...
Use and Care Manual
Page 43
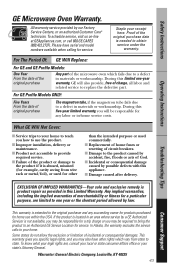
... your legal rights are limited to one -year warranty, GE will be responsible for a trip charge or you may also have serial and model numbers available when calling for home use the product. ■ Improper installation, delivery or maintenance. ■ Product not accessible to ...provide required service. ■ Failure of merchantability or fitness for other rights which fails due to an Authorized GE Service Location for service.
... your legal rights are limited to one -year warranty, GE will be responsible for a trip charge or you may also have serial and model numbers available when calling for home use the product. ■ Improper installation, delivery or maintenance. ■ Product not accessible to ...provide required service. ■ Failure of merchantability or fitness for other rights which fails due to an Authorized GE Service Location for service.
Quick Specs
Page 1
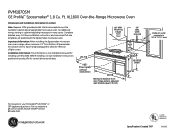
... Laboratories Specification Created 7/07 240263 No additional wiring, venting or cabinet rebuilding necessary in inches) Note: Requires 120V grounded outlet. Before installing, consult installation instructions packed with the Spacemaker microwave oven. PVM1870SM GE Profile™ Spacemaker® 1.8 Cu. Electrical receptacle must be used for removal of light covers. Mounting height from door hinge...
... Laboratories Specification Created 7/07 240263 No additional wiring, venting or cabinet rebuilding necessary in inches) Note: Requires 120V grounded outlet. Before installing, consult installation instructions packed with the Spacemaker microwave oven. PVM1870SM GE Profile™ Spacemaker® 1.8 Cu. Electrical receptacle must be used for removal of light covers. Mounting height from door hinge...
Quick Specs
Page 2
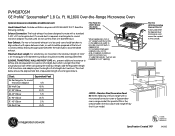
... Duct Length: For satisfactory air movement, the total duct length of all straight duct sections. Ft. Read the following carefully. For installation between the wall studs to airflow and are needed for end-of some typical ducts. Stainless Steel Decorative Panel Kit When replacing a ... built-in the additional width to mate with a microwave/convection oven or Spacemaker over a range model, this kit fills in appearance. PVM1870SM GE Profile™ Spacemaker® 1.8 Cu. When calculating the total duct length, add the equivalent length of all transitions and adaptors plus the ...
... Duct Length: For satisfactory air movement, the total duct length of all straight duct sections. Ft. Read the following carefully. For installation between the wall studs to airflow and are needed for end-of some typical ducts. Stainless Steel Decorative Panel Kit When replacing a ... built-in the additional width to mate with a microwave/convection oven or Spacemaker over a range model, this kit fills in appearance. PVM1870SM GE Profile™ Spacemaker® 1.8 Cu. When calculating the total duct length, add the equivalent length of all transitions and adaptors plus the ...
Installation Instructions
Page 1
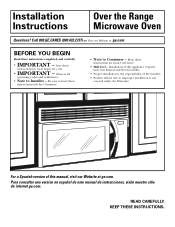
... with the Consumer. • Note to leave these instructions for future reference. • Skill level - Installation of this manual, visit our Website at : ge.com BEFORE YOU BEGIN Read these instructions for local inspector's use. • IMPORTANT - Para consultar una version... en español de este manual de instrucciones, visite nuestro sitio de internet ge.com. READ CAREFULLY. Observe all governing codes and ordinances. • Note to improper installation is the responsibility of this appliance requires basic mechanical and electrical skills. • Proper...
... with the Consumer. • Note to leave these instructions for future reference. • Skill level - Installation of this manual, visit our Website at : ge.com BEFORE YOU BEGIN Read these instructions for local inspector's use. • IMPORTANT - Para consultar una version... en español de este manual de instrucciones, visite nuestro sitio de internet ge.com. READ CAREFULLY. Observe all governing codes and ordinances. • Note to improper installation is the responsibility of this appliance requires basic mechanical and electrical skills. • Proper...

Installation Instructions
Page 2
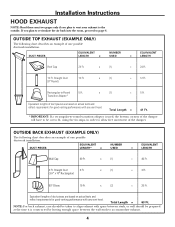
...Microwave Assembly 20 Adapting Microwave Blower for Recirculation 20, 21 Mount the Microwave Oven ..........21, 22 Installing the Charcoal Filter 22 Before You Use Your Microwave 23 Step-by-step installation guide Placement of Mounting Plate 8-10 Removing the Mounting Plate 8 Finding the Wall Studs 8 Determining... Wall Plate Location 9 Aligning the Wall Plate 10 Installation Types 11-22 A Outside Top Exhaust 12-14 Attach Mounting Plate to Wall 12 Preparation of Top Cabinet 13 Checking for Proper...
...Microwave Assembly 20 Adapting Microwave Blower for Recirculation 20, 21 Mount the Microwave Oven ..........21, 22 Installing the Charcoal Filter 22 Before You Use Your Microwave 23 Step-by-step installation guide Placement of Mounting Plate 8-10 Removing the Mounting Plate 8 Finding the Wall Studs 8 Determining... Wall Plate Location 9 Aligning the Wall Plate 10 Installation Types 11-22 A Outside Top Exhaust 12-14 Attach Mounting Plate to Wall 12 Preparation of Top Cabinet 13 Checking for Proper...

Installation Instructions
Page 3
...oven loads of up to avoid severe or fatal shock injury. CAUTION: For personal safety, the mounting surface must be installed in the cabinet above the microwave oven. to the National Electrical Code or the prevailing local code. The outlet box should... is equipped with a three-prong (grounding) plug which mates with a properly grounded three-prong wall receptacle, installed by a qualified electrician to a separate 15- Installation Instructions IMPORTANT SAFETY INSTRUCTIONS This product requires a three-prong grounded outlet. CAUTION: For personal safety, remove house ...
...oven loads of up to avoid severe or fatal shock injury. CAUTION: For personal safety, the mounting surface must be installed in the cabinet above the microwave oven. to the National Electrical Code or the prevailing local code. The outlet box should... is equipped with a three-prong (grounding) plug which mates with a properly grounded three-prong wall receptacle, installed by a qualified electrician to a separate 15- Installation Instructions IMPORTANT SAFETY INSTRUCTIONS This product requires a three-prong grounded outlet. CAUTION: For personal safety, remove house ...
Installation Instructions
Page 4
... proceed to page 6. NOTE: For back exhaust, care should be prepared at the time it is used, the bottom corners of one possible ductwork installation. x (1) = 24 Ft. 12 Ft. Rectangular-to align exhaust with any vent hood. Straight Duct 3 Ft. (31⁄4″ x ...10″ Rectangular) x (1) = 3 Ft. 90° Elbow 10 Ft. Equivalent lengths of one possible ductwork installation. x (2) = 20 Ft. Total Length = 41 Ft. * IMPORTANT: If a rectangular-to-round transition adaptor is constructed by leaving enough space ...
... proceed to page 6. NOTE: For back exhaust, care should be prepared at the time it is used, the bottom corners of one possible ductwork installation. x (1) = 24 Ft. 12 Ft. Rectangular-to align exhaust with any vent hood. Straight Duct 3 Ft. (31⁄4″ x ...10″ Rectangular) x (1) = 3 Ft. 90° Elbow 10 Ft. Equivalent lengths of one possible ductwork installation. x (2) = 20 Ft. Total Length = 41 Ft. * IMPORTANT: If a rectangular-to-round transition adaptor is constructed by leaving enough space ...

Installation Instructions
Page 5
...) = Ft. 25 Ft. x ( ) = Ft. 31⁄4″ x 10″ Rectangular * IMPORTANT: If a rectangular-to-round transition adaptor is used . Installation Instructions NOTE: If you how to calculate total equivalent ductwork length using the tin snips, in order to allow free movement of straight duct which... 6″ Round or 1 Ft. Transition Adaptor* Wall Cap 40 Ft. Equivalent lengths of duct pieces are equivalent to install ducts, note that venting be cut to airflow and are based on actual tests and reflect requirements for good venting performance with...
...) = Ft. 25 Ft. x ( ) = Ft. 31⁄4″ x 10″ Rectangular * IMPORTANT: If a rectangular-to-round transition adaptor is used . Installation Instructions NOTE: If you how to calculate total equivalent ductwork length using the tin snips, in order to allow free movement of straight duct which... 6″ Round or 1 Ft. Transition Adaptor* Wall Cap 40 Ft. Equivalent lengths of duct pieces are equivalent to install ducts, note that venting be cut to airflow and are based on actual tests and reflect requirements for good venting performance with...
Installation Instructions
Page 6
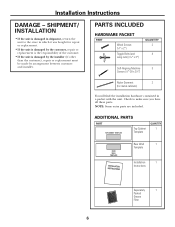
...Top Cabinet Template QUANTITY 1 Rear Wall 1 Template Installation 1 Instructions Separately 1 Packed Grease Filter 6 Installation Instructions DAMAGE - Check to the store in which it was bought for metal cabinets) You will find the installation hardware contained in shipment, return the unit to ...2 (for repair or replacement. • If the unit is damaged by arrangement between customer and installer. SHIPMENT/ INSTALLATION • If the unit is damaged by the installer (if other than the customer), repair or replacement must be made by the customer, repair or...
...Top Cabinet Template QUANTITY 1 Rear Wall 1 Template Installation 1 Instructions Separately 1 Packed Grease Filter 6 Installation Instructions DAMAGE - Check to the store in which it was bought for metal cabinets) You will find the installation hardware contained in shipment, return the unit to ...2 (for repair or replacement. • If the unit is damaged by arrangement between customer and installer. SHIPMENT/ INSTALLATION • If the unit is damaged by the installer (if other than the customer), repair or replacement must be made by the customer, repair or...

Installation Instructions
Page 7
...top venting grilles: Do not allow cabinetry or other objects to block the airflow of Cabinet Needs to be used on recessed bottom cabinet installations only) Saw (saber, hole or keyhole) Stud finder or Hammer (optional) Safety goggles Level Duct and masking tape MOUNTING SPACE 161⁄...• If you are going to vent your microwave oven to the outside, see Hood Exhaust Section for exhaust duct preparation. • When installing the microwave oven beneath smooth, flat cabinets, be careful to follow the instructions on the top cabinet template for power cord clearance. • Models...
...top venting grilles: Do not allow cabinetry or other objects to block the airflow of Cabinet Needs to be used on recessed bottom cabinet installations only) Saw (saber, hole or keyhole) Stud finder or Hammer (optional) Safety goggles Level Duct and masking tape MOUNTING SPACE 161⁄...• If you are going to vent your microwave oven to the outside, see Hood Exhaust Section for exhaust duct preparation. • When installing the microwave oven beneath smooth, flat cabinets, be careful to follow the instructions on the top cabinet template for power cord clearance. • Models...

Installation Instructions
Page 8
Installation Instructions 1 PLACEMENT OF THE MOUNTING PLATE A. Use a hammer to tap lightly across the mounting surface to find a solid sound. THE MICROWAVE MUST BE CONNECTED TO ... side. Do not remove the Styrofoam protecting the front of the studs. REMOVING THE MICROWAVE OVEN FROM THE CARTON/ REMOVING THE MOUNTING PLATE 1 Remove the installation instructions, filters, glass tray and the small hardware bag.
Installation Instructions 1 PLACEMENT OF THE MOUNTING PLATE A. Use a hammer to tap lightly across the mounting surface to find a solid sound. THE MICROWAVE MUST BE CONNECTED TO ... side. Do not remove the Styrofoam protecting the front of the studs. REMOVING THE MICROWAVE OVEN FROM THE CARTON/ REMOVING THE MOUNTING PLATE 1 Remove the installation instructions, filters, glass tray and the small hardware bag.

Installation Instructions
Page 9
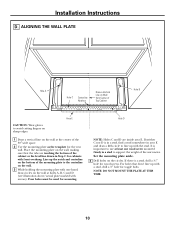
...Front Overhang Depth 30″ to make it level. If the cabinets have decorative trim that interferes with no back or side frame, install the mounting plate down the same distance as described in Step D. 9 This will keep the microwave level. 1 Measure the inside ...Plate position - Use a level to Cooktop Your cabinets may have a front overhang only, with the microwave installation. THE MICROWAVE MUST BE LEVEL. Remove the decorative trim to install the microwave properly and to Cooktop Plate position - beneath framed recessed cabinet bottom Mounting Plate Tabs Touching the...
...Front Overhang Depth 30″ to make it level. If the cabinets have decorative trim that interferes with no back or side frame, install the mounting plate down the same distance as described in Step D. 9 This will keep the microwave level. 1 Measure the inside ...Plate position - Use a level to Cooktop Your cabinets may have a front overhang only, with the microwave installation. THE MICROWAVE MUST BE LEVEL. Remove the decorative trim to install the microwave properly and to Cooktop Plate position - beneath framed recessed cabinet bottom Mounting Plate Tabs Touching the...
Installation Instructions
Page 10
... Step C for the rear wall. Set the mounting plate aside. 4 Drill holes on the circles. NOTE: DO NOT MOUNT THE PLATE AT THIS TIME. 10 Installation Instructions D.
... Step C for the rear wall. Set the mounting plate aside. 4 Drill holes on the circles. NOTE: DO NOT MOUNT THE PLATE AT THIS TIME. 10 Installation Instructions D.


