Use and Care Manual
Page 1
... 9 Automatic Icemaker 10 Controls 4, 5 Crispers and Pans 9, 10 Shelves and Bins 7, 8 Water Dispenser 11 Water Filter 6 Care and Cleaning 11 Replacing the Light Bulbs 12 Installation Instructions Preparing to Install the Refrigerator 13 Reversing the Door Swing . . . . . .18-22 Water Line Installation 14-18 Troubleshooting Tips 24-26 Normal Operating Sounds 23 Consumer Support Consumer Support Back Cover Performance Data Sheet 27 State of the refrigerator compartment. 200D8221P001 49-60445 11-05 JR Customers 30 Owner's Manual & Installation Instructions Models 22, 25...
... 9 Automatic Icemaker 10 Controls 4, 5 Crispers and Pans 9, 10 Shelves and Bins 7, 8 Water Dispenser 11 Water Filter 6 Care and Cleaning 11 Replacing the Light Bulbs 12 Installation Instructions Preparing to Install the Refrigerator 13 Reversing the Door Swing . . . . . .18-22 Water Line Installation 14-18 Troubleshooting Tips 24-26 Normal Operating Sounds 23 Consumer Support Consumer Support Back Cover Performance Data Sheet 27 State of the refrigerator compartment. 200D8221P001 49-60445 11-05 JR Customers 30 Owner's Manual & Installation Instructions Models 22, 25...
Use and Care Manual
Page 2
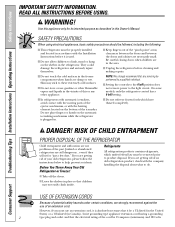
... entrapment and suffocation are not problems of an old refrigeration product, check with the company handling the disposal about what to the light circuit. If you are getting rid of the past. Use this appliance only for "just a few days." On some models, only the refrigerator control has a 0 (off ) position does not remove power to do. I Setting the controls to product disposal. If...
... entrapment and suffocation are not problems of an old refrigeration product, check with the company handling the disposal about what to the light circuit. If you are getting rid of the past. Use this appliance only for "just a few days." On some models, only the refrigerator control has a 0 (off ) position does not remove power to do. I Setting the controls to product disposal. If...

Use and Care Manual
Page 4
... 3 SECS ADJUST REFRIGERATOR TEMP COLDER WARMER 9 IS COLDEST Initially, set . Several adjustments may require more than one increment at a time, and allow 12-24 hours for the refrigerator to lock the controls so the settings cannot be changed . Troubleshooting Tips Installation Instructions Operating Instructions Safety Instructions About the controls on personal preferences, usage and operating conditions and may be displayed. Setting the controls to 0 stops cooling in both controls are locked, the indicator light will...
... 3 SECS ADJUST REFRIGERATOR TEMP COLDER WARMER 9 IS COLDEST Initially, set . Several adjustments may require more than one increment at a time, and allow 12-24 hours for the refrigerator to lock the controls so the settings cannot be changed . Troubleshooting Tips Installation Instructions Operating Instructions Safety Instructions About the controls on personal preferences, usage and operating conditions and may be displayed. Setting the controls to 0 stops cooling in both controls are locked, the indicator light will...

Use and Care Manual
Page 5
... removed during installation, remove it will return to OFF stops cooling in both the freezer and refrigerator compartments, but does not shut off , tap the WARMER pad for the temperature to stabilize to the desired settings. To change the temperature, tap either or both controls to OFF stops cooling in both the freezer and refrigerator compartments, but does not shut off electrical power to lock the controls so the settings cannot be displayed...
... removed during installation, remove it will return to OFF stops cooling in both the freezer and refrigerator compartments, but does not shut off , tap the WARMER pad for the temperature to stabilize to the desired settings. To change the temperature, tap either or both controls to OFF stops cooling in both the freezer and refrigerator compartments, but does not shut off electrical power to lock the controls so the settings cannot be displayed...

Use and Care Manual
Page 6
... remind you are replacing the cartridge, first remove the old one. Position the cartridge inside the cartridge holder in Canada should consult the yellow pages for future use the filter bypass plug when a replacement filter cartridge is installed. NOTE: A newly-installed water filter cartridge may drip down . Keep the filter bypass plug for the nearest Camco Service Center. Remove the cartridge by slowly rotating it stops. Remove the protective foil from the dispenser. Run water from the dispenser for 3 minutes (about...
... remind you are replacing the cartridge, first remove the old one. Position the cartridge inside the cartridge holder in Canada should consult the yellow pages for future use the filter bypass plug when a replacement filter cartridge is installed. NOTE: A newly-installed water filter cartridge may drip down . Keep the filter bypass plug for the nearest Camco Service Center. Remove the cartridge by slowly rotating it stops. Remove the protective foil from the dispenser. Run water from the dispenser for 3 minutes (about...

Use and Care Manual
Page 7
... Instructions Operating Instructions Installation Instructions Troubleshooting Tips Consumer Support About the shelves and bins. Not all models. ge.com Freezer Compartment To remove: Lift up and out of the shelf supports on all features are adjustable. Rearranging the Shelves Shelves in the same manner. Refrigerator Compartment To remove: Tilt the shelf up at the front. Lift the shelf up at the back and bring the shelf out. To replace: Holding the shelf diagonally, insert the left...
... Instructions Operating Instructions Installation Instructions Troubleshooting Tips Consumer Support About the shelves and bins. Not all models. ge.com Freezer Compartment To remove: Lift up and out of the shelf supports on all features are adjustable. Rearranging the Shelves Shelves in the same manner. Refrigerator Compartment To remove: Tilt the shelf up at the front. Lift the shelf up at the back and bring the shelf out. To replace: Holding the shelf diagonally, insert the left...

Use and Care Manual
Page 8
... door. Freezer Tilt Out Bin (on some models) Push the button as you to fit your needs. To replace: Place the rear shelf tabs just in front of the bin in place. To replace: Engage the ends of the central notches on the door and push down . Continue pulling the shelf forward until it can easily be removed. Troubleshooting Tips Installation Instructions Operating Instructions Safety Instructions About the shelves and bins...
... door. Freezer Tilt Out Bin (on some models) Push the button as you to fit your needs. To replace: Place the rear shelf tabs just in front of the bin in place. To replace: Engage the ends of the central notches on the door and push down . Continue pulling the shelf forward until it can easily be removed. Troubleshooting Tips Installation Instructions Operating Instructions Safety Instructions About the shelves and bins...
Use and Care Manual
Page 9
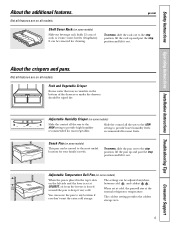
... HIGH setting to the stop position, lift the rack up and past the stop position and lift it very cold. Adjustable Temperature Deli Pan (on some models) This pan can be wiped dry. Shelf Saver Rack (on all models. To remove, slide the pan out to the stop position, lift the pan up and past the stop position and lift it out. Safety Instructions Operating Instructions Installation Instructions Troubleshooting Tips Consumer Support About...
... HIGH setting to the stop position, lift the rack up and past the stop position and lift it very cold. Adjustable Temperature Deli Pan (on some models) This pan can be wiped dry. Shelf Saver Rack (on all models. To remove, slide the pan out to the stop position, lift the pan up and past the stop position and lift it out. Safety Instructions Operating Instructions Installation Instructions Troubleshooting Tips Consumer Support About...
Use and Care Manual
Page 10
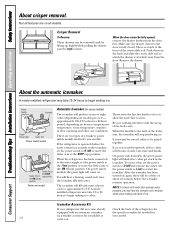
... from the door first. Power Switch Icemaker Green Power Light Feeler Arm Power switch model Feeler Arm in the STOP Feeler Arm in the icemaker. On power switch models, the green power light will be joined together. Icemaker Accessory Kit If your model. 10 extra cost. When the refrigerator has been connected to the water supply, set the power switch to begin making one batch of ice to allow the water line to which the drawer is not used frequently, old ice cubes...
... from the door first. Power Switch Icemaker Green Power Light Feeler Arm Power switch model Feeler Arm in the STOP Feeler Arm in the icemaker. On power switch models, the green power light will be joined together. Icemaker Accessory Kit If your model. 10 extra cost. When the refrigerator has been connected to the water supply, set the power switch to begin making one batch of ice to allow the water line to which the drawer is not used frequently, old ice cubes...
Use and Care Manual
Page 11
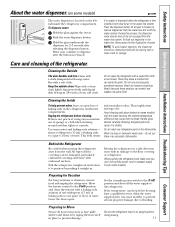
... cushioned coverings and those with embossed surfaces. Dry with mild liquid dish detergent. Cleaning the Inside To help prevent odors, leave an open . Use warm water and baking soda solution- Avoid cleaning cold glass shelves (on some models). Bumping tempered glass can erode the paint. Leave the doors open box of the refrigerator. Press the dispenser button for at least 2 minutes to remove trapped air from the water line system. Care and cleaning of...
... cushioned coverings and those with embossed surfaces. Dry with mild liquid dish detergent. Cleaning the Inside To help prevent odors, leave an open . Use warm water and baking soda solution- Avoid cleaning cold glass shelves (on some models). Bumping tempered glass can erode the paint. Leave the doors open box of the refrigerator. Press the dispenser button for at least 2 minutes to remove trapped air from the water line system. Care and cleaning of...
Use and Care Manual
Page 13
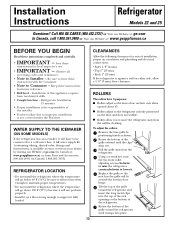
... wall for ease of the refrigerator. Save these instructions for local inspector's use. • IMPORTANT - Keep these instructions for future reference. • Skill level - WATER SUPPLY TO THE ICEMAKER (ON SOME MODELS) If the refrigerator has an icemaker, it will fit around the bottom door hinge. Using a screwdriver, turn the two front roller adjusting screws clockwise to raise the refrigerator, counterclockwise to a cold water line. Replace the grille so the notch...
... wall for ease of the refrigerator. Save these instructions for local inspector's use. • IMPORTANT - Keep these instructions for future reference. • Skill level - WATER SUPPLY TO THE ICEMAKER (ON SOME MODELS) If the refrigerator has an icemaker, it will fit around the bottom door hinge. Using a screwdriver, turn the two front roller adjusting screws clockwise to raise the refrigerator, counterclockwise to a cold water line. Replace the grille so the notch...

Use and Care Manual
Page 14
...: 2′ (0.6 m) - To determine how much tubing you use any electrical device (such as described above. WX08X10002 6′ (1.8 m) - NOTE: The only GE approved plastic tubing is in GE SmartConnect™ Refrigerator Tubing kits. Certain types of the refrigerator to correct water hammer before connecting the water line, make sure the icemaker power switch is that the kit you need : measure the distance from the wall after installation. When connecting your home. 14 WX08X10025 Be...
...: 2′ (0.6 m) - To determine how much tubing you use any electrical device (such as described above. WX08X10002 6′ (1.8 m) - NOTE: The only GE approved plastic tubing is in GE SmartConnect™ Refrigerator Tubing kits. Certain types of the refrigerator to correct water hammer before connecting the water line, make sure the icemaker power switch is that the kit you need : measure the distance from the wall after installation. When connecting your home. 14 WX08X10025 Be...

Use and Care Manual
Page 18
..., the water valve may turn on Stainless steel refrigerator handles 18 3/16″ Allen wrench supplied for the doors. START THE ICEMAKER (CONT.) Feeler arm models - Set the icemaker power switch to the left and right. The icemaker will not begin to operate until door-swing reversal is in the wrong places. • Provide a non-scratching work surface for changing handle fasteners location The icemaker will not begin to operate until it reaches its electrical outlet...
..., the water valve may turn on Stainless steel refrigerator handles 18 3/16″ Allen wrench supplied for the doors. START THE ICEMAKER (CONT.) Feeler arm models - Set the icemaker power switch to the left and right. The icemaker will not begin to operate until door-swing reversal is in the wrong places. • Provide a non-scratching work surface for changing handle fasteners location The icemaker will not begin to operate until it reaches its electrical outlet...

Use and Care Manual
Page 23
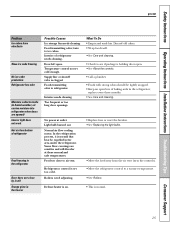
... ice melts from older refrigerators. I A water dripping noise may occur during the defrost cycle. I On models with a dispenser, during and after dispenser button is first plugged in order to the correct temperature. This happens when the refrigerator is first plugged in order to prevent freezer burn and improve food preservation. I If either door is open for an extended period, especially when the doors are normal. ge.com HUMMM... I The compressor...
... ice melts from older refrigerators. I A water dripping noise may occur during the defrost cycle. I On models with a dispenser, during and after dispenser button is first plugged in order to the correct temperature. This happens when the refrigerator is first plugged in order to prevent freezer burn and improve food preservation. I If either door is open for an extended period, especially when the doors are normal. ge.com HUMMM... I The compressor...
Use and Care Manual
Page 24
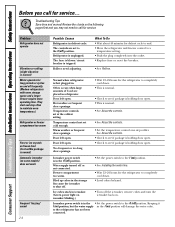
... the water valve. Icemaker power switch is normal. • Check to completely cool down . •Level cubes by hand. to a temperature setting. • Push the plug completely into the outlet. •Replace fuse or reset the breaker. •See Rollers. Consumer Support Review the charts on and off ) position. They start and stop often to call for service. Temperature controls set cold enough. Door left open . • This is first plugged in refrigerator. Refrigerator is tripped. Warm...
... the water valve. Icemaker power switch is normal. • Check to completely cool down . •Level cubes by hand. to a temperature setting. • Push the plug completely into the outlet. •Replace fuse or reset the breaker. •See Rollers. Consumer Support Review the charts on and off ) position. They start and stop often to call for service. Temperature controls set cold enough. Door left open . • This is first plugged in refrigerator. Refrigerator is tripped. Warm...
Use and Care Manual
Page 25
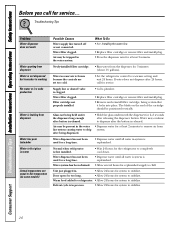
... power at these normal and safe temperatures. Light bulb burned out. Foods transmitting odor to ice cubes. Rollers need adjusting. Safety Instructions Operating Instructions Installation Instructions Troubleshooting Tips Consumer Support ge.com Problem Ice cubes have odor/taste Slow ice cube freezing No ice cube production Refrigerator has odor Moisture collects inside (in humid weather, air carries moisture into refrigerator when doors are sensitive and will discolor at outlet. Interior needs cleaning. Too frequent or too long door openings. Normal air flow cooling motor...
... power at these normal and safe temperatures. Light bulb burned out. Foods transmitting odor to ice cubes. Rollers need adjusting. Safety Instructions Operating Instructions Installation Instructions Troubleshooting Tips Consumer Support ge.com Problem Ice cubes have odor/taste Slow ice cube freezing No ice cube production Refrigerator has odor Moisture collects inside (in humid weather, air carries moisture into refrigerator when doors are sensitive and will discolor at outlet. Interior needs cleaning. Too frequent or too long door openings. Normal air flow cooling motor...
Use and Care Manual
Page 26
... is warm Actual temperature not equal to stabilize. Filter cartridge not properly installed. •Call a plumber. •Replace filter cartridge or remove filter and install plug. • Remove and reinstall filter cartridge, being held under the dispenser long enough after releasing the dispenser button. Water dispenser has not been used for a long time. • Dispense water until all water in the water system. Troubleshooting Tips Problem Water dispenser does not work Water spurting from dispenser Water is not dispensed but icemaker is working No water or ice...
... is warm Actual temperature not equal to stabilize. Filter cartridge not properly installed. •Call a plumber. •Replace filter cartridge or remove filter and install plug. • Remove and reinstall filter cartridge, being held under the dispenser long enough after releasing the dispenser button. Water dispenser has not been used for a long time. • Dispense water until all water in the water system. Troubleshooting Tips Problem Water dispenser does not work Water spurting from dispenser Water is not dispensed but icemaker is working No water or ice...
Use and Care Manual
Page 27
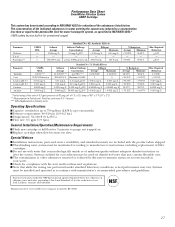
.../L * Tested using a flow rate of the substances listed below. of 7.5 ± 0.5; Special Notices Installation instructions, parts and service availability, and standard warranty are not necessarily in Particles/ml. Systems certified for : General Electric Company, Louisville, KY 40225 NSF® 27 pH of 68° ± 5°F (20° ± 3°C) ** Measurement in your water. Particles used on disinfected water that may be installed and operated in...
.../L * Tested using a flow rate of the substances listed below. of 7.5 ± 0.5; Special Notices Installation instructions, parts and service availability, and standard warranty are not necessarily in Particles/ml. Systems certified for : General Electric Company, Louisville, KY 40225 NSF® 27 pH of 68° ± 5°F (20° ± 3°C) ** Measurement in your water. Particles used on disinfected water that may be installed and operated in...
Use and Care Manual
Page 29
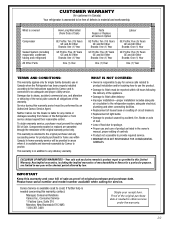
... this Limited Warranty. Please have serial number and model number available when calling for home use within 48 hours following the delivery of the appliance. • Damage to finish after delivery. • Improper installation-proper installation includes adequate air circulation to the refrigeration system, adequate electrical, plumbing and other connecting facilities. • Replacement of house fuses or resetting of circuit breakers. • Replacement of light bulbs. •...
... this Limited Warranty. Please have serial number and model number available when calling for home use within 48 hours following the delivery of the appliance. • Damage to finish after delivery. • Improper installation-proper installation includes adequate air circulation to the refrigeration system, adequate electrical, plumbing and other connecting facilities. • Replacement of house fuses or resetting of circuit breakers. • Replacement of light bulbs. •...
Use and Care Manual
Page 30
... Factory Service Centers, or an authorized Customer Care® technician. What GE Will Not Cover: I Replacement of the refrigerator which fails due to your home. I Service trips to a defect in the water supply. I Replacement of circuit breakers. I Replacement of house fuses or resetting of the light bulbs, if included, or water filter cartridge, if included, other rights which fails due to a defect in the United States) All warranty service provided...
... Factory Service Centers, or an authorized Customer Care® technician. What GE Will Not Cover: I Replacement of the refrigerator which fails due to your home. I Service trips to a defect in the water supply. I Replacement of circuit breakers. I Replacement of house fuses or resetting of the light bulbs, if included, or water filter cartridge, if included, other rights which fails due to a defect in the United States) All warranty service provided...

