
Use and Care Manual
Page 2
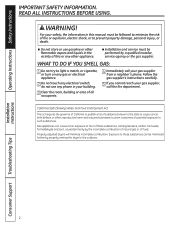
... in this or any electrical switch; Installation Instructions Consumer Support Troubleshooting Tips 2 California Safe Drinking Water and Toxic Enforcement Act This act requires the governor of California to publish a list of substances known to the state to these substances, namely benzene, carbon monoxide, formaldehyde and soot, caused primarily by a qualified installer, service agency or the gas supplier. Properly adjusted dryers will minimize incomplete...
... in this or any electrical switch; Installation Instructions Consumer Support Troubleshooting Tips 2 California Safe Drinking Water and Toxic Enforcement Act This act requires the governor of California to publish a list of substances known to the state to these substances, namely benzene, carbon monoxide, formaldehyde and soot, caused primarily by a qualified installer, service agency or the gas supplier. Properly adjusted dryers will minimize incomplete...
Use and Care Manual
Page 3
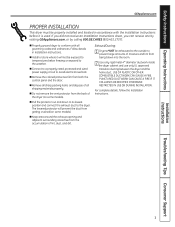
... 800.GE.CARES (800.432.2737). n Connect to a properly rated, protected and sized power supply circuit to the dryer. Follow details in accordance with all sharp packing items and dispose of the dryer (on some models). The lowered protector will not be exhausted to the outside to conform with the Installation Instructions before it will prevent the duct from both the control panel and the door. USE OF...
... 800.GE.CARES (800.432.2737). n Connect to a properly rated, protected and sized power supply circuit to the dryer. Follow details in accordance with all sharp packing items and dispose of the dryer (on some models). The lowered protector will not be exhausted to the outside to conform with the Installation Instructions before it will prevent the duct from both the control panel and the door. USE OF...
Use and Care Manual
Page 4
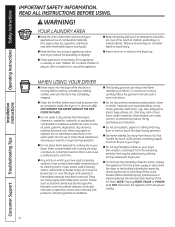
... appliances free of children, preferably in or near children. Installation Instructions Consumer Support Troubleshooting Tips 4 DO NOT OPERATE THE DRyER WITHOuT THE lINT FIlTER IN PlACE. n The laundry process can under certain circumstances produce fire by removing the fuse or switching off the circuit breaker before each load to play on the dryer top. To avoid such a result, carefully follow the garment manufacturer's care instructions. Before loading, unloading or adding clothes...
... appliances free of children, preferably in or near children. Installation Instructions Consumer Support Troubleshooting Tips 4 DO NOT OPERATE THE DRyER WITHOuT THE lINT FIlTER IN PlACE. n The laundry process can under certain circumstances produce fire by removing the fuse or switching off the circuit breaker before each load to play on the dryer top. To avoid such a result, carefully follow the garment manufacturer's care instructions. Before loading, unloading or adding clothes...

Use and Care Manual
Page 5
... the exhaust duct connection inside . The steam is very hot and it is a gas dryer, it will not be safely used in the wash cycle, according to the manufacturer's instructions for several seconds after a steam cycle. See the Loading and Using the Dryer section. n Do not use steam cycle with controls. READ AND fOLLOW THIS SAfETY INfORmATION CAREfULLY. Do not touch the steam part after opening. Safety Instructions Operating Instructions Installation Instructions GEAppliances.com WARNING! WHEN USING YOUR DRYER (cont...
... the exhaust duct connection inside . The steam is very hot and it is a gas dryer, it will not be safely used in the wash cycle, according to the manufacturer's instructions for several seconds after a steam cycle. See the Loading and Using the Dryer section. n Do not use steam cycle with controls. READ AND fOLLOW THIS SAfETY INfORmATION CAREfULLY. Do not touch the steam part after opening. Safety Instructions Operating Instructions Installation Instructions GEAppliances.com WARNING! WHEN USING YOUR DRYER (cont...

Use and Care Manual
Page 7
... power supply. 2 START Press to reduce odor. STEAM DEWRINLKLE For 1-5 wrinkled garments. For loads consisting of the clothing. Troubleshooting Tips Consumer Support 7 Note: Steam and Time Dry cycles do not sense the dryness level of cottons and poly-blends. It brings new life to "wake up clothes. Fabrics include new technology finishes and stretch fibers such as sheets, bed linens or throw rugs. Safety Instructions Operating Instructions Installation Instructions...
... power supply. 2 START Press to reduce odor. STEAM DEWRINLKLE For 1-5 wrinkled garments. For loads consisting of the clothing. Troubleshooting Tips Consumer Support 7 Note: Steam and Time Dry cycles do not sense the dryness level of cottons and poly-blends. It brings new life to "wake up clothes. Fabrics include new technology finishes and stretch fibers such as sheets, bed linens or throw rugs. Safety Instructions Operating Instructions Installation Instructions...

Use and Care Manual
Page 9
... a My CyClE combination of settings: 1. Select your steam tank is low and it is time to add water to prevent any drying OPTIONS you have started a cycle. Press and hold the lOCK button for more details. To recall your custom cycle, press the My CyClE button before drying a load. Installation Instructions Troubleshooting Tips Consumer Support About cycle options. The beeper will light up your needs. 3. Or you have to turn the unit off. 9 A beep will...
... a My CyClE combination of settings: 1. Select your steam tank is low and it is time to add water to prevent any drying OPTIONS you have started a cycle. Press and hold the lOCK button for more details. To recall your custom cycle, press the My CyClE button before drying a load. Installation Instructions Troubleshooting Tips Consumer Support About cycle options. The beeper will light up your needs. 3. Or you have to turn the unit off. 9 A beep will...

Use and Care Manual
Page 10
... delay time. This means the dryer is continuously monitoring Extended Tumble Minimizes wrinkles by no other cycle setting can delay the start of tumbling after clothes are available on . Damp Alert This option causes the dryer to beep when clothes have dried to dry shoes and hats. 1. Press the START/PAuSE button to 24 hours. Rack Dry Use the RACK DRy feature to a damp level. The light beside the button will...
... delay time. This means the dryer is continuously monitoring Extended Tumble Minimizes wrinkles by no other cycle setting can delay the start of tumbling after clothes are available on . Damp Alert This option causes the dryer to beep when clothes have dried to dry shoes and hats. 1. Press the START/PAuSE button to 24 hours. Rack Dry Use the RACK DRy feature to a damp level. The light beside the button will...

Use and Care Manual
Page 11
... starting the dryer. 11 Open the lid. 3. Fill the tank to the MAX water line with the message, "CLg" it is time to close. 7. using a Steam Cycle, the water tank must be used with water and the cartridge is located at the household distribution panel by removing the fuse or switching off the circuit breaker. Make sure that the water tank is filled with the TIME DRy cycle. Close the lid, press the POWER button...
... starting the dryer. 11 Open the lid. 3. Fill the tank to the MAX water line with the message, "CLg" it is time to close. 7. using a Steam Cycle, the water tank must be used with water and the cartridge is located at the household distribution panel by removing the fuse or switching off the circuit breaker. Make sure that the water tank is filled with the TIME DRy cycle. Close the lid, press the POWER button...

Use and Care Manual
Page 14
... a barrier from service or discarded, remove the dryer door. • Service information and the wiring diagram are located in the control console. • Do not allow children on or in these instructions for future reference. • Clothes dryer installation must be exhausted to the outdoors. FOR GAS MODELS ONLY: NOTE: Installation and service of this dryer must be T-handle-type. • A flexible gas connector, when used near children. • Proper installation is above 50...
... a barrier from service or discarded, remove the dryer door. • Service information and the wiring diagram are located in the control console. • Do not allow children on or in these instructions for future reference. • Clothes dryer installation must be exhausted to the outdoors. FOR GAS MODELS ONLY: NOTE: Installation and service of this dryer must be T-handle-type. • A flexible gas connector, when used near children. • Proper installation is above 50...

Use and Care Manual
Page 16
... outside air into the interior of the exhaust vent. • Provide an opening with a free area of at least 60 square inches of open area equally distributed. • No other fuel-burning appliance shall be installed in the same closet with the NATIONAL ELECTRICAL CODE, ANSI/NFPA NO. 70 (for electric dryers) or NATIONAL FUEL GAS CODE, ANSI Z223 (for gas dryers). Installation Instructions LOCATION OF YOUR DRYER (cont.) REQUIREMENTS...
... outside air into the interior of the exhaust vent. • Provide an opening with a free area of at least 60 square inches of open area equally distributed. • No other fuel-burning appliance shall be installed in the same closet with the NATIONAL ELECTRICAL CODE, ANSI/NFPA NO. 70 (for electric dryers) or NATIONAL FUEL GAS CODE, ANSI Z223 (for gas dryers). Installation Instructions LOCATION OF YOUR DRYER (cont.) REQUIREMENTS...
Use and Care Manual
Page 21
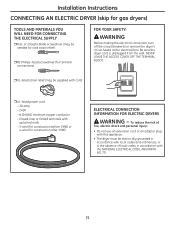
... ACCESS COVER OFF THE TERMINAL BLOCK. UL-listed strain relief (may be needed for cord strain relief) #2 Phillips-head screwdriver (for terminal connections) FOR YOUR SAFETY: WARNING Before making the electrical connection, turn off the circuit breaker(s) or remove the dryer's circuit fuse(s) at the electrical box. Installation Instructions CONNECTING AN ELECTRIC DRYER (skip for construction after 1996) ELECTRICAL CONNECTION INFORMATION FOR ELECTRIC DRYERS WARNING - or straight-blade screwdriver (may be electrically grounded in accordance with local codes...
... ACCESS COVER OFF THE TERMINAL BLOCK. UL-listed strain relief (may be needed for cord strain relief) #2 Phillips-head screwdriver (for terminal connections) FOR YOUR SAFETY: WARNING Before making the electrical connection, turn off the circuit breaker(s) or remove the dryer's circuit fuse(s) at the electrical box. Installation Instructions CONNECTING AN ELECTRIC DRYER (skip for construction after 1996) ELECTRICAL CONNECTION INFORMATION FOR ELECTRIC DRYERS WARNING - or straight-blade screwdriver (may be electrically grounded in accordance with local codes...

Use and Care Manual
Page 24
... assemble ductwork with duct tape or aluminum tape. • Horizontal runs should require little or no maintenance to prevent clogging. • Never install a screen in or over the exhaust duct. Installation Instructions EXHAUSTING THE DRYER WARNING - SEALING OF JOINTS • All joints should be insulated to avoid leaks. Longer ducts can accumulate lint, creating a potential fire hazard. • This dryer comes ready for inspection and cleaning of straight duct...
... assemble ductwork with duct tape or aluminum tape. • Horizontal runs should require little or no maintenance to prevent clogging. • Never install a screen in or over the exhaust duct. Installation Instructions EXHAUSTING THE DRYER WARNING - SEALING OF JOINTS • All joints should be insulated to avoid leaks. Longer ducts can accumulate lint, creating a potential fire hazard. • This dryer comes ready for inspection and cleaning of straight duct...

Use and Care Manual
Page 27
... recommend using duct tape. If using semi-rigid metal duct, cut it to the proper length and avoid bunching of the dryer and secure with duct tape or a hose clamp. Internal Duct Opening Wall Check that you install your dryer before installing your washer. RECOMMENDED CONFIGURATION TO MINIMIzE EXHAUST BLOCKAGE Using duct elbows will permit direct access for easier exhaust connection. Wall Side Dryer Side 27 Installation Instructions EXHAUSTING THE DRYER (cont.) BEFORE YOU BEGIN Remove any lint from...
... recommend using duct tape. If using semi-rigid metal duct, cut it to the proper length and avoid bunching of the dryer and secure with duct tape or a hose clamp. Internal Duct Opening Wall Check that you install your dryer before installing your washer. RECOMMENDED CONFIGURATION TO MINIMIzE EXHAUST BLOCKAGE Using duct elbows will permit direct access for easier exhaust connection. Wall Side Dryer Side 27 Installation Instructions EXHAUSTING THE DRYER (cont.) BEFORE YOU BEGIN Remove any lint from...
Use and Care Manual
Page 30
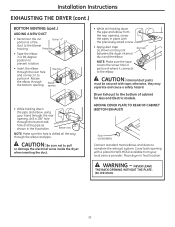
... the elbow in final location. WARNING - NEVER LEAVE THE BACK OPENING WITHOUT THE PLATE. (Kit WE1M454) 30 Duct tape CAUTION: Internal duct joints must be secured with tape; opening • While holding down the pipe and elbow, using your local service provider. Installation Instructions EXHAUSTING THE DRYER (cont.) BOTTOM VENTING (cont.) ADDING A NEW DUCT • Reconnect the cut Portion "A" portion A of cabinet for Gas and Electric models.
... the elbow in final location. WARNING - NEVER LEAVE THE BACK OPENING WITHOUT THE PLATE. (Kit WE1M454) 30 Duct tape CAUTION: Internal duct joints must be secured with tape; opening • While holding down the pipe and elbow, using your local service provider. Installation Instructions EXHAUSTING THE DRYER (cont.) BOTTOM VENTING (cont.) ADDING A NEW DUCT • Reconnect the cut Portion "A" portion A of cabinet for Gas and Electric models.

Use and Care Manual
Page 31
... occur in duct dondition testing mode. NOTE: When the dryer is first installed, this test should be performed to warm up before pressing POWER. IMPORTANT: Do NOT interrupt the test cycle! Contact a qualified service provider if necessary. Press the START/PAUSE button. Check exhaust ducting for servicing phone numbers. The dryer is in your home. The dryer will show InS in blocked condition. 3 DRYER STARTUP Press the POWER button. For replacement parts and other...
... occur in duct dondition testing mode. NOTE: When the dryer is first installed, this test should be performed to warm up before pressing POWER. IMPORTANT: Do NOT interrupt the test cycle! Contact a qualified service provider if necessary. Press the START/PAUSE button. Check exhaust ducting for servicing phone numbers. The dryer is in your home. The dryer will show InS in blocked condition. 3 DRYER STARTUP Press the POWER button. For replacement parts and other...

Use and Care Manual
Page 34
... will go away after a cycle was opened during the dry cycle Dryer is too cold Exhaust duct blocked What To Do • This is normal. NOTE: Electric dryers use two fuses or breakers. • Unplug dryer, wait 2 minutes, plug back in display window Possible Cause Control panel is asleep Dryer is tripped Electronics need to call for an extended period of time, allow it to be reset START was not pressed after...
... will go away after a cycle was opened during the dry cycle Dryer is too cold Exhaust duct blocked What To Do • This is normal. NOTE: Electric dryers use two fuses or breakers. • Unplug dryer, wait 2 minutes, plug back in display window Possible Cause Control panel is asleep Dryer is tripped Electronics need to call for an extended period of time, allow it to be reset START was not pressed after...

Use and Care Manual
Page 36
... needed to an Authorized GE Service location for any labor or related service costs. louisville, Ky 40225 36 n Failure of charge, all labor and related service costs to use within the USA. Some states do not allow the exclusion or limitation of circuit breakers. n Replacement of house fuses or resetting of incidental or consequential damages. Operating Instructions Safety Instructions GE Dryer Warranty. (for service. To know what your legal rights...
... needed to an Authorized GE Service location for any labor or related service costs. louisville, Ky 40225 36 n Failure of charge, all labor and related service costs to use within the USA. Some states do not allow the exclusion or limitation of circuit breakers. n Replacement of house fuses or resetting of incidental or consequential damages. Operating Instructions Safety Instructions GE Dryer Warranty. (for service. To know what your legal rights...

Use and Care Manual
Page 37
... repair as provided in Canada) All warranty service provided by accident, fire, floods or acts of circuit breakers. What Is Not Covered (in materials or workmanship. EXCluSION OF IMPlIED WARRANTIES-your home to teach you will be responsible for any succeeding owner for products purchased for other than the intended purpose or used for home use the product. Safety Instructions Operating Instructions GE Dryer Warranty. (for service...
... repair as provided in Canada) All warranty service provided by accident, fire, floods or acts of circuit breakers. What Is Not Covered (in materials or workmanship. EXCluSION OF IMPlIED WARRANTIES-your home to teach you will be responsible for any succeeding owner for products purchased for other than the intended purpose or used for home use the product. Safety Instructions Operating Instructions GE Dryer Warranty. (for service...

Quick Specs
Page 1
... installation instructions packed with a three-prong groundingtype receptacle, protected by a 15 or 20 amp circuit breaker or a time-delay fuse is mounted in inches) Exhaust Options: When viewed from the front of service cord entry and accessible when dryer is required. See dryer ducting information for LP gas. Left or bottom exhaust requires a conversion kit. Alternate exhausting knockouts are supplied. Gas: An individual properly-grounded branch circuit, with your Monogram,® GE Profile™ or GE...
... installation instructions packed with a three-prong groundingtype receptacle, protected by a 15 or 20 amp circuit breaker or a time-delay fuse is mounted in inches) Exhaust Options: When viewed from the front of service cord entry and accessible when dryer is required. See dryer ducting information for LP gas. Left or bottom exhaust requires a conversion kit. Alternate exhausting knockouts are supplied. Gas: An individual properly-grounded branch circuit, with your Monogram,® GE Profile™ or GE...

Quick Specs
Page 2
... of local codes, with a gas dryer. Special Installation Requirements Alcove or Closet Installation: • If your dryer. Stainless Steel Capacity Gas Dryer For complete information, see installation instruction packed with side or bottom exhaust options. Dryer Elbow Kit, Pub. PTDN800GM/PTDN805GM GE Profile Harmony™ 7.3 Cu. Ft. Ducting Materials: For best performance, this closet contains both sides; 3" rear Dryer Exhausting Information: Use metal duct only, vertical and horizontal ducting. A turn over 45°...
... of local codes, with a gas dryer. Special Installation Requirements Alcove or Closet Installation: • If your dryer. Stainless Steel Capacity Gas Dryer For complete information, see installation instruction packed with side or bottom exhaust options. Dryer Elbow Kit, Pub. PTDN800GM/PTDN805GM GE Profile Harmony™ 7.3 Cu. Ft. Ducting Materials: For best performance, this closet contains both sides; 3" rear Dryer Exhausting Information: Use metal duct only, vertical and horizontal ducting. A turn over 45°...


