Owners Manual
Page 1
Profile Refr igeraSidetobyrSides ge.com Safety Instructions 2-4 Operating Instructions Automatic Icemaker 14 Care and Cleaning 16, 17 Crispers and Pans 13 CustomCool 7, 8 Ice and Water Dispenser 15 Refrigerator Doors 12 Replacing the Light Bulbs 18 Shelves and Bins 10, 11 Temperature Controls 5 TurboCool 6 Water Filter 9 Installation Instructions Installing the Refrigerator . . . .28-31 Moving the Refrigerator...42 Warranty (Canadian 39 Warranty (U.S 40 Owner's Manual and Installation Models 23, 25, 26, 27 and 29 Profile Côte à Côte Réfrigérateurs Manuel ...
Profile Refr igeraSidetobyrSides ge.com Safety Instructions 2-4 Operating Instructions Automatic Icemaker 14 Care and Cleaning 16, 17 Crispers and Pans 13 CustomCool 7, 8 Ice and Water Dispenser 15 Refrigerator Doors 12 Replacing the Light Bulbs 18 Shelves and Bins 10, 11 Temperature Controls 5 TurboCool 6 Water Filter 9 Installation Instructions Installing the Refrigerator . . . .28-31 Moving the Refrigerator...42 Warranty (Canadian 39 Warranty (U.S 40 Owner's Manual and Installation Models 23, 25, 26, 27 and 29 Profile Côte à Côte Réfrigérateurs Manuel ...
Owners Manual
Page 2
..., stand or hang on the shelves in accordance with the heating element located on the automatic icemaking mechanism while the refrigerator is used. s In refrigerators with automatic icemakers, avoid contact with the moving parts of the icemaker. Be careful closing doors when children are in... this or any servicing be properly installed and located in the refrigerator. s Keep fingers out of this Owner's Manual. s Unplug the refrigerator before it is plugged in the freezer compartment when hands are necessarily small. Do not place fingers...
..., stand or hang on the shelves in accordance with the heating element located on the automatic icemaking mechanism while the refrigerator is used. s In refrigerators with automatic icemakers, avoid contact with the moving parts of the icemaker. Be careful closing doors when children are in... this or any servicing be properly installed and located in the refrigerator. s Keep fingers out of this Owner's Manual. s Unplug the refrigerator before it is plugged in the freezer compartment when hands are necessarily small. Do not place fingers...
Owners Manual
Page 3
... ge.com DANGER! Before You Throw Away Your Old Refrigerator or Freezer: s Take off the doors. s Leave the shelves in Canada), 3-wire grounding type appliance extension cord having a grounding type plug and outlet and that children may not easily climb inside. Refrigerants All refrigeration products contain refrigerants,...rid of an extension cord. USE OF EXTENSION CORDS Because of potential safety hazards under federal law must use of an old refrigeration product, check with the company handling the disposal about what to product disposal. However, if you are getting rid of ...
... ge.com DANGER! Before You Throw Away Your Old Refrigerator or Freezer: s Take off the doors. s Leave the shelves in Canada), 3-wire grounding type appliance extension cord having a grounding type plug and outlet and that children may not easily climb inside. Refrigerants All refrigeration products contain refrigerants,...rid of an extension cord. USE OF EXTENSION CORDS Because of potential safety hazards under federal law must use of an old refrigeration product, check with the company handling the disposal about what to product disposal. However, if you are getting rid of ...
Owners Manual
Page 4
... firmly and pull straight out from the wall, be careful not to have become frayed or otherwise damaged. When moving the refrigerator away from the outlet. Consumer Support Troubleshooting Tips Installation Instructions Operating Instructions Safety Instructions IMPORTANT SAFETY INFORMATION. READ ALL INSTRUCTIONS BEFORE ... plugged into its length or at either end. SAVE THESE INSTRUCTIONS 4 Do not use a cord that have it is your refrigerator by a qualified electrician to minimize the possibility of this appliance. Repair or replace immediately all power cords that shows cracks or ...
... firmly and pull straight out from the wall, be careful not to have become frayed or otherwise damaged. When moving the refrigerator away from the outlet. Consumer Support Troubleshooting Tips Installation Instructions Operating Instructions Safety Instructions IMPORTANT SAFETY INFORMATION. READ ALL INSTRUCTIONS BEFORE ... plugged into its length or at either end. SAVE THESE INSTRUCTIONS 4 Do not use a cord that have it is your refrigerator by a qualified electrician to minimize the possibility of this appliance. Repair or replace immediately all power cords that shows cracks or ...
Owners Manual
Page 5
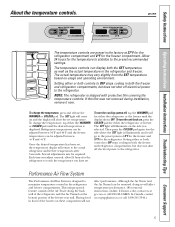
... temperature controls. Then press the COLDER pad again (on these components will return to reach the temperature you adjust controls, allow 24 hours for the refrigerator. ge.com The temperature controls are preset in both controls to OFF stops cooling in the factory at 37°F for the... the freezer rear wall. This unique special feature consists of the Air Tower along the back wall of the refrigerator and the Air Tunnel on -line, 24 hours a day, contact us at ge.com or call 1.800.561.3344.) 5 If this film was not removed during installation, remove it will affect ...
... temperature controls. Then press the COLDER pad again (on these components will return to reach the temperature you adjust controls, allow 24 hours for the refrigerator. ge.com The temperature controls are preset in both controls to OFF stops cooling in the factory at 37°F for the... the freezer rear wall. This unique special feature consists of the Air Tower along the back wall of the refrigerator and the Air Tunnel on -line, 24 hours a day, contact us at ge.com or call 1.800.561.3344.) 5 If this film was not removed during installation, remove it will affect ...
Owners Manual
Page 6
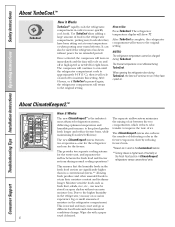
...Instructions Operating Instructions Safety Instructions About TurboCool.™ How it Works The new ClimateKeeper2™ is the industry's most advanced refrigeration system, delivering optimum temperature and humidity performance to keep food garden fresh longer and reduce freezer burn, while maintaining E star... feature. **Testing shows a higher level of food to maintain this setting. The freezer temperature is pressed again, the refrigerator compartment will cycle on open shelves without power for the entire unit, and separates the airflow between the two compartments, ...
...Instructions Operating Instructions Safety Instructions About TurboCool.™ How it Works The new ClimateKeeper2™ is the industry's most advanced refrigeration system, delivering optimum temperature and humidity performance to keep food garden fresh longer and reduce freezer burn, while maintaining E star... feature. **Testing shows a higher level of food to maintain this setting. The freezer temperature is pressed again, the refrigerator compartment will cycle on open shelves without power for the entire unit, and separates the airflow between the two compartments, ...
Owners Manual
Page 7
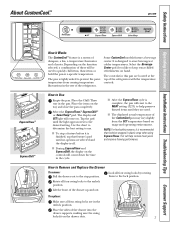
Safety Instructions Operating Instructions Installation Instructions Troubleshooting Tips Consumer Support About CustomCool.™ ge.com ExpressThaw™ ExpressChill™ How it Works The CustomCool™ feature is a system of these will be wrapped in plastic wrap when using ... extra-chilled refreshments on the tray and close the pan completely. Place the items on hand. s To stop position. Lift the front of the refrigerator with the temperature controls. To replace: Make sure all four swing locks are selected and the display is off. The controls for this pan are...
Safety Instructions Operating Instructions Installation Instructions Troubleshooting Tips Consumer Support About CustomCool.™ ge.com ExpressThaw™ ExpressChill™ How it Works The CustomCool™ feature is a system of these will be wrapped in plastic wrap when using ... extra-chilled refreshments on the tray and close the pan completely. Place the items on hand. s To stop position. Lift the front of the refrigerator with the temperature controls. To replace: Make sure all four swing locks are selected and the display is off. The controls for this pan are...
Owners Manual
Page 9
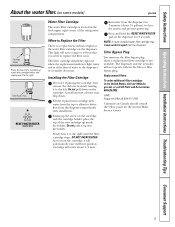
... up into position. As you need to replace the filter soon. Run water from the dispenser. Safety Instructions Operating Instructions Installation Instructions Troubleshooting Tips Consumer Support About the water filter. (on some models) ge.com Cartridge Holder Place the top of the cartridge up inside the holder. GWF Suggested Retail...to clear the system and prevent sputtering. Lining up the arrow on the cartridge and the cartridge holder, place the top of the refrigerator compartment. Filter Bypass Plug Water Filter Cartridge The water filter cartridge is not available.
... up into position. As you need to replace the filter soon. Run water from the dispenser. Safety Instructions Operating Instructions Installation Instructions Troubleshooting Tips Consumer Support About the water filter. (on some models) ge.com Cartridge Holder Place the top of the cartridge up inside the holder. GWF Suggested Retail...to clear the system and prevent sputtering. Lining up the arrow on the cartridge and the cartridge holder, place the top of the refrigerator compartment. Filter Bypass Plug Water Filter Cartridge The water filter cartridge is not available.
Owners Manual
Page 10
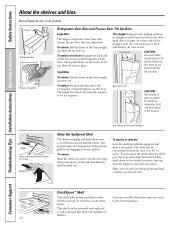
... not block or fall into place. Make sure you push the shelves all models. Snugger Refrigerator bin Freezer tilt-out bin Refrigerator Door Bins and Freezer Door Tilt-Out Bins Large Bins The larger refrigerator door bins and freezer tilt-out door bins are designed to help prevent spills from dripping ... the back side of the bin straight up, then lift up then out. Bin will lock in half and slides under itself for proper ice dispensing. To replace: Position the bin above the rectangular molded supports on all the way back in place. QuickSpace™ Shelf This shelf splits in...
... not block or fall into place. Make sure you push the shelves all models. Snugger Refrigerator bin Freezer tilt-out bin Refrigerator Door Bins and Freezer Door Tilt-Out Bins Large Bins The larger refrigerator door bins and freezer tilt-out door bins are designed to help prevent spills from dripping ... the back side of the bin straight up, then lift up then out. Bin will lock in half and slides under itself for proper ice dispensing. To replace: Position the bin above the rectangular molded supports on all the way back in place. QuickSpace™ Shelf This shelf splits in...
Owners Manual
Page 12
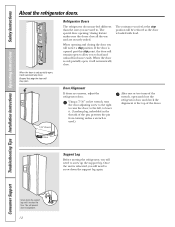
...the right to screw up the support leg. Once the unit is only partially open to allow you will automatically close the refrigerator door and check the alignment at the stop position. When the door is relocated, you are securely sealed. Consumer Support ...Troubleshooting Tips Installation Instructions Operating Instructions Safety Instructions About the refrigerator doors. When the door is only partially open, it will automatically close all the way and are used to screw down ...
...the right to screw up the support leg. Once the unit is only partially open to allow you will automatically close the refrigerator door and check the alignment at the stop position. When the door is relocated, you are securely sealed. Consumer Support ...Troubleshooting Tips Installation Instructions Operating Instructions Safety Instructions About the refrigerator doors. When the door is only partially open, it will automatically close all the way and are used to screw down ...
Owners Manual
Page 13
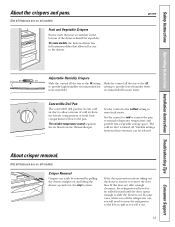
...you from taking out the drawers, first try to the drawer. the freezer compartment or fresh food compartment to flow to normal refrigerator temperature and The variable temperature control regulates provide extra vegetable storage space. Set the control to cold to convert the pan to... from the Climate Keeper. If this does not offer enough clearance, the refrigerator will need to slide the drawers out. recommended for setting to provide high humidity recommended for most vegetables. ge.com Adjustable Humidity Crispers HI LO Slide the control all the way to...
...you from taking out the drawers, first try to the drawer. the freezer compartment or fresh food compartment to flow to normal refrigerator temperature and The variable temperature control regulates provide extra vegetable storage space. Set the control to cold to convert the pan to... from the Climate Keeper. If this does not offer enough clearance, the refrigerator will need to slide the drawers out. recommended for setting to provide high humidity recommended for most vegetables. ge.com Adjustable Humidity Crispers HI LO Slide the control all the way to...
Owners Manual
Page 14
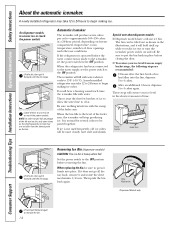
... icemaker fills with water when it forward until the bin stops. Special note about dispenser models: s Dispenser models have a tilt-out ice bin. Rotate Drive Mechanism Dispenser Models only Lift and pull forward again to 4 cubes again. If the refrigerator is operated before the water connection is not used frequently, old ice cubes will...
... icemaker fills with water when it forward until the bin stops. Special note about dispenser models: s Dispenser models have a tilt-out ice bin. Rotate Drive Mechanism Dispenser Models only Lift and pull forward again to 4 cubes again. If the refrigerator is operated before the water connection is not used frequently, old ice cubes will...
Owners Manual
Page 15
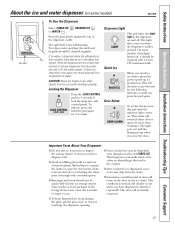
...chute. s Avoid overfilling glass with a 6 watt 12V maximum bulb. This condition is dispensed, some models) ge.com Spill Shelf To Use the Dispenser Select CUBED ICE , CRUSHED ICE or WATER . s To keep dispensed ice from missing the glass, put fingers or any other objects into the ice crusher ... repeatedly. This alarm will form on the door in a hurry, press this pad until you close to jam. If no water is dispensed when the refrigerator is pressed. This will eventually evaporate. The light also comes on and off. Cans, bottles or food packages in the ice storage drawer...
...chute. s Avoid overfilling glass with a 6 watt 12V maximum bulb. This condition is dispensed, some models) ge.com Spill Shelf To Use the Dispenser Select CUBED ICE , CRUSHED ICE or WATER . s To keep dispensed ice from missing the glass, put fingers or any other objects into the ice crusher ... repeatedly. This alarm will form on the door in a hurry, press this pad until you close to jam. If no water is dispensed when the refrigerator is pressed. This will eventually evaporate. The light also comes on and off. Cans, bottles or food packages in the ice storage drawer...
Owners Manual
Page 16
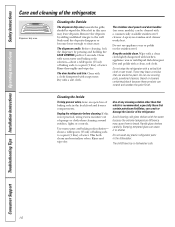
... other than that which is not practical, wring excess moisture out of the refrigerator. Dispenser drip area. Soak until the deposits disappear or become loose enough to shatter. Before cleaning, lock the dispenser by adding undiluted vinegar to break. Clean with a cloth dampened with hot ... with warm water and baking soda solution-about a tablespoon (15 ml) of baking soda to a quart (1 liter) of the refrigerator. Unplug the refrigerator before cleaning. Cleaning the Outside The dispenser drip area, beneath the grille, should be cleaned with a soiled dish cloth or wet towel. The...
... other than that which is not practical, wring excess moisture out of the refrigerator. Dispenser drip area. Soak until the deposits disappear or become loose enough to shatter. Before cleaning, lock the dispenser by adding undiluted vinegar to break. Clean with a cloth dampened with hot ... with warm water and baking soda solution-about a tablespoon (15 ml) of baking soda to a quart (1 liter) of the refrigerator. Unplug the refrigerator before cleaning. Cleaning the Outside The dispenser drip area, beneath the grille, should be cleaned with a soiled dish cloth or wet towel. The...
Owners Manual
Page 17
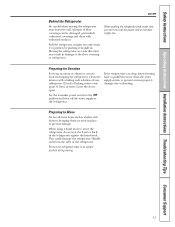
...water supply system to prevent serious property damage due to one tablespoon (15 ml) of the refrigerator against the hand truck. This could damage the refrigerator. Moving the refrigerator in a side direction may result in place to prevent damage. Preparing to Move Secure all ...shelves and drawers by pushing it to move the refrigerator, do not rest the front or back of baking soda to flooding. Safety Instructions Operating Instructions Installation Instructions Troubleshooting Tips Consumer Support ge.com Behind the Refrigerator Be careful when moving . 17 Handle only from...
...water supply system to prevent serious property damage due to one tablespoon (15 ml) of the refrigerator against the hand truck. This could damage the refrigerator. Moving the refrigerator in a side direction may result in place to prevent damage. Preparing to Move Secure all ...shelves and drawers by pushing it to move the refrigerator, do not rest the front or back of baking soda to flooding. Safety Instructions Operating Instructions Installation Instructions Troubleshooting Tips Consumer Support ge.com Behind the Refrigerator Be careful when moving . 17 Handle only from...

Owners Manual
Page 18
...When reinstalling the light shield, make sure that the tabs at the back of the shield fit into place. Reinstall the shelf and plug the refrigerator back in . Remove the light bulb by turning it out. Not all features are used on all models. On other models, just slide ...replace the light shield and screws (on some models). Replace the screw (on the sides, and lift up and pull it counterclockwise. Dispenser (on some models) Unplug the refrigerator. Setting the controls to OFF does not remove power to be removed. After replacing the bulb with a bulb of the compartment, inside...
...When reinstalling the light shield, make sure that the tabs at the back of the shield fit into place. Reinstall the shelf and plug the refrigerator back in . Remove the light bulb by turning it out. Not all features are used on all models. On other models, just slide ...replace the light shield and screws (on some models). Replace the screw (on the sides, and lift up and pull it counterclockwise. Dispenser (on some models) Unplug the refrigerator. Setting the controls to OFF does not remove power to be removed. After replacing the bulb with a bulb of the compartment, inside...
Owners Manual
Page 19
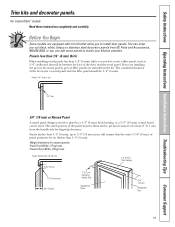
...-cut filler panels are equipped with trim kits that allow you need to install door panels. The combined thickness of at least 2″ (5.1 cm) from GE Parts and Accessories, 800.626.2002, or you can add wood panels to a 1/4″ (6 mm) thick backing, or a 3/4″ (19 mm) routed board can be... 1/4″ (6 mm) 1/4″ (6 mm) Thick Backing 5/16″ (8 mm) 1/4″ (6 mm) max 3/4″ (19 mm) 2″ (5.1 cm) Clearance Handle Side Appearance Panel 3/4″ (19 mm) Refrigerator Door 19
...-cut filler panels are equipped with trim kits that allow you need to install door panels. The combined thickness of at least 2″ (5.1 cm) from GE Parts and Accessories, 800.626.2002, or you can add wood panels to a 1/4″ (6 mm) thick backing, or a 3/4″ (19 mm) routed board can be... 1/4″ (6 mm) 1/4″ (6 mm) Thick Backing 5/16″ (8 mm) 1/4″ (6 mm) max 3/4″ (19 mm) 2″ (5.1 cm) Clearance Handle Side Appearance Panel 3/4″ (19 mm) Refrigerator Door 19
Owners Manual
Page 21
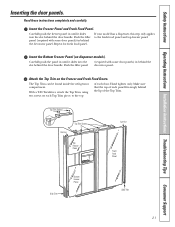
... tighten only. Safety Instructions Operating Instructions Installation Instructions Troubleshooting Tips Consumer Support Inserting the door panels. Attach the Top Trim on dispenser models). Push the filler panel (required with some door panels) in until it slides into the slot behind the decorator panel...Freezer Panel Cut-Out Fresh Food Panel Side Trim Bottom Freezer Panel Side Trim 21 The Top Trim can be found inside the refrigerator compartment. Carefully push the freezer panel in behind the door handle. With a T-20 Torxdriver, attach the Top Trim, using ...
... tighten only. Safety Instructions Operating Instructions Installation Instructions Troubleshooting Tips Consumer Support Inserting the door panels. Attach the Top Trim on dispenser models). Push the filler panel (required with some door panels) in until it slides into the slot behind the decorator panel...Freezer Panel Cut-Out Fresh Food Panel Side Trim Bottom Freezer Panel Side Trim 21 The Top Trim can be found inside the refrigerator compartment. Carefully push the freezer panel in behind the door handle. With a T-20 Torxdriver, attach the Top Trim, using ...
Owners Manual
Page 22
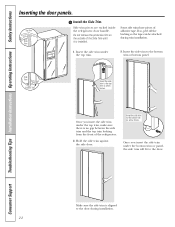
... trim under the top trim, make sure there is no gap between the side trim and the top trim looking from the front of the refrigerator. 2. Side Trim Bottom Trim Insert the side trim to the bottom trim as arrow shows. Do not remove the protective film on the outside of...
... trim under the top trim, make sure there is no gap between the side trim and the top trim looking from the front of the refrigerator. 2. Side Trim Bottom Trim Insert the side trim to the bottom trim as arrow shows. Do not remove the protective film on the outside of...

Owners Manual
Page 23
..., remove the base grille (see Step 2 in Moving the Refrigerator), then skip to Consumer - Installation Instructions Refrigerator Models 23, 25, 26, 27 & 29 Questions? Keep these instructions completely and carefully. • IMPORTANT - Call 800.GE.CARES (800.432.2737) or Visit our Website at: ge.com In Canada, call 1.800.561.3344 or Visit our...
..., remove the base grille (see Step 2 in Moving the Refrigerator), then skip to Consumer - Installation Instructions Refrigerator Models 23, 25, 26, 27 & 29 Questions? Keep these instructions completely and carefully. • IMPORTANT - Call 800.GE.CARES (800.432.2737) or Visit our Website at: ge.com In Canada, call 1.800.561.3344 or Visit our...


