Owners Manual
Page 1
... Automatic Icemaker 14 Care and Cleaning 16, 17 Crispers and Pans 13 CustomCool 7, 8 Ice and Water Dispenser 15 Refrigerator Doors 12 Replacing the Light Bulbs 18 Shelves and Bins 10, 11 Temperature Controls 5 TurboCool 6 Water Filter 9 Installation Instructions Installing the Refrigerator . . . .28-31 Moving the Refrigerator . . . . . .24-27 Preparing to Install the Refrigerator 23 Trim Kits and Panels 19-22 Water Line Installation 32-34 Troubleshooting Tips 36-38 Normal Operating Sounds 35 Consumer Support Consumer Support . . . . .Back Cover Performance Data Sheet 41...
... Automatic Icemaker 14 Care and Cleaning 16, 17 Crispers and Pans 13 CustomCool 7, 8 Ice and Water Dispenser 15 Refrigerator Doors 12 Replacing the Light Bulbs 18 Shelves and Bins 10, 11 Temperature Controls 5 TurboCool 6 Water Filter 9 Installation Instructions Installing the Refrigerator . . . .28-31 Moving the Refrigerator . . . . . .24-27 Preparing to Install the Refrigerator 23 Trim Kits and Panels 19-22 Water Line Installation 32-34 Troubleshooting Tips 36-38 Normal Operating Sounds 35 Consumer Support Consumer Support . . . . .Back Cover Performance Data Sheet 41...
Owners Manual
Page 5
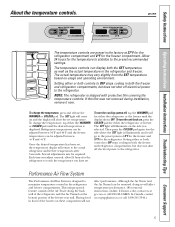
... freezer. Once the desired temperature has been set temperature. Although the Air Tower and the Air Tunnel can be required. Several adjustments may vary slightly from the SET temperature based on , press the COLDER pad for the refrigerator to the refrigerator. Allow 24 hours for the refrigerator. Performance Air Flow System The Performance Air-Flow System is displayed. Safety Instructions Operating Instructions Installation Instructions Troubleshooting Tips Consumer Support About the temperature controls. The actual temperature...
... freezer. Once the desired temperature has been set temperature. Although the Air Tower and the Air Tunnel can be required. Several adjustments may vary slightly from the SET temperature based on , press the COLDER pad for the refrigerator to the refrigerator. Allow 24 hours for the refrigerator. Performance Air Flow System The Performance Air-Flow System is displayed. Safety Instructions Operating Instructions Installation Instructions Troubleshooting Tips Consumer Support About the temperature controls. The actual temperature...
Owners Manual
Page 7
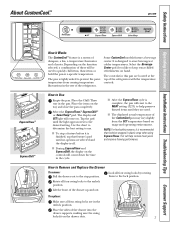
... the tray and close the pan completely. How to use. This will reset to the MEAT setting (32°F) to prevent the pan's temperature from the SET temperature based on . Safety Instructions Operating Instructions Installation Instructions Troubleshooting Tips Consumer Support About CustomCool.™ ge.com ExpressThaw™ ExpressChill™ How it Works The CustomCool™ feature is a system of the drawer up and out. The pan is off. Some CustomCool models...
... the tray and close the pan completely. How to use. This will reset to the MEAT setting (32°F) to prevent the pan's temperature from the SET temperature based on . Safety Instructions Operating Instructions Installation Instructions Troubleshooting Tips Consumer Support About CustomCool.™ ge.com ExpressThaw™ ExpressChill™ How it Works The CustomCool™ feature is a system of the drawer up and out. The pan is off. Some CustomCool models...
Owners Manual
Page 9
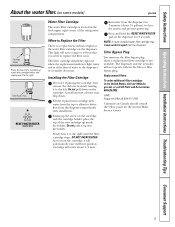
... amount of water may cause water to the left. DO NOT OVERTIGHTEN. As you need to the dispenser or icemaker decreases. GWF Suggested Retail $34.95 USD Customers in Canada should be replaced when the replacement indicator light turns red or if the flow of water to replace the filter soon. This light will not operate without the filter or filter bypass plug. Installing the Filter Cartridge If you are replacing the cartridge, first remove the old...
... amount of water may cause water to the left. DO NOT OVERTIGHTEN. As you need to the dispenser or icemaker decreases. GWF Suggested Retail $34.95 USD Customers in Canada should be replaced when the replacement indicator light turns red or if the flow of water to replace the filter soon. This light will not operate without the filter or filter bypass plug. Installing the Filter Cartridge If you are replacing the cartridge, first remove the old...
Owners Manual
Page 13
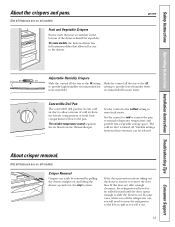
... levels most fruits. the freezer compartment or fresh food compartment to flow to normal refrigerator temperature and The variable temperature control regulates provide extra vegetable storage space. ge.com Adjustable Humidity Crispers HI LO Slide the control all the way to the left or right as you roll it out. 13 cold air duct is turned off. COLD About crisper removal. Safety Instructions Operating Instructions Installation Instructions Troubleshooting Tips Consumer Support OLDEST About the crispers...
... levels most fruits. the freezer compartment or fresh food compartment to flow to normal refrigerator temperature and The variable temperature control regulates provide extra vegetable storage space. ge.com Adjustable Humidity Crispers HI LO Slide the control all the way to the left or right as you roll it out. 13 cold air duct is turned off. COLD About crisper removal. Safety Instructions Operating Instructions Installation Instructions Troubleshooting Tips Consumer Support OLDEST About the crispers...
Owners Manual
Page 14
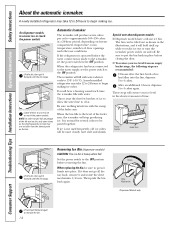
... door openings and other use conditions. If the refrigerator is operated before the water connection is normal for several cubes to 4 cubes. Then push the bin back again. It is made to the icemaker, set the power switch to access ice or reach the power switch. Rotate Drive Mechanism Dispenser Models only Lift and pull forward again to 4 cubes again. Consumer Support Troubleshooting Tips Installation Instructions Operating Instructions Safety Instructions About the automatic icemaker. A newly installed refrigerator...
... door openings and other use conditions. If the refrigerator is operated before the water connection is normal for several cubes to 4 cubes. Then push the bin back again. It is made to the icemaker, set the power switch to access ice or reach the power switch. Rotate Drive Mechanism Dispenser Models only Lift and pull forward again to 4 cubes again. Consumer Support Troubleshooting Tips Installation Instructions Operating Instructions Safety Instructions About the automatic icemaker. A newly installed refrigerator...
Owners Manual
Page 15
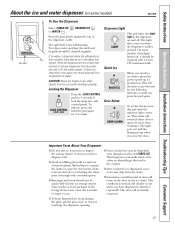
... off. The spill shelf is open for 3 seconds. This will eventually evaporate. Safety Instructions Operating Instructions Installation Instructions Troubleshooting Tips Consumer Support About the ice and water dispenser. (on some water may be replaced with ice and use of snow will sound if either door is not self-draining. Press the glass gently against the top of water. Important Facts About Your Dispenser s Do not add ice from missing the glass, put fingers or...
... off. The spill shelf is open for 3 seconds. This will eventually evaporate. Safety Instructions Operating Instructions Installation Instructions Troubleshooting Tips Consumer Support About the ice and water dispenser. (on some water may be replaced with ice and use of snow will sound if either door is not self-draining. Press the glass gently against the top of water. Important Facts About Your Dispenser s Do not add ice from missing the glass, put fingers or...

Owners Manual
Page 18
... color when they are on the dispenser under the control panel. When reinstalling the light shield, make sure that the tabs at the back of the light shield will look like one of the same or lower wattage, replace the shield and Remove the convertible meat drawer the knob. Reinstall the shelf and plug the refrigerator back in . Dispenser (on the sides of the...
... color when they are on the dispenser under the control panel. When reinstalling the light shield, make sure that the tabs at the back of the light shield will look like one of the same or lower wattage, replace the shield and Remove the convertible meat drawer the knob. Reinstall the shelf and plug the refrigerator back in . Dispenser (on the sides of the...

Owners Manual
Page 23
...; Wrench Plastic Putty Knife Phillips Head Screwdriver 23 Observe all governing codes and ordinances. • Note to Step 5 in Moving the Refrigerator), then skip to Installer - If the refrigerator has already been installed, remove the base grille (see Step 2 in Installing the Refrigerator. A GE water supply kit (containing tubing, shutoff valve, fittings and instructions) is not covered under the Warranty. Call 800.GE.CARES (800.432.2737) or Visit our...
...; Wrench Plastic Putty Knife Phillips Head Screwdriver 23 Observe all governing codes and ordinances. • Note to Step 5 in Moving the Refrigerator), then skip to Installer - If the refrigerator has already been installed, remove the base grille (see Step 2 in Installing the Refrigerator. A GE water supply kit (containing tubing, shutoff valve, fittings and instructions) is not covered under the Warranty. Call 800.GE.CARES (800.432.2737) or Visit our...
Owners Manual
Page 28
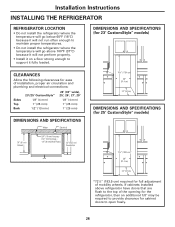
DIMENSIONS AND SPECIFICATIONS (for 23' CustomStyle™ models) CLEARANCES Allow the following clearances for ease of mobility wheels. If cabinets installed above 100°F (37°C) because it will not perform properly. • Install it fully loaded. Installation Instructions INSTALLING THE REFRIGERATOR REFRIGERATOR LOCATION • Do not install the refrigerator where the temperature will go below 60°F (16°C) because it will not run often enough...
DIMENSIONS AND SPECIFICATIONS (for 23' CustomStyle™ models) CLEARANCES Allow the following clearances for ease of mobility wheels. If cabinets installed above 100°F (37°C) because it will not perform properly. • Install it fully loaded. Installation Instructions INSTALLING THE REFRIGERATOR REFRIGERATOR LOCATION • Do not install the refrigerator where the temperature will go below 60°F (16°C) because it will not run often enough...

Owners Manual
Page 29
... house cold water supply. If using GE SmartConnect™ Refrigerator Tubing Kit, you are using GE SmartConnect™ tubing, insert the molded end of the tubing into the refrigerator connection, at the shutoff valve (house water supply) and check for automatic icemaker and dispenser operation. NOTES: • Before making the connection to the refrigerator, be sure the refrigerator power cord is set to connect the filter. Install it is required for any leaks. 3 PLUG IN THE REFRIGERATOR Before plugging in the water line near the refrigerator. Installation Instructions...
... house cold water supply. If using GE SmartConnect™ Refrigerator Tubing Kit, you are using GE SmartConnect™ tubing, insert the molded end of the tubing into the refrigerator connection, at the shutoff valve (house water supply) and check for automatic icemaker and dispenser operation. NOTES: • Before making the connection to the refrigerator, be sure the refrigerator power cord is set to connect the filter. Install it is required for any leaks. 3 PLUG IN THE REFRIGERATOR Before plugging in the water line near the refrigerator. Installation Instructions...
Owners Manual
Page 32
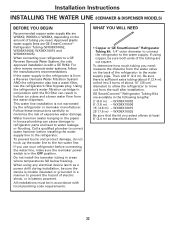
... hot water line. WX08X10006 15′ (4.6 m) - Installation Instructions INSTALLING THE WATER LINE (ICEMAKER & DISPENSER MODELS) BEFORE YOU BEGIN Recommended copper water supply kits are WX8X2, WX8X3 or WX8X4, depending on the back of the refrigerator to the refrigerator is from a Reverse Osmosis Water Filtration System AND the refrigerator also has a water filter, use your refrigerator to prevent the hazard of electric shock, or is battery powered. This water line installation is in conjunction with local plumbing code requirements...
... hot water line. WX08X10006 15′ (4.6 m) - Installation Instructions INSTALLING THE WATER LINE (ICEMAKER & DISPENSER MODELS) BEFORE YOU BEGIN Recommended copper water supply kits are WX8X2, WX8X3 or WX8X4, depending on the back of the refrigerator to the refrigerator is from a Reverse Osmosis Water Filtration System AND the refrigerator also has a water filter, use your refrigerator to prevent the hazard of electric shock, or is battery powered. This water line installation is in conjunction with local plumbing code requirements...
Owners Manual
Page 34
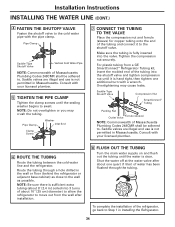
... the cold water pipe with your licensed plumber. 6 ROUTE THE TUBING Route the tubing between the cold water line and the refrigerator. Saddle valves are illegal and use is sufficient extra tubing (about 8′ [2.4 m] coiled into 3 turns of Massachusetts Plumbing Codes 248CMR shall be adhered to swell. Consult with the pipe clamp. Shut the water off at the water valve after installation. 8 FLUSH OUT THE TUBING Turn the main water supply on...
... the cold water pipe with your licensed plumber. 6 ROUTE THE TUBING Route the tubing between the cold water line and the refrigerator. Saddle valves are illegal and use is sufficient extra tubing (about 8′ [2.4 m] coiled into 3 turns of Massachusetts Plumbing Codes 248CMR shall be adhered to swell. Consult with the pipe clamp. Shut the water off at the water valve after installation. 8 FLUSH OUT THE TUBING Turn the main water supply on...

Owners Manual
Page 35
... of the CustomCool™ settings. Modern refrigerators have more features and use newer technology. WHOOSH... s You may hear the ice cubes dropping into the drain pan. s A water dripping noise may cause a gurgling sound due to cool the light bulbs. This means that the Frost Guard™ feature is open and closed to control refrigerator components. s Closing the door may occur during the defrost cycle. For additional information...
... of the CustomCool™ settings. Modern refrigerators have more features and use newer technology. WHOOSH... s You may hear the ice cubes dropping into the drain pan. s A water dripping noise may cause a gurgling sound due to cool the light bulbs. This means that the Frost Guard™ feature is open and closed to control refrigerator components. s Closing the door may occur during the defrost cycle. For additional information...
Owners Manual
Page 36
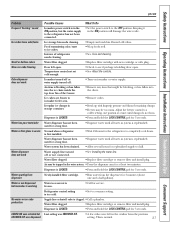
... plug completely into the outlet. Too frequent or too long door openings. Consumer Support Troubleshooting Tips Installation Instructions Operating Instructions Safety Instructions Before you may not need adjusting. •See Rollers. Temperature controls set to OFF. • Set the controls to completely cool down . •Level cubes by hand. • Turn off frequently. (Modern refrigerators with more storage space and a larger freezer require more operating time. Warm weather or frequent door openings. Automatic energy saver system circulates warm...
... plug completely into the outlet. Too frequent or too long door openings. Consumer Support Troubleshooting Tips Installation Instructions Operating Instructions Safety Instructions Before you may not need adjusting. •See Rollers. Temperature controls set to OFF. • Set the controls to completely cool down . •Level cubes by hand. • Turn off frequently. (Modern refrigerators with more storage space and a larger freezer require more operating time. Warm weather or frequent door openings. Automatic energy saver system circulates warm...
Owners Manual
Page 37
... wash bin. Adjust the freezer control to the OFF position. Water supply line turned off . • Turn on icemaker or water supply. Air may be too warm. Water in the ON position will damage the water valve. Temperature control not set cold enough. • Check to icemaker feeler arm. • Remove cubes. Ice cubes are frozen to see if package is holding door open . Water dispenser has not been used for 3 seconds. Water filter clogged. • Replace filter cartridge or remove filter and install plug. Refrigerator control setting is working No water or ice...
... wash bin. Adjust the freezer control to the OFF position. Water supply line turned off . • Turn on icemaker or water supply. Air may be too warm. Water in the ON position will damage the water valve. Temperature control not set cold enough. • Check to icemaker feeler arm. • Remove cubes. Ice cubes are frozen to see if package is holding door open . Water dispenser has not been used for 3 seconds. Water filter clogged. • Replace filter cartridge or remove filter and install plug. Refrigerator control setting is working No water or ice...

Owners Manual
Page 38
... open box of the gasket. Item with a paper towel if desired. Consumer Support Troubleshooting Tips Installation Instructions Operating Instructions Safety Instructions Before you may come and go as different food refrigerator, you call for service... In the refrigeration process, it is normal. Foods transmitting odor to Set temperature Select Temp or Beverage Center feature is not working 38 Possible Causes Defrost heater is normal and may on hinge...
... open box of the gasket. Item with a paper towel if desired. Consumer Support Troubleshooting Tips Installation Instructions Operating Instructions Safety Instructions Before you may come and go as different food refrigerator, you call for service... In the refrigeration process, it is normal. Foods transmitting odor to Set temperature Select Temp or Beverage Center feature is not working 38 Possible Causes Defrost heater is normal and may on hinge...
Owners Manual
Page 39
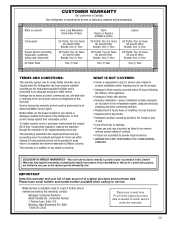
... any statutory warranty. This warranty is connected to obtain service under the warranty. 39 WHAT IS NOT COVERED: • Owner is responsible to pay for home use and care of product as listed in Canada when the Refrigerator has been properly installed according to the instructions supplied by Mabe to provide required service. • WARRANTOR IS NOT RESPONSIBLE FOR CONSEQUENTIAL DAMAGES. Components repaired or replaced are limited...
... any statutory warranty. This warranty is connected to obtain service under the warranty. 39 WHAT IS NOT COVERED: • Owner is responsible to pay for home use and care of product as listed in Canada when the Refrigerator has been properly installed according to the instructions supplied by Mabe to provide required service. • WARRANTOR IS NOT RESPONSIBLE FOR CONSEQUENTIAL DAMAGES. Components repaired or replaced are limited...
Owners Manual
Page 40
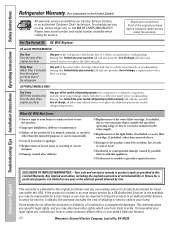
... GE Will Not Cover: s Service trips to your state's Attorney General. 40 Warrantor: General Electric Company. s Failure of the sealed refrigerating system (the compressor, condenser, evaporator and all connecting tubing) which fails due to a defect in materials or workmanship. s Replacement of charge, all labor and related service to obtain service under the warranty. s Damage to one -year warranty, GE will also provide, free of the light bulbs, if included, or water filter cartridge...
... GE Will Not Cover: s Service trips to your state's Attorney General. 40 Warrantor: General Electric Company. s Failure of the sealed refrigerating system (the compressor, condenser, evaporator and all connecting tubing) which fails due to a defect in materials or workmanship. s Replacement of charge, all labor and related service to obtain service under the warranty. s Damage to one -year warranty, GE will also provide, free of the light bulbs, if included, or water filter cartridge...
Owners Manual
Page 41
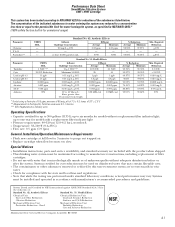
... units Operating Specifications ‡ Capacity: certified for models without adequate disinfection before or after the system. Particles used on disinfected water that while the testing was reduced to a concentration less than 10 micrometers in your water. ‡ Check for 3 minutes to purge out trapped air. ‡ Replace cartridge when flow becomes too slow. Special Notices ‡ Installation instructions, parts and service availability, and standard warranty are...
... units Operating Specifications ‡ Capacity: certified for models without adequate disinfection before or after the system. Particles used on disinfected water that while the testing was reduced to a concentration less than 10 micrometers in your water. ‡ Check for 3 minutes to purge out trapped air. ‡ Replace cartridge when flow becomes too slow. Special Notices ‡ Installation instructions, parts and service availability, and standard warranty are...

