
User Manual
Page 1
Use andCare Guide With Installation Instructions Dryer Safety Instructions 3, 4 Installation Instructions Exhaust 5, 6 Electric Dryer 7 Operating Instructions, Tips Automatic Drying 10, 11 Drying Selection Guide 10 Knits Drying Tips 8, 10, 14 Lint Filter 12 Loading 9 Operating the Dryer 8, 9 Permanent Press Drying Tips 10, 14 Sorting Clothes 9, ...10 Special Instructions 10, 11 Timed Drying 11 Care and Cleaning Dryer Exhaust 13 Exterior 12 Lint Filter 12 Problem Solver 14 Consumer Services Model and Serial Numbers 2 Repair Service ...
Use andCare Guide With Installation Instructions Dryer Safety Instructions 3, 4 Installation Instructions Exhaust 5, 6 Electric Dryer 7 Operating Instructions, Tips Automatic Drying 10, 11 Drying Selection Guide 10 Knits Drying Tips 8, 10, 14 Lint Filter 12 Loading 9 Operating the Dryer 8, 9 Permanent Press Drying Tips 10, 14 Sorting Clothes 9, ...10 Special Instructions 10, 11 Timed Drying 11 Care and Cleaning Dryer Exhaust 13 Exterior 12 Lint Filter 12 Problem Solver 14 Consumer Services Model and Serial Numbers 2 Repair Service ...
User Manual
Page 2
...Do not store or use any electrical switch; do not use gasoline or other appliance. - Please Call: 1-800-361-3400 Camco Service Contracts Your new dryer is intended to help , write (include your phone number) Consumer Relations Manager Camco Inc. 1 Factory Lane, Suite 310 Moncton, N.B. Camco Service Contracts are.... E1C 9M3 Save time and money. Before it left the factory, it went through rigorous tests, just to be satisfied with your dryer. And you have reason to make sure it was as problem-free as you can correct yourself. Should your appliance require service after ...
...Do not store or use any electrical switch; do not use gasoline or other appliance. - Please Call: 1-800-361-3400 Camco Service Contracts Your new dryer is intended to help , write (include your phone number) Consumer Relations Manager Camco Inc. 1 Factory Lane, Suite 310 Moncton, N.B. Camco Service Contracts are.... E1C 9M3 Save time and money. Before it left the factory, it went through rigorous tests, just to be satisfied with your dryer. And you have reason to make sure it was as problem-free as you can correct yourself. Should your appliance require service after ...
User Manual
Page 3
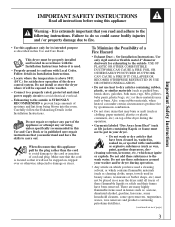
...or explode. Use only rigid metal or flexible metal 4" diameter ductwork for satisfactory operation of the appliance or attempt any part of the dryer control system. FOIL OR OTHER EASILY PUNCTURED DUCTWORK CAN CAUSE A FIRE IF IT COLLAPSES OR BECOMES OTHERWISE RESTRICTED IN USE OR DURING INSTALLATION... on , tripped over or otherwise subjected to carry out. It is STRONGLY RECOMMENDED to the cord or junction of these substances around your dryer. • Do not wash or dry articles that you have been cleaned in, washed in, soaked in this appliance pull by spontaneous combustion...
...or explode. Use only rigid metal or flexible metal 4" diameter ductwork for satisfactory operation of the appliance or attempt any part of the dryer control system. FOIL OR OTHER EASILY PUNCTURED DUCTWORK CAN CAUSE A FIRE IF IT COLLAPSES OR BECOMES OTHERWISE RESTRICTED IN USE OR DURING INSTALLATION... on , tripped over or otherwise subjected to carry out. It is STRONGLY RECOMMENDED to the cord or junction of these substances around your dryer. • Do not wash or dry articles that you have been cleaned in, washed in, soaked in this appliance pull by spontaneous combustion...
User Manual
Page 4
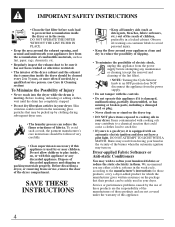
...accumulation of combustible materials, such as detergents, bleaches, fabric softeners, etc.) out of the reach of Injury • Never reach into the dryer while the drum is damaged, malfunctioning, partially disassembled, or has missing or broken parts, including a damaged cord or plug. • ... a locked cabinet. Burns may result from the remaining glass particles that may turn on , or with this appliance. 4 Before discarding a dryer, or removing from service, remove the door of discarded appliances and shipping or packing materials properly. DO NOT ATTEMPT TO LIGHT WITH A MATCH...
...accumulation of combustible materials, such as detergents, bleaches, fabric softeners, etc.) out of the reach of Injury • Never reach into the dryer while the drum is damaged, malfunctioning, partially disassembled, or has missing or broken parts, including a damaged cord or plug. • ... a locked cabinet. Burns may result from the remaining glass particles that may turn on , or with this appliance. 4 Before discarding a dryer, or removing from service, remove the door of discarded appliances and shipping or packing materials properly. DO NOT ATTEMPT TO LIGHT WITH A MATCH...
User Manual
Page 5
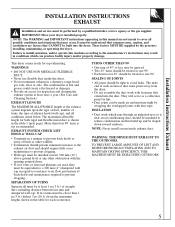
.... Installation Instructions Exhaust INSTALLATION INSTRUCTIONS EXHAUST Installation and service must be tight to avoid leaks. NOTE: Never install screen inside the dryer. • Do not terminate exhaust in conditions which runs through an unheated area or is not recommended. NOTE: The WARNING ... 1 (next page). INSULATION • Duct work with duct tape. More than 1 m (3 ft.) deduct 3 m (10 ft.) from the dryer. • Do not assemble the duct work which can be built into the duct. These factors MUST BE supplied by a qualified installer, service agency...
.... Installation Instructions Exhaust INSTALLATION INSTRUCTIONS EXHAUST Installation and service must be tight to avoid leaks. NOTE: Never install screen inside the dryer. • Do not terminate exhaust in conditions which runs through an unheated area or is not recommended. NOTE: The WARNING ... 1 (next page). INSULATION • Duct work with duct tape. More than 1 m (3 ft.) deduct 3 m (10 ft.) from the dryer. • Do not assemble the duct work which can be built into the duct. These factors MUST BE supplied by a qualified installer, service agency...
User Manual
Page 6
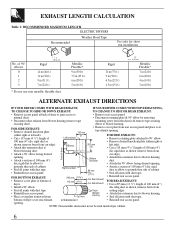
...Remove cover plate at back of cabinet. • Seal all joints with duct tape. EXHAUST LENGTH CALCULATION Table 1: RECOMMENDED MAXIMUM LENGTH ELECTRIC DRYERS Recommended Weather Hood Type Use only for short run installations No. internal ducts. • Disconnect retaining plate & 90˚ elbow by... m (24 ft.) * Do not use non metallic flexible duct. of 100 mm (4") dia. NOTE: Non-metallic ducts must never be used inside dryer cabinet. 6 elbow to • Remove rear access panel. rigid duct as shown (remove burrs from • Seal all joints with duct tape. &#...
...Remove cover plate at back of cabinet. • Seal all joints with duct tape. EXHAUST LENGTH CALCULATION Table 1: RECOMMENDED MAXIMUM LENGTH ELECTRIC DRYERS Recommended Weather Hood Type Use only for short run installations No. internal ducts. • Disconnect retaining plate & 90˚ elbow by... m (24 ft.) * Do not use non metallic flexible duct. of 100 mm (4") dia. NOTE: Non-metallic ducts must never be used inside dryer cabinet. 6 elbow to • Remove rear access panel. rigid duct as shown (remove burrs from • Seal all joints with duct tape. &#...
User Manual
Page 7
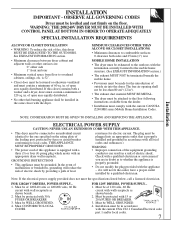
...other surfaces are in accordance with wall receptacle as shown beside. 2. of electric shock. in . MOBILE HOME INSTALLATION • The dryer must be connected to an individual circuit identical to the one specified on the floor. The plug must be grounded. ELECTRICAL POWER SUPPLY...". • Closet door must contain a minimum of open area equally distributed. See EXHAUST INFORMATION section. • Minimum clearances between dryer cabinet and adjacent walls or other fuel-burning appliance shall be louvered or otherwise ventilated and must be WELL GROUNDED. 4. in . ...
...other surfaces are in accordance with wall receptacle as shown beside. 2. of electric shock. in . MOBILE HOME INSTALLATION • The dryer must be connected to an individual circuit identical to the one specified on the floor. The plug must be grounded. ELECTRICAL POWER SUPPLY...". • Closet door must contain a minimum of open area equally distributed. See EXHAUST INFORMATION section. • Minimum clearances between dryer cabinet and adjacent walls or other fuel-burning appliance shall be louvered or otherwise ventilated and must be WELL GROUNDED. 4. in . ...
User Manual
Page 8
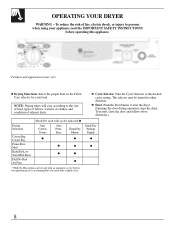
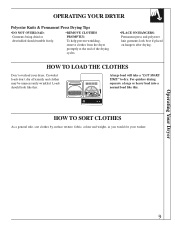
Turn the Cycle Selector to start the dryer. (Opening the door during operation stops the dryer. Push the Start button to the desired cycle setting. Features and appearances may be used with cycles indicated Auto Cottons Cotons Auto Perm. Select the...-No Heat option can be used with an automatic cycle, but for your appliance read the IMPORTANT SAFETY INSTRUCTIONS before operating this appliance. OPERATING YOUR DRYER WARNING - The selector may vary 1 Drying Selections. To restart, close the door and follow above directions.) Drying Selections Cottons Reg Cotons-Reg Perma Press ...
Turn the Cycle Selector to start the dryer. (Opening the door during operation stops the dryer. Push the Start button to the desired cycle setting. Features and appearances may be used with cycles indicated Auto Cottons Cotons Auto Perm. Select the...-No Heat option can be used with an automatic cycle, but for your appliance read the IMPORTANT SAFETY INSTRUCTIONS before operating this appliance. OPERATING YOUR DRYER WARNING - The selector may vary 1 Drying Selections. To restart, close the door and follow above directions.) Drying Selections Cottons Reg Cotons-Reg Perma Press ...
User Manual
Page 9
... drying. HOW TO SORT CLOTHES As a general rule, sort clothes by surface texture, fabric, colour and weight, as you would for your dryer. For quicker drying separate a large or heavy load into a normal load like this . Loads should tumble freely. •REMOVE CLOTHES PROMPTLYTo ...help prevent wrinkling, remove clothes from the dryer promptly at the end of the drying cycles. •PLACE ON HANGERSPermanent press and polyester knit garments look like this : A large load will ...
... drying. HOW TO SORT CLOTHES As a general rule, sort clothes by surface texture, fabric, colour and weight, as you would for your dryer. For quicker drying separate a large or heavy load into a normal load like this . Loads should tumble freely. •REMOVE CLOTHES PROMPTLYTo ...help prevent wrinkling, remove clothes from the dryer promptly at the end of the drying cycles. •PLACE ON HANGERSPermanent press and polyester knit garments look like this : A large load will ...
User Manual
Page 10
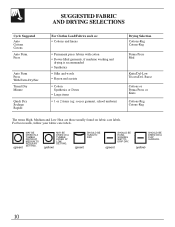
For best results, follow your fabric care labels. (green) MAY BE DRIED IN A TUMBLE DRYER AT MEDIUM TO REGULAR SETTING. (yellow) MAY BE DRIED IN A TUMBLE DRYER AT LOW SETTING. SHOULD BE HUNG TO DRY. (green) SHOULD BE HUNG SOAKING WET TO DRIP DRY. (green) SHOULD BE DRIED ON A FLAT SURFACE. (yellow) ...
For best results, follow your fabric care labels. (green) MAY BE DRIED IN A TUMBLE DRYER AT MEDIUM TO REGULAR SETTING. (yellow) MAY BE DRIED IN A TUMBLE DRYER AT LOW SETTING. SHOULD BE HUNG TO DRY. (green) SHOULD BE HUNG SOAKING WET TO DRIP DRY. (green) SHOULD BE DRIED ON A FLAT SURFACE. (yellow) ...
User Manual
Page 11
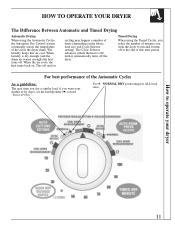
... Automatic Cycles As a guideline: The next time you dry a similar load, if you wish the dryer to be dryer, set the knob/pointer ( ) toward "Extra dry/Sec". * Use NORMAL DRY positioning for ALL...clothes to run and it automatically turns off and on cycling may happen a number of the air in the dryer drum. The Cycle Selector advances (when the heat is dry enough (and the drum air warms enough) ...the heat turns off at the end of this air cool. HOW TO OPERATE YOUR DRYER The Difference Between Automatic and Timed Drying Automatic Drying When using the Timed Cycles, you select the number...
... Automatic Cycles As a guideline: The next time you dry a similar load, if you wish the dryer to be dryer, set the knob/pointer ( ) toward "Extra dry/Sec". * Use NORMAL DRY positioning for ALL...clothes to run and it automatically turns off and on cycling may happen a number of the air in the dryer drum. The Cycle Selector advances (when the heat is dry enough (and the drum air warms enough) ...the heat turns off at the end of this air cool. HOW TO OPERATE YOUR DRYER The Difference Between Automatic and Timed Drying Automatic Drying When using the Timed Cycles, you select the number...
User Manual
Page 12
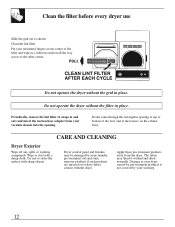
... or bottom of the door and at one corner of the filter and wipe in and out) and insert the suction hose adapter from the dryer. Apply these pre-treatment products away from your warranty. 12 Periodically, remove the lint filter (it snaps in a sideways motion all the way across to... to your moistened fingers at the louvers on or have direct contact with a damp cloth. The fabric may be washed and dried normally. Put your dryer caused by pre-treatment products is not covered by some laundry pre-treatment soil and stain remover products if such products are sprayed on the...
... or bottom of the door and at one corner of the filter and wipe in and out) and insert the suction hose adapter from the dryer. Apply these pre-treatment products away from your warranty. 12 Periodically, remove the lint filter (it snaps in a sideways motion all the way across to... to your moistened fingers at the louvers on or have direct contact with a damp cloth. The fabric may be washed and dried normally. Put your dryer caused by pre-treatment products is not covered by some laundry pre-treatment soil and stain remover products if such products are sprayed on the...
User Manual
Page 13
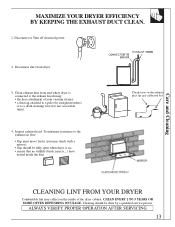
CLEAN EVERY 2 TO 3 YEARS OR MORE OFTEN DEPENDING ON USAGE. Inspect exhaust hood. CLEANING LINT FROM YOUR DRYER Combustible lint may check with a mirror); • flap should be fully open when dryer is connected to the exhaust hood using: • the hose attachment of your vacuum cleaner: • a dust rag ...: • flap must move freely (you may collect on ; • ensure that no wildlife (birds, insects,...) have nested inside of the dryer cabinet. ALWAYS VERIFY PROPER OPERATION AFTER SERVICING 13 Disconnect or Turn off electrical power. 2. Disconnect duct from end where...
CLEAN EVERY 2 TO 3 YEARS OR MORE OFTEN DEPENDING ON USAGE. Inspect exhaust hood. CLEANING LINT FROM YOUR DRYER Combustible lint may check with a mirror); • flap should be fully open when dryer is connected to the exhaust hood using: • the hose attachment of your vacuum cleaner: • a dust rag ...: • flap must move freely (you may collect on ; • ensure that no wildlife (birds, insects,...) have nested inside of the dryer cabinet. ALWAYS VERIFY PROPER OPERATION AFTER SERVICING 13 Disconnect or Turn off electrical power. 2. Disconnect duct from end where...
User Manual
Page 14
... setting. • Rerinse and dry on Perma Press setting. • If unsuccessful, retumble on the same electrical outlet or circuit while the dryer is overloaded. Avoid laundering heavy Permanent Press items, such as work clothes, with regular laundry. • Failure to dry. Since it's the...are set for one or more similar articles, even if dry, to ensure proper tumbling. • Some fabrics will shrink in dryer. Most electric dryers use fabric softener. Clean filter before every load. make sure damper in permanent press synthetic/cotton blends, the cotton portion of moisture...
... setting. • Rerinse and dry on Perma Press setting. • If unsuccessful, retumble on the same electrical outlet or circuit while the dryer is overloaded. Avoid laundering heavy Permanent Press items, such as work clothes, with regular laundry. • Failure to dry. Since it's the...are set for one or more similar articles, even if dry, to ensure proper tumbling. • Some fabrics will shrink in dryer. Most electric dryers use fabric softener. Clean filter before every load. make sure damper in permanent press synthetic/cotton blends, the cotton portion of moisture...
User Manual
Page 16
...adequate electrical, exhausting and other than its intended purpose or used commercially. • Damage to be defective in Canada when the dryer has been properly installed according to the instructions supplied by law in making this warranty must present the original Bill of this ...warranty, write: Consumer Relations Manager, Camco Inc. 1 Factory Lane, Suite 310 Moncton, N.B. If you have any failure of the dryer, or from service delays beyond their reasonable control. • To obtain warranty service, purchaser must be repaired or replaced at the address below...
...adequate electrical, exhausting and other than its intended purpose or used commercially. • Damage to be defective in Canada when the dryer has been properly installed according to the instructions supplied by law in making this warranty must present the original Bill of this ...warranty, write: Consumer Relations Manager, Camco Inc. 1 Factory Lane, Suite 310 Moncton, N.B. If you have any failure of the dryer, or from service delays beyond their reasonable control. • To obtain warranty service, purchaser must be repaired or replaced at the address below...


