
User Manual
Page 1
... andCare Guide With Installation Instructions Dryer Safety Instructions 3, 4 Installation Instructions Exhaust 5, 6 Electric Dryer 7 Operating Instructions, Tips Automatic Drying 10, 11 Drying Selection Guide 10 Knits Drying Tips 8, 10, 14 Lint Filter 12 Loading 9 Operating the Dryer 8, 9 Permanent Press Drying Tips 10, 14 Sorting Clothes 9, 10 Special Instructions 10, 11 Timed Drying 11 Care and Cleaning Dryer Exhaust 13 Exterior 12 Lint Filter 12 Problem Solver 14 Consumer Services Model and Serial Numbers 2 Repair Service 2 Warranty 16 www.geappliances.ca For service...
... andCare Guide With Installation Instructions Dryer Safety Instructions 3, 4 Installation Instructions Exhaust 5, 6 Electric Dryer 7 Operating Instructions, Tips Automatic Drying 10, 11 Drying Selection Guide 10 Knits Drying Tips 8, 10, 14 Lint Filter 12 Loading 9 Operating the Dryer 8, 9 Permanent Press Drying Tips 10, 14 Sorting Clothes 9, 10 Special Instructions 10, 11 Timed Drying 11 Care and Cleaning Dryer Exhaust 13 Exterior 12 Lint Filter 12 Problem Solver 14 Consumer Services Model and Serial Numbers 2 Repair Service 2 Warranty 16 www.geappliances.ca For service...
User Manual
Page 2
... appliance require service after the warranty has expired, a Camco Service Contract takes care of any phone in the vicinity of the dryer behind the door. Write down the model and serial numbers. do not use gasoline or other appliance. - Keep it went through rigorous tests, just to prevent property damage, personal injury or death. - Before you received a damaged dryer... Follow the gas supplier's instructions. •...
... appliance require service after the warranty has expired, a Camco Service Contract takes care of any phone in the vicinity of the dryer behind the door. Write down the model and serial numbers. do not use gasoline or other appliance. - Keep it went through rigorous tests, just to prevent property damage, personal injury or death. - Before you received a damaged dryer... Follow the gas supplier's instructions. •...
User Manual
Page 3
... the cord is above 50˚F. (10˚C.) for its intended purpose as wax, paint, gasoline degreasers, dry- Connect to a properly rated, protected and sized power supply circuit to damage or stress. IMPORTANT SAFETY INSTRUCTIONS Read all traces of these flammable liquids or solids and their fumes have been removed. Carefully follow the Exhausting Details in this appliance only for satisfactory operation...
... the cord is above 50˚F. (10˚C.) for its intended purpose as wax, paint, gasoline degreasers, dry- Connect to a properly rated, protected and sized power supply circuit to damage or stress. IMPORTANT SAFETY INSTRUCTIONS Read all traces of these flammable liquids or solids and their fumes have been removed. Carefully follow the Exhausting Details in this appliance only for satisfactory operation...
User Manual
Page 4
... of the dryer cabinet and the exhaust duct connection inside the dryer or in them. IMPORTANT SAFETY INSTRUCTIONS • Clean the lint filter before attempting any maintenance or cleaning (except the removal and cleaning of the lint filter). • NOTE: Turning the Cycle Selector knob to an OFF position does NOT disconnect the appliance from the power supply. • Do not tamper with the controls. • Do not operate this...
... of the dryer cabinet and the exhaust duct connection inside the dryer or in them. IMPORTANT SAFETY INSTRUCTIONS • Clean the lint filter before attempting any maintenance or cleaning (except the removal and cleaning of the lint filter). • NOTE: Turning the Cycle Selector knob to an OFF position does NOT disconnect the appliance from the power supply. • Do not tamper with the controls. • Do not operate this...
User Manual
Page 5
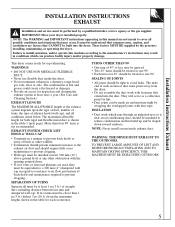
...: The WARNING and IMPORTANT instructions appearing in a chimney, range hood, gas vent, floor or attic. This dryer comes ready for each section of duct must be installed at least once a year. (See Care and Cleaning Section.) EXHAUST LENGTH The MAXIMUM ALLOWABLE length of the exhaust system depends upon the type of duct, number of turns, the type of straight duct, including distance between last turn over 45˚ should be...
...: The WARNING and IMPORTANT instructions appearing in a chimney, range hood, gas vent, floor or attic. This dryer comes ready for each section of duct must be installed at least once a year. (See Care and Cleaning Section.) EXHAUST LENGTH The MAXIMUM ALLOWABLE length of the exhaust system depends upon the type of duct, number of turns, the type of straight duct, including distance between last turn over 45˚ should be...
User Manual
Page 6
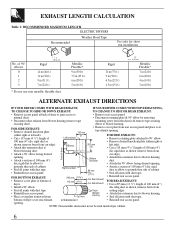
...; Seal all joints with duct tape. Rigid cutting edge). • Reinstall rear access panel. • Place cover plate (removed from rear access panel and place over rear exhaust EXTENSION DUCT • Reinstall rear access panel. NOTE: Non-metallic ducts must never be used inside dryer cabinet. 6 EXHAUST LENGTH CALCULATION Table 1: RECOMMENDED MAXIMUM LENGTH ELECTRIC DRYERS Recommended Weather Hood Type Use only for short run installations No. rigid duct as • Remove desired knockout plate (either right or left side). •...
...; Seal all joints with duct tape. Rigid cutting edge). • Reinstall rear access panel. • Place cover plate (removed from rear access panel and place over rear exhaust EXTENSION DUCT • Reinstall rear access panel. NOTE: Non-metallic ducts must never be used inside dryer cabinet. 6 EXHAUST LENGTH CALCULATION Table 1: RECOMMENDED MAXIMUM LENGTH ELECTRIC DRYERS Recommended Weather Hood Type Use only for short run installations No. rigid duct as • Remove desired knockout plate (either right or left side). •...
User Manual
Page 7
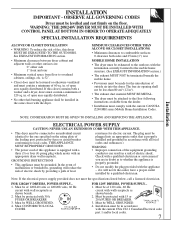
... individual circuit identical to the floor following instructions available from floor to whether the appliance is 52". • Closet door must contain a minimum of open area equally distributed. FOR 120V DRYERS, POWER SUPPLY... 1. If this dryer MUST BE EXHAUSTED TO THE OUTDOORS. FOR 120/240 V DRYERS, POWER SUPPLY... 1. WARNING: THE 208/240V DRYER MUST BE INSTALLED WITH CONTROL PANEL AT BOTTOM IN ORDER TO OPERATE...
... individual circuit identical to the floor following instructions available from floor to whether the appliance is 52". • Closet door must contain a minimum of open area equally distributed. FOR 120V DRYERS, POWER SUPPLY... 1. If this dryer MUST BE EXHAUSTED TO THE OUTDOORS. FOR 120/240 V DRYERS, POWER SUPPLY... 1. WARNING: THE 208/240V DRYER MUST BE INSTALLED WITH CONTROL PANEL AT BOTTOM IN ORDER TO OPERATE...
User Manual
Page 8
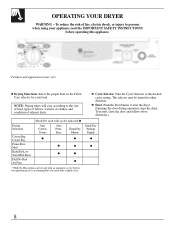
... the size of load, types of fabrics, wetness of clothes, and condition of exhaust ducts. 2 Cycle Selector. NOTE: Drying times will vary according to persons when using your load. Turn the Cycle Selector to start the dryer. (Opening the door during operation stops the dryer. The selector may vary 1 Drying Selections. Press Timed Dry Minute Quick Dry Sechage Rapide * Fluff-No Heat option can be used with a timed cycle. 8 To restart, close the door and follow above directions.) Drying Selections...
... the size of load, types of fabrics, wetness of clothes, and condition of exhaust ducts. 2 Cycle Selector. NOTE: Drying times will vary according to persons when using your load. Turn the Cycle Selector to start the dryer. (Opening the door during operation stops the dryer. The selector may vary 1 Drying Selections. Press Timed Dry Minute Quick Dry Sechage Rapide * Fluff-No Heat option can be used with a timed cycle. 8 To restart, close the door and follow above directions.) Drying Selections...
User Manual
Page 9
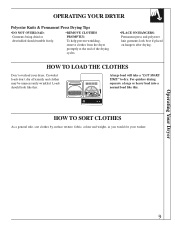
... freely. •REMOVE CLOTHES PROMPTLYTo help prevent wrinkling, remove clothes from the dryer promptly at the end of the drying cycles. •PLACE ON HANGERSPermanent press and polyester knit garments look like this : A large load will take a "LOT MORE TIME" to dry. Operating Your Dryer 9 For quicker drying separate a large or heavy load into a normal load like this . OPERATING YOUR DRYER Polyester Knits & Permanent Press Drying Tips •DO...
... freely. •REMOVE CLOTHES PROMPTLYTo help prevent wrinkling, remove clothes from the dryer promptly at the end of the drying cycles. •PLACE ON HANGERSPermanent press and polyester knit garments look like this : A large load will take a "LOT MORE TIME" to dry. Operating Your Dryer 9 For quicker drying separate a large or heavy load into a normal load like this . OPERATING YOUR DRYER Polyester Knits & Permanent Press Drying Tips •DO...
User Manual
Page 10
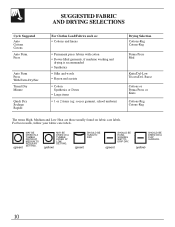
...Press With Extra Dry/Sec Timed Dry Minute Quick Dry Sechage Rapide For Clothes Load/Fabrics such as: • Cottons and linens • Permanent press fabrics with cotton • Down-filled garments, if machine washing and drying is recommended &#...DRYER AT LOW SETTING. Basse Cottons or Perma Press or Knits Cottons-Reg Cotons-Reg The terms High, Medium and Low Heat are those usually found on fabric care labels. SHOULD BE HUNG TO DRY. (green) SHOULD BE HUNG SOAKING WET TO DRIP DRY. (green) SHOULD BE DRIED ON A FLAT SURFACE. (yellow) 10 SUGGESTED FABRIC AND DRYING SELECTIONS Cycle...
...Press With Extra Dry/Sec Timed Dry Minute Quick Dry Sechage Rapide For Clothes Load/Fabrics such as: • Cottons and linens • Permanent press fabrics with cotton • Down-filled garments, if machine washing and drying is recommended &#...DRYER AT LOW SETTING. Basse Cottons or Perma Press or Knits Cottons-Reg Cotons-Reg The terms High, Medium and Low Heat are those usually found on fabric care labels. SHOULD BE HUNG TO DRY. (green) SHOULD BE HUNG SOAKING WET TO DRIP DRY. (green) SHOULD BE DRIED ON A FLAT SURFACE. (yellow) 10 SUGGESTED FABRIC AND DRYING SELECTIONS Cycle...
User Manual
Page 11
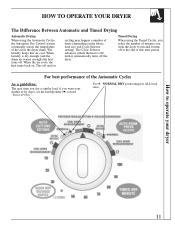
When the air cools, the heat turns back on cycling may happen a number of the air in the dryer drum. For best performance of the Automatic Cycles As a guideline: The next time you dry a similar load, if you wish the dryer to be dryer, set the knob/pointer ( ) toward "Extra dry/Sec". * Use NORMAL DRY positioning for ALL load sizes. How to operate your • clothes to run and it automatically turns off at the end...
When the air cools, the heat turns back on cycling may happen a number of the air in the dryer drum. For best performance of the Automatic Cycles As a guideline: The next time you dry a similar load, if you wish the dryer to be dryer, set the knob/pointer ( ) toward "Extra dry/Sec". * Use NORMAL DRY positioning for ALL load sizes. How to operate your • clothes to run and it automatically turns off at the end...
User Manual
Page 12
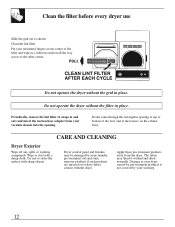
... not covered by some laundry pre-treatment soil and stain remover products if such products are sprayed on the cabinet front. Wipe or dust with sharp objects. Do not operate the dryer without the filter in place. Clean the filter before every dryer use Slide the grid out as shown Clean the lint filter. Do the same through the rectangular opening . Put your warranty...
... not covered by some laundry pre-treatment soil and stain remover products if such products are sprayed on the cabinet front. Wipe or dust with sharp objects. Do not operate the dryer without the filter in place. Clean the filter before every dryer use Slide the grid out as shown Clean the lint filter. Do the same through the rectangular opening . Put your warranty...
User Manual
Page 13
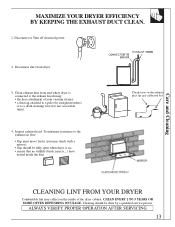
... OFTEN DEPENDING ON USAGE. Clean exhaust duct from dryer. 3. Cleaning should be done by a qualified service person. CLEANING LINT FROM YOUR DRYER Combustible lint may check with a mirror); • flap should be fully open when dryer is connected to a drain cleaning wire (for straight stretches) or to the exhaust hood using: • the hose attachment of the dryer cabinet. Disconnect or Turn off electrical power. 2. To minimize resistance to the exhaust air flow: • flap must...
... OFTEN DEPENDING ON USAGE. Clean exhaust duct from dryer. 3. Cleaning should be done by a qualified service person. CLEANING LINT FROM YOUR DRYER Combustible lint may check with a mirror); • flap should be fully open when dryer is connected to a drain cleaning wire (for straight stretches) or to the exhaust hood using: • the hose attachment of the dryer cabinet. Disconnect or Turn off electrical power. 2. To minimize resistance to the exhaust air flow: • flap must...
User Manual
Page 14
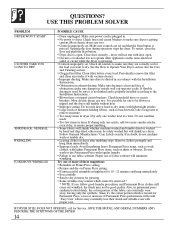
... Perma Press setting. • Rerinse and dry on Perma Press setting. • If unsuccessful, retumble on the same electrical outlet or circuit while the dryer is treated for Service, GIVE THE MODEL AND SERIAL NUMBERS AND DESCRIBE THE SYMPTOMS OF THE DRYER. 14 QUESTIONS? USE THIS PROBLEM SOLVER PROBLEM DRYER WON'T START CLOTHES TAKE TOO LONG TO DRY SHRINKAGE, GENERAL WRINKLING TO REMOVE WRINKLES POSSIBLE CAUSE • Dryer unplugged. IF DRYER STILL DOES NOT OPERATE, call for...
... Perma Press setting. • Rerinse and dry on Perma Press setting. • If unsuccessful, retumble on the same electrical outlet or circuit while the dryer is treated for Service, GIVE THE MODEL AND SERIAL NUMBERS AND DESCRIBE THE SYMPTOMS OF THE DRYER. 14 QUESTIONS? USE THIS PROBLEM SOLVER PROBLEM DRYER WON'T START CLOTHES TAKE TOO LONG TO DRY SHRINKAGE, GENERAL WRINKLING TO REMOVE WRINKLES POSSIBLE CAUSE • Dryer unplugged. IF DRYER STILL DOES NOT OPERATE, call for...
User Manual
Page 16
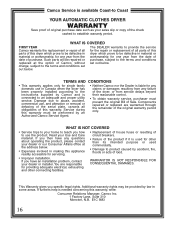
... domestic use , and alteration or removal or defacing of the serial plate, cancels all parts of this warranty must present the original Bill of the check cashed to establish warranty period. You are warranted through the remainder of this appliance readily accessible for servicing. • Replacement of house fuses or resetting of circuit breakers. • Failure of God. • Improper installation. Additional warranty rights may be repaired or replaced...
... domestic use , and alteration or removal or defacing of the serial plate, cancels all parts of this warranty must present the original Bill of the check cashed to establish warranty period. You are warranted through the remainder of this appliance readily accessible for servicing. • Replacement of house fuses or resetting of circuit breakers. • Failure of God. • Improper installation. Additional warranty rights may be repaired or replaced...


