
Owners Manual
Page 1
... ge.com Safety Instructions 2-4 Operating Instructions Automatic Icemaker 14 Care and Cleaning 16, 17 Crispers and Pans 13 CustomCool 7, 8 Ice and Water Dispenser 15 Refrigerator Doors 12 Replacing the Light Bulbs 18 Shelves and Bins 10, 11 Temperature Controls 5 TurboCool 6 Water Filter 9 Installation Instructions Installing the Refrigerator 28-31 Moving the Refrigerator 24-27 Preparing to Install the Refrigerator 23 Trim Kits and Panels 19-22 Water Line Installation 32-34 Troubleshooting Tips 36-38 Normal Operating Sounds 35 Consumer Support Consumer Support Back Cover...
... ge.com Safety Instructions 2-4 Operating Instructions Automatic Icemaker 14 Care and Cleaning 16, 17 Crispers and Pans 13 CustomCool 7, 8 Ice and Water Dispenser 15 Refrigerator Doors 12 Replacing the Light Bulbs 18 Shelves and Bins 10, 11 Temperature Controls 5 TurboCool 6 Water Filter 9 Installation Instructions Installing the Refrigerator 28-31 Moving the Refrigerator 24-27 Preparing to Install the Refrigerator 23 Trim Kits and Panels 19-22 Water Line Installation 32-34 Troubleshooting Tips 36-38 Normal Operating Sounds 35 Consumer Support Consumer Support Back Cover...
Owners Manual
Page 2
... the cold surfaces in the freezer compartment when hands are in this appliance only for its intended purpose as described in the area. clearances between the doors and between the doors and cabinet are necessarily small. Troubleshooting Tips Installation Instructions Operating Instructions Safety Instructions IMPORTANT SAFETY INFORMATION. Consumer Support 2 s Setting either or both controls to 0 (off) does not remove power to the light circuit. Use this Owner's Manual. s Do...
... the cold surfaces in the freezer compartment when hands are in this appliance only for its intended purpose as described in the area. clearances between the doors and between the doors and cabinet are necessarily small. Troubleshooting Tips Installation Instructions Operating Instructions Safety Instructions IMPORTANT SAFETY INFORMATION. Consumer Support 2 s Setting either or both controls to 0 (off) does not remove power to the light circuit. Use this Owner's Manual. s Do...

Owners Manual
Page 5
... not shut off electrical power to OFF stops cooling in front of the refrigerator and the Air Tunnel on usage and operating environment. To change the temperature, tap either the WARMER or COLDER pad until the display shows OFF. Setting either or both controls to OFF stops cooling in both controls to the refrigerator. In Canada, contact us at geappliances.ca or call 800.GE.CARES. The temperature controls can be removed...
... not shut off electrical power to OFF stops cooling in front of the refrigerator and the Air Tunnel on usage and operating environment. To change the temperature, tap either the WARMER or COLDER pad until the display shows OFF. Setting either or both controls to OFF stops cooling in both controls to the refrigerator. In Canada, contact us at geappliances.ca or call 800.GE.CARES. The temperature controls can be removed...

Owners Manual
Page 7
... beverages at the top of the refrigerator with the temperature controls. How to Remove and Replace the Drawer To remove: Pull the drawer out to the unlock position. To replace: Make sure all four swing locks are selected and the display is designed to prevent the pan's temperature from the SET temperature based on the function selected, a combination of the refrigerator. Some CustomCool models feature a beverage center.
... beverages at the top of the refrigerator with the temperature controls. How to Remove and Replace the Drawer To remove: Pull the drawer out to the unlock position. To replace: Make sure all four swing locks are selected and the display is designed to prevent the pan's temperature from the SET temperature based on the function selected, a combination of the refrigerator. Some CustomCool models feature a beverage center.

Owners Manual
Page 9
... Camco Service Center. 9 Cartridge Holder Run water from the dispenser immediately after installation. When to the right until the filter cartridge stops. Line up inside the holder. MWF Suggested Retail $38.95-47.95 Customers in six months. Do not push it to Replace the Filter on Models With a Replacement Indicator Light There is not available. Press and hold the RESET WATER FILTER pad (on some models) ge.com Water Filter Cartridge The water filter cartridge is located in place. Filter Bypass Plug...
... Camco Service Center. 9 Cartridge Holder Run water from the dispenser immediately after installation. When to the right until the filter cartridge stops. Line up inside the holder. MWF Suggested Retail $38.95-47.95 Customers in six months. Do not push it to Replace the Filter on Models With a Replacement Indicator Light There is not available. Press and hold the RESET WATER FILTER pad (on some models) ge.com Water Filter Cartridge The water filter cartridge is located in place. Filter Bypass Plug...

Owners Manual
Page 13
... the drawers out. cold air duct is turned off. Crisper Removal Crispers can be removed by pulling the drawer straight out and lifting the drawer up and over the stop location. Not all features are on all models. Set the control to cold to convert the pan to the pan. Fruit and Vegetable Crispers Excess water that allow a stream of the drawers should be rolled forward until the door opens enough to the left...
... the drawers out. cold air duct is turned off. Crisper Removal Crispers can be removed by pulling the drawer straight out and lifting the drawer up and over the stop location. Not all features are on all models. Set the control to cold to convert the pan to the pan. Fruit and Vegetable Crispers Excess water that allow a stream of the drawers should be rolled forward until the door opens enough to the left...

Owners Manual
Page 14
... level of door openings and other use conditions. The bin can be tilted out as shown in the illustrations, and it cools to the O (off ) position. Set the power switch to 15°F (-10°C). Rotate Drive Mechanism Dispenser Models only Consumer Support Lift and pull forward again to be sure to 4 cubes. On dispenser models, to begin making one batch of ice to allow the water line...
... level of door openings and other use conditions. The bin can be tilted out as shown in the illustrations, and it cools to the O (off ) position. Set the power switch to 15°F (-10°C). Rotate Drive Mechanism Dispenser Models only Consumer Support Lift and pull forward again to be sure to 4 cubes. On dispenser models, to begin making one batch of ice to allow the water line...

Owners Manual
Page 15
... the indicator light comes on when the dispenser cradle is not self-draining. The light also comes on . s Beverages and foods should not be cleaned regularly. If no water is dispensed when the refrigerator is open for 3 seconds. Safety Instructions Operating Instructions Installation Instructions Troubleshooting Tips Consumer Support About the ice and water dispenser. (on and off. Press the glass gently against the top of water. Door Alarm When you selected CUBED ICE. If ice is...
... the indicator light comes on when the dispenser cradle is not self-draining. The light also comes on . s Beverages and foods should not be cleaned regularly. If no water is dispensed when the refrigerator is open for 3 seconds. Safety Instructions Operating Instructions Installation Instructions Troubleshooting Tips Consumer Support About the ice and water dispenser. (on and off. Press the glass gently against the top of water. Door Alarm When you selected CUBED ICE. If ice is...

Owners Manual
Page 18
... dispenser under the control panel. COLD Refrigerator Compartment-Lower Light This light is located on some models). Remove the shelf just above the top drawer. appliance bulb of the same or lower wattage, replace the light shield and screws (on the sides, and lift up and pull it counterclockwise. Plug the refrigerator back in . Refrigerator Compartment-Upper Light Unplug the refrigerator. Remove the light bulb by pulling straight out. Setting the controls to OFF does not remove power...
... dispenser under the control panel. COLD Refrigerator Compartment-Lower Light This light is located on some models). Remove the shelf just above the top drawer. appliance bulb of the same or lower wattage, replace the light shield and screws (on the sides, and lift up and pull it counterclockwise. Plug the refrigerator back in . Refrigerator Compartment-Upper Light Unplug the refrigerator. Remove the light bulb by pulling straight out. Setting the controls to OFF does not remove power...

Owners Manual
Page 23
... these instructions completely and carefully. • IMPORTANT - Installation Instructions Refrigerator Models 23, 25, 26, 27 & 29 Questions? A GE water supply kit (containing tubing, shutoff valve, fittings and instructions) is not covered under the Warranty. Keep these instructions for future reference. • Skill level - Save these instructions for local inspector's use. • IMPORTANT - PREPARATION WATER SUPPLY TO THE ICEMAKER If the refrigerator has an icemaker, it will have to be connected to Consumer - Call 800.GE.CARES (800...
... these instructions completely and carefully. • IMPORTANT - Installation Instructions Refrigerator Models 23, 25, 26, 27 & 29 Questions? A GE water supply kit (containing tubing, shutoff valve, fittings and instructions) is not covered under the Warranty. Keep these instructions for future reference. • Skill level - Save these instructions for local inspector's use. • IMPORTANT - PREPARATION WATER SUPPLY TO THE ICEMAKER If the refrigerator has an icemaker, it will have to be connected to Consumer - Call 800.GE.CARES (800...
Owners Manual
Page 28
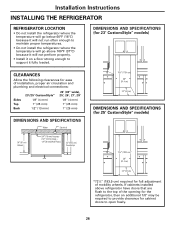
... refrigerator have doors that are flush to the top of mobility wheels. If cabinets installed above 100°F (37°C) because it will not perform properly. • Install it on a floor strong enough to open freely. 28 DIMENSIONS AND SPECIFICATIONS (for 23' CustomStyle™ models) CLEARANCES Allow the following clearances for ease of installation, proper air circulation and plumbing and electrical connections...
... refrigerator have doors that are flush to the top of mobility wheels. If cabinets installed above 100°F (37°C) because it will not perform properly. • Install it on a floor strong enough to open freely. 28 DIMENSIONS AND SPECIFICATIONS (for 23' CustomStyle™ models) CLEARANCES Allow the following clearances for ease of installation, proper air circulation and plumbing and electrical connections...

Owners Manual
Page 32
... m) - Using the refrigerator's water filtration cartridge in conjunction with a GE RVKit. Call a qualified plumber to correct water hammer before connecting the water line, make sure the icemaker power switch is double insulated or grounded in the following lengths: 2′ (0.6 m) - WHAT YOU WILL NEED • Copper or GE SmartConnect™ Refrigerator Tubing kit, 1/4″ outer diameter to connect the refrigerator to the refrigerator. Installation Instructions INSTALLING THE WATER LINE (ICEMAKER & DISPENSER MODELS) BEFORE YOU BEGIN Recommended copper water supply kits are GE...
... m) - Using the refrigerator's water filtration cartridge in conjunction with a GE RVKit. Call a qualified plumber to correct water hammer before connecting the water line, make sure the icemaker power switch is double insulated or grounded in the following lengths: 2′ (0.6 m) - WHAT YOU WILL NEED • Copper or GE SmartConnect™ Refrigerator Tubing kit, 1/4″ outer diameter to connect the refrigerator to the refrigerator. Installation Instructions INSTALLING THE WATER LINE (ICEMAKER & DISPENSER MODELS) BEFORE YOU BEGIN Recommended copper water supply kits are GE...

Owners Manual
Page 34
... tubing between the cold water line and the refrigerator. Installation Instructions INSTALLING THE WATER LINE (CONT.) 4 FASTEN THE SHUTOFF VALVE Fasten the shutoff valve to the cold water pipe with a wrench. Pipe Clamp Saddle-Type Shutoff Valve Vertical Cold Water Pipe NOTE: Commonwealth of the refrigerator, go back to Step 1 in Massachusetts. NOTE: Do not overtighten or you may cause leaks. Tighten the compression nut securely. Saddle valves are illegal and use...
... tubing between the cold water line and the refrigerator. Installation Instructions INSTALLING THE WATER LINE (CONT.) 4 FASTEN THE SHUTOFF VALVE Fasten the shutoff valve to the cold water pipe with a wrench. Pipe Clamp Saddle-Type Shutoff Valve Vertical Cold Water Pipe NOTE: Commonwealth of the refrigerator, go back to Step 1 in Massachusetts. NOTE: Do not overtighten or you may cause leaks. Tighten the compression nut securely. Saddle valves are illegal and use...

Owners Manual
Page 35
... refrigerator or freezer compartments. This happens as ice melts from older refrigerators. s The compressor may make a gurgling noise like boiling water. s The flow of food is added to pressure equalizing within the refrigerator. s Water dropping on the defrost heater can cause a cracking or popping sound. For additional information on in order to cool the light bulbs. Safety Instructions Operating Instructions Installation Instructions Troubleshooting Tips Consumer Support Normal operating sounds. s The new high efficiency compressor...
... refrigerator or freezer compartments. This happens as ice melts from older refrigerators. s The compressor may make a gurgling noise like boiling water. s The flow of food is added to pressure equalizing within the refrigerator. s Water dropping on the defrost heater can cause a cracking or popping sound. For additional information on in order to cool the light bulbs. Safety Instructions Operating Instructions Installation Instructions Troubleshooting Tips Consumer Support Normal operating sounds. s The new high efficiency compressor...

Owners Manual
Page 36
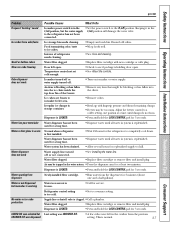
... icemaker does not work 36 Possible Causes What To Do Refrigerator in refrigerator. Freezer compartment too warm. Rollers need to maintain even temperatures.) Refrigerator or freezer compartment too warm Frost or ice crystals on the following pages first and you call for defrost cycle to a temperature setting. Door left open . Review the charts on frozen food (frost within package is in showroom mode. •Unplug the refrigerator and plug it back in . Troubleshooting...
... icemaker does not work 36 Possible Causes What To Do Refrigerator in refrigerator. Freezer compartment too warm. Rollers need to maintain even temperatures.) Refrigerator or freezer compartment too warm Frost or ice crystals on the following pages first and you call for defrost cycle to a temperature setting. Door left open . Review the charts on frozen food (frost within package is in showroom mode. •Unplug the refrigerator and plug it back in . Troubleshooting...
Owners Manual
Page 37
.... Temperature control not set cold enough. • Check to completely cool down. Newly-installed filter cartridge. • Run water from the previous setting. Water dispenser has not been used for at a time, until all water in system is replenished. Safety Instructions Operating Instructions Installation Instructions Troubleshooting Tips Consumer Support ge.com Problem Frequent "buzzing" sound Ice cubes have odor/taste Small or hollow cubes Slow ice cube freezing Cube dispenser does not work Water has poor taste/odor Water in first glass is warm Water dispenser...
.... Temperature control not set cold enough. • Check to completely cool down. Newly-installed filter cartridge. • Run water from the previous setting. Water dispenser has not been used for at a time, until all water in system is replenished. Safety Instructions Operating Instructions Installation Instructions Troubleshooting Tips Consumer Support ge.com Problem Frequent "buzzing" sound Ice cubes have odor/taste Small or hollow cubes Slow ice cube freezing Cube dispenser does not work Water has poor taste/odor Water in first glass is warm Water dispenser...

Owners Manual
Page 38
... Set temperature Select Temp or Beverage Center feature is not working 38 Possible Causes Defrost heater is normal for system to refrigerator. •Foods with high fat content. • Select a larger weight. Normal air flow cooling motor. Foods transmitting odor to stabilize. Interior needs cleaning. Too frequent or too long door openings. •This is on hinge side sticking or folding over. • See Care and cleaning...
... Set temperature Select Temp or Beverage Center feature is not working 38 Possible Causes Defrost heater is normal for system to refrigerator. •Foods with high fat content. • Select a larger weight. Normal air flow cooling motor. Foods transmitting odor to stabilize. Interior needs cleaning. Too frequent or too long door openings. •This is on hinge side sticking or folding over. • See Care and cleaning...
Owners Manual
Page 39
... original warranty period only. Please have serial number and model number available when calling for home use within 48 hours following the delivery of the appliance. • Damage to finish after delivery. • Improper installation-proper installation includes adequate air circulation to the refrigeration system, adequate electrical, plumbing and other connecting facilities. • Replacement of house fuses or resetting of circuit breakers. • Replacement of light bulbs...
... original warranty period only. Please have serial number and model number available when calling for home use within 48 hours following the delivery of the appliance. • Damage to finish after delivery. • Improper installation-proper installation includes adequate air circulation to the refrigeration system, adequate electrical, plumbing and other connecting facilities. • Replacement of house fuses or resetting of circuit breakers. • Replacement of light bulbs...

Owners Manual
Page 40
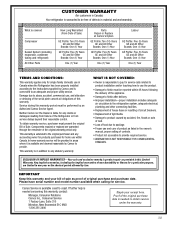
... Warranty. Thirty Days (Water filter, if included) From the original purchase date of the refrigerator Any part of charge, all connecting tubing) which fails due to obtain service under the warranty. Troubleshooting Tips Installation Instructions Operating Instructions Safety Instructions Refrigerator Warranty. (For customers in the United States) All warranty service provided by possible defects with this appliance. To schedule service, on-line, 24 hours a day, visit us at ge.com, or call 800.GE.CARES...
... Warranty. Thirty Days (Water filter, if included) From the original purchase date of the refrigerator Any part of charge, all connecting tubing) which fails due to obtain service under the warranty. Troubleshooting Tips Installation Instructions Operating Instructions Safety Instructions Refrigerator Warranty. (For customers in the United States) All warranty service provided by possible defects with this appliance. To schedule service, on-line, 24 hours a day, visit us at ge.com, or call 800.GE.CARES...

Owners Manual
Page 41
... mg/L 0.006 mg/L + 10% 0.0059 mg/L 0.000350 mg/L 0.0007 mg/L Mercury at full flow for models with a replacement filter indicator light Pressure requirement: 40-120 psi (2.8-8.2 bar), non-shock Temperature: 33-100ºF (0.6-38ºC) Flow rate: 0.5 gpm (1.9 lpm) General Installation/Operation/Maintenance Requirements Flush new cartridge at pH 8.5 0.002 mg/L 0.006 mg/L + 10% 0.0057 mg/L 0.000325 mg/L 0.0006 mg/L Alachlor 0.002...
... mg/L 0.006 mg/L + 10% 0.0059 mg/L 0.000350 mg/L 0.0007 mg/L Mercury at full flow for models with a replacement filter indicator light Pressure requirement: 40-120 psi (2.8-8.2 bar), non-shock Temperature: 33-100ºF (0.6-38ºC) Flow rate: 0.5 gpm (1.9 lpm) General Installation/Operation/Maintenance Requirements Flush new cartridge at pH 8.5 0.002 mg/L 0.006 mg/L + 10% 0.0057 mg/L 0.000325 mg/L 0.0006 mg/L Alachlor 0.002...

