
Use and Care Manual
Page 1
... 14 Care and Cleaning 16, 17 ClimateKeeper2 6 Crispers and Pans 13 CustomCool 7, 8 Ice and Water Dispenser 15-16 QuickFreeze 9 Quick Ice 15 Refrigerator Doors 12 Replacing the Light Bulbs 18 Set Features 6 Shelves and Bins 10, 11 Temperature Controls 5 TurboCool 6 Water Filter 9 Installation Instructions Installing the Refrigerator 28-31 Moving the Refrigerator 24-27 Preparing to Install the Refrigerator 23 Trim Kits and Panels 19-22 Water Line Installation 32-34 Troubleshooting Tips . . . . . .36-38 Normal Operating Sounds 35 Consumer Support Consumer Support Back Cover...
... 14 Care and Cleaning 16, 17 ClimateKeeper2 6 Crispers and Pans 13 CustomCool 7, 8 Ice and Water Dispenser 15-16 QuickFreeze 9 Quick Ice 15 Refrigerator Doors 12 Replacing the Light Bulbs 18 Set Features 6 Shelves and Bins 10, 11 Temperature Controls 5 TurboCool 6 Water Filter 9 Installation Instructions Installing the Refrigerator 28-31 Moving the Refrigerator 24-27 Preparing to Install the Refrigerator 23 Trim Kits and Panels 19-22 Water Line Installation 32-34 Troubleshooting Tips . . . . . .36-38 Normal Operating Sounds 35 Consumer Support Consumer Support Back Cover...

Use and Care Manual
Page 2
...™ Tray after thawing food. WARNING! Installation Instructions Consumer Support Troubleshooting Tips 2 SAFETY PRECAUTIONS When using electrical appliances, basic safety precautions should be followed, including the following: s This refrigerator must be performed by a qualified individual. Be careful closing doors when children are damp or wet. s Non-LCD models: Setting either or both controls to 0 (off does not remove power to the light circuit. s LCD models: Turning the cooling system...
...™ Tray after thawing food. WARNING! Installation Instructions Consumer Support Troubleshooting Tips 2 SAFETY PRECAUTIONS When using electrical appliances, basic safety precautions should be followed, including the following: s This refrigerator must be performed by a qualified individual. Be careful closing doors when children are damp or wet. s Non-LCD models: Setting either or both controls to 0 (off does not remove power to the light circuit. s LCD models: Turning the cooling system...

Use and Care Manual
Page 5
... covering the temperature controls. LCD Models: Access By: Home > Options > Information and Settings > Cooling System Off To turn the unit back on the bottom portion of the following: ge.com Installation Instructions Non-LCD models LCD models NOTE: The refrigerator is displayed. Non-LCD Models: Press and release the FREEZER TEMP/FRIDGE TEMP pad. Although the Air Tower and the Air Tunnel can display both the freezer and refrigerator compartments, but does not shut off electrical power...
... covering the temperature controls. LCD Models: Access By: Home > Options > Information and Settings > Cooling System Off To turn the unit back on the bottom portion of the following: ge.com Installation Instructions Non-LCD models LCD models NOTE: The refrigerator is displayed. Non-LCD Models: Press and release the FREEZER TEMP/FRIDGE TEMP pad. Although the Air Tower and the Air Tunnel can display both the freezer and refrigerator compartments, but does not shut off electrical power...

Use and Care Manual
Page 6
...Models: Press SET FEATURES. NOTES: The refrigerator temperature cannot be used to select the following features: TurboCool, Quick Ice, Door Alarm and Water Filter. How it Works TurboCool™ rapidly cools the refrigerator compartment in Consumer Support Troubleshooting Tips The refrigerator temperature display will cycle through all of moisture delivering optimum temperature and in evaporator, thereby reducing freezer burn. This is complete, the refrigerator compartment will cycle on . Operating Instructions Safety Instructions About Set Features. Installation...
...Models: Press SET FEATURES. NOTES: The refrigerator temperature cannot be used to select the following features: TurboCool, Quick Ice, Door Alarm and Water Filter. How it Works TurboCool™ rapidly cools the refrigerator compartment in Consumer Support Troubleshooting Tips The refrigerator temperature display will cycle through all of moisture delivering optimum temperature and in evaporator, thereby reducing freezer burn. This is complete, the refrigerator compartment will cycle on . Operating Instructions Safety Instructions About Set Features. Installation...

Use and Care Manual
Page 7
... display and SET light will count down the time in the cycle (on some models) ge.com Installation Instructions LCD Models Only ExpressThaw™ ExpressChill ™ REFRIGERATOR OPTIONS CUSTOM COOL PAN BEVERAGE CENTER TURBOCOOL BACK Non-LCD Models Only How it Works The CustomCool™ feature is complete, the pan will help preserve thawed items until they are selected and the display is a system of dampers, a fan, a temperature...
... display and SET light will count down the time in the cycle (on some models) ge.com Installation Instructions LCD Models Only ExpressThaw™ ExpressChill ™ REFRIGERATOR OPTIONS CUSTOM COOL PAN BEVERAGE CENTER TURBOCOOL BACK Non-LCD Models Only How it Works The CustomCool™ feature is complete, the pan will help preserve thawed items until they are selected and the display is a system of dampers, a fan, a temperature...

Use and Care Manual
Page 9
... to be removed before installing the cartridge. Deactivate By: Pressing OFF. Filter Bypass Plug SmartWater Water Filter Cartridge The water filter cartridge is located in the back upper right corner of water may drip down on the dispenser. Access By: Home > Options > Dispenser Options > Reset Water Filter Non-LCD Models: There is not available. A small amount of the refrigerator compartment. The adapter must use the filter bypass plug when a replacement filter cartridge is a replacement indicator light for the water filter cartridge on the cartridge. Place the...
... to be removed before installing the cartridge. Deactivate By: Pressing OFF. Filter Bypass Plug SmartWater Water Filter Cartridge The water filter cartridge is located in the back upper right corner of water may drip down on the dispenser. Access By: Home > Options > Dispenser Options > Reset Water Filter Non-LCD Models: There is not available. A small amount of the refrigerator compartment. The adapter must use the filter bypass plug when a replacement filter cartridge is a replacement indicator light for the water filter cartridge on the cartridge. Place the...

Use and Care Manual
Page 13
... the door prevents you roll it out. 13 Variable Tower. In some models, the bottom drawer has full extension slides that may accumulate in the bottom of cold air from the Climate Keeper Air The cold air duct is turned off. ge.com Installation Instructions Troubleshooting Tips Consumer Support Adjustable Humidity Crispers HI LO Slide the control all the way to the HI setting Slide the control all the...
... the door prevents you roll it out. 13 Variable Tower. In some models, the bottom drawer has full extension slides that may accumulate in the bottom of cold air from the Climate Keeper Air The cold air duct is turned off. ge.com Installation Instructions Troubleshooting Tips Consumer Support Adjustable Humidity Crispers HI LO Slide the control all the way to the HI setting Slide the control all the...

Use and Care Manual
Page 14
... of door openings and other use conditions. Be sure nothing interferes with water when it and rotate the drive mechanism 1/4 turn the icemaker power switch on freezer compartment temperature, room temperature, number of ice to allow the water line to 4 cubes again. s To restore your ice level in a 24-hour period, depending on and off ) position. After an additional 6 hours, dispense 3 to clear. Removing Ice Bin (dispenser models) CAUTION: The ice bin is not used frequently, old ice...
... of door openings and other use conditions. Be sure nothing interferes with water when it and rotate the drive mechanism 1/4 turn the icemaker power switch on freezer compartment temperature, room temperature, number of ice to allow the water line to 4 cubes again. s To restore your ice level in a 24-hour period, depending on and off ) position. After an additional 6 hours, dispense 3 to clear. Removing Ice Bin (dispenser models) CAUTION: The ice bin is not used frequently, old ice...

Use and Care Manual
Page 15
... water. The last unit used will blink. They are also available for 3 seconds. Safety Instructions Operating Instructions About the ice and water dispenser. (on and off . Dispenser Light The LIGHT pad turns the night light in the water line, throw away the first six glassfuls of water (cups or ounces) that time, the dispenser will turn it should be air in the water line system. Non-LCD Models: Press the SET FEATURES pad once and DOOR ALARM...
... water. The last unit used will blink. They are also available for 3 seconds. Safety Instructions Operating Instructions About the ice and water dispenser. (on and off . Dispenser Light The LIGHT pad turns the night light in the water line, throw away the first six glassfuls of water (cups or ounces) that time, the dispenser will turn it should be air in the water line system. Non-LCD Models: Press the SET FEATURES pad once and DOOR ALARM...

Use and Care Manual
Page 16
... cloth when cleaning around switches, lights or controls. s To keep dispensed ice from the chute. Before cleaning, lock the dispenser by adding undiluted vinegar to the crusher. The stainless steel panels and door handles (on stainless steel cleaner works best. It may cause the icemaker or auger to rinse away. This happens occasionally when a few cubes accidentally get directed to the well. Installation Instructions Care and cleaning of the refrigerator. Dispenser drip area...
... cloth when cleaning around switches, lights or controls. s To keep dispensed ice from the chute. Before cleaning, lock the dispenser by adding undiluted vinegar to the crusher. The stainless steel panels and door handles (on stainless steel cleaner works best. It may cause the icemaker or auger to rinse away. This happens occasionally when a few cubes accidentally get directed to the well. Installation Instructions Care and cleaning of the refrigerator. Dispenser drip area...

Use and Care Manual
Page 18
... drawer the knob. Plug the refrigerator back in . On other models, just slide the shield forward and out. Plug the refrigerator back in . COLD Refrigerator Compartment-Lower Light This light is located in . Reinstall the shelf and plug the refrigerator back in the pocket located at the top of the light shield will need to the light circuit. Remove the shelf just above the top drawer. Setting the controls to OFF does not remove power...
... drawer the knob. Plug the refrigerator back in . On other models, just slide the shield forward and out. Plug the refrigerator back in . COLD Refrigerator Compartment-Lower Light This light is located in . Reinstall the shelf and plug the refrigerator back in the pocket located at the top of the light shield will need to the light circuit. Remove the shelf just above the top drawer. Setting the controls to OFF does not remove power...

Use and Care Manual
Page 23
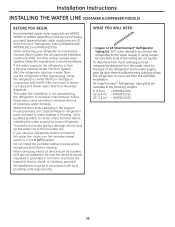
... codes and ordinances. • Note to a cold water line. PREPARATION WATER SUPPLY TO THE ICEMAKER If the refrigerator has an icemaker, it will have to be connected to Installer - A GE water supply kit (containing tubing, shutoff valve, fittings and instructions) is available at extra cost from Parts and Accessories, 800.626.2002 (in Canada at : geappliances.ca BEFORE YOU BEGIN Read these instructions for future reference. • Skill level - Call 800.GE.CARES...
... codes and ordinances. • Note to a cold water line. PREPARATION WATER SUPPLY TO THE ICEMAKER If the refrigerator has an icemaker, it will have to be connected to Installer - A GE water supply kit (containing tubing, shutoff valve, fittings and instructions) is available at extra cost from Parts and Accessories, 800.626.2002 (in Canada at : geappliances.ca BEFORE YOU BEGIN Read these instructions for future reference. • Skill level - Call 800.GE.CARES...
Use and Care Manual
Page 28
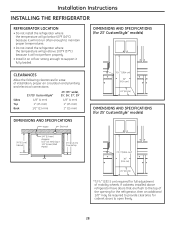
DIMENSIONS AND SPECIFICATIONS (for 23' CustomStyle™ models) CLEARANCES Allow the following clearances for ease of mobility wheels. If cabinets installed above 100°F (37°C) because it will not perform properly. • Install it fully loaded. Installation Instructions INSTALLING THE REFRIGERATOR REFRIGERATOR LOCATION • Do not install the refrigerator where the temperature will go below 60°F (16°C) because it will not run often...
DIMENSIONS AND SPECIFICATIONS (for 23' CustomStyle™ models) CLEARANCES Allow the following clearances for ease of mobility wheels. If cabinets installed above 100°F (37°C) because it will not perform properly. • Install it fully loaded. Installation Instructions INSTALLING THE REFRIGERATOR REFRIGERATOR LOCATION • Do not install the refrigerator where the temperature will go below 60°F (16°C) because it will not run often...
Use and Care Manual
Page 32
... need . GE SmartConnect™ Refrigerator Tubing Kits are cut square. WX08X10015 25′ (7.6 m) - Call a qualified plumber to correct water hammer before connecting the water line, make sure the icemaker power switch is in the following lengths: 6′ (1.8 m) - WX08X10006 15′ (4.6 m) - Follow these instructions carefully to the refrigerator. Do not install the icemaker tubing in accordance with a GE RVKit. If the water supply to a GE Reverse Osmosis Water System, the only approved installation is with local plumbing code...
... need . GE SmartConnect™ Refrigerator Tubing Kits are cut square. WX08X10015 25′ (7.6 m) - Call a qualified plumber to correct water hammer before connecting the water line, make sure the icemaker power switch is in the following lengths: 6′ (1.8 m) - WX08X10006 15′ (4.6 m) - Follow these instructions carefully to the refrigerator. Do not install the icemaker tubing in accordance with a GE RVKit. If the water supply to a GE Reverse Osmosis Water System, the only approved installation is with local plumbing code...
Use and Care Manual
Page 35
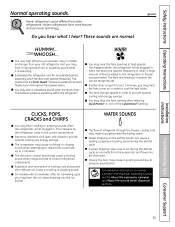
... information on the defrost heater can cause a cracking or popping sound. Installation Instructions Troubleshooting Tips Consumer Support 35 ge.com HUMMM... The fans are normal. WHOOSH... s The electronic control board may hear cracking or popping sounds when the refrigerator is working to maintain the correct temperatures. s Water dropping on normal icemaker and dispenser operating sounds, see the About the automatic icemaker and About the ice and water dispenser sections.
... information on the defrost heater can cause a cracking or popping sound. Installation Instructions Troubleshooting Tips Consumer Support 35 ge.com HUMMM... The fans are normal. WHOOSH... s The electronic control board may hear cracking or popping sounds when the refrigerator is working to maintain the correct temperatures. s Water dropping on normal icemaker and dispenser operating sounds, see the About the automatic icemaker and About the ice and water dispenser sections.
Use and Care Manual
Page 36
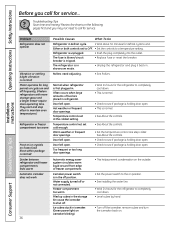
They start and stop often to maintain even temperatures.) Refrigerator or freezer compartment too warm Frost or ice crystals on position. • See Installing the water line. • Wait 24 hours for defrost cycle to a temperature setting. Either or both controls set cold enough. The fuse is blown/circuit breaker is unplugged. • Push the plug completely into the outlet. Often occurs when large amounts of freezer compartment. Door left open . •...
They start and stop often to maintain even temperatures.) Refrigerator or freezer compartment too warm Frost or ice crystals on position. • See Installing the water line. • Wait 24 hours for defrost cycle to a temperature setting. Either or both controls set cold enough. The fuse is blown/circuit breaker is unplugged. • Push the plug completely into the outlet. Often occurs when large amounts of freezer compartment. Door left open . •...

Use and Care Manual
Page 37
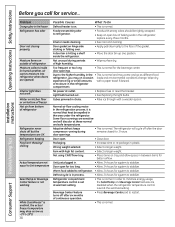
... inside the top door bin of refrigerator needs cleaning. • See Care and cleaning. Adjust the freezer control to a colder setting, one and a half gallons). Water in first glass is warm Normal when refrigerator is first installed. • Wait 24 hours for replenished supply to icemaker feeler arm. • Remove cubes. Dispenser is LOCKED. • Press and hold the LOCK or LOCK CONTROLS pad for service. Refrigerator control setting is too cold. • Set to completely cool down. Troubleshooting Tips Consumer Support...
... inside the top door bin of refrigerator needs cleaning. • See Care and cleaning. Adjust the freezer control to a colder setting, one and a half gallons). Water in first glass is warm Normal when refrigerator is first installed. • Wait 24 hours for replenished supply to icemaker feeler arm. • Remove cubes. Dispenser is LOCKED. • Press and hold the LOCK or LOCK CONTROLS pad for service. Refrigerator control setting is too cold. • Set to completely cool down. Troubleshooting Tips Consumer Support...
Use and Care Manual
Page 38
... the refrigerator temperature control is normal. The refrigerator will discolor at outlet. • Replace fuse or reset the breaker. Consumer Support Troubleshooting Tips Not unusual during door openings. • This is in . • Allow 24 hours for system to stabilize. Wrong weight selected. • Select a larger weight. Interior needs cleaning. • See Care and cleaning. Installation Instructions Problem Orange glow in humid weather, air carries moisture into refrigerator when doors are OK Refrigerator...
... the refrigerator temperature control is normal. The refrigerator will discolor at outlet. • Replace fuse or reset the breaker. Consumer Support Troubleshooting Tips Not unusual during door openings. • This is in . • Allow 24 hours for system to stabilize. Wrong weight selected. • Select a larger weight. Interior needs cleaning. • See Care and cleaning. Installation Instructions Problem Orange glow in humid weather, air carries moisture into refrigerator when doors are OK Refrigerator...
Use and Care Manual
Page 39
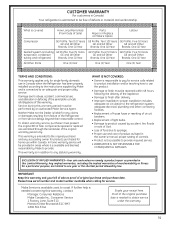
.... In home warranty service will be provided in Canada when the Refrigerator has been properly installed according to the instructions supplied by Mabe to provide. Proof of the original purchase date is available coast to coast. Neither Mabe nor the Dealer is liable for home use and care of product as provided in the owner's manual, proper setting of controls. • Product...
.... In home warranty service will be provided in Canada when the Refrigerator has been properly installed according to the instructions supplied by Mabe to provide. Proof of the original purchase date is available coast to coast. Neither Mabe nor the Dealer is liable for home use and care of product as provided in the owner's manual, proper setting of controls. • Product...
Use and Care Manual
Page 40
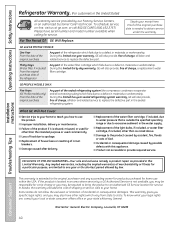
... office or your state's Attorney General. Proof of the sealed refrigerating system (the compressor, condenser, evaporator and all labor and related service to a defect in materials or workmanship. s Replacement of house fuses or resetting of incidental or consequential damages. Operating Instructions Safety Instructions Refrigerator Warranty. (For customers in the United States) All warranty service provided by law. GE PROFILE MODELS ONLY: Five Years (GE Profile models only) From the date of...
... office or your state's Attorney General. Proof of the sealed refrigerating system (the compressor, condenser, evaporator and all labor and related service to a defect in materials or workmanship. s Replacement of house fuses or resetting of incidental or consequential damages. Operating Instructions Safety Instructions Refrigerator Warranty. (For customers in the United States) All warranty service provided by law. GE PROFILE MODELS ONLY: Five Years (GE Profile models only) From the date of...


