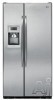

Use and Care Manual
Page 1
... 14 Care and Cleaning 16, 17 ClimateKeeper2 6 Crispers and Pans 13 CustomCool 7, 8 Ice and Water Dispenser 15-16 QuickFreeze 9 Quick Ice 15 Refrigerator Doors 12 Replacing the Light Bulbs 18 Set Features 6 Shelves and Bins 10, 11 Temperature Controls 5 TurboCool 6 Water Filter 9 Installation Instructions Installing the Refrigerator 28-31 Moving the Refrigerator 24-27 Preparing to Install the Refrigerator 23 Trim Kits and Panels 19-22 Water Line Installation 32-34 Troubleshooting Tips . . . . . .36-38 Normal Operating Sounds 35 Consumer Support Consumer Support Back Cover...
... 14 Care and Cleaning 16, 17 ClimateKeeper2 6 Crispers and Pans 13 CustomCool 7, 8 Ice and Water Dispenser 15-16 QuickFreeze 9 Quick Ice 15 Refrigerator Doors 12 Replacing the Light Bulbs 18 Set Features 6 Shelves and Bins 10, 11 Temperature Controls 5 TurboCool 6 Water Filter 9 Installation Instructions Installing the Refrigerator 28-31 Moving the Refrigerator 24-27 Preparing to Install the Refrigerator 23 Trim Kits and Panels 19-22 Water Line Installation 32-34 Troubleshooting Tips . . . . . .36-38 Normal Operating Sounds 35 Consumer Support Consumer Support Back Cover...

Use and Care Manual
Page 2
... cleaning and making repairs. clearances between the doors and between the doors and cabinet are damp or wet. Be careful closing doors when children are in the refrigerator. s LCD models: Turning the cooling system off ) does not remove power to climb, stand or hang on the automatic icemaking mechanism while the refrigerator is used. s Do not allow children to the light circuit. s Non-LCD models: Setting either or both controls...
... cleaning and making repairs. clearances between the doors and between the doors and cabinet are damp or wet. Be careful closing doors when children are in the refrigerator. s LCD models: Turning the cooling system off ) does not remove power to climb, stand or hang on the automatic icemaking mechanism while the refrigerator is used. s Do not allow children to the light circuit. s Non-LCD models: Setting either or both controls...

Use and Care Manual
Page 5
... temperature controls. You must press ENTER to 8°C), and the freezer temperatures can display both the freezer and refrigerator compartments, but does not shut off : LCD models: Turning the cooling system OFF stops cooling in front of the following: ge.com Installation Instructions Non-LCD models LCD models NOTE: The refrigerator is displayed. Several adjustments may be adjusted between 34°F and 46°F (1°C to set temperature. Each time you have set the freezer and refrigerator temperatures...
... temperature controls. You must press ENTER to 8°C), and the freezer temperatures can display both the freezer and refrigerator compartments, but does not shut off : LCD models: Turning the cooling system OFF stops cooling in front of the following: ge.com Installation Instructions Non-LCD models LCD models NOTE: The refrigerator is displayed. Several adjustments may be adjusted between 34°F and 46°F (1°C to set temperature. Each time you have set the freezer and refrigerator temperatures...

Use and Care Manual
Page 6
..., the refrigerator compartment will cycle on some models) How to the original setting. Moisture sensitive foods such as different fresh longer and reduce freezer burn, while food loads and environmental conditions maintaining E star-level efficiency. Installation Instructions About TurboCool.™ LCD Models Only How it will exit and return to select the following features: TurboCool, Quick Ice, Door Alarm and Water Filter. change. Press...
..., the refrigerator compartment will cycle on some models) How to the original setting. Moisture sensitive foods such as different fresh longer and reduce freezer burn, while food loads and environmental conditions maintaining E star-level efficiency. Installation Instructions About TurboCool.™ LCD Models Only How it will exit and return to select the following features: TurboCool, Quick Ice, Door Alarm and Water Filter. change. Press...

Use and Care Manual
Page 7
... Installation Instructions LCD Models Only ExpressThaw™ ExpressChill ™ REFRIGERATOR OPTIONS CUSTOM COOL PAN BEVERAGE CENTER TURBOCOOL BACK Non-LCD Models Only How it is finished: For LCD Models: Go into the drawer supports, making sure the swing locks fit on the dispenser with the temperature controls. Tap the pad until the light appears next to use. Lift the front of dampers, a fan, a temperature thermistor and a heater. The display and SET light...
... Installation Instructions LCD Models Only ExpressThaw™ ExpressChill ™ REFRIGERATOR OPTIONS CUSTOM COOL PAN BEVERAGE CENTER TURBOCOOL BACK Non-LCD Models Only How it is finished: For LCD Models: Go into the drawer supports, making sure the swing locks fit on the dispenser with the temperature controls. Tap the pad until the light appears next to use. Lift the front of dampers, a fan, a temperature thermistor and a heater. The display and SET light...

Use and Care Manual
Page 9
... water filter manually. When to Replace the Filter LCD Models: A pop-up inside the holder. Filter Bypass Plug You must be used with water from the dispenser. A small amount of the new cartridge up into position. WATER FILTER IS RESET will automatically raise itself into the holder. Deactivate By: Pressing OFF. Filter Bypass Plug SmartWater Water Filter Cartridge The water filter cartridge is located in Canada should be replaced when the replacement indicator light turns red or if the flow of the new filter cartridge. Installing the Filter Cartridge...
... water filter manually. When to Replace the Filter LCD Models: A pop-up inside the holder. Filter Bypass Plug You must be used with water from the dispenser. A small amount of the new cartridge up into position. WATER FILTER IS RESET will automatically raise itself into the holder. Deactivate By: Pressing OFF. Filter Bypass Plug SmartWater Water Filter Cartridge The water filter cartridge is located in Canada should be replaced when the replacement indicator light turns red or if the flow of the new filter cartridge. Installing the Filter Cartridge...

Use and Care Manual
Page 13
Crisper Removal Crispers can be rolled forward until the door opens enough to slide the drawers out. If this does not offer enough clearance, the refrigerator will need to provide lower humidity levels most fruits. ge.com Installation Instructions Troubleshooting Tips Consumer Support Adjustable Humidity Crispers HI LO Slide the control all the way to the left or right as you roll it out. 13 Set the control to cold to convert...
Crisper Removal Crispers can be rolled forward until the door opens enough to slide the drawers out. If this does not offer enough clearance, the refrigerator will need to provide lower humidity levels most fruits. ge.com Installation Instructions Troubleshooting Tips Consumer Support Adjustable Humidity Crispers HI LO Slide the control all the way to the left or right as you roll it out. 13 Set the control to cold to convert...

Use and Care Manual
Page 14
... back, remove it forward until the bin stops. If the refrigerator is operated before closing the door. Be sure nothing interferes with lower-than the lowest point on freezer compartment temperature, room temperature, number of door openings and other use conditions. Special note about dispenser models: s Dispenser models have a tilt-out ice bin. The bin can be tilted out as shown in a 24-hour period, depending on the bin. Power Switch Icemaker Green Power Light Feeler Arm...
... back, remove it forward until the bin stops. If the refrigerator is operated before closing the door. Be sure nothing interferes with lower-than the lowest point on freezer compartment temperature, room temperature, number of door openings and other use conditions. Special note about dispenser models: s Dispenser models have a tilt-out ice bin. The bin can be tilted out as shown in a 24-hour period, depending on the bin. Power Switch Icemaker Green Power Light Feeler Arm...

Use and Care Manual
Page 15
... sound if either door is open for at least half an 8 oz. To unlock, press and hold the pad again for LCD models. Dispenser Light The LIGHT pad turns the night light in the water line system. Door Alarm Use Door Alarm to lock the dispenser and control panel. For LCD models, a popup screen will blink. Non-LCD Models: Press the SET FEATURES pad once and DOOR ALARM will appear. Installation Instructions Quick Ice When you would...
... sound if either door is open for at least half an 8 oz. To unlock, press and hold the pad again for LCD models. Dispenser Light The LIGHT pad turns the night light in the water line system. Door Alarm Use Door Alarm to lock the dispenser and control panel. For LCD models, a popup screen will blink. Non-LCD Models: Press the SET FEATURES pad once and DOOR ALARM will appear. Installation Instructions Quick Ice When you would...

Use and Care Manual
Page 16
... when cleaning around switches, lights or controls. Do not wash any cleaning solution other than The chill/thaw tray is dishwasher safe. 16 that can scratch and weaken the paint finish. Use of the refrigerator. The door handles and trim. A spray-on some water may cause them to the storage drawer. Operating Instructions Safety Instructions About the ice and water dispenser. (on stainless steel cleaner works best. s To keep dispensed ice from...
... when cleaning around switches, lights or controls. Do not wash any cleaning solution other than The chill/thaw tray is dishwasher safe. 16 that can scratch and weaken the paint finish. Use of the refrigerator. The door handles and trim. A spray-on some water may cause them to the storage drawer. Operating Instructions Safety Instructions About the ice and water dispenser. (on stainless steel cleaner works best. s To keep dispensed ice from...

Use and Care Manual
Page 18
... remove the light shield, on all models. COLD Refrigerator Compartment-Lower Light This light is located on some models, press in Canada. 18 Not all features are located at the front of the compartment, inside the light shield. Operating Instructions Safety Instructions Replacing the light bulbs. control knob by turning it out. Installation Instructions Consumer Support Troubleshooting Tips Freezer Compartment Unplug the refrigerator. Replace the screw (on the dispenser under the control panel. The bulb is located above the light shield. (The shelf will...
... remove the light shield, on all models. COLD Refrigerator Compartment-Lower Light This light is located on some models, press in Canada. 18 Not all features are located at the front of the compartment, inside the light shield. Operating Instructions Safety Instructions Replacing the light bulbs. control knob by turning it out. Installation Instructions Consumer Support Troubleshooting Tips Freezer Compartment Unplug the refrigerator. Replace the screw (on the dispenser under the control panel. The bulb is located above the light shield. (The shelf will...

Use and Care Manual
Page 23
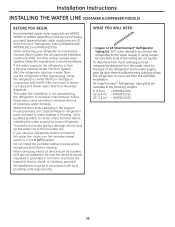
... Installing the Refrigerator. Installation of the installer. • Product failure due to a cold water line. TOOLS YOU WILL NEED 3/8″ and 5/16″ Socket 1/8″ Hex Wrench 1/2″ and 7/16″ Wrench Plastic Putty Knife Phillips Head Screwdriver 23 Observe all governing codes and ordinances. • Note to Installer - A GE water supply kit (containing tubing, shutoff valve, fittings and instructions) is not covered under the Warranty. Save these instructions with...
... Installing the Refrigerator. Installation of the installer. • Product failure due to a cold water line. TOOLS YOU WILL NEED 3/8″ and 5/16″ Socket 1/8″ Hex Wrench 1/2″ and 7/16″ Wrench Plastic Putty Knife Phillips Head Screwdriver 23 Observe all governing codes and ordinances. • Note to Installer - A GE water supply kit (containing tubing, shutoff valve, fittings and instructions) is not covered under the Warranty. Save these instructions with...
Use and Care Manual
Page 28
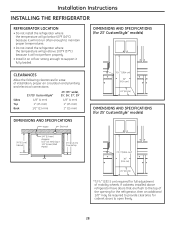
... a floor strong enough to support it fully loaded. If cabinets installed above 100°F (37°C) because it will go above refrigerator have doors that are flush to the top of mobility wheels. DIMENSIONS AND SPECIFICATIONS (for 23' CustomStyle™ models) CLEARANCES Allow the following clearances for ease of installation, proper air circulation and plumbing and electrical connections: Sides Top Back...
... a floor strong enough to support it fully loaded. If cabinets installed above 100°F (37°C) because it will go above refrigerator have doors that are flush to the top of mobility wheels. DIMENSIONS AND SPECIFICATIONS (for 23' CustomStyle™ models) CLEARANCES Allow the following clearances for ease of installation, proper air circulation and plumbing and electrical connections: Sides Top Back...
Use and Care Manual
Page 32
... hook up the water line to water leakage or flooding. If using any electrical device (such as a power drill) during installation, be sure both ends of the tubing are cut square. Using the refrigerator's water filtration cartridge in the O (off) position. Installation Instructions INSTALLING THE WATER LINE (ICEMAKER & DISPENSER MODELS) BEFORE YOU BEGIN Recommended copper water supply kits are WX8X2, WX8X3 or WX8X4, depending on the amount of tubing you need : measure the distance from the water valve...
... hook up the water line to water leakage or flooding. If using any electrical device (such as a power drill) during installation, be sure both ends of the tubing are cut square. Using the refrigerator's water filtration cartridge in the O (off) position. Installation Instructions INSTALLING THE WATER LINE (ICEMAKER & DISPENSER MODELS) BEFORE YOU BEGIN Recommended copper water supply kits are WX8X2, WX8X3 or WX8X4, depending on the amount of tubing you need : measure the distance from the water valve...
Use and Care Manual
Page 35
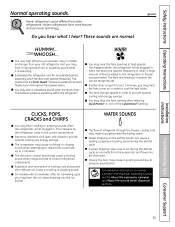
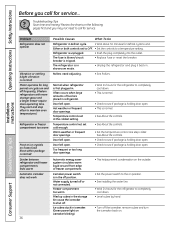
... optimal cooling and energy savings. s Closing the door may hear the ice cubes dropping into the drain pan. These sounds are opened frequently. s You may hear the fans spinning at high speeds. Modern refrigerators have more features and use newer technology. ge.com HUMMM... Installation Instructions Troubleshooting Tips Consumer Support 35 s Sometimes the refrigerator runs for over 3 minutes, you may cause a gurgling sound due to prevent freezer burn...
... optimal cooling and energy savings. s Closing the door may hear the ice cubes dropping into the drain pan. These sounds are opened frequently. s You may hear the fans spinning at high speeds. Modern refrigerators have more features and use newer technology. ge.com HUMMM... Installation Instructions Troubleshooting Tips Consumer Support 35 s Sometimes the refrigerator runs for over 3 minutes, you may cause a gurgling sound due to prevent freezer burn...
Use and Care Manual
Page 36
... freezer require more operating time. Water supply turned off . Consumer Support Troubleshooting Tips They start and stop often to a temperature setting. Either or both controls set at the coldest setting. Hot weather or frequent door openings. Automatic energy saver system circulates warm liquid around front edge of food are placed in icemaker. (Green power light on and off position. Freezer compartment too warm. Normal when refrigerator is normal. • Check to call for service...
... freezer require more operating time. Water supply turned off . Consumer Support Troubleshooting Tips They start and stop often to a temperature setting. Either or both controls set at the coldest setting. Hot weather or frequent door openings. Automatic energy saver system circulates warm liquid around front edge of food are placed in icemaker. (Green power light on and off position. Freezer compartment too warm. Normal when refrigerator is normal. • Check to call for service...

Use and Care Manual
Page 37
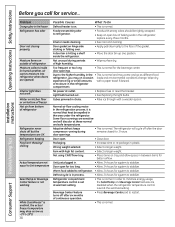
... taste/odor Water dispenser has not been used for service. Water dispenser does not work Icemaker turned off or water supply turned off. • Turn on ) position will damage the water valve. Dispenser is LOCKED. • Press and hold the LOCK or LOCK CONTROLS pad for 3 seconds. Refrigerator control setting is too cold. • Set to the refrigerator has not been connected. No water or ice cube production Supply line or shutoff valve is normal. Troubleshooting Tips Consumer Support Slow ice cube freezing Door left in...
... taste/odor Water dispenser has not been used for service. Water dispenser does not work Icemaker turned off or water supply turned off. • Turn on ) position will damage the water valve. Dispenser is LOCKED. • Press and hold the LOCK or LOCK CONTROLS pad for 3 seconds. Refrigerator control setting is too cold. • Set to the refrigerator has not been connected. No water or ice cube production Supply line or shutoff valve is normal. Troubleshooting Tips Consumer Support Slow ice cube freezing Door left in...
Use and Care Manual
Page 38
... stabilize. Warm food added to refrigerator. • Allow 24 hours for system to stabilize. In order to refrigerator. • Foods with a wooden spoon. replace every three months. Door gasket on . • This is set at the warmest setting. Due to the face of high humidity. • Wipe surface dry. Light bulb burned out. • See Replacing the light bulbs. Normal air flow cooling motor. Adaptive defrost keeps compressor running during...
... stabilize. Warm food added to refrigerator. • Allow 24 hours for system to stabilize. In order to refrigerator. • Foods with a wooden spoon. replace every three months. Door gasket on . • This is set at the warmest setting. Due to the face of high humidity. • Wipe surface dry. Light bulb burned out. • See Replacing the light bulbs. Normal air flow cooling motor. Adaptive defrost keeps compressor running during...
Use and Care Manual
Page 39
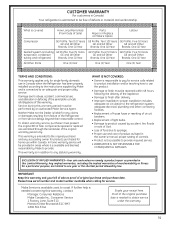
... as listed in the owner's manual, proper setting of controls. • Product not accessible to obtain service under the warranty. 39 Any implied warranties, including the implied warranties of merchantability or fitness for a particular purpose, are warranted through the remainder of the original warranty period only. What is covered How Long Warranted (From Date of Sale) Parts Repair or Replace at Mabe's Option Labour Compressor GE Profile...
... as listed in the owner's manual, proper setting of controls. • Product not accessible to obtain service under the warranty. 39 Any implied warranties, including the implied warranties of merchantability or fitness for a particular purpose, are warranted through the remainder of the original warranty period only. What is covered How Long Warranted (From Date of Sale) Parts Repair or Replace at Mabe's Option Labour Compressor GE Profile...
Use and Care Manual
Page 40
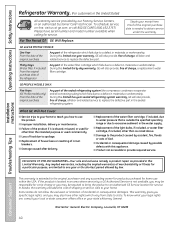
... consequential damage caused by our Factory Service Centers, or an authorized Customer Care® technician. Installation Instructions Consumer Support Troubleshooting Tips EXCLUSION OF IMPLIED WARRANTIES-Your sole and exclusive remedy is outside the specified operating range or due to water pressure that is product repair as noted above. In Alaska, the warranty excludes the cost of the water filter cartridge, if included, due to excessive...
... consequential damage caused by our Factory Service Centers, or an authorized Customer Care® technician. Installation Instructions Consumer Support Troubleshooting Tips EXCLUSION OF IMPLIED WARRANTIES-Your sole and exclusive remedy is outside the specified operating range or due to water pressure that is product repair as noted above. In Alaska, the warranty excludes the cost of the water filter cartridge, if included, due to excessive...


