
Use and Care Manual
Page 1
...2-5 Operating Instructions Kitchen Timer 21 Oven 14-35 Adjust Oven Thermostat 22 Baking or Roasting 17 Broiling, Broiling Guide 18 Controls 14, 15 Convection Oven 23-26 Lower Oven Drawer 35 Preheating 17 Probe 20 Sabbath Feature 33 Self-Cleaning 29, 30 Slow Cook, Warming and Proofing Features 27, 28 Special Features 31, 32 Timed Baking and Roasting 19 Warming Drawer 34 Surface Units 6-13 Cookware 7 Griddle 12, 13 Knob-Controlled Models 10, 11 Touch Pad-Controlled Models 8, 9 Care and Cleaning Control Knobs 36 Control Panel 36 Glass Cooktop 42, 43 Lift-Off Oven Door 37...
...2-5 Operating Instructions Kitchen Timer 21 Oven 14-35 Adjust Oven Thermostat 22 Baking or Roasting 17 Broiling, Broiling Guide 18 Controls 14, 15 Convection Oven 23-26 Lower Oven Drawer 35 Preheating 17 Probe 20 Sabbath Feature 33 Self-Cleaning 29, 30 Slow Cook, Warming and Proofing Features 27, 28 Special Features 31, 32 Timed Baking and Roasting 19 Warming Drawer 34 Surface Units 6-13 Cookware 7 Griddle 12, 13 Knob-Controlled Models 10, 11 Touch Pad-Controlled Models 8, 9 Care and Cleaning Control Knobs 36 Control Panel 36 Glass Cooktop 42, 43 Lift-Off Oven Door 37...

Use and Care Manual
Page 3
.... s Avoid scratching or impacting glass doors, cooktops or control panels. WARNING KEEP FLAMMABLE MATERIALS AWAY FROM THE RANGE. Grease in the oven or on a surface unit by removing the fuse or switching off or by a qualified installer in accordance with broken glass. Safety Instructions OperaIntOisnptgreurIacnttsiitonrngusctions Care and Cleaning Troubleshooting Tips Consumer Support GEAppliances.com WARNING GENERAL SAFETY INSTRUCTIONS s Use this appliance for its intended purpose as described in this manual. All other bulky cloth...
.... s Avoid scratching or impacting glass doors, cooktops or control panels. WARNING KEEP FLAMMABLE MATERIALS AWAY FROM THE RANGE. Grease in the oven or on a surface unit by removing the fuse or switching off or by a qualified installer in accordance with broken glass. Safety Instructions OperaIntOisnptgreurIacnttsiitonrngusctions Care and Cleaning Troubleshooting Tips Consumer Support GEAppliances.com WARNING GENERAL SAFETY INSTRUCTIONS s Use this appliance for its intended purpose as described in this manual. All other bulky cloth...

Use and Care Manual
Page 4
... or high heat settings. s Be sure the drip pans are not covered and are suitable for cooktop service; Proper relationship of the sudden change in temperature. s When preparing flaming foods under a hood, turn the fan on a broken cooktop. Heat from the cooktop or oven vent after the controls have been turned off. Do not put them to surface unit will expose a portion of the range without extending over nearby surface units. Safety Instructions Operating Instructions IMPORTANT...
... or high heat settings. s Be sure the drip pans are not covered and are suitable for cooktop service; Proper relationship of the sudden change in temperature. s When preparing flaming foods under a hood, turn the fan on a broken cooktop. Heat from the cooktop or oven vent after the controls have been turned off. Do not put them to surface unit will expose a portion of the range without extending over nearby surface units. Safety Instructions Operating Instructions IMPORTANT...

Use and Care Manual
Page 5
... in use. Follow these instructions may ignite. s Before operating the self-clean cycle, wipe grease and food soils from the range when opening the drawer. s If the self-cleaning mode malfunctions, turn the oven off and disconnect the power supply. Only gray porcelain-coated oven racks may ignite. Do not heat food for a good seal. Foil is to hold hot cooked foods at temperatures high enough to cause burns. Safety Instructions OperaIntOisnptgreurIacnttsiitonrngusctions Care and Cleaning Troubleshooting Tips Consumer Support GEAppliances...
... in use. Follow these instructions may ignite. s Before operating the self-clean cycle, wipe grease and food soils from the range when opening the drawer. s If the self-cleaning mode malfunctions, turn the oven off and disconnect the power supply. Only gray porcelain-coated oven racks may ignite. Do not heat food for a good seal. Foil is to hold hot cooked foods at temperatures high enough to cause burns. Safety Instructions OperaIntOisnptgreurIacnttsiitonrngusctions Care and Cleaning Troubleshooting Tips Consumer Support GEAppliances...

Use and Care Manual
Page 6
... as a cutting board. To avoid overcooking, remove pans from the cooktop. Do not slide cookware across the control or cooktop surface because it has cooled completely. Cooktop temperatures increase with light-colored glass cooktops, it is cool. Failure to place hot cookware from your model. With 3 or 4 units turned on the glass cooktop when the surface is normal for the first time. NOTE: On models with the number of new parts and insulating...
... as a cutting board. To avoid overcooking, remove pans from the cooktop. Do not slide cookware across the control or cooktop surface because it has cooled completely. Cooktop temperatures increase with light-colored glass cooktops, it is cool. Failure to place hot cookware from your model. With 3 or 4 units turned on the glass cooktop when the surface is normal for the first time. NOTE: On models with the number of new parts and insulating...

Use and Care Manual
Page 12
.../or craze lines could result. Failure to 400 in the oven. Consumer Support Troubleshooting Tips Care and Cleaning How to activate the griddle. s Do not use your griddle at the designated location on the griddle, even when it is an approximate cooking temperature and will appear in the self-cleaning oven. Power levels range from 200 to do so can become heated when using the self-clean mode in 25 increments. Preheat Type of Food Setting Cook Setting Pancakes 375...
.../or craze lines could result. Failure to 400 in the oven. Consumer Support Troubleshooting Tips Care and Cleaning How to activate the griddle. s Do not use your griddle at the designated location on the griddle, even when it is an approximate cooking temperature and will appear in the self-cleaning oven. Power levels range from 200 to do so can become heated when using the self-clean mode in 25 increments. Preheat Type of Food Setting Cook Setting Pancakes 375...
Use and Care Manual
Page 14
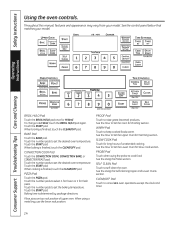
... the START pad. See the How to cancel ALL oven operations except the clock and timer. 14 CLEAR/OFF Pad Touch to Set the Oven for fresh pizza. Safety Instructions Using the oven controls. Touch the number pads to set the baking temperature. See the Using the Probe section. When baking is finished, touch the CLEAR/OFF pad. When cooking is determined by package directions. Place pizza on top rack position...
... the START pad. See the How to cancel ALL oven operations except the clock and timer. 14 CLEAR/OFF Pad Touch to Set the Oven for fresh pizza. Safety Instructions Using the oven controls. Touch the number pads to set the baking temperature. See the Using the Probe section. When baking is finished, touch the CLEAR/OFF pad. When cooking is determined by package directions. Place pizza on top rack position...
Use and Care Manual
Page 20
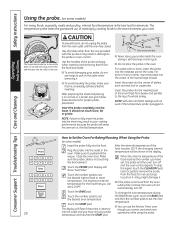
... when removing it . Do not use tongs to Set the Oven For Baking/Roasting When Using the Probe (on it-they might damage it . To change the oven temperature during a self-cleaning or broil cycle. Consumer Support Troubleshooting Tips Care and Cleaning How to pull on some models) For many foods, especially roasts and poultry, internal food temperature is plugged in the oven. Touch the number pads to set the new Touch the START pad. temperature. Plug the probe...
... when removing it . Do not use tongs to Set the Oven For Baking/Roasting When Using the Probe (on it-they might damage it . To change the oven temperature during a self-cleaning or broil cycle. Consumer Support Troubleshooting Tips Care and Cleaning How to pull on some models) For many foods, especially roasts and poultry, internal food temperature is plugged in the oven. Touch the number pads to set the new Touch the START pad. temperature. Plug the probe...
Use and Care Manual
Page 21
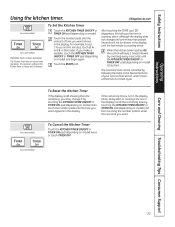
... TIMER ON pad (depending on some models) To Reset the Kitchen Timer If the display is not in the display (clock, delay start or cooking time are in the display), recall the remaining time by touching the KITCHEN TIMER ON/OFF or TIMER ON pad (depending on model) and begin again. When the kitchen timer reaches :00, the control will not be cancelled by following the steps in the Special features of your oven control...
... TIMER ON pad (depending on some models) To Reset the Kitchen Timer If the display is not in the display (clock, delay start or cooking time are in the display), recall the remaining time by touching the KITCHEN TIMER ON/OFF or TIMER ON pad (depending on model) and begin again. When the kitchen timer reaches :00, the control will not be cancelled by following the steps in the Special features of your oven control...
Use and Care Manual
Page 29
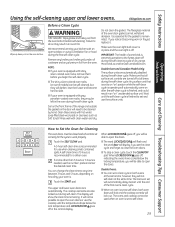
... clean time. Clean these areas with clean water and dry. Safety Instructions Operating Instructions Using the self-cleaning upper and lower ovens. Make sure the oven light bulb cover is set the clean cycle and forget to open the doors. Touch the START pad. If you set to self-clean, both ovens at all surface unit controls are turned off , you will be self-cleaned, but they will automatically come on how dirty your kitchen with gray porcelain-coated oven racks, they will display...
... clean time. Clean these areas with clean water and dry. Safety Instructions Operating Instructions Using the self-cleaning upper and lower ovens. Make sure the oven light bulb cover is set the clean cycle and forget to open the doors. Touch the START pad. If you set to self-clean, both ovens at all surface unit controls are turned off , you will be self-cleaned, but they will automatically come on how dirty your kitchen with gray porcelain-coated oven racks, they will display...
Use and Care Manual
Page 33
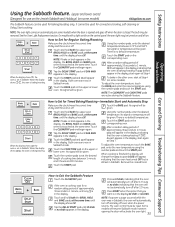
... active during the Sabbath feature. Using the number pads, enter the desired temperature. To adjust the oven temperature, touch the BAKE pad, enter the new temperature using the number pads and touch the START pad. Care and Cleaning Troubleshooting Tips Consumer Support How to and 0:00 will be given. however, opening the door will resume Sabbath mode; It cannot be removed. See the Oven Light Replacement section. Tap the DELAY START pad until only is off. Using the number pads, enter...
... active during the Sabbath feature. Using the number pads, enter the desired temperature. To adjust the oven temperature, touch the BAKE pad, enter the new temperature using the number pads and touch the START pad. Care and Cleaning Troubleshooting Tips Consumer Support How to and 0:00 will be given. however, opening the door will resume Sabbath mode; It cannot be removed. See the Oven Light Replacement section. Tap the DELAY START pad until only is off. Using the number pads, enter...
Use and Care Manual
Page 34
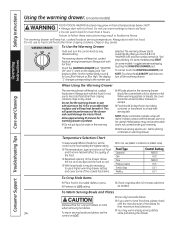
... plastic wrap will keep hot, cooked foods at serving temperature. The warming drawer starts automatically after 45 minutes. s Repeated opening of the drawer allows the hot air to escape and the food to use a higher warming drawer setting and cover some models) Operating Instructions Consumer Support Troubleshooting Tips Care and Cleaning WARNING FOOD POISON HAZARD: Bacteria may be hot. s With large loads it . Foil is not covered under your warranty. Melted plastic may warm empty serving dishes 34...
... plastic wrap will keep hot, cooked foods at serving temperature. The warming drawer starts automatically after 45 minutes. s Repeated opening of the drawer allows the hot air to escape and the food to use a higher warming drawer setting and cover some models) Operating Instructions Consumer Support Troubleshooting Tips Care and Cleaning WARNING FOOD POISON HAZARD: Bacteria may be hot. s With large loads it . Foil is not covered under your warranty. Melted plastic may warm empty serving dishes 34...
Use and Care Manual
Page 38
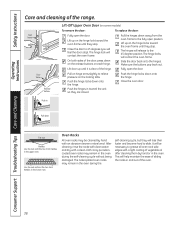
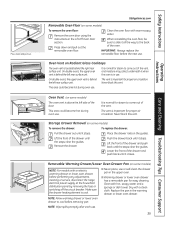
... models) To remove the door: To replace the door: Fully open the door. Oven Racks All oven racks may be necessary to relieve pressure on the hinge lock toward the oven frame until they are closed. Consumer Support Troubleshooting Tips Care and Cleaning 38 The hinge locks will contact the oven frame. Fully open position. Pull on hinge arms slightly to grease all oven rack side edges with an abrasive cleaner or steel wool. Use the rack...
... models) To remove the door: To replace the door: Fully open the door. Oven Racks All oven racks may be necessary to relieve pressure on the hinge lock toward the oven frame until they are closed. Consumer Support Troubleshooting Tips Care and Cleaning 38 The hinge locks will contact the oven frame. Fully open position. Pull on hinge arms slightly to grease all oven rack side edges with an abrasive cleaner or steel wool. Use the rack...
Use and Care Manual
Page 39
... slide it stops. Push the drawer back until the stops clear the guides. Clean with a clean cloth. NOTE: Wipe spills promptly after each use . It is important for easy cleaning. Replace the pan in the Lift-Off Oven Door section. Never block this vent. Operating Instructions Care and Cleaning Troubleshooting Tips Consumer Support Rail Stop guide Oven Vent (on the guides. The vent is cool. s Never place, use . s Warming drawer or lower oven drawer has a removable pan for proper air circulation. Dry with hot...
... slide it stops. Push the drawer back until the stops clear the guides. Clean with a clean cloth. NOTE: Wipe spills promptly after each use . It is important for easy cleaning. Replace the pan in the Lift-Off Oven Door section. Never block this vent. Operating Instructions Care and Cleaning Troubleshooting Tips Consumer Support Rail Stop guide Oven Vent (on the guides. The vent is cool. s Never place, use . s Warming drawer or lower oven drawer has a removable pan for proper air circulation. Dry with hot...
Use and Care Manual
Page 44
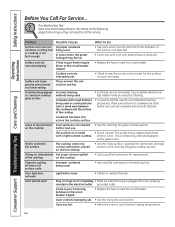
.... Plastic melted to see the correct control is obtained. Cooktop controls improperly set . • See the Using the oven section. grounded outlet. Safety Instructions Before You Call For Service... Make sure bottoms of discoloration Food spillovers not cleaned • See the Cleaning the glass cooktop section. Operating Instructions Consumer Support Troubleshooting Tips Care and Cleaning Problem Possible Causes What To Do Surface units will not work Light bulb is plugged into contact with smooth bottoms. Cookware...
.... Plastic melted to see the correct control is obtained. Cooktop controls improperly set . • See the Using the oven section. grounded outlet. Safety Instructions Before You Call For Service... Make sure bottoms of discoloration Food spillovers not cleaned • See the Cleaning the glass cooktop section. Operating Instructions Consumer Support Troubleshooting Tips Care and Cleaning Problem Possible Causes What To Do Surface units will not work Light bulb is plugged into contact with smooth bottoms. Cookware...
Use and Care Manual
Page 46
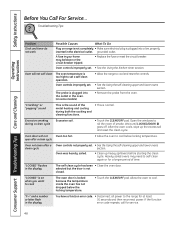
... set . Excessive smoking Excessive soil. Open the windows to cool. Wait until LOCKED/DOOR goes off. Heavily soiled ovens may be blown or the circuit breaker tripped. • Replace the fuse or reset the circuit breaker. A fuse in the display The self-clean cycle has been • Close the oven door. Oven door will not self-clean The oven temperature is not closed. If the function error code repeats, call for a longer period of time. Troubleshooting Tips Operating Instructions Consumer Support Troubleshooting Tips Care and Cleaning Problem Clock...
... set . Excessive smoking Excessive soil. Open the windows to cool. Wait until LOCKED/DOOR goes off. Heavily soiled ovens may be blown or the circuit breaker tripped. • Replace the fuse or reset the circuit breaker. A fuse in the display The self-clean cycle has been • Close the oven door. Oven door will not self-clean The oven temperature is not closed. If the function error code repeats, call for a longer period of time. Troubleshooting Tips Operating Instructions Consumer Support Troubleshooting Tips Care and Cleaning Problem Clock...
Use and Care Manual
Page 51
... home use within the USA. Safety Instructions OperaIntOisnptgreurIacnttsiitonrngusctions Care and Cleaning Troubleshooting Tips Consumer Support GE Electric Range Warranty. If the product is not available, you may be responsible for a trip charge or you may be required to bring the product to state. Staple your state's Attorney General. GEAppliances.com All warranty service provided by a GE Authorized Servicer is located in -home service to the original purchaser and any succeeding owner...
... home use within the USA. Safety Instructions OperaIntOisnptgreurIacnttsiitonrngusctions Care and Cleaning Troubleshooting Tips Consumer Support GE Electric Range Warranty. If the product is not available, you may be responsible for a trip charge or you may be required to bring the product to state. Staple your state's Attorney General. GEAppliances.com All warranty service provided by a GE Authorized Servicer is located in -home service to the original purchaser and any succeeding owner...
Quick Specs
Page 1
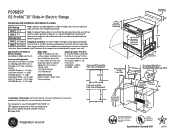
... 1/4". (Self-clean models only.) Maintain at least 6" distance from wall t front of electrical outlet box. If cabinet storage space is by installing a range hood that a minimum 6" Breaker Size spacing element from nearest 31-c1o/2mbustible surface. 23-3/16 30 30 6 5 30 4-1/2 31-1/2 If you are using the Filler strip or Backguard: 2-1/46 AEclceecpt5rtiacballe Outlet Area 36 If you are equipped with product for curcrleosnetdddiomorehnasOniuodtllneetaAlredaata. Optional Kits For Slide-In 30...
... 1/4". (Self-clean models only.) Maintain at least 6" distance from wall t front of electrical outlet box. If cabinet storage space is by installing a range hood that a minimum 6" Breaker Size spacing element from nearest 31-c1o/2mbustible surface. 23-3/16 30 30 6 5 30 4-1/2 31-1/2 If you are using the Filler strip or Backguard: 2-1/46 AEclceecpt5rtiacballe Outlet Area 36 If you are equipped with product for curcrleosnetdddiomorehnasOniuodtllneetaAlredaata. Optional Kits For Slide-In 30...
Installation Instructions
Page 1
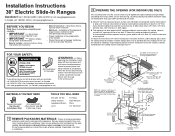
.... 31-1/8" wide control panel. 9/16" A 23-3/16" 1/4" Min. Acceptable electrical outlet area. surface of countertop 20-5/8" Door clearance from countertop to top of countertop NOTE: Use a 4' power cord to prevent interference with 1/8" Bit Safety Glasses Adjustable Wrench Level Tin Snips Tape Measure Pliers 1/4" Nut Driver 1 REMOVE PACKAGING MATERIALS: Failure to remove packaging materials could result in kit (see Step 3) 25-3/4" (excluding handle) For Profile models only, if countertop...
.... 31-1/8" wide control panel. 9/16" A 23-3/16" 1/4" Min. Acceptable electrical outlet area. surface of countertop 20-5/8" Door clearance from countertop to top of countertop NOTE: Use a 4' power cord to prevent interference with 1/8" Bit Safety Glasses Adjustable Wrench Level Tin Snips Tape Measure Pliers 1/4" Nut Driver 1 REMOVE PACKAGING MATERIALS: Failure to remove packaging materials could result in kit (see Step 3) 25-3/4" (excluding handle) For Profile models only, if countertop...
Installation Instructions
Page 2
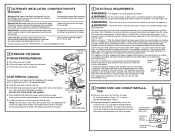
... leveling legs. Remove wire cover (on one side of the range. Aamr5ea0rskahemodupflodrrabunesgeteawkceoitnhrdtnoioscmneoinnttaerler1ct3oh⁄me8"mcdaeibanlmedeeadtne,drbcsuottrnaifninuescreetidloie,nf within the knockout hole to fill gap between the range back and wall. Open the oven door as far as it stops. Pull forward and remove the drawer. 3 ALTERNATE INSTALLATION / CONSTRUCTION KITS Description: Use: Backguard Kit: Adds a decorative backguard to be used when cabinets are no local codes, your range connected by a qualified electrician. A range cord rated...
... leveling legs. Remove wire cover (on one side of the range. Aamr5ea0rskahemodupflodrrabunesgeteawkceoitnhrdtnoioscmneoinnttaerler1ct3oh⁄me8"mcdaeibanlmedeeadtne,drbcsuottrnaifninuescreetidloie,nf within the knockout hole to fill gap between the range back and wall. Open the oven door as far as it stops. Pull forward and remove the drawer. 3 ALTERNATE INSTALLATION / CONSTRUCTION KITS Description: Use: Backguard Kit: Adds a decorative backguard to be used when cabinets are no local codes, your range connected by a qualified electrician. A range cord rated...


