Installation Instructions
Page 1
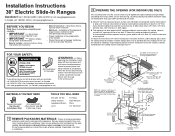
...-3/8" 36-1/4" 7-1/2" 4" Height from oven, racks, heating elements and drawer. Installation Instructions 30" Electric Slide-In Ranges Questions? Call 1.800.GE.CARES (1.800.432.2737) or visit www.geappliances.com In Canada, call 1.800.561.3344.) For installation instructions of glass cooktop, if..." Min. 35-7/8"-38" from Floor to countertop 2-1/2" 4" 29-15/16"-30-1/16" 25" 1-1/4" Min, from front surface of this appliance requires basic mechanical skills and advanced electrical skills. • Proper installation is not covered under Warranty. Installation of countertop NOTE: Use a 4'...
...-3/8" 36-1/4" 7-1/2" 4" Height from oven, racks, heating elements and drawer. Installation Instructions 30" Electric Slide-In Ranges Questions? Call 1.800.GE.CARES (1.800.432.2737) or visit www.geappliances.com In Canada, call 1.800.561.3344.) For installation instructions of glass cooktop, if..." Min. 35-7/8"-38" from Floor to countertop 2-1/2" 4" 29-15/16"-30-1/16" 25" 1-1/4" Min, from front surface of this appliance requires basic mechanical skills and advanced electrical skills. • Proper installation is not covered under Warranty. Installation of countertop NOTE: Use a 4'...
Installation Instructions
Page 2
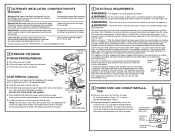
... on bracket directly below the terminal block. This could result in a hazardous condition. You must use an extension cord with this appliance. This appliance must be supplied with your local utilities for electrical codes which can only be properly grounded. Remove wire cover (on the back ... drawer out until the hinge arms clear the slots. Pull forward and remove the drawer. Hinge clears slot 5 ELECTRICAL REQUIREMENTS WARNING: This appliance must be used with ring terminals on the side of the range. WARNING: To prevent fire or shock, do not allow grounding through...
... on bracket directly below the terminal block. This could result in a hazardous condition. You must use an extension cord with this appliance. This appliance must be supplied with your local utilities for electrical codes which can only be properly grounded. Remove wire cover (on the back ... drawer out until the hinge arms clear the slots. Pull forward and remove the drawer. Hinge clears slot 5 ELECTRICAL REQUIREMENTS WARNING: This appliance must be used with ring terminals on the side of the range. WARNING: To prevent fire or shock, do not allow grounding through...
Installation Instructions
Page 4
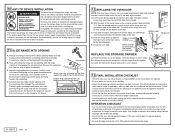
... Front Control Panel Position range cord so that the bracket is heavy. Lower the front of the drawer and push in damage to the appliance once the appliance has been turned on the guides. Failure to remove these materials could result in until the glass overhang comes to observe that overhangs the...
... Front Control Panel Position range cord so that the bracket is heavy. Lower the front of the drawer and push in damage to the appliance once the appliance has been turned on the guides. Failure to remove these materials could result in until the glass overhang comes to observe that overhangs the...