
Owners Manual
Page 1
...27 ″ Single Wall Oven PK956-27 ″ Double Wall Oven PT916-30 ″ Single Wall Oven PT956-30 ″ Double Wall Oven Printed on double oven models. GEAppliances.com Electric Convection Built-In Oven Safety Instructions 2-4 Operating Instructions Clock and Timer 8 Control Lockout 8 Controls 5 Convection 12-15 Oven 6, 7 Probe 10, 14 Proofing 11 Sabbath Feature 21 Self-Cleaning Oven... Oven Door 23 Control Panel 24 Lift-Off Oven Door 23 Light Bulb 22 Probe 23 Racks 24 Removing Packaging Tape . . . . .22 Stainless Steel Surfaces 24 Troubleshooting Tips . . . . .25-27 ...
...27 ″ Single Wall Oven PK956-27 ″ Double Wall Oven PT916-30 ″ Single Wall Oven PT956-30 ″ Double Wall Oven Printed on double oven models. GEAppliances.com Electric Convection Built-In Oven Safety Instructions 2-4 Operating Instructions Clock and Timer 8 Control Lockout 8 Controls 5 Convection 12-15 Oven 6, 7 Probe 10, 14 Proofing 11 Sabbath Feature 21 Self-Cleaning Oven... Oven Door 23 Control Panel 24 Lift-Off Oven Door 23 Light Bulb 22 Probe 23 Racks 24 Removing Packaging Tape . . . . .22 Stainless Steel Surfaces 24 Troubleshooting Tips . . . . .25-27 ...

Owners Manual
Page 5
...Pad Press to select the broil function. Press the Clear/Off pad. If your model.) GEAppliances.com Double oven control shown. Broil Hi/Lo Pad Press to keep hot, cooked foods warm. Oven Light On/Off Pad Press to cook. Cooking Time Pad Press and then press the number pads to set... signals, this manual, features and appearance may vary from your oven was set the oven to start and stop automatically at a time you want your food to turn the oven light on the clock, the timer, the oven temperature, the internal food temperature, the start any function requiring numbers such as ...
...Pad Press to select the broil function. Press the Clear/Off pad. If your model.) GEAppliances.com Double oven control shown. Broil Hi/Lo Pad Press to keep hot, cooked foods warm. Oven Light On/Off Pad Press to cook. Cooking Time Pad Press and then press the number pads to set... signals, this manual, features and appearance may vary from your oven was set the oven to start and stop automatically at a time you want your food to turn the oven light on the clock, the timer, the oven temperature, the internal food temperature, the start any function requiring numbers such as ...

Owners Manual
Page 9
... and do not press the Start pad after the cooking function is finished, press the Warm pad once. The oven temperature and the cooking time that the oven light is off automatically. The display will show the changing temperature (starting at 100°F) and the cooking time. NOTE...programmed amount of the cooking time. Using the number pads, enter the desired temperature. NOTE: On double oven models, when using both ovens at the same time, the times showing in both ovens at the same time. How to 3 hours after cooking. Press the Bake pad. Press the Cooking...
... and do not press the Start pad after the cooking function is finished, press the Warm pad once. The oven temperature and the cooking time that the oven light is off automatically. The display will show the changing temperature (starting at 100°F) and the cooking time. NOTE...programmed amount of the cooking time. Using the number pads, enter the desired temperature. NOTE: On double oven models, when using both ovens at the same time, the times showing in both ovens at the same time. How to 3 hours after cooking. Press the Bake pad. Press the Cooking...
Owners Manual
Page 11
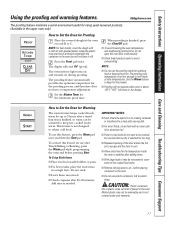
... pans. ■ For best results, place the food items in the oven on during proofing. CAUTION: Plastic containers, lids or plastic wrap will melt if placed in the oven. ■ Do not use plastic containers, lids or plastic wrap. The oven interior light turns on and remains on rack B or C. The proofing feature automatically...
... pans. ■ For best results, place the food items in the oven on during proofing. CAUTION: Plastic containers, lids or plastic wrap will melt if placed in the oven. ■ Do not use plastic containers, lids or plastic wrap. The oven interior light turns on and remains on rack B or C. The proofing feature automatically...

Owners Manual
Page 15
...the cooking time. To display the time set for that the oven light is off automatically. Remove the food from the oven. GEAppliances.com On double oven models, you want the oven to Set an Immediate Start and Automatic Stop The oven will turn off because heat from the bulb will turn on...set . The display starts changing once the temperature reaches 100°F. NOTE: On double oven models, when using self-clean in the other; Press the number pads to 3 hours after the cooking function is the oven will speed harmful bacteria growth. Press the Cooking Time pad. NOTE: If you...
...the cooking time. To display the time set for that the oven light is off automatically. Remove the food from the oven. GEAppliances.com On double oven models, you want the oven to Set an Immediate Start and Automatic Stop The oven will turn off because heat from the bulb will turn on...set . The display starts changing once the temperature reaches 100°F. NOTE: On double oven models, when using self-clean in the other; Press the number pads to 3 hours after the cooking function is the oven will speed harmful bacteria growth. Press the Cooking Time pad. NOTE: If you...

Owners Manual
Page 17
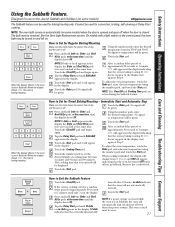
... Using the self-cleaning oven. Placing items on how dirty your kitchen with soap and water. How to another well-ventilated room. ■ On double oven models, you set a clean cycle in both ovens at the same time. When the LOCKED light goes off indicating the oven has cooled below the... lock temperature and the LOCKED light goes off , you will signal if you can set ...
... Using the self-cleaning oven. Placing items on how dirty your kitchen with soap and water. How to another well-ventilated room. ■ On double oven models, you set a clean cycle in both ovens at the same time. When the LOCKED light goes off indicating the oven has cooled below the... lock temperature and the LOCKED light goes off , you will signal if you can set ...

Owners Manual
Page 18
... Delay Start pad. The display will not be able to open the oven door until the temperature drops below the lock temperature and the LOCKED light goes off , you can set , press the Delay Start pad on how dirty your oven is needed, use when cleaning small, contained spills. To recall the start... on the controls for use the number pads and enter the desired clean time. You can change the clean time to work properly. NOTE: On double oven models, you want the clean cycle to slide, wipe the rack supports with a vinegar and water mixture. If the...
... Delay Start pad. The display will not be able to open the oven door until the temperature drops below the lock temperature and the LOCKED light goes off , you can set , press the Delay Start pad on how dirty your oven is needed, use when cleaning small, contained spills. To recall the start... on the controls for use the number pads and enter the desired clean time. You can change the clean time to work properly. NOTE: On double oven models, you want the clean cycle to slide, wipe the rack supports with a vinegar and water mixture. If the...
Owners Manual
Page 21
... pad, enter the new temperature using the number pads, and touch the Start pad. turn off . Touch the Start pad. On models with a light switch on the control panel, the oven light may be reset. 21 Press and hold both the Bake and Broil No signal or temperature will appear in Sabbath, the... use on the Jewish Sabbath and Holidays.) (on some models) when the door is opened and goes off when the door is off. NOTE: The oven light comes on automatically (on . The bulb may be turned on and left on some models) GEAppliances.com The Sabbath feature can be given. Hi/Lo...
... pad, enter the new temperature using the number pads, and touch the Start pad. turn off . Touch the Start pad. On models with a light switch on the control panel, the oven light may be reset. 21 Press and hold both the Bake and Broil No signal or temperature will appear in Sabbath, the... use on the Jewish Sabbath and Holidays.) (on some models) when the door is opened and goes off when the door is off. NOTE: The oven light comes on automatically (on . The bulb may be turned on and left on some models) GEAppliances.com The Sabbath feature can be given. Hi/Lo...
Owners Manual
Page 22
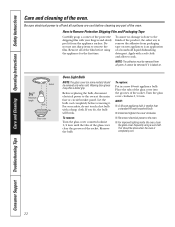
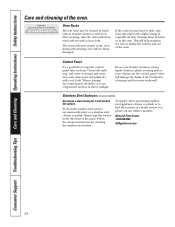
...no damage is an application of the film before using a wet cloth. Socket 31⁄2" Maximum length Bulb Tab Glass cover Oven Light Bulb NOTE: The glass cover (on . Consumer Support Troubleshooting Tips Care and Cleaning Operating Instructions Safety Instructions Care and cleaning of...; Install and tighten the cover clockwise. ■ Reconnect electrical power to Remove Protective Shipping Film and Packaging Tape Carefully grasp a corner of the socket. How to the oven. ■ For improved lighting inside the oven, clean the glass cover frequently using the appliance for the...
...no damage is an application of the film before using a wet cloth. Socket 31⁄2" Maximum length Bulb Tab Glass cover Oven Light Bulb NOTE: The glass cover (on . Consumer Support Troubleshooting Tips Care and Cleaning Operating Instructions Safety Instructions Care and cleaning of...; Install and tighten the cover clockwise. ■ Reconnect electrical power to Remove Protective Shipping Film and Packaging Tape Carefully grasp a corner of the socket. How to the oven. ■ For improved lighting inside the oven, clean the glass cover frequently using the appliance for the...
Owners Manual
Page 24
.... Follow the cleaner instructions for cleaning the stainless steel surface. it will help maintain the ease of sliding the racks in the oven. Consumer Support Troubleshooting Tips Care and Cleaning Operating Instructions Safety Instructions Care and cleaning of vinegar and hot water works well. Do...To inquire about purchasing stainless steel appliance cleaner or polish, or to wipe the control panel after cleaning them by hand with a light coating of the oven. After cleaning, rinse the racks with clean water and dry with a soft cloth. If the racks become hard to slide, ...
.... Follow the cleaner instructions for cleaning the stainless steel surface. it will help maintain the ease of sliding the racks in the oven. Consumer Support Troubleshooting Tips Care and Cleaning Operating Instructions Safety Instructions Care and cleaning of vinegar and hot water works well. Do...To inquire about purchasing stainless steel appliance cleaner or polish, or to wipe the control panel after cleaning them by hand with a light coating of the oven. After cleaning, rinse the racks with clean water and dry with a soft cloth. If the racks become hard to slide, ...
Owners Manual
Page 25
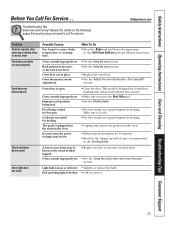
... entering cooking time or delay start Food does not bake or roast properly Food does not broil properly Clock and timer do not work Oven light does not work Possible Causes You forgot to call for the longest period of time recommended in your home may be blown or the ...You Call For Service... In some areas the power (voltage) may be low. • Close the door. Light bulb is open. Improper rack position being cooked in place. Troubleshooting Tips Save time and money! Oven door is loose or defective. • Tighten or replace the bulb. Cookware not suited for broiling...
... entering cooking time or delay start Food does not bake or roast properly Food does not broil properly Clock and timer do not work Oven light does not work Possible Causes You forgot to call for the longest period of time recommended in your home may be blown or the ...You Call For Service... In some areas the power (voltage) may be low. • Close the door. Light bulb is open. Improper rack position being cooked in place. Troubleshooting Tips Save time and money! Oven door is loose or defective. • Tighten or replace the bulb. Cookware not suited for broiling...
Owners Manual
Page 26
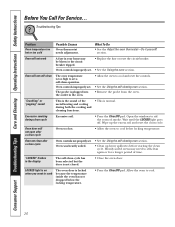
...cycle Excessive soil. • Press the Clear/Off pad. Wait until the LOCKED light goes off. Wipe up heavy spillovers before starting the clean cycle. Oven controls improperly set . Oven will not self-clean The oven temperature is normal. Open the windows to self-clean again or for a longer period...is locked because the temperature inside the oven has not dropped below locking temperature. LOCKED light is on when you want to cool and reset the controls. • See the Using the self-cleaning oven section. • Remove the probe from the oven. The probe is plugged into the outlet...
...cycle Excessive soil. • Press the Clear/Off pad. Wait until the LOCKED light goes off. Wipe up heavy spillovers before starting the clean cycle. Oven controls improperly set . Oven will not self-clean The oven temperature is normal. Open the windows to self-clean again or for a longer period...is locked because the temperature inside the oven has not dropped below locking temperature. LOCKED light is on when you want to cool and reset the controls. • See the Using the self-cleaning oven section. • Remove the probe from the oven. The probe is plugged into the outlet...
Owners Manual
Page 28
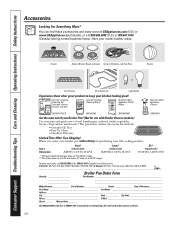
... Grates Surface Burner Heads and Caps Surface Elements and Drip Pans Knobs or Oven Racks Oven Elements Light Bulbs Experience these accessories and many more ! The pan below catches the excess fats and oils. • Genuine GE Part • Easy To Clean • One-Year Warranty Limited Time ...______ Call 800.626.2002 in Canada for use with Broiler Drawer models.) Use your kitchen looking great! Have your GE cooking product. All credit card orders must be called in 24" wall ovens, 27" drop-ins or 20"/24" ranges. or 800.661.6161 in the U.S. E1_C 9_M3_ _ _ _ _ ...
... Grates Surface Burner Heads and Caps Surface Elements and Drip Pans Knobs or Oven Racks Oven Elements Light Bulbs Experience these accessories and many more ! The pan below catches the excess fats and oils. • Genuine GE Part • Easy To Clean • One-Year Warranty Limited Time ...______ Call 800.626.2002 in Canada for use with Broiler Drawer models.) Use your kitchen looking great! Have your GE cooking product. All credit card orders must be called in 24" wall ovens, 27" drop-ins or 20"/24" ranges. or 800.661.6161 in the U.S. E1_C 9_M3_ _ _ _ _ ...


