
Owners Manual
Page 1
... Instructions 2-7 Operating Instructions Baking or Roasting 11 Broiling, Broiling Guide 14 Clock and Timer 15 Control Lockout 15 Convection 18-22 Cookware 9 Oven 10-30 Probe 17 Proofing 23 Sabbath Feature 30 Self-Cleaning 25, 26 Special Features 27-29 Surface Burners 8, 9 Thermostat 24 Timed Baking & Roasting 16 Warming 23 Care and Cleaning Burner Assembly 31 Burner Grates and Vent Grille 32 Control Panel 35 Door 34 Floor 35 Glass Cooktop 36, 37 Knobs 31 Owner's Manual JGS968 PGS968 Lift-Off Oven Door 34 Light Bulbs 32 Packaging Tape 31 Painted Surfaces 35 Racks...
... Instructions 2-7 Operating Instructions Baking or Roasting 11 Broiling, Broiling Guide 14 Clock and Timer 15 Control Lockout 15 Convection 18-22 Cookware 9 Oven 10-30 Probe 17 Proofing 23 Sabbath Feature 30 Self-Cleaning 25, 26 Special Features 27-29 Surface Burners 8, 9 Thermostat 24 Timed Baking & Roasting 16 Warming 23 Care and Cleaning Burner Assembly 31 Burner Grates and Vent Grille 32 Control Panel 35 Door 34 Floor 35 Glass Cooktop 36, 37 Knobs 31 Owner's Manual JGS968 PGS968 Lift-Off Oven Door 34 Light Bulbs 32 Packaging Tape 31 Painted Surfaces 35 Racks...
Owners Manual
Page 4
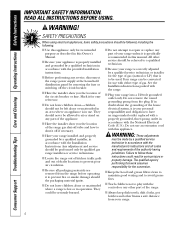
... this manual. Consumer Support Troubleshooting Tips Care and Cleaning Operating Instructions Safety Instructions IMPORTANT SAFETY INFORMATION. SAFETY PRECAUTIONS When using electrical appliances, basic safety precautions should not be used. s Do not leave children alone or unattended where a range is in operation. READ ALL INSTRUCTIONS BEFORE USING. s Be sure your appliance is specifically recommended in accordance with the controls or any service, disconnect the range power supply at the household distribution panel by qualified gas range installers or service...
... this manual. Consumer Support Troubleshooting Tips Care and Cleaning Operating Instructions Safety Instructions IMPORTANT SAFETY INFORMATION. SAFETY PRECAUTIONS When using electrical appliances, basic safety precautions should not be used. s Do not leave children alone or unattended where a range is in operation. READ ALL INSTRUCTIONS BEFORE USING. s Be sure your appliance is specifically recommended in accordance with the controls or any service, disconnect the range power supply at the household distribution panel by qualified gas range installers or service...

Owners Manual
Page 5
... tip it directly over vinyl tile or linoleum that are located at the rear of the cooktop, at the top and bottom of the oven door, and at the bottom of the range. Never install the range over interior kitchen carpeting. s Do not clean the range with baking soda or, if available, by closing the oven door and turning the control to broken or shattered glass. s Never block the vents (air openings...
... tip it directly over vinyl tile or linoleum that are located at the rear of the cooktop, at the top and bottom of the oven door, and at the bottom of the range. Never install the range over interior kitchen carpeting. s Do not clean the range with baking soda or, if available, by closing the oven door and turning the control to broken or shattered glass. s Never block the vents (air openings...

Owners Manual
Page 6
... food properly. s Do not leave plastic items on the cooktop. Use pans with handles that may melt if left on . The hot air from the vent may damage the burner grate and burner head. Boilovers cause smoking and greasy spillovers that can ignite. Do not use an open flames when lifting cookware. Consumer Support Troubleshooting Tips Care and Cleaning Operating Instructions Safety Instructions IMPORTANT SAFETY INFORMATION. This may cause them . s Foods for...
... food properly. s Do not leave plastic items on the cooktop. Use pans with handles that may melt if left on . The hot air from the vent may damage the burner grate and burner head. Boilovers cause smoking and greasy spillovers that can ignite. Do not use an open flames when lifting cookware. Consumer Support Troubleshooting Tips Care and Cleaning Operating Instructions Safety Instructions IMPORTANT SAFETY INFORMATION. This may cause them . s Foods for...
Owners Manual
Page 7
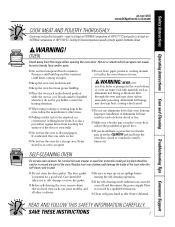
... against foodborne illness. s If the self-cleaning mode malfunctions, turn the oven off and disconnect the power supply. READ AND FOLLOW THIS SAFETY INFORMATION CAREFULLY. Hot air or steam which escapes can cause burns to reduce the possibility of the oven. s Keep the oven vent unobstructed. s Keep the oven free from the range when opening the oven door. Have it burns out. Cooking to these temperatures usually protects against burns from...
... against foodborne illness. s If the self-cleaning mode malfunctions, turn the oven off and disconnect the power supply. READ AND FOLLOW THIS SAFETY INFORMATION CAREFULLY. Hot air or steam which escapes can cause burns to reduce the possibility of the oven. s Keep the oven vent unobstructed. s Keep the oven free from the range when opening the oven door. Have it burns out. Cooking to these temperatures usually protects against burns from...
Owners Manual
Page 10
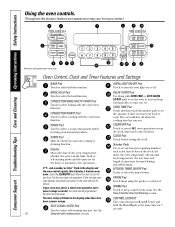
... the CLEAR/OFF pad. See the How to cancel ALL oven operations except the clock, timer and control lockout. If "F- Consumer Support Troubleshooting Tips Care and Cleaning Operating Instructions Safety Instructions Using the oven controls. (Throughout this indicates a function error code. Oven Control, Clock and Timer Features and Settings BAKE Pad Touch to select the broil function. BROIL HI/LO Pad DELAY START Pad Touch to select the bake function. PROOF Pad Touch to cook food. PROBE Pad Touch when using the probe to select a warm environment useful for Warming section.
... the CLEAR/OFF pad. See the How to cancel ALL oven operations except the clock, timer and control lockout. If "F- Consumer Support Troubleshooting Tips Care and Cleaning Operating Instructions Safety Instructions Using the oven controls. (Throughout this indicates a function error code. Oven Control, Clock and Timer Features and Settings BAKE Pad Touch to select the broil function. BROIL HI/LO Pad DELAY START Pad Touch to select the bake function. PROOF Pad Touch to cook food. PROBE Pad Touch when using the probe to select a warm environment useful for Warming section.

Owners Manual
Page 15
.... s The adjustment will show LOC ON. To Reset the Timer If the display is counting down . Control Lockout Your control will work properly. To unlock the control, touch the 9 and 0 pads at the same time for 3 seconds, until the KITCHEN TIMER ON/OFF pad is activated. Safety Instructions Operating Instructions Care and Cleaning Troubleshooting Tips Consumer Support Using the clock, timer and control lockout. Make sure the clock is a minute timer only. To Set the Clock The clock must be...
.... s The adjustment will show LOC ON. To Reset the Timer If the display is counting down . Control Lockout Your control will work properly. To unlock the control, touch the 9 and 0 pads at the same time for 3 seconds, until the KITCHEN TIMER ON/OFF pad is activated. Safety Instructions Operating Instructions Care and Cleaning Troubleshooting Tips Consumer Support Using the clock, timer and control lockout. Make sure the clock is a minute timer only. To Set the Clock The clock must be...

Owners Manual
Page 16
Consumer Support Troubleshooting Tips Care and Cleaning Operating Instructions Safety Instructions Using the timed baking and roasting features. (on some models) NOTE: Foods that the oven light is off because heat from the bulb will speed harmful bacteria growth. How to Set an Immediate Start and Automatic Stop The oven will turn on immediately and cook for a selected length of the cooking time the oven will show the changing temperature (starting at the time of time, then shut off automatically. At the end...
Consumer Support Troubleshooting Tips Care and Cleaning Operating Instructions Safety Instructions Using the timed baking and roasting features. (on some models) NOTE: Foods that the oven light is off because heat from the bulb will speed harmful bacteria growth. How to Set an Immediate Start and Automatic Stop The oven will turn on immediately and cook for a selected length of the cooking time the oven will show the changing temperature (starting at the time of time, then shut off automatically. At the end...

Owners Manual
Page 30
... in the display. Touch the START pad. Using the number pads, enter the desired temperature. If ⊃ doesn't appear in Sabbath. The oven control must be given. Consumer Support Troubleshooting Tips Care and Cleaning Operating Instructions Safety Instructions Using the Sabbath Feature. (Designed for use on the Jewish Sabbath and Holidays.) (on some models) The Sabbath feature can be used for convection, broiling, self-cleaning or Delay Start cooking. No signal or temperature will be turned on and left on automatically when the door is opened and...
... in the display. Touch the START pad. Using the number pads, enter the desired temperature. If ⊃ doesn't appear in Sabbath. The oven control must be given. Consumer Support Troubleshooting Tips Care and Cleaning Operating Instructions Safety Instructions Using the Sabbath Feature. (Designed for use on the Jewish Sabbath and Holidays.) (on some models) The Sabbath feature can be used for convection, broiling, self-cleaning or Delay Start cooking. No signal or temperature will be turned on and left on automatically when the door is opened and...

Owners Manual
Page 38
... for service. Switch operating light is locked. Review the charts on . Gas supply not connected or turned on the following pages first and you use the oven. Control Lockout feature is plugged into a live , properly inserted in the Installation Instructions that came with your range. • Replace the fuse or reset the circuit breaker. • See the Care and cleaning of the LITE position to the desired setting. • Turn the burner off to be determined visually. Problem Burners...
... for service. Switch operating light is locked. Review the charts on . Gas supply not connected or turned on the following pages first and you use the oven. Control Lockout feature is plugged into a live , properly inserted in the Installation Instructions that came with your range. • Replace the fuse or reset the circuit breaker. • See the Care and cleaning of the LITE position to the desired setting. • Turn the burner off to be determined visually. Problem Burners...

Owners Manual
Page 39
... range. section. Remove and replace the oven door. Power cord may be obstructing drawer in the Care and cleaning of your range section. 39 Rear drawer support is crooked Storage drawer won't close Possible Causes Oven controls improperly set . Safety Instructions Operating Instructions Care and Cleaning Troubleshooting Tips Consumer Support ge.com (U.S.) www.GEAppliances.ca (Canada) Problem Food does not bake or roast properly Food does not broil properly Oven temperature too hot or too cold Oven door is crooked Storage drawer is on top of the guide...
... range. section. Remove and replace the oven door. Power cord may be obstructing drawer in the Care and cleaning of your range section. 39 Rear drawer support is crooked Storage drawer won't close Possible Causes Oven controls improperly set . Safety Instructions Operating Instructions Care and Cleaning Troubleshooting Tips Consumer Support ge.com (U.S.) www.GEAppliances.ca (Canada) Problem Food does not bake or roast properly Food does not broil properly Oven temperature too hot or too cold Oven door is crooked Storage drawer is on top of the guide...
Owners Manual
Page 40
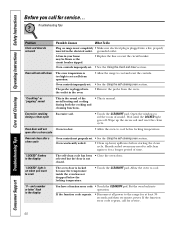
.... Consumer Support Troubleshooting Tips Care and Cleaning Operating Instructions Safety Instructions Before you want to cook The oven door is too high to set . • See the Using the clock and timer section. Troubleshooting Tips Problem Clock and timer do not work Possible Causes What To Do Plug on when you call for service... Oven will not Oven too hot. Wait until the LOCKED light goes off. Oven was heavily soiled. • Clean up the excess soil and reset the clean cycle. "F-and a number...
.... Consumer Support Troubleshooting Tips Care and Cleaning Operating Instructions Safety Instructions Before you want to cook The oven door is too high to set . • See the Using the clock and timer section. Troubleshooting Tips Problem Clock and timer do not work Possible Causes What To Do Plug on when you call for service... Oven will not Oven too hot. Wait until the LOCKED light goes off. Oven was heavily soiled. • Clean up the excess soil and reset the clean cycle. "F-and a number...
Owners Manual
Page 50
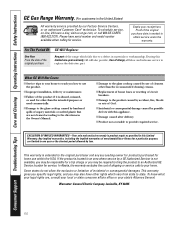
... to teach you may also have serial number and model number available when calling for a trip charge or you how to provide required service. Warrantor: General Electric Company. Consumer Support Troubleshooting Tips Care and Cleaning Operating Instructions Safety Instructions GE Gas Range Warranty. (For customers in this Limited Warranty. During this appliance. Please have other rights which fails due to a defect in -home service to obtain service under the warranty. To know what your legal rights...
... to teach you may also have serial number and model number available when calling for a trip charge or you how to provide required service. Warrantor: General Electric Company. Consumer Support Troubleshooting Tips Care and Cleaning Operating Instructions Safety Instructions GE Gas Range Warranty. (For customers in this Limited Warranty. During this appliance. Please have other rights which fails due to a defect in -home service to obtain service under the warranty. To know what your legal rights...

Owners Manual
Page 51
.... Proof of God. I Improper installation, delivery or maintenance. I Damage to the glass cooktop caused by our Factory Service Centres or an authorized Customer Care® technician. Safety Instructions Operating Instructions Care and Cleaning Troubleshooting Tips Consumer Support GE Gas Range Warranty. (For customers in materials or workmanship. Please have serial number and model number available when calling for a particular purpose, are not cleaned according to the directions in -home service to provide required service. During this limited one year...
.... Proof of God. I Improper installation, delivery or maintenance. I Damage to the glass cooktop caused by our Factory Service Centres or an authorized Customer Care® technician. Safety Instructions Operating Instructions Care and Cleaning Troubleshooting Tips Consumer Support GE Gas Range Warranty. (For customers in materials or workmanship. Please have serial number and model number available when calling for a particular purpose, are not cleaned according to the directions in -home service to provide required service. During this limited one year...

Installation Instructions
Page 3
Installation Instructions ELECTRICAL REQUIREMENTS This appliance must be supplied with the proper voltage and frequency and connected to an individual, properly grounded branch circuit, protected by a circuit breaker or fuse having amperage as noted on the rating plate. (Rating plate is located above the storage drawer below the oven frame.) Rating plate location We recommend you have the electrician show you where your main range disconnect is...
Installation Instructions ELECTRICAL REQUIREMENTS This appliance must be supplied with the proper voltage and frequency and connected to an individual, properly grounded branch circuit, protected by a circuit breaker or fuse having amperage as noted on the rating plate. (Rating plate is located above the storage drawer below the oven frame.) Rating plate location We recommend you have the electrician show you where your main range disconnect is...

Installation Instructions
Page 8
... on pressure regulator. Use liquid leak detector at the back of range) is in the system. 8 Gas supply to oven Oven shut-off lever shown in an easily accessible location. Installation Instructions GAS CONNECTIONS 11 MAKING THE CONNECTIONS 3″ 15″ 7″ 31⁄2″ 12″ A Install a manual shut-off valve in the gas supply line in the open position Gas Inlet Gas supply to top burner Pressure regulator as seen from front of range 11 MAKING THE CONNECTIONS (cont.) F Install...
... on pressure regulator. Use liquid leak detector at the back of range) is in the system. 8 Gas supply to oven Oven shut-off lever shown in an easily accessible location. Installation Instructions GAS CONNECTIONS 11 MAKING THE CONNECTIONS 3″ 15″ 7″ 31⁄2″ 12″ A Install a manual shut-off valve in the gas supply line in the open position Gas Inlet Gas supply to top burner Pressure regulator as seen from front of range 11 MAKING THE CONNECTIONS (cont.) F Install...

Installation Instructions
Page 11
... Drawer does not close completely Rear drawer support is resting on the guides. If Drawer is Crooked: Rear drawer support is on top of the oven cavity, to slide it will open. Installation Instructions 15 REPLACE THE OVEN DOOR NOTE: The oven door is in the guide. 11 Do not lift the door by the handle. C Lift the front of the drawer and push in until the stops clear the guides. D Push the hinge locks...
... Drawer does not close completely Rear drawer support is resting on the guides. If Drawer is Crooked: Rear drawer support is on top of the oven cavity, to slide it will open. Installation Instructions 15 REPLACE THE OVEN DOOR NOTE: The oven door is in the guide. 11 Do not lift the door by the handle. C Lift the front of the drawer and push in until the stops clear the guides. D Push the hinge locks...

Installation Instructions
Page 16
... 30-3/8″ If range is installed in cabinet opening , locate the valve bypass screw located on the outer cone is normal. Refer to natural gas, reverse the instructions given in operation on . conversion instructions supplied with two other burners are turned on a medium setting. IN SOME CASES A With L.P. Rechecking steps will soon disappear. Please see L.P. NOTE: Instructions are left the factory. • When ordering parts, always include the serial number and model number...
... 30-3/8″ If range is installed in cabinet opening , locate the valve bypass screw located on the outer cone is normal. Refer to natural gas, reverse the instructions given in operation on . conversion instructions supplied with two other burners are turned on a medium setting. IN SOME CASES A With L.P. Rechecking steps will soon disappear. Please see L.P. NOTE: Instructions are left the factory. • When ordering parts, always include the serial number and model number...
Dimensions
Page 1
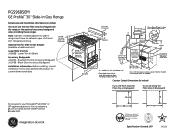
... Slide-In Gas Ranges: (Available at ge.com or call GE Answer Center® service, 800.626.2000. 30 4-1/2 6 5 2-1/4 Acceptable Electrical Outlet Area Accessory 30" Backguard Slide-in inches) 23-3/16 30" Min. on models JSP26/J3S1S-12/26/16. M2ax8. The installation If you are using the Filler strip or Backguard: B 2-1/4 Acceptable 9/16 36 Electrical MOaiunttleatinArea at least 1/4". (Self-clean combustible surface. For answers to frocnot mofbustible 18" Min. 6closed door hsaurnfdalcee. Range 30...
... Slide-In Gas Ranges: (Available at ge.com or call GE Answer Center® service, 800.626.2000. 30 4-1/2 6 5 2-1/4 Acceptable Electrical Outlet Area Accessory 30" Backguard Slide-in inches) 23-3/16 30" Min. on models JSP26/J3S1S-12/26/16. M2ax8. The installation If you are using the Filler strip or Backguard: B 2-1/4 Acceptable 9/16 36 Electrical MOaiunttleatinArea at least 1/4". (Self-clean combustible surface. For answers to frocnot mofbustible 18" Min. 6closed door hsaurnfdalcee. Range 30...

Dimensions
Page 2
..., ensuring better baking results • Convection Roast - Offers a low setting of scrubbing • Self-Clean Heavy-Duty Oven Racks - Features a smooth glass design that is easy-to-operate and easy-to -clean • Two Speed Gas Convection Oven - Features a flat one-piece ceramic glass surface that is sleek and easy-to -clean • PowerBoil™ Burner - Delivers 15,000 BTUs of forceful heat for cooking more temperature control for simmering • Model PGS968SEMSS - Double coated porcelain...
..., ensuring better baking results • Convection Roast - Offers a low setting of scrubbing • Self-Clean Heavy-Duty Oven Racks - Features a smooth glass design that is easy-to-operate and easy-to -clean • Two Speed Gas Convection Oven - Features a flat one-piece ceramic glass surface that is sleek and easy-to -clean • PowerBoil™ Burner - Delivers 15,000 BTUs of forceful heat for cooking more temperature control for simmering • Model PGS968SEMSS - Double coated porcelain...


