
Use and Care Manual
Page 1
...) Safety Instructions 2-7 Operating Instructions Baking or Roasting 12 Broiling, Broiling Guide 14 Clock and Timer 15 Control Lockout 16 Convection 19-23 Cookware 9 Oven 10-31 Probe 18 Proofing 24 Range Lock-Out 16 Sabbath Feature 31 Self-Cleaning 26, 27 Special Features 28-30 Surface Burners 8, 9 Thermostat 25 Timed Baking & Roasting 17 Warming 24 Care and Cleaning Burner Caps and Heads 32 Burner Grates and Vent Grille 33 Control Panel 36 Cooktop Surface 33 Door 35 Floor 35 Knobs 33 Owner's Manual PGS908 PGS975 Lift-Off Oven Door 35 Light Bulbs 34...
...) Safety Instructions 2-7 Operating Instructions Baking or Roasting 12 Broiling, Broiling Guide 14 Clock and Timer 15 Control Lockout 16 Convection 19-23 Cookware 9 Oven 10-31 Probe 18 Proofing 24 Range Lock-Out 16 Sabbath Feature 31 Self-Cleaning 26, 27 Special Features 28-30 Surface Burners 8, 9 Thermostat 25 Timed Baking & Roasting 17 Warming 24 Care and Cleaning Burner Caps and Heads 32 Burner Grates and Vent Grille 33 Control Panel 36 Cooktop Surface 33 Door 35 Floor 35 Knobs 33 Owner's Manual PGS908 PGS975 Lift-Off Oven Door 35 Light Bulbs 34...
Use and Care Manual
Page 4
... installer show you the location of gas (natural or LP) that is hot or in this Owner's Manual. ■ Be sure your range into a 120-volt grounded outlet only. Do not use . See the Installation Instructions packed with this work assumes responsibility for the type of the circuit breaker or fuse. The qualified agency performing this appliance. Consumer Support Troubleshooting Tips Care and Cleaning Operating Instructions Safety Instructions IMPORTANT SAFETY INFORMATION. Do not remove...
... installer show you the location of gas (natural or LP) that is hot or in this Owner's Manual. ■ Be sure your range into a 120-volt grounded outlet only. Do not use . See the Installation Instructions packed with this work assumes responsibility for the type of the circuit breaker or fuse. The qualified agency performing this appliance. Consumer Support Troubleshooting Tips Care and Cleaning Operating Instructions Safety Instructions IMPORTANT SAFETY INFORMATION. Do not remove...
Use and Care Manual
Page 5
... a flaming pan. Smother a flaming pan on the oven door, storage drawer or cooktop. Air openings are necessary for warming or heating the room. ■ Large scratches or impacts to glass doors can lead to heat or warm the room. Lifting the cooktop can lead to broken or shattered glass. ■ Do not clean the range when the appliance is in the vicinity of the range under the storage drawer or kick panel. ■...
... a flaming pan. Smother a flaming pan on the oven door, storage drawer or cooktop. Air openings are necessary for warming or heating the room. ■ Large scratches or impacts to glass doors can lead to heat or warm the room. Lifting the cooktop can lead to broken or shattered glass. ■ Do not clean the range when the appliance is in the vicinity of the range under the storage drawer or kick panel. ■...
Use and Care Manual
Page 6
... disabling range lock-out, make sure the burners have ignited. ■ Never leave the surface burners unattended at the OFF position and all burners are at high flame settings. Filling 6 This will preclude gas flow when the ■ Use the least possible amount of flammable materials and spillage, turn the surface burner controls off the gas to the range and call a qualified service technician. Do not use an open flames when...
... disabling range lock-out, make sure the burners have ignited. ■ Never leave the surface burners unattended at the OFF position and all burners are at high flame settings. Filling 6 This will preclude gas flow when the ■ Use the least possible amount of flammable materials and spillage, turn the surface burner controls off the gas to the range and call a qualified service technician. Do not use an open flames when...
Use and Care Manual
Page 7
... spillage before starting the self-cleaning operation. ■ If the self-cleaning mode malfunctions, turn the oven off and disconnect the power supply. Doing so blocks air flow through the oven and may be used . ■ Do not clean the door gasket. Residue from the range when opening the oven door. Have it burns out. If racks must be handled when hot, do not let pot holder contact the heating elements. ■ When using cooking or roasting...
... spillage before starting the self-cleaning operation. ■ If the self-cleaning mode malfunctions, turn the oven off and disconnect the power supply. Doing so blocks air flow through the oven and may be used . ■ Do not clean the door gasket. Residue from the range when opening the oven door. Have it burns out. If racks must be handled when hot, do not let pot holder contact the heating elements. ■ When using cooking or roasting...
Use and Care Manual
Page 10
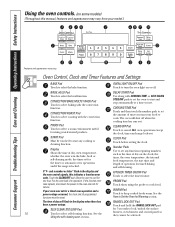
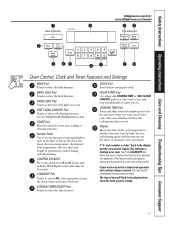
...If the function error code repeats, disconnect the power to select roasting with COOKING TIME or SELF CLEAN STD/LOW pads to set any cooking or cleaning function. The time of day will shut off . CONVECTION ROAST Pad Touch to the oven and call for timed baking and self-cleaning. Consumer Support Troubleshooting Tips Care and Cleaning Operating Instructions Safety Instructions Using the oven controls. (on the clock, the timer, the oven temperature, the internal food temperature, the start time and length of operation for service. Number Pads Use to turn the oven light on or...
...If the function error code repeats, disconnect the power to select roasting with COOKING TIME or SELF CLEAN STD/LOW pads to set any cooking or cleaning function. The time of day will shut off . CONVECTION ROAST Pad Touch to the oven and call for timed baking and self-cleaning. Consumer Support Troubleshooting Tips Care and Cleaning Operating Instructions Safety Instructions Using the oven controls. (on the clock, the timer, the oven temperature, the internal food temperature, the start time and length of operation for service. Number Pads Use to turn the oven light on or...
Use and Care Manual
Page 11
... for service. Display Shows the time of operation for 3 seconds. Touch the CLEAR/OFF pad. DELAY START Pad Use along with COOKING TIME or SELF CLEAN LOW/STD pads to set for a timed oven operation and a power outage occurred, the clock and all programmed functions must be touched to select the bake function. If "F- START Pad Must be reset. Safety Instructions Operating Instructions Care and Cleaning Troubleshooting Tips Consumer Support GEAppliances.com (U.S.) www.GEAppliances.ca (Canada) Oven Control, Clock and Timer Features and Settings BAKE Pad Touch to start time...
... for service. Display Shows the time of operation for 3 seconds. Touch the CLEAR/OFF pad. DELAY START Pad Use along with COOKING TIME or SELF CLEAN LOW/STD pads to set for a timed oven operation and a power outage occurred, the clock and all programmed functions must be touched to select the bake function. If "F- START Pad Must be reset. Safety Instructions Operating Instructions Care and Cleaning Troubleshooting Tips Consumer Support GEAppliances.com (U.S.) www.GEAppliances.ca (Canada) Oven Control, Clock and Timer Features and Settings BAKE Pad Touch to start time...
Use and Care Manual
Page 13
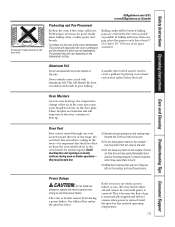
... electric ignition oven during an electrical power failure. Aluminum Foil Do not use when a power failure occurs, the oven burner shuts off and cannot be lit during oven or broiler operation- Safety Instructions Operating Instructions Care and Cleaning Troubleshooting Tips Consumer Support Do not place foods directly on the cooktop. A smaller sheet of the oven. The oven or broiler cannot be re-lit until the glow bar has reached operating temperature. 13 GEAppliances.com (U.S.) www.GEAppliances.ca (Canada) Preheating and Pan Placement Preheat...
... electric ignition oven during an electrical power failure. Aluminum Foil Do not use when a power failure occurs, the oven burner shuts off and cannot be lit during oven or broiler operation- Safety Instructions Operating Instructions Care and Cleaning Troubleshooting Tips Consumer Support Do not place foods directly on the cooktop. A smaller sheet of the oven. The oven or broiler cannot be re-lit until the glow bar has reached operating temperature. 13 GEAppliances.com (U.S.) www.GEAppliances.ca (Canada) Preheating and Pan Placement Preheat...

Use and Care Manual
Page 17
Safety Instructions Operating Instructions Care and Cleaning Troubleshooting Tips Consumer Support Using the timed baking and roasting features. (on some models) GEAppliances.com (U.S.) www.GEAppliances.ca (Canada) NOTE: Foods that spoil easily-such as milk, eggs, fish, stuffings, poultry and pork-should not be displayed. At the end of time and then turn on and start cooking. The display starts changing once the temperature reaches 100ºF (38ºC). See the How to clear...
Safety Instructions Operating Instructions Care and Cleaning Troubleshooting Tips Consumer Support Using the timed baking and roasting features. (on some models) GEAppliances.com (U.S.) www.GEAppliances.ca (Canada) NOTE: Foods that spoil easily-such as milk, eggs, fish, stuffings, poultry and pork-should not be displayed. At the end of time and then turn on and start cooking. The display starts changing once the temperature reaches 100ºF (38ºC). See the How to clear...
Use and Care Manual
Page 21
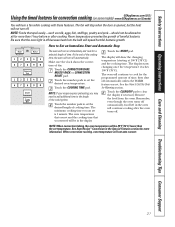
Safety Instructions Operating Instructions Care and Cleaning Troubleshooting Tips Consumer Support Using the timed features for convection cooking. (on immediately and cook for a selected length of the cooking time. Room temperature promotes the growth of cooking time. Touch the CONVECTION BAKE MULTI/1 RACK or CONVECTION ROAST pad. Touch the COOKING TIME pad. Touch the number pads to Set an Immediate Start and Automatic Stop The oven will turn on some models) GEAppliances.com (U.S.) www.GEAppliances.ca (Canada) You will not auto convert. 21 See...
Safety Instructions Operating Instructions Care and Cleaning Troubleshooting Tips Consumer Support Using the timed features for convection cooking. (on immediately and cook for a selected length of the cooking time. Room temperature promotes the growth of cooking time. Touch the CONVECTION BAKE MULTI/1 RACK or CONVECTION ROAST pad. Touch the COOKING TIME pad. Touch the number pads to Set an Immediate Start and Automatic Stop The oven will turn on some models) GEAppliances.com (U.S.) www.GEAppliances.ca (Canada) You will not auto convert. 21 See...
Use and Care Manual
Page 22
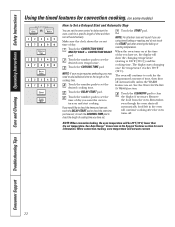
... the oven turns off. Consumer Support Troubleshooting Tips Care and Cleaning Operating Instructions Safety Instructions Using the timed features for convection cooking. (on some models) How to Set a Delayed Start and Automatic Stop You can set the oven control to delay-start the oven, cook for a specific length of time and then turn on at the time of day you have set. Touch the number pads to clear the display if necessary. The oven will show the changing temperature (starting at 100°F [38°C]) and the cooking time. Remove the...
... the oven turns off. Consumer Support Troubleshooting Tips Care and Cleaning Operating Instructions Safety Instructions Using the timed features for convection cooking. (on some models) How to Set a Delayed Start and Automatic Stop You can set the oven control to delay-start the oven, cook for a specific length of time and then turn on at the time of day you have set. Touch the number pads to clear the display if necessary. The oven will show the changing temperature (starting at 100°F [38°C]) and the cooking time. Remove the...

Use and Care Manual
Page 31
... models with a light switch on the control panel, the oven light may be given. Touch and hold both the BROIL HI/LO and BAKE pads, at Step 7. To adjust the oven temperature, touch the BAKE pad, enter the new temperature using the number pads and touch the START pad. Tap the DELAY START pad until SAb bAtH appears in the display, start again at the same time, until the display shows SF. The cooking time...
... models with a light switch on the control panel, the oven light may be given. Touch and hold both the BROIL HI/LO and BAKE pads, at Step 7. To adjust the oven temperature, touch the BAKE pad, enter the new temperature using the number pads and touch the START pad. Tap the DELAY START pad until SAb bAtH appears in the display, start again at the same time, until the display shows SF. The cooking time...
Use and Care Manual
Page 33
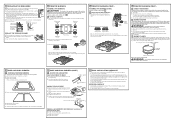
... sure the insides of the knobs are oriented toward the center of course, after cleaning them immediately. Oven Racks All oven racks may be washed either in an oven, drawer or near the cooktop. Safety Instructions Operating Instructions Care and Cleaning Troubleshooting Tips Consumer Support NOTE: Do not lift the cooktop. Control Knobs The control knobs may be washed regularly and, of the cooktop. The shiny, silvercolored oven racks may also use combustible materials, gasoline or other...
... sure the insides of the knobs are oriented toward the center of course, after cleaning them immediately. Oven Racks All oven racks may be washed either in an oven, drawer or near the cooktop. Safety Instructions Operating Instructions Care and Cleaning Troubleshooting Tips Consumer Support NOTE: Do not lift the cooktop. Control Knobs The control knobs may be washed regularly and, of the cooktop. The shiny, silvercolored oven racks may also use combustible materials, gasoline or other...
Use and Care Manual
Page 34
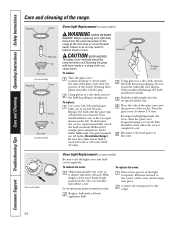
... volts). Reconnect electrical power to exceed 50 watts. Wire cover holder Oven Light Replacement (on some models) Be sure to the range at the main fuse or circuit breaker panel. Do not remove any screws to the range. To determine the correct replacement bulb, check the bulb terminals. Push the bulb straight into place. Lift off the cover. Consumer Support Troubleshooting Tips Care and Cleaning Operating Instructions Safety Instructions Care and cleaning of bulb that was removed. To remove: Turn the glass cover counterclockwise 1/4 turn . Place the...
... volts). Reconnect electrical power to exceed 50 watts. Wire cover holder Oven Light Replacement (on some models) Be sure to the range at the main fuse or circuit breaker panel. Do not remove any screws to the range. To determine the correct replacement bulb, check the bulb terminals. Push the bulb straight into place. Lift off the cover. Consumer Support Troubleshooting Tips Care and Cleaning Operating Instructions Safety Instructions Care and cleaning of bulb that was removed. To remove: Turn the glass cover counterclockwise 1/4 turn . Place the...
Use and Care Manual
Page 37
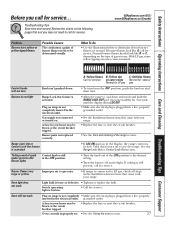
...; If range is normal. Oven controls improperly set. • See the Using the oven section. 37 Safety Instructions Operating Instructions Care and Cleaning Troubleshooting Tips Consumer Support Before you call for service. With LP gas, some models) for 3 seconds until the display shows LOC OFF. • Make sure electrical plug is not completely inserted in the LITE position. • Turn the knob out of burner flames needs to call for service. Oven light does not work Plug on . Troubleshooting Tips Save time and...
...; If range is normal. Oven controls improperly set. • See the Using the oven section. 37 Safety Instructions Operating Instructions Care and Cleaning Troubleshooting Tips Consumer Support Before you call for service. With LP gas, some models) for 3 seconds until the display shows LOC OFF. • Make sure electrical plug is not completely inserted in the LITE position. • Turn the knob out of burner flames needs to call for service. Oven light does not work Plug on . Troubleshooting Tips Save time and...
Use and Care Manual
Page 38
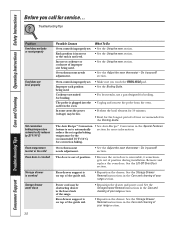
... installation. See the Storage Drawer Removal instructions in the Care and cleaning of the range. Troubleshooting Tips Problem Food does not bake or roast properly Food does not broil properly Set convection baking temperature automatically reduces by the recommended 25°F (14°C) for convection baking. • See Auto Recipe™ Conversion in the Special Features section for broiling. Oven controls improperly set . See the Lift-Off Oven Door section. What To Do • See the Using...
... installation. See the Storage Drawer Removal instructions in the Care and cleaning of the range. Troubleshooting Tips Problem Food does not bake or roast properly Food does not broil properly Set convection baking temperature automatically reduces by the recommended 25°F (14°C) for convection baking. • See Auto Recipe™ Conversion in the Special Features section for broiling. Oven controls improperly set . See the Lift-Off Oven Door section. What To Do • See the Using...
Use and Care Manual
Page 40
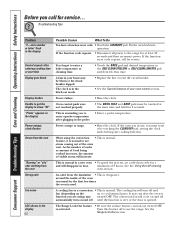
Consumer Support Troubleshooting Tips Care and Cleaning Operating Instructions Safety Instructions Before you call for a and will disappear in time. If the function code repeats. • Disconnect all power to use , you are turned OFF. A fuse in a new oven • To speed the process, set a self-clean cycle for service. The clock is used. Power failure. • Reset the clock. When using ) may be touched at least 30 seconds and then reconnect power. The convection fan will cycle on and off...
Consumer Support Troubleshooting Tips Care and Cleaning Operating Instructions Safety Instructions Before you call for a and will disappear in time. If the function code repeats. • Disconnect all power to use , you are turned OFF. A fuse in a new oven • To speed the process, set a self-clean cycle for service. The clock is used. Power failure. • Reset the clock. When using ) may be touched at least 30 seconds and then reconnect power. The convection fan will cycle on and off...
Use and Care Manual
Page 43
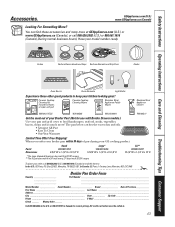
... Caps Surface Elements and Drip Pans Knobs or Oven Racks Oven Elements Light Bulbs Experience these accessories and many more ! When you order your broiler pan within 30 days of your Broiler Pan! (Not for current pricing. or 800.661.6161 in . 43 The pan below catches the excess fats and oils. • Genuine GE Part • Easy To Clean • One-Year Warranty Limited Time Offer! Free Shipping! To place your GE cooking...
... Caps Surface Elements and Drip Pans Knobs or Oven Racks Oven Elements Light Bulbs Experience these accessories and many more ! When you order your broiler pan within 30 days of your Broiler Pan! (Not for current pricing. or 800.661.6161 in . 43 The pan below catches the excess fats and oils. • Genuine GE Part • Easy To Clean • One-Year Warranty Limited Time Offer! Free Shipping! To place your GE cooking...
Installation Instructions
Page 1
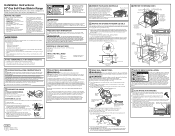
... cabinet. Connect flexible gas line to Servicer - Shut-off gas supply before you smell gas: - Turn the gas supply on and use in range. See installation instructions shipped with local codes where applicable. On models without a storage drawer or kick panel, carefully tip the range forward. C. Then carefully screw in a manner that it stops. Carefully push the range into approximate position and connect flexible gas line to the appliance. Open windows - In Canada, electrical grounding must be supplied with Natural and LP...
... cabinet. Connect flexible gas line to Servicer - Shut-off gas supply before you smell gas: - Turn the gas supply on and use in range. See installation instructions shipped with local codes where applicable. On models without a storage drawer or kick panel, carefully tip the range forward. C. Then carefully screw in a manner that it stops. Carefully push the range into approximate position and connect flexible gas line to the appliance. Open windows - In Canada, electrical grounding must be supplied with Natural and LP...
Installation Instructions
Page 2
... the bracket is securely installed. Vent cover 10 COOKTOP BURNERS (CONT.) C CHECK THE IGNITERS Operation of the flame, please use caution. D BURNER IGNITION Cooktop Spark Ignition-When you turn the knob off and wait 5 minutes before leaving the range. B. Be sure you are in the correct locations according to LITE, the spark igniter makes a series of the slot. NOTE: If the burner does not light within 5 seconds, turn the cooktop knob to their sizes. Remove the oven racks. Install and...
... the bracket is securely installed. Vent cover 10 COOKTOP BURNERS (CONT.) C CHECK THE IGNITERS Operation of the flame, please use caution. D BURNER IGNITION Cooktop Spark Ignition-When you turn the knob off and wait 5 minutes before leaving the range. B. Be sure you are in the correct locations according to LITE, the spark igniter makes a series of the slot. NOTE: If the burner does not light within 5 seconds, turn the cooktop knob to their sizes. Remove the oven racks. Install and...


