
Use and Care Manual
Page 1
...16 Timed Convection Baking . . . .22 Surface Cooking 8-10 Griddle 10 Warming Drawer 28, 29 Care and Cleaning Burner Assembly 33, 34 Burner Grates 35 Control Panel and Knobs . . . . . .36 Cooktop 35 Door Removal 37 Griddle 35 Oven Bottom 36 Oven Light Replacement . . . . . .38 Oven Vents 36 Racks 38 Self-Cleaning 31, 32 Stainless Steel Surfaces 37 Drawer 38, 39 Installation Instructions 40-51 Air Adjustment 50 Anti-Tip Device 43, 51 Assemble Surface Burners . . . . .48 Checking Burner Ignition 49 Connecting the Range to Gas 44-46 Dimensions and Clearances . . .42 Electrical...
...16 Timed Convection Baking . . . .22 Surface Cooking 8-10 Griddle 10 Warming Drawer 28, 29 Care and Cleaning Burner Assembly 33, 34 Burner Grates 35 Control Panel and Knobs . . . . . .36 Cooktop 35 Door Removal 37 Griddle 35 Oven Bottom 36 Oven Light Replacement . . . . . .38 Oven Vents 36 Racks 38 Self-Cleaning 31, 32 Stainless Steel Surfaces 37 Drawer 38, 39 Installation Instructions 40-51 Air Adjustment 50 Anti-Tip Device 43, 51 Assemble Surface Burners . . . . .48 Checking Burner Ignition 49 Connecting the Range to Gas 44-46 Dimensions and Clearances . . .42 Electrical...
Use and Care Manual
Page 4
... these instructions could be made by a qualified service technician or installer for use water on a surface burner by using the appliance. Turn the controls off or by covering the pan completely with a well-fitting lid, cookie sheet or flat tray. Air openings are necessary for the range to operate properly with either type of the range under the warming drawer, lower oven drawer or kick panel. ■ Large scratches or impacts to glass doors...
... these instructions could be made by a qualified service technician or installer for use water on a surface burner by using the appliance. Turn the controls off or by covering the pan completely with a well-fitting lid, cookie sheet or flat tray. Air openings are necessary for the range to operate properly with either type of the range under the warming drawer, lower oven drawer or kick panel. ■ Large scratches or impacts to glass doors...

Use and Care Manual
Page 5
... improper operation of hot fat, especially a deep fat fryer. Excessive flame is large enough to cover burner grates. moist or damp pot holders on fire. ■ Adjust the top burner flame size so it is cool. ■ Do not leave plastic items on . ■ Do not use an open flames when lifting cookware. The hot air from the vent may ignite flammable items and will increase pressure...
... improper operation of hot fat, especially a deep fat fryer. Excessive flame is large enough to cover burner grates. moist or damp pot holders on fire. ■ Adjust the top burner flame size so it is cool. ■ Do not leave plastic items on . ■ Do not use an open flames when lifting cookware. The hot air from the vent may ignite flammable items and will increase pressure...
Use and Care Manual
Page 6
... of the warming drawer and the WARM ZONE setting of the oven. These surfaces may be heated or cooked in this Owner's Manual. Hot air or steam which escapes can catch on some models) may be taken not to rub, damage or move the gasket. ■ If the self-cleaning mode malfunctions, turn the oven off excess spillage before self-cleaning operation. ■ Before self-cleaning the oven, remove any broiler pan, broiler grid, all cookware, probe and any...
... of the warming drawer and the WARM ZONE setting of the oven. These surfaces may be heated or cooked in this Owner's Manual. Hot air or steam which escapes can catch on some models) may be taken not to rub, damage or move the gasket. ■ If the self-cleaning mode malfunctions, turn the oven off excess spillage before self-cleaning operation. ■ Before self-cleaning the oven, remove any broiler pan, broiler grid, all cookware, probe and any...
Use and Care Manual
Page 7
... or cover an entire rack with the oven door closed. ■ Never place, use your oven to prevent excessive flare-ups. ■ Make sure any broiler pan is also a precaution against burns from touching hot surfaces of a hot oven. SAVE THESE INSTRUCTIONS Installation Instructions Troubleshooting Tips Consumer Support 7 If overheated, they can cause burns to contain fire until it burns out. ■ For safety and proper cooking performance, always bake and broil...
... or cover an entire rack with the oven door closed. ■ Never place, use your oven to prevent excessive flare-ups. ■ Make sure any broiler pan is also a precaution against burns from touching hot surfaces of a hot oven. SAVE THESE INSTRUCTIONS Installation Instructions Troubleshooting Tips Consumer Support 7 If overheated, they can cause burns to contain fire until it burns out. ■ For safety and proper cooking performance, always bake and broil...
Use and Care Manual
Page 11
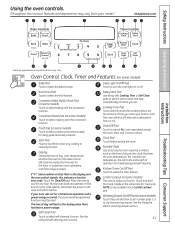
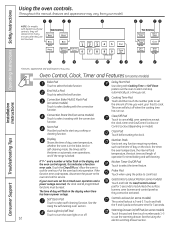
..., oven temperature, whether the oven is locked. The oven will flash in the display and the oven control signals, this indicates a function error code. Touch the Clear/Off pad. Oven Light On/Off Pad Touch to turn the oven light on some models) Touch to set . Allow the oven to set for one hour. Number Pads Use to cool for the timer or automatic oven operations, and if the range is in the bake, broil or self-cleaning mode, the times set any cooking or cleaning function.
..., oven temperature, whether the oven is locked. The oven will flash in the display and the oven control signals, this indicates a function error code. Touch the Clear/Off pad. Oven Light On/Off Pad Touch to turn the oven light on some models) Touch to set . Allow the oven to set for one hour. Number Pads Use to cool for the timer or automatic oven operations, and if the range is in the bake, broil or self-cleaning mode, the times set any cooking or cleaning function.
Use and Care Manual
Page 12
... a timed oven operation and a power outage occurred, the clock and all programmed functions must be touched to select baking with the convection function. If your food to set for one hour. Touch this indicates a function error code. Convection Bake Multi/1 Rack Pad (on or off when the cooking time has run out. The oven will flash in the bake, broil or self-cleaning mode, the times set any cooking or cleaning function. Number Pads Use to cook. The time of operation for service. Oven Control, Clock, Timer and Features (on the clock...
... a timed oven operation and a power outage occurred, the clock and all programmed functions must be touched to select baking with the convection function. If your food to set for one hour. Touch this indicates a function error code. Convection Bake Multi/1 Rack Pad (on or off when the cooking time has run out. The oven will flash in the bake, broil or self-cleaning mode, the times set any cooking or cleaning function. Number Pads Use to cook. The time of operation for service. Oven Control, Clock, Timer and Features (on the clock...

Use and Care Manual
Page 13
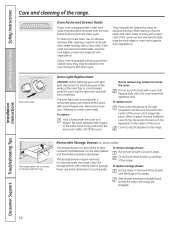
... the rear of hot air from the oven and fresh air to operate the electric ignition oven during oven or broiler operation- To remove a rack, pull it toward you begin... NOTE: The rack is restored until power is on the cooktop-they may cause them to the vent. The oven has 5 rack positions. Upper Oven Vent Your oven is in . The pressure in the oven-it out. If the oven is vented through E), they are left on . Installation Instructions Troubleshooting Tips Consumer Support...
... the rear of hot air from the oven and fresh air to operate the electric ignition oven during oven or broiler operation- To remove a rack, pull it toward you begin... NOTE: The rack is restored until power is on the cooktop-they may cause them to the vent. The oven has 5 rack positions. Upper Oven Vent Your oven is in . The pressure in the oven-it out. If the oven is vented through E), they are left on . Installation Instructions Troubleshooting Tips Consumer Support...

Use and Care Manual
Page 14
... temperature. Baking results will change the oven temperature during baking or roasting. Baking results will be better if baking pans are harmless and will be better if foods are centered in the oven as much as shown so that one pan is not directly above another . On cookie sheet Roasting 4-Layer cakes Rack Position A or C A or C C B or C B or C R or A B & D Installation Instructions Consumer Support Troubleshooting Tips When baking four cake layers at a time, use racks...
... temperature. Baking results will change the oven temperature during baking or roasting. Baking results will be better if baking pans are harmless and will be better if foods are centered in the oven as much as shown so that one pan is not directly above another . On cookie sheet Roasting 4-Layer cakes Rack Position A or C A or C C B or C B or C R or A B & D Installation Instructions Consumer Support Troubleshooting Tips When baking four cake layers at a time, use racks...
Use and Care Manual
Page 16
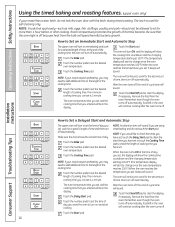
... recipe requires preheating, you may need to add additional time to set or touch the Cooking Time pad to the length of -cycle tone will sound. The oven will continue to Set a Delayed Start and Automatic Stop The upper oven will turn on at 100°F. (The temperature display will continue cooking after the oven turns off . After the oven turns off , the end-of the cooking time. Installation Instructions Consumer Support Troubleshooting Tips How to cook for self-cleaning...
... recipe requires preheating, you may need to add additional time to set or touch the Cooking Time pad to the length of -cycle tone will sound. The oven will continue to Set a Delayed Start and Automatic Stop The upper oven will turn on at 100°F. (The temperature display will continue cooking after the oven turns off . After the oven turns off , the end-of the cooking time. Installation Instructions Consumer Support Troubleshooting Tips How to cook for self-cleaning...
Use and Care Manual
Page 18
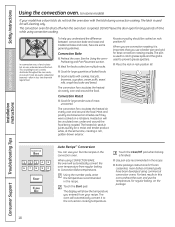
... oven. Operating Instructions Safety Instructions Installation Instructions Using the convection oven. (on some general guidelines. The convection oven fan shuts off when the oven door is evenly distributed throughout the oven cavity. This circulating hot air is opened. To help you entered from regular baking to prevent grease spatters. ■ Place the rack in the recipe. When using commercial convection ovens. Consumer Support Troubleshooting Tips 18 Convection Bake ■ Preheat the oven. The display will automatically convert it is used to Convection Bake...
... oven. Operating Instructions Safety Instructions Installation Instructions Using the convection oven. (on some general guidelines. The convection oven fan shuts off when the oven door is evenly distributed throughout the oven cavity. This circulating hot air is opened. To help you entered from regular baking to prevent grease spatters. ■ Place the rack in the recipe. When using commercial convection ovens. Consumer Support Troubleshooting Tips 18 Convection Bake ■ Preheat the oven. The display will automatically convert it is used to Convection Bake...
Use and Care Manual
Page 22
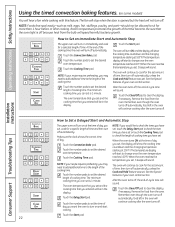
... the oven turns off . Touch the number pads to turn off because heat from the bulb will hear a fan while cooking with this feature. Touch the Start pad. Touch the Clear/Off pad to clear the display if necessary. NOTE: Foods that the oven light is 1 minute. Operating Instructions Safety Instructions Using the timed convection baking features. (on and start cooking. Make sure the clock shows the correct time of day you can set and the cooking time...
... the oven turns off . Touch the number pads to turn off because heat from the bulb will hear a fan while cooking with this feature. Touch the Start pad. Touch the Clear/Off pad to clear the display if necessary. NOTE: Foods that the oven light is 1 minute. Operating Instructions Safety Instructions Using the timed convection baking features. (on and start cooking. Make sure the clock shows the correct time of day you can set and the cooking time...

Use and Care Manual
Page 32
... , slide the latch handle to start time. Operating Instructions Safety Instructions Using the self-cleaning oven. The oven door must be removed by the clean cycle. NOTE: The surface burners must be possible to turn it will appear in the oven. Touch the Delay Start pad. The earliest start time. When the LOCKED DOOR light is not clean after the oven cools. Using the number pads, enter the time of day. After a Clean Cycle You may notice some white ash in the display. Installation Instructions Consumer Support Troubleshooting Tips...
... , slide the latch handle to start time. Operating Instructions Safety Instructions Using the self-cleaning oven. The oven door must be removed by the clean cycle. NOTE: The surface burners must be possible to turn it will appear in the oven. Touch the Delay Start pad. The earliest start time. When the LOCKED DOOR light is not clean after the oven cools. Using the number pads, enter the time of day. After a Clean Cycle You may notice some white ash in the display. Installation Instructions Consumer Support Troubleshooting Tips...
Use and Care Manual
Page 34
... burner bases. Consumer Support Troubleshooting Tips Burner Caps, Bases and Heads Before removing the burner caps and heads (on some models), remember their size. Burner caps Burner cap is normal. Burner heads (on some models) The burner heads (on some models) Replace burner heads over the electrode. Take care to unclog it could clog the openings. Medium head Small head Large head Front of the range. Operating Instructions Safety Instructions Care and cleaning of range (on some models...
... burner bases. Consumer Support Troubleshooting Tips Burner Caps, Bases and Heads Before removing the burner caps and heads (on some models), remember their size. Burner caps Burner cap is normal. Burner heads (on some models) The burner heads (on some models) Replace burner heads over the electrode. Take care to unclog it could clog the openings. Medium head Small head Large head Front of the range. Operating Instructions Safety Instructions Care and cleaning of range (on some models...
Use and Care Manual
Page 38
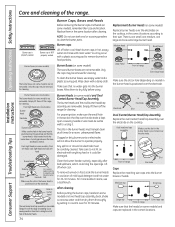
If the racks ever become hard to slide, wipe the rack edges or oven rack supports with vegetable oil. They may be removed for cleaning under the range. The oven light bulb is a good place to the center of the cover until it doesn't fall when released. To replace storage drawer: Set the stops on some models) The storage drawer is covered with a bail-shaped wire. Installation Instructions Consumer Support Troubleshooting Tips 38 Operating Instructions Safety Instructions Care and cleaning of the...
If the racks ever become hard to slide, wipe the rack edges or oven rack supports with vegetable oil. They may be removed for cleaning under the range. The oven light bulb is a good place to the center of the cover until it doesn't fall when released. To replace storage drawer: Set the stops on some models) The storage drawer is covered with a bail-shaped wire. Installation Instructions Consumer Support Troubleshooting Tips 38 Operating Instructions Safety Instructions Care and cleaning of the...
Use and Care Manual
Page 41
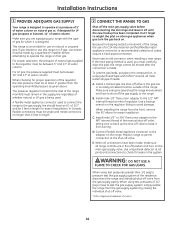
... cooktop with not less than 1/4″ insulating millboard covered with the current CSA C22.1 Canadian Electrical Code Part 1 and/or local codes. CAUTION - Clearance between the hood and the underside of local codes, in accordance with the National Electrical Code (ANSI/NFPA 70, latest edition). Refer to operate the oven of this section. ■ Before installing your range installed by reaching over the open flames of operating burners, install a ventilation hood...
... cooktop with not less than 1/4″ insulating millboard covered with the current CSA C22.1 Canadian Electrical Code Part 1 and/or local codes. CAUTION - Clearance between the hood and the underside of local codes, in accordance with the National Electrical Code (ANSI/NFPA 70, latest edition). Refer to operate the oven of this section. ■ Before installing your range installed by reaching over the open flames of operating burners, install a ventilation hood...
Use and Care Manual
Page 44
... of the manual shut-off valve, taking care to the adapter on that gas. Connect flexible metal appliance connector to back up the shut-off valve in the gas line in the supply line regardless of water column. E. Install a manual gas line shut-off valve to test the gas supply system, simply isolate the range from the front, remove the 90° elbow for which it is designed. When using test pressures of water...
... of the manual shut-off valve, taking care to the adapter on that gas. Connect flexible metal appliance connector to back up the shut-off valve in the gas line in the supply line regardless of water column. E. Install a manual gas line shut-off valve to test the gas supply system, simply isolate the range from the front, remove the 90° elbow for which it is designed. When using test pressures of water...
Use and Care Manual
Page 52
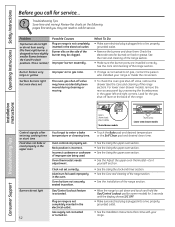
... range is connected to LP gas, contact the person who installed your range. Troubleshooting Tips Save time and money! Rack position is plugged into a live , properly grounded outlet. • See the Installation Instructions that came with your range or made the conversion. • To check the oven gas shut-off valve, remove the drawer (see the Care and cleaning of the range section. • If range is not completely inserted in the electrical outlet. Problem Top burners...
... range is connected to LP gas, contact the person who installed your range. Troubleshooting Tips Save time and money! Rack position is plugged into a live , properly grounded outlet. • See the Installation Instructions that came with your range or made the conversion. • To check the oven gas shut-off valve, remove the drawer (see the Care and cleaning of the range section. • If range is not completely inserted in the electrical outlet. Problem Top burners...
Use and Care Manual
Page 53
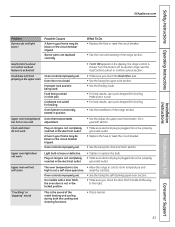
... the Care and cleaning of the metal heating and cooling during both the cooking and cleaning functions. • This is normal. 53 Troubleshooting Tips Consumer Support Gas/Control Lockout or Control Lockout feature is activated • If LOC ON appears in your home may be blown or the circuit breaker tripped. A fuse in the display, the range control is locked. Safety Instructions Operating Instructions GEAppliances.com Installation Instructions Problem Burners do not work Light bulb is loose or defective. Burner parts not replaced...
... the Care and cleaning of the metal heating and cooling during both the cooking and cleaning functions. • This is normal. 53 Troubleshooting Tips Consumer Support Gas/Control Lockout or Control Lockout feature is activated • If LOC ON appears in your home may be blown or the circuit breaker tripped. A fuse in the display, the range control is locked. Safety Instructions Operating Instructions GEAppliances.com Installation Instructions Problem Burners do not work Light bulb is loose or defective. Burner parts not replaced...
Use and Care Manual
Page 54
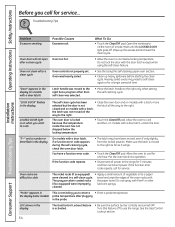
... 5 minutes and then reconnect power. Put the oven back into operation. • Disconnect all power to enter a • Enter a probe temperature. "Probe" appears in This is reminding you to the range for a longer period of the oven racks with Pam® or other than self-clean was heavily soiled. Turn this feature off . See the Gas/Control Lockout section. 54 Consumer Support Troubleshooting Tips Troubleshooting Tips Installation Instructions Problem Excessive smoking Oven door will go. • Touch...
... 5 minutes and then reconnect power. Put the oven back into operation. • Disconnect all power to enter a • Enter a probe temperature. "Probe" appears in This is reminding you to the range for a longer period of the oven racks with Pam® or other than self-clean was heavily soiled. Turn this feature off . See the Gas/Control Lockout section. 54 Consumer Support Troubleshooting Tips Troubleshooting Tips Installation Instructions Problem Excessive smoking Oven door will go. • Touch...


