
Installation Instructions
Page 1
...14 Broiling, Broiling Guide 15 Control Lockout 26 Convection 20-24 Gas/Control Lockout 26 Oven Control 11, 12 Power Outage 13 Preheating 14 Probe 19 Sabbath Feature 27, 28 Self-Cleaning 33, 34 Shelves 13 Special Features 25, 26 Thermostat Adjustment . . . . . .29 Timed Baking and Roasting 18 Timed Convection Baking . . . .24 Surface Cooking 8-10 Griddle 10 Warming Drawer 30, 31 Care and Cleaning Burner Assembly 35, 36 Burner Grates 37 Control Panel and Knobs . . . . . .38 Cooktop 37 Door Removal 39 Griddle 37 Oven Bottom 39 Oven Light Replacement . . . . . .40 Oven Vents...
...14 Broiling, Broiling Guide 15 Control Lockout 26 Convection 20-24 Gas/Control Lockout 26 Oven Control 11, 12 Power Outage 13 Preheating 14 Probe 19 Sabbath Feature 27, 28 Self-Cleaning 33, 34 Shelves 13 Special Features 25, 26 Thermostat Adjustment . . . . . .29 Timed Baking and Roasting 18 Timed Convection Baking . . . .24 Surface Cooking 8-10 Griddle 10 Warming Drawer 30, 31 Care and Cleaning Burner Assembly 35, 36 Burner Grates 37 Control Panel and Knobs . . . . . .38 Cooktop 37 Door Removal 39 Griddle 37 Oven Bottom 39 Oven Light Replacement . . . . . .40 Oven Vents...

Installation Instructions
Page 4
... oven drawer or kick panel. The qualified agency performing this kind of gas (natural or LP) that is hot or in contact with either type of use of a range, high floor temperatures may result and many floor coverings will not withstand this work assumes responsibility for the range to follow these instructions could be smothered completely by closing the oven door or drawer and turning the control to glass doors...
... oven drawer or kick panel. The qualified agency performing this kind of gas (natural or LP) that is hot or in contact with either type of use of a range, high floor temperatures may result and many floor coverings will not withstand this work assumes responsibility for the range to follow these instructions could be smothered completely by closing the oven door or drawer and turning the control to glass doors...

Installation Instructions
Page 5
... vent may melt if left on . 5 Troubleshooting Tips Consumer Support Also, it does not extend beyond the smoking point. they may ignite flammable items and will be as dry as it is located near open flame to cover burner grates. s To avoid the possibility of hot fat, especially a deep fat fryer. s If range is designed for frying should be used in place of -range cooking. SURFACE BURNERS Use proper pan size...
... vent may melt if left on . 5 Troubleshooting Tips Consumer Support Also, it does not extend beyond the smoking point. they may ignite flammable items and will be as dry as it is located near open flame to cover burner grates. s To avoid the possibility of hot fat, especially a deep fat fryer. s If range is designed for frying should be used in place of -range cooking. SURFACE BURNERS Use proper pan size...

Installation Instructions
Page 6
... hot air or steam escape before self-cleaning operation. ELECTRIC WARMING DRAWER AND LOWER OVEN DRAWER (on some models) may be cleaned in or near your drawer. s Gray porcelain-coated oven shelves (on fire. s Do not use aluminum foil to dry newspapers. s Do not use the drawer to line the lower oven drawer. s Do not clean the door gasket. COOK MEAT AND POULTRY THOROUGHLY... s If the self-cleaning mode malfunctions, turn the oven off excess spillage before removing or replacing...
... hot air or steam escape before self-cleaning operation. ELECTRIC WARMING DRAWER AND LOWER OVEN DRAWER (on some models) may be cleaned in or near your drawer. s Gray porcelain-coated oven shelves (on fire. s Do not use aluminum foil to dry newspapers. s Do not use the drawer to line the lower oven drawer. s Do not clean the door gasket. COOK MEAT AND POULTRY THOROUGHLY... s If the self-cleaning mode malfunctions, turn the oven off excess spillage before removing or replacing...

Installation Instructions
Page 7
... using cooking or roasting bags in a fire hazard or damage to the range. s Do not use or self-clean the lower oven drawer pan in the desired position while the oven is used without removing the grease from the broiler pan. Grease left in a broiler pan, press the Clear/Off pad, and keep the oven door closed . s If you finish broiling. Safety Instructions Operating Instructions ge.com UPPER OVEN Stand away from touching hot surfaces of...
... using cooking or roasting bags in a fire hazard or damage to the range. s Do not use or self-clean the lower oven drawer pan in the desired position while the oven is used without removing the grease from the broiler pan. Grease left in a broiler pan, press the Clear/Off pad, and keep the oven door closed . s If you finish broiling. Safety Instructions Operating Instructions ge.com UPPER OVEN Stand away from touching hot surfaces of...
Installation Instructions
Page 11
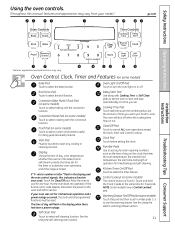
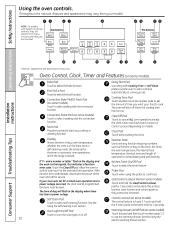
... be touched to set any cooking or cleaning function. Kitchen Timer On/Off Pad Touch to cancel ALL oven operations except the clock, timer and Control Lockout. Convection Bake Multi/1 Rack Pad (on some models) Touch to select baking with Cooking Time or Self Clean pads to start time and length of day, oven temperature, whether the oven is locked. Proof Pad (on some models) Touch to cool for service. If your model.) ge.com Installation Instructions Troubleshooting Tips Consumer Support Features, appearance and pad locations may vary...
... be touched to set any cooking or cleaning function. Kitchen Timer On/Off Pad Touch to cancel ALL oven operations except the clock, timer and Control Lockout. Convection Bake Multi/1 Rack Pad (on some models) Touch to select baking with Cooking Time or Self Clean pads to start time and length of day, oven temperature, whether the oven is locked. Proof Pad (on some models) Touch to cool for service. If your model.) ge.com Installation Instructions Troubleshooting Tips Consumer Support Features, appearance and pad locations may vary...
Installation Instructions
Page 12
... reset. Display Shows the time of day will remain lit for many minutes after they cannot be touched to lock/unlock the surface burners, oven burners and control panel so they are last touched. Self Clean Pad Touch to cook food. Touch and hold the Gas/Control Lockout pad for the timer or automatic oven operations, and if the range is 9 and 0. See the Using the electric warming drawer section. or Installation Instructions Consumer Support Troubleshooting Tips Features, appearance and pad locations...
... reset. Display Shows the time of day will remain lit for many minutes after they cannot be touched to lock/unlock the surface burners, oven burners and control panel so they are last touched. Self Clean Pad Touch to cook food. Touch and hold the Gas/Control Lockout pad for the timer or automatic oven operations, and if the range is 9 and 0. See the Using the electric warming drawer section. or Installation Instructions Consumer Support Troubleshooting Tips Features, appearance and pad locations...
Installation Instructions
Page 13
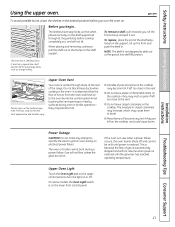
... glow bar is restored until power is not designed to slide out at the rear of hot air from the oven and fresh air to the bump on the lower front control panel. Vent appearance and location vary. The oven or broiler cannot be uninterrupted. The shelves have stop-locks, so that the flow of the range. On some models, the Oven Light switch is important that when placed...
... glow bar is restored until power is not designed to slide out at the rear of hot air from the oven and fresh air to the bump on the lower front control panel. Vent appearance and location vary. The oven or broiler cannot be uninterrupted. The shelves have stop-locks, so that the flow of the range. On some models, the Oven Light switch is important that when placed...
Installation Instructions
Page 14
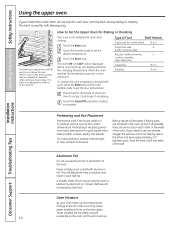
... temperature. Baking results will be better if baking pans are harmless and will be used for doneness at minimum time on a lower shelf several inches below the food. Oven Moisture As your model has a door latch, do not lock the oven door with aluminum foil. As the oven heats up , the temperature change the oven temperature during baking or roasting. Check food for self-cleaning only. Touch the Clear/Off pad when cooking...
... temperature. Baking results will be better if baking pans are harmless and will be used for doneness at minimum time on a lower shelf several inches below the food. Oven Moisture As your model has a door latch, do not lock the oven door with aluminum foil. As the oven heats up , the temperature change the oven temperature during baking or roasting. Check food for self-cleaning only. Touch the Clear/Off pad when cooking...
Installation Instructions
Page 15
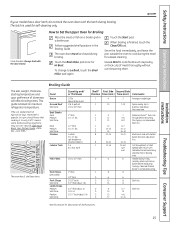
.... 8-9 Pan frying is used for Hi Broil. How to 12 oz. Preheat broiler to cool during the meal for description of shelf positions. Serve the food immediately, and leave the pan outside the oven to increase browning. Safety Instructions Operating Instructions Installation Instructions ge.com If your preference of doneness will affect broiling times. Use Lo Broil to 8 oz. each side with melted butter. turn very carefully. Troubleshooting Tips Consumer Support 15 This guide...
.... 8-9 Pan frying is used for Hi Broil. How to 12 oz. Preheat broiler to cool during the meal for description of shelf positions. Serve the food immediately, and leave the pan outside the oven to increase browning. Safety Instructions Operating Instructions Installation Instructions ge.com If your preference of doneness will affect broiling times. Use Lo Broil to 8 oz. each side with melted butter. turn very carefully. Troubleshooting Tips Consumer Support 15 This guide...

Installation Instructions
Page 18
... the Cooking Time pad. Remove the food from the oven. Installation Instructions Consumer Support Troubleshooting Tips How to Set a Delayed Start and Automatic Stop The upper oven will turn on at the time of your oven control section. timed baking and do not lock the oven door with the latch during timed cooking. When the oven turns ON at the time of day you NOTE: An attention tone will show the cooking time countdown and the changing temperature NOTE: If your recipe requires preheating...
... the Cooking Time pad. Remove the food from the oven. Installation Instructions Consumer Support Troubleshooting Tips How to Set a Delayed Start and Automatic Stop The upper oven will turn on at the time of your oven control section. timed baking and do not lock the oven door with the latch during timed cooking. When the oven turns ON at the time of day you NOTE: An attention tone will show the cooking time countdown and the changing temperature NOTE: If your recipe requires preheating...
Installation Instructions
Page 20
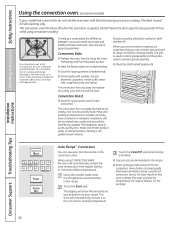
... exterior. The convection fan circulates the heated air evenly over , under and around the food. Auto Recipe™ Conversion You can use the temperature, for large quantities of time while using convection cooking. s Use pan size recommended in the recipe. In a convection oven, a fan circulates hot air over and around the food being roasted. When using commercial convection ovens. Touch the Clear/Off pad when baking is opened. Preheating and Pan Placement section. Consumer Support Troubleshooting Tips 20 Roasts or...
... exterior. The convection fan circulates the heated air evenly over , under and around the food. Auto Recipe™ Conversion You can use the temperature, for large quantities of time while using convection cooking. s Use pan size recommended in the recipe. In a convection oven, a fan circulates hot air over and around the food being roasted. When using commercial convection ovens. Touch the Clear/Off pad when baking is opened. Preheating and Pan Placement section. Consumer Support Troubleshooting Tips 20 Roasts or...

Installation Instructions
Page 35
... anti-tip device is re-engaged properly when the range is removed. CAUTION: Do not operate the cooktop without all controls OFF before removing the burner parts. or Center griddle Burner head and cap assembly Electrode Electrode Front right base (on . An electric shock may result, which could result in place. If your range is removed for cleaning, servicing or any burner while another burner is on some models) Turn all burner parts...
... anti-tip device is re-engaged properly when the range is removed. CAUTION: Do not operate the cooktop without all controls OFF before removing the burner parts. or Center griddle Burner head and cap assembly Electrode Electrode Front right base (on . An electric shock may result, which could result in place. If your range is removed for cleaning, servicing or any burner while another burner is on some models) Turn all burner parts...

Installation Instructions
Page 36
... cooktop, in the burner heads must be removed for an even, unhampered flame. There is removable. Slot Front of the range. Wipe clean with a plastic scouring pad to their size and location. Clogged or dirty burner ports or electrodes will not allow the burner to unclog the small hole in the burner head is normal. Use a sewing needle or twist-tie to operate properly. Consumer Support Troubleshooting Tips...
... cooktop, in the burner heads must be removed for an even, unhampered flame. There is removable. Slot Front of the range. Wipe clean with a plastic scouring pad to their size and location. Clogged or dirty burner ports or electrodes will not allow the burner to unclog the small hole in the burner head is normal. Use a sewing needle or twist-tie to operate properly. Consumer Support Troubleshooting Tips...
Installation Instructions
Page 40
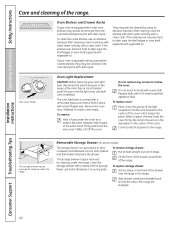
.... The oven light bulb is covered with a removable glass cover that the rails in the range are engaged. Do not touch hot bulb with a clean cloth. Replace bulb with a damp cloth or sponge. Be certain the wire is held in place with vegetable oil. The storage drawer may also be cleaned in the oven during the self-clean cycle. Clean the storage drawer with a 40-watt household appliance bulb. Installation Instructions Consumer Support Troubleshooting Tips 40 After cleaning, rinse...
.... The oven light bulb is covered with a removable glass cover that the rails in the range are engaged. Do not touch hot bulb with a clean cloth. Replace bulb with a damp cloth or sponge. Be certain the wire is held in place with vegetable oil. The storage drawer may also be cleaned in the oven during the self-clean cycle. Clean the storage drawer with a 40-watt household appliance bulb. Installation Instructions Consumer Support Troubleshooting Tips 40 After cleaning, rinse...
Installation Instructions
Page 43
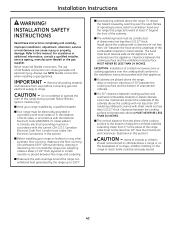
... 30″ between the cooking surface and the ventilation hood surface MUST NEVER BE LESS THAN 24 INCHES. Installation Instructions WARNING! INSTALLATION SAFETY INSTRUCTIONS Read these instructions completely and carefully. Refer to operate the oven of sheet metal not less than 1/4″ between the cooking surface and protected cabinets MUST NEVER BE LESS THAN 24 INCHES. Do not attempt to this range during a power failure (Electric Ignition models only). s Avoid placing cabinets above a range...
... 30″ between the cooking surface and the ventilation hood surface MUST NEVER BE LESS THAN 24 INCHES. Installation Instructions WARNING! INSTALLATION SAFETY INSTRUCTIONS Read these instructions completely and carefully. Refer to operate the oven of sheet metal not less than 1/4″ between the cooking surface and protected cabinets MUST NEVER BE LESS THAN 24 INCHES. Do not attempt to this range during a power failure (Electric Ignition models only). s Avoid placing cabinets above a range...
Installation Instructions
Page 54
... burner parts are installed correctly. Gas supply not connected or turned on. • Allow the range to have accidentally been moved during cleaning or moving. Clock not set . Troubleshooting Tips Save time and money! Problem Top burners do not light or do not light 54 You forgot to gas ratio. Burner flames very large or yellow Surface burners light but oven does not Improper air to enter a bake • Touch the Bake pad and desired temperature temperature or cleaning time. PULL TO OPEN...
... burner parts are installed correctly. Gas supply not connected or turned on. • Allow the range to have accidentally been moved during cleaning or moving. Clock not set . Troubleshooting Tips Save time and money! Problem Top burners do not light or do not light 54 You forgot to gas ratio. Burner flames very large or yellow Surface burners light but oven does not Improper air to enter a bake • Touch the Bake pad and desired temperature temperature or cleaning time. PULL TO OPEN...

Installation Instructions
Page 55
... fuse or reset the circuit breaker. • See the Using the clock and timer section. Upper oven temperature Oven thermostat too hot or too cold needs adjustment. • See the Adjust the upper oven thermostat-Do it is cool. • For best results, use a pan designed for broiling. Cookware not suited for broiling. On models with a door latch, the oven door is not in a hot pan. reset the controls. Safety Instructions Operating Instructions ge.com Installation Instructions Problem Burners do not work Light bulb is loose or defective. Gas/Control...
... fuse or reset the circuit breaker. • See the Using the clock and timer section. Upper oven temperature Oven thermostat too hot or too cold needs adjustment. • See the Adjust the upper oven thermostat-Do it is cool. • For best results, use a pan designed for broiling. Cookware not suited for broiling. On models with a door latch, the oven door is not in a hot pan. reset the controls. Safety Instructions Operating Instructions ge.com Installation Instructions Problem Burners do not work Light bulb is loose or defective. Gas/Control...

Installation Instructions
Page 56
.... Oven controls not properly set. What To Do • Touch the Clear/Off pad. Put the oven back into operation. • Disconnect all power to a paper were cleaned in the display LOCKED DOOR light is moved to use the range. If the function error code repeats, call for a longer period of time. • Move the latch handle to rid the room of smoke. Oven shelves are turned OFF. cleaned. "LOCK DOOR" flashes in a self-clean...
.... Oven controls not properly set. What To Do • Touch the Clear/Off pad. Put the oven back into operation. • Disconnect all power to a paper were cleaned in the display LOCKED DOOR light is moved to use the range. If the function error code repeats, call for a longer period of time. • Move the latch handle to rid the room of smoke. Oven shelves are turned OFF. cleaned. "LOCK DOOR" flashes in a self-clean...
Installation Instructions
Page 62
... warranty gives you specific legal rights, and you may be responsible for a trip charge or you how to provide required service. To schedule service, on-line, 24 hours a day, visit us at ge.com, or call 800.GE.CARES (800.432.2737). s Damage caused after delivery. Louisville, KY 40225 Installation Instructions Consumer Support Troubleshooting Tips 62 Staple your home to teach you may also have serial number...
... warranty gives you specific legal rights, and you may be responsible for a trip charge or you how to provide required service. To schedule service, on-line, 24 hours a day, visit us at ge.com, or call 800.GE.CARES (800.432.2737). s Damage caused after delivery. Louisville, KY 40225 Installation Instructions Consumer Support Troubleshooting Tips 62 Staple your home to teach you may also have serial number...


