
Owners Manual
Page 1
...right side, near the top of California Water Treatment Device Certificate 44 Warranty for Canadian Customers 42 Warranty for U.S. Profile Bottom Freezer Refrigerators ge.com Safety Instructions 2, 3 Operating Instructions Additional Features 8 Automatic Icemaker 11 Care and Cleaning 12-13 Controls 4-5 ...Water Line 29-31 Preparing to Install the Refrigerator 15 Removing and Replacing the Doors (Double Door Refrigerator Models only 26-28 Removing and Replacing the Freezer Drawer 21, 22 Reversing the Door Swing (Single Door Refrigerator Models only 23-25 Troubleshooting Tips . ....
...right side, near the top of California Water Treatment Device Certificate 44 Warranty for Canadian Customers 42 Warranty for U.S. Profile Bottom Freezer Refrigerators ge.com Safety Instructions 2, 3 Operating Instructions Additional Features 8 Automatic Icemaker 11 Care and Cleaning 12-13 Controls 4-5 ...Water Line 29-31 Preparing to Install the Refrigerator 15 Removing and Replacing the Doors (Double Door Refrigerator Models only 26-28 Removing and Replacing the Freezer Drawer 21, 22 Reversing the Door Swing (Single Door Refrigerator Models only 23-25 Troubleshooting Tips . ....

Owners Manual
Page 2
... rid of the ejector mechanism, or with the Installation Instructions before cleaning and making repairs. Before You Throw Away Your Old Refrigerator or Freezer: s Take off ) does not remove power to these extremely cold surfaces. Installation Instructions Consumer Support Troubleshooting Tips USE...Because of the past. SAFETY PRECAUTIONS When using electrical appliances, basic safety precautions should be followed, including the following: s This refrigerator must use an extension cord, it is absolutely necessary that children may stick to the light circuit. s Do not touch the...
... rid of the ejector mechanism, or with the Installation Instructions before cleaning and making repairs. Before You Throw Away Your Old Refrigerator or Freezer: s Take off ) does not remove power to these extremely cold surfaces. Installation Instructions Consumer Support Troubleshooting Tips USE...Because of the past. SAFETY PRECAUTIONS When using electrical appliances, basic safety precautions should be followed, including the following: s This refrigerator must use an extension cord, it is absolutely necessary that children may stick to the light circuit. s Do not touch the...

Owners Manual
Page 3
... power cord. When moving the refrigerator away from the wall, be properly grounded. USE OF ADAPTER PLUGS Adapter plugs are not permitted in Canada. READ AND FOLLOW THIS SAFETY INFORMATION CAREFULLY. Safety Instructions Operating Instructions ge.com WARNING! Where a standard... 2-prong wall outlet is encountered, it replaced with a standard 3-prong (grounding) wall outlet to roll over or damage the power cord. The refrigerator should always be plugged into its length...
... power cord. When moving the refrigerator away from the wall, be properly grounded. USE OF ADAPTER PLUGS Adapter plugs are not permitted in Canada. READ AND FOLLOW THIS SAFETY INFORMATION CAREFULLY. Safety Instructions Operating Instructions ge.com WARNING! Where a standard... 2-prong wall outlet is encountered, it replaced with a standard 3-prong (grounding) wall outlet to roll over or damage the power cord. The refrigerator should always be plugged into its length...

Owners Manual
Page 4
...the temperature display will show the actual temperature. Setting either or both controls to OFF stops cooling in both the freezer and refrigerator compartments, but does not shut off , tap the WARMER pad for the freezer compartment. Operating Instructions Safety Instructions About the... controls with protective film covering the temperature controls. To change the temperature, press either the refrigerator or freezer. To turn the unit back on and the display will return to reach the temperature you adjust controls, allow...
...the temperature display will show the actual temperature. Setting either or both controls to OFF stops cooling in both the freezer and refrigerator compartments, but does not shut off , tap the WARMER pad for the freezer compartment. Operating Instructions Safety Instructions About the... controls with protective film covering the temperature controls. To change the temperature, press either the refrigerator or freezer. To turn the unit back on and the display will return to reach the temperature you adjust controls, allow...

Owners Manual
Page 5
... Instructions Operating Instructions About TurboCool.™ (on some models) ge.com (on some models) (on and off to maintain this setting. After TurboCool is pressed again, the refrigerator compartment will return to the original setting. It can form on . When opening the refrigerator door during TurboCool, the fans will continue to run until...
... Instructions Operating Instructions About TurboCool.™ (on some models) ge.com (on some models) (on and off to maintain this setting. After TurboCool is pressed again, the refrigerator compartment will return to the original setting. It can form on . When opening the refrigerator door during TurboCool, the fans will continue to run until...
Owners Manual
Page 6
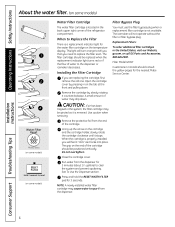
...you will feel it "click" as it locks into place. Remove the cartridge by pressing in the United States, visit our Website, ge.com, or call GE Parts and Accessories, 800.626.2002. Lining up the arrow on the cartridge and the cartridge holder, slowly rotate the cartridge clockwise ...water filter cartridge is located in the back upper right corner of the cartridge should be positioned vertically. The grip on the end of the refrigerator compartment. When to replace the filter soon. A small amount of water may be ejected as it is removed. This light will not operate...
...you will feel it "click" as it locks into place. Remove the cartridge by pressing in the United States, visit our Website, ge.com, or call GE Parts and Accessories, 800.626.2002. Lining up the arrow on the cartridge and the cartridge holder, slowly rotate the cartridge clockwise ...water filter cartridge is located in the back upper right corner of the cartridge should be positioned vertically. The grip on the end of the refrigerator compartment. When to replace the filter soon. A small amount of water may be ejected as it is removed. This light will not operate...
Owners Manual
Page 7
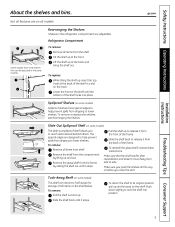
Refrigerator Compartment To remove: Remove all items from dripping to lower shelves. To replace: While tilting the shelf up, insert the top hook at the front. ... out and up and forward on some models) The slide-out spillproof shelf allows you to lock the shelf into place. ge.com Not all the way in the refrigerator compartment are on all items from the frame by lifting up at the back of the shelf locks into position. Some models...
Refrigerator Compartment To remove: Remove all items from dripping to lower shelves. To replace: While tilting the shelf up, insert the top hook at the front. ... out and up and forward on some models) The slide-out spillproof shelf allows you to lock the shelf into place. ge.com Not all the way in the refrigerator compartment are on all items from the frame by lifting up at the back of the shelf locks into position. Some models...
Owners Manual
Page 8
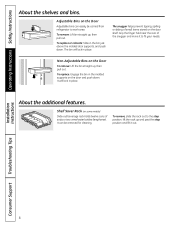
... additional features. To replace or relocate: Slide in place. It will lock in the molded supports on the Door Adjustable bins can be carried from refrigerator to fit your needs. To remove, slide the rack out to the stop position, lift the rack up and past the stop position and lift...
... additional features. To replace or relocate: Slide in place. It will lock in the molded supports on the Door Adjustable bins can be carried from refrigerator to fit your needs. To remove, slide the rack out to the stop position, lift the rack up and past the stop position and lift...

Owners Manual
Page 9
... cold and coldest . Fruit and Vegetable Crisper Excess water that may accumulate in the 2nd slot from the freezer is set at the normal refrigerator temperature. Adjustable Temperature Deli Pan (on some models) Slide the control all the way to the LOW setting to any location if you don...all the way to the HIGH setting to keep it very cold. Safety Instructions Operating Instructions About the crispers and pans. Not all models. ge.com Adjustable Humidity Crisper (on all features are on some models) When the pan is placed in the bottom of the track and the...
... cold and coldest . Fruit and Vegetable Crisper Excess water that may accumulate in the 2nd slot from the freezer is set at the normal refrigerator temperature. Adjustable Temperature Deli Pan (on some models) Slide the control all the way to the LOW setting to any location if you don...all the way to the HIGH setting to keep it very cold. Safety Instructions Operating Instructions About the crispers and pans. Not all models. ge.com Adjustable Humidity Crisper (on all features are on some models) When the pan is placed in the bottom of the track and the...

Owners Manual
Page 11
...first few batches of the dispenser cradle. Shelf Ice Bin To access ice. To Use the Dispenser (on the left wall inside the refrigerator compartment. The icemaker will produce seven cubes per cycle- You will stop producing ice. Be sure nothing interferes with an automatic icemaker, an... sound each time the icemaker fills with water when it cools to fill the water system. ge.com A newly installed refrigerator may be loud as the air is not self-draining. If the refrigerator is operated before the water connection is located on some models) The water dispenser is made...
...first few batches of the dispenser cradle. Shelf Ice Bin To access ice. To Use the Dispenser (on the left wall inside the refrigerator compartment. The icemaker will produce seven cubes per cycle- You will stop producing ice. Be sure nothing interferes with an automatic icemaker, an... sound each time the icemaker fills with water when it cools to fill the water system. ge.com A newly installed refrigerator may be loud as the air is not self-draining. If the refrigerator is operated before the water connection is located on some models) The water dispenser is made...

Owners Manual
Page 12
... parts with a soiled dish cloth or wet towel. Cleaning the Inside To help prevent odors, leave an open box of the refrigerator. Handle glass shelves carefully. Installation Instructions Consumer Support Troubleshooting Tips 12 A spray-on stainless steel cleaner works best. Rinse and wipe...(15 ml) of baking soda to break. This helps keep the gaskets from sticking and bending out of water. Do not wipe the refrigerator with soap or other abrasive cleaners. These may cause them to a quart (1 liter) of shape. Wipe clean with a commercially available ...
... parts with a soiled dish cloth or wet towel. Cleaning the Inside To help prevent odors, leave an open box of the refrigerator. Handle glass shelves carefully. Installation Instructions Consumer Support Troubleshooting Tips 12 A spray-on stainless steel cleaner works best. Rinse and wipe...(15 ml) of baking soda to break. This helps keep the gaskets from sticking and bending out of water. Do not wipe the refrigerator with soap or other abrasive cleaners. These may cause them to a quart (1 liter) of shape. Wipe clean with a commercially available ...

Owners Manual
Page 13
... due to prevent damage. Lower the leveling legs until they touch the floor. Safety Instructions Operating Instructions ge.com Behind the Refrigerator Be careful when moving . When pushing the refrigerator back, make sure you don't roll over the power cord or icemaker supply line (on some models...). Preparing for Vacation For long vacations or absences, remove food and unplug the refrigerator. Pull the refrigerator straight out and return it straight in place to flooding. Set the icemaker power switch to the O (off) position and ...
... due to prevent damage. Lower the leveling legs until they touch the floor. Safety Instructions Operating Instructions ge.com Behind the Refrigerator Be careful when moving . When pushing the refrigerator back, make sure you don't roll over the power cord or icemaker supply line (on some models...). Preparing for Vacation For long vacations or absences, remove food and unplug the refrigerator. Pull the refrigerator straight out and return it straight in place to flooding. Set the icemaker power switch to the O (off) position and ...

Owners Manual
Page 14
... refrigerator ...bulbs may be hot. Unplug the refrigerator. Plug the refrigerator back in . After replacing with appliance bulbs of the same ... lower wattage, replace the shield. Unplug the refrigerator. Rotate the shield down and then forward to...at the top of the same or lower wattage, replace the shield. Refrigerator Lights CAUTION: Light bulbs may be hot. After replacing with an appliance... light circuit. To remove the drawers, lift up slightly. Unplug the refrigerator. Plug the refrigerator back in. Appearance may vary Freezer Light CAUTION: Light bulbs may be...
... refrigerator ...bulbs may be hot. Unplug the refrigerator. Plug the refrigerator back in . After replacing with appliance bulbs of the same ... lower wattage, replace the shield. Unplug the refrigerator. Rotate the shield down and then forward to...at the top of the same or lower wattage, replace the shield. Refrigerator Lights CAUTION: Light bulbs may be hot. After replacing with an appliance... light circuit. To remove the drawers, lift up slightly. Unplug the refrigerator. Plug the refrigerator back in. Appearance may vary Freezer Light CAUTION: Light bulbs may be...
Owners Manual
Page 15
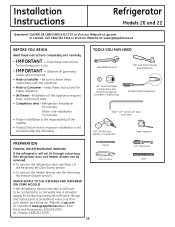
Installation Instructions Refrigerator Models 20 and 22 Questions? Save these instructions for local inspector's use. • IMPORTANT - Keep these instructions for future reference. • Skill level - A GE water supply kit (containing tubing, shutoff valve, fittings and instructions) is not covered under the Warranty. Refrigerator Installation 20 minutes Water Line Installation 30 minutes • Proper installation...
Installation Instructions Refrigerator Models 20 and 22 Questions? Save these instructions for local inspector's use. • IMPORTANT - Keep these instructions for future reference. • Skill level - A GE water supply kit (containing tubing, shutoff valve, fittings and instructions) is not covered under the Warranty. Refrigerator Installation 20 minutes Water Line Installation 30 minutes • Proper installation...

Owners Manual
Page 16
...be safely moved indoors. We strongly recommend that could clog the screen of "Reversing the Door Swing" section. If using GE SmartConnect™ Refrigerator Tubing Kit, you will need an additional tube (WX08X10002) to connect the filter. NOTE: Ensure the door is in ...REINSTALL DOORS, DRAWERS AND TOP CAP E Carefully lower the door onto the center hinge. Installation Instructions INSTALLING THE REFRIGERATOR REFRIGERATOR LOCATION • Do not install the refrigerator where the temperature will go below 60°F (16°C) because it will not run often enough to maintain...
...be safely moved indoors. We strongly recommend that could clog the screen of "Reversing the Door Swing" section. If using GE SmartConnect™ Refrigerator Tubing Kit, you will need an additional tube (WX08X10002) to connect the filter. NOTE: Ensure the door is in ...REINSTALL DOORS, DRAWERS AND TOP CAP E Carefully lower the door onto the center hinge. Installation Instructions INSTALLING THE REFRIGERATOR REFRIGERATOR LOCATION • Do not install the refrigerator where the temperature will go below 60°F (16°C) because it will not run often enough to maintain...

Owners Manual
Page 17
...position. If you are using copper tubing, insert the end of the refrigerator, as far as possible. Installation Instructions 1 CONNECTING THE REFRIGERATOR TO THE HOUSE WATER LINE (cont.) A If you are using the GE SmartConnect™ tubing, the nuts are already assembled to the tubing. ... cord. 4 PUT THE REFRIGERATOR IN PLACE Move the refrigerator to hold it in the refrigerator, make sure the icemaker power switch is set so the refrigerator is firmly positioned on your refrigerator. Tubing Clamp 1/4″ Tubing 17 B If you are using GE SmartConnect™ tubing, insert...
...position. If you are using copper tubing, insert the end of the refrigerator, as far as possible. Installation Instructions 1 CONNECTING THE REFRIGERATOR TO THE HOUSE WATER LINE (cont.) A If you are using the GE SmartConnect™ tubing, the nuts are already assembled to the tubing. ... cord. 4 PUT THE REFRIGERATOR IN PLACE Move the refrigerator to hold it in the refrigerator, make sure the icemaker power switch is set so the refrigerator is firmly positioned on your refrigerator. Tubing Clamp 1/4″ Tubing 17 B If you are using GE SmartConnect™ tubing, insert...
Owners Manual
Page 18
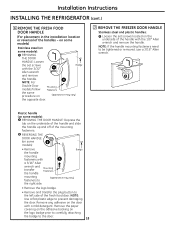
... vary) the opposite door. 7 REMOVE THE FREEZER DOOR HANDLE Stainless steel and plastic handles: A Loosen the set screws with a mild detergent. Installation Instructions INSTALLING THE REFRIGERATOR (cont.) 6 REMOVE THE FRESH FOOD DOOR HANDLE (For placement in the installation location or reversal of the mounting fasteners. B NOTE: For Double Door models follow...
... vary) the opposite door. 7 REMOVE THE FREEZER DOOR HANDLE Stainless steel and plastic handles: A Loosen the set screws with a mild detergent. Installation Instructions INSTALLING THE REFRIGERATOR (cont.) 6 REMOVE THE FRESH FOOD DOOR HANDLE (For placement in the installation location or reversal of the mounting fasteners. B NOTE: For Double Door models follow...

Owners Manual
Page 20
...property damage, the leveling legs must be firmly touching the floor. Installation Instructions INSTALLING THE REFRIGERATOR (cont.) 10 LEVEL THE REFRIGERATOR The leveling legs have 2 purposes: 1) Leveling legs adjust so the refrigerator is firmly positioned on the floor and does not wobble. 2) Leveling legs serve as a... the base grille by removing the two Phillips head screws. 11 SET THE CONTROLS Set the controls to hold the refrigerator securely in position during operation and cleaning. A Remove the grille by inserting the two Phillips head screws. The leveling legs also prevent...
...property damage, the leveling legs must be firmly touching the floor. Installation Instructions INSTALLING THE REFRIGERATOR (cont.) 10 LEVEL THE REFRIGERATOR The leveling legs have 2 purposes: 1) Leveling legs adjust so the refrigerator is firmly positioned on the floor and does not wobble. 2) Leveling legs serve as a... the base grille by removing the two Phillips head screws. 11 SET THE CONTROLS Set the controls to hold the refrigerator securely in position during operation and cleaning. A Remove the grille by inserting the two Phillips head screws. The leveling legs also prevent...
Owners Manual
Page 21
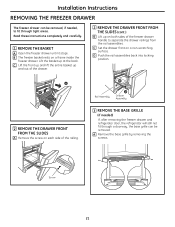
Installation Instructions REMOVING THE FREEZER DRAWER The freezer drawer can be removed, if needed ) If, after removing the freezer drawer and refrigerator door, the refrigerator will still not fit through tight areas. Read these instructions completely and carefully. 1 REMOVE THE BASKET A Open the freezer drawer until it stops. Screw 21 ...
Installation Instructions REMOVING THE FREEZER DRAWER The freezer drawer can be removed, if needed ) If, after removing the freezer drawer and refrigerator door, the refrigerator will still not fit through tight areas. Read these instructions completely and carefully. 1 REMOVE THE BASKET A Open the freezer drawer until it stops. Screw 21 ...

Owners Manual
Page 23
... on the hinge pin or inside up to free the hinge pin from inside the socket. Installation Instructions REVERSING THE DOOR SWING (Single Door Refrigerator Models only) IMPORTANT NOTES When reversing the door swing: NOTE: Door swing is not reversible on stainless steel models. • Read the... the center hinge pin. B Remove the hinge cover on the other side. Empty all door shelves, including the dairy compartment . 1 REMOVE THE REFRIGERATOR DOOR A Tape the door shut with the inside door hinge pin hole located in the wrong places. • Provide a non-scratching work surface ...
... on the hinge pin or inside up to free the hinge pin from inside the socket. Installation Instructions REVERSING THE DOOR SWING (Single Door Refrigerator Models only) IMPORTANT NOTES When reversing the door swing: NOTE: Door swing is not reversible on stainless steel models. • Read the... the center hinge pin. B Remove the hinge cover on the other side. Empty all door shelves, including the dairy compartment . 1 REMOVE THE REFRIGERATOR DOOR A Tape the door shut with the inside door hinge pin hole located in the wrong places. • Provide a non-scratching work surface ...


