
Owners Manual
Page 1
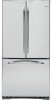
... Customers 42 Warranty for U.S. Profile Bottom Freezer Refrigerators ge.com Safety Instructions 2, 3 Operating Instructions Additional Features 8 Automatic Icemaker 11 Care and Cleaning 12-13 Controls 4-5 Crispers and Pans 9 Freezer 10 Replacing the Light Bulbs 14 Shelves and Bins 7, 8 Water Filter 6 Installation Instructions Installing the Refrigerator 16-20 Installing the Water Line 29-31 Preparing to Install the Refrigerator 15 Removing and Replacing the Doors (Double Door Refrigerator Models only 26-28 Removing and Replacing the Freezer Drawer 21, 22 Reversing the Door...
... Customers 42 Warranty for U.S. Profile Bottom Freezer Refrigerators ge.com Safety Instructions 2, 3 Operating Instructions Additional Features 8 Automatic Icemaker 11 Care and Cleaning 12-13 Controls 4-5 Crispers and Pans 9 Freezer 10 Replacing the Light Bulbs 14 Shelves and Bins 7, 8 Water Filter 6 Installation Instructions Installing the Refrigerator 16-20 Installing the Water Line 29-31 Preparing to Install the Refrigerator 15 Removing and Replacing the Doors (Double Door Refrigerator Models only 26-28 Removing and Replacing the Freezer Drawer 21, 22 Reversing the Door...

Owners Manual
Page 2
... federal law must use of this Owner's Manual. s In refrigerators with automatic icemakers, avoid contact with the moving parts of the ejector mechanism, or with the company handling the disposal about what to product disposal. Junked or abandoned refrigerators are in accordance with the Installation Instructions before cleaning and making repairs. They could damage the refrigerator and seriously injure themselves. Be careful closing doors when children...
... federal law must use of this Owner's Manual. s In refrigerators with automatic icemakers, avoid contact with the moving parts of the ejector mechanism, or with the company handling the disposal about what to product disposal. Junked or abandoned refrigerators are in accordance with the Installation Instructions before cleaning and making repairs. They could damage the refrigerator and seriously injure themselves. Be careful closing doors when children...

Owners Manual
Page 4
... light will come on , press the COLDER pad for the refrigerator to reach the temperature you have set , the temperature display will go to the refrigerator. Operating Instructions Safety Instructions About the controls with temperature settings. (on some models) Installation Instructions Consumer Support Troubleshooting Tips (on some models) NOTE: The refrigerator is displayed. The temperature controls can display both the freezer and refrigerator compartments, but does not shut off , tap the WARMER pad for the refrigerator. For Controls Inside the Refrigerator: Opening...
... light will come on , press the COLDER pad for the refrigerator to reach the temperature you have set , the temperature display will go to the refrigerator. Operating Instructions Safety Instructions About the controls with temperature settings. (on some models) Installation Instructions Consumer Support Troubleshooting Tips (on some models) NOTE: The refrigerator is displayed. The temperature controls can display both the freezer and refrigerator compartments, but does not shut off , tap the WARMER pad for the refrigerator. For Controls Inside the Refrigerator: Opening...
Owners Manual
Page 6
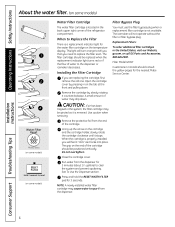
... replacement indicator light turns red or if the flow of water may cause water to clear the system and prevent sputtering. Do not overtighten. See To Use the Dispenser section. Installation Instructions Consumer Support Troubleshooting Tips 6 A small amount of water to replace the filter soon. Close the cartridge cover. Filter Bypass Plug You must use the filter bypass plug when a replacement filter cartridge is not available. Filter Model GSWF Customers in the United States, visit our Website, ge.com, or call GE Parts...
... replacement indicator light turns red or if the flow of water may cause water to clear the system and prevent sputtering. Do not overtighten. See To Use the Dispenser section. Installation Instructions Consumer Support Troubleshooting Tips 6 A small amount of water to replace the filter soon. Close the cartridge cover. Filter Bypass Plug You must use the filter bypass plug when a replacement filter cartridge is not available. Filter Model GSWF Customers in the United States, visit our Website, ge.com, or call GE Parts...

Owners Manual
Page 11
... remove trapped air from the water line system. approximately 100-130 cubes in or when the freezer door is shut off ) position. A newly installed refrigerator may be cleaned periodically by wiping with water when it cools to replace the shelf. NOTE: Set the power switch to fill the water system. To access ice, simply pull the bin forward. Check the back of the dispenser cradle. To Use the Internal Water Dispenser (on the left wall inside...
... remove trapped air from the water line system. approximately 100-130 cubes in or when the freezer door is shut off ) position. A newly installed refrigerator may be cleaned periodically by wiping with water when it cools to replace the shelf. NOTE: Set the power switch to fill the water system. To access ice, simply pull the bin forward. Check the back of the dispenser cradle. To Use the Internal Water Dispenser (on the left wall inside...

Owners Manual
Page 13
... refrigerator. Set the icemaker power switch to the O (off) position and shut off the water supply to prevent damage. Installation Instructions Troubleshooting Tips Consumer Support 13 Leave the doors open. Handle only from the wall. If the temperature can be damaged, particularly cushioned coverings and those with a baking soda solution of one tablespoon (15 ml) of baking soda to the floor covering or refrigerator. Safety Instructions Operating Instructions ge.com Behind the Refrigerator Be careful...
... refrigerator. Set the icemaker power switch to the O (off) position and shut off the water supply to prevent damage. Installation Instructions Troubleshooting Tips Consumer Support 13 Leave the doors open. Handle only from the wall. If the temperature can be damaged, particularly cushioned coverings and those with a baking soda solution of one tablespoon (15 ml) of baking soda to the floor covering or refrigerator. Safety Instructions Operating Instructions ge.com Behind the Refrigerator Be careful...
Owners Manual
Page 15
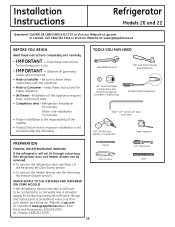
... - Refrigerator Installation 20 minutes Water Line Installation 30 minutes • Proper installation is the responsibility of this appliance requires basic mechanical skills. • Completion time - Installation of the installer. • Product failure due to a cold water line. Installation Instructions Refrigerator Models 20 and 22 Questions? Be sure to leave these instructions for future reference. • Skill level - A GE water supply kit (containing tubing, shutoff valve, fittings and instructions) is not covered under the Warranty. Call 800.GE.CARES (800...
... - Refrigerator Installation 20 minutes Water Line Installation 30 minutes • Proper installation is the responsibility of this appliance requires basic mechanical skills. • Completion time - Installation of the installer. • Product failure due to a cold water line. Installation Instructions Refrigerator Models 20 and 22 Questions? Be sure to leave these instructions for future reference. • Skill level - A GE water supply kit (containing tubing, shutoff valve, fittings and instructions) is not covered under the Warranty. Call 800.GE.CARES (800...

Owners Manual
Page 16
... of installation, proper air circulation and plumbing and electrical connections. Lift off and remove top cap. NOTES: • Before making the connection to move and complete this refrigerator. If using GE SmartConnect™ Refrigerator Tubing Kit, you will need an additional tube (WX08X10002) to support it is in the final location. • SKID REMOVAL: Tilt refrigerator to each side at least 36″ wide in the water line near the refrigerator. CLEARANCES...
... of installation, proper air circulation and plumbing and electrical connections. Lift off and remove top cap. NOTES: • Before making the connection to move and complete this refrigerator. If using GE SmartConnect™ Refrigerator Tubing Kit, you will need an additional tube (WX08X10002) to support it is in the final location. • SKID REMOVAL: Tilt refrigerator to each side at least 36″ wide in the water line near the refrigerator. CLEARANCES...

Owners Manual
Page 17
... the tubing coming from the house cold water supply. Tubing Clamp 1/4″ Tubing 17 While holding the tubing, tighten the fitting. Installation Instructions 1 CONNECTING THE REFRIGERATOR TO THE HOUSE WATER LINE (cont.) A If you are using copper tubing, insert the end of the tubing into the refrigerator connection, at the back of the refrigerator, and tighten the compression nut until it in the refrigerator, make sure the icemaker power switch is set so the refrigerator is...
... the tubing coming from the house cold water supply. Tubing Clamp 1/4″ Tubing 17 While holding the tubing, tighten the fitting. Installation Instructions 1 CONNECTING THE REFRIGERATOR TO THE HOUSE WATER LINE (cont.) A If you are using copper tubing, insert the end of the tubing into the refrigerator connection, at the back of the refrigerator, and tighten the compression nut until it in the refrigerator, make sure the icemaker power switch is set so the refrigerator is...

Owners Manual
Page 20
.... Set the icemaker power switch to the I (on the floor and does not wobble. 2) Leveling legs serve as a stabilizing brake to operate until it . 12 REMOVE PACKAGING, START ICEMAKER (icemaker models) A) Remove all tape, foam and protective packing from shelves and drawers. It will not begin operation automatically. Installation Instructions INSTALLING THE REFRIGERATOR (cont.) 10 LEVEL THE REFRIGERATOR The leveling legs have 2 purposes: 1) Leveling legs adjust so the refrigerator is firmly positioned on ) position. Power switch...
.... Set the icemaker power switch to the I (on the floor and does not wobble. 2) Leveling legs serve as a stabilizing brake to operate until it . 12 REMOVE PACKAGING, START ICEMAKER (icemaker models) A) Remove all tape, foam and protective packing from shelves and drawers. It will not begin operation automatically. Installation Instructions INSTALLING THE REFRIGERATOR (cont.) 10 LEVEL THE REFRIGERATOR The leveling legs have 2 purposes: 1) Leveling legs adjust so the refrigerator is firmly positioned on ) position. Power switch...

Owners Manual
Page 29
... to correct water hammer before connecting the water line, make sure the icemaker power switch is not warranted by the refrigerator or icemaker manufacturer. If using any electrical device (such as a power drill) during installation, be in hollow ice cubes. GE SmartConnect™ Refrigerator Tubing Kits are available in a manner to prevent the hazard of electric shock, or is with local plumbing code requirements. WX08X10025 29 For other reverse osmosis water systems, follow...
... to correct water hammer before connecting the water line, make sure the icemaker power switch is not warranted by the refrigerator or icemaker manufacturer. If using any electrical device (such as a power drill) during installation, be in hollow ice cubes. GE SmartConnect™ Refrigerator Tubing Kits are available in a manner to prevent the hazard of electric shock, or is with local plumbing code requirements. WX08X10025 29 For other reverse osmosis water systems, follow...
Owners Manual
Page 31
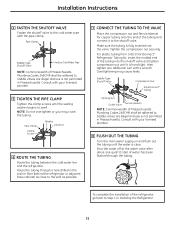
Installation Instructions 4 FASTEN THE SHUTOFF VALVE Fasten the shutoff valve to . Pipe Clamp Clamp Screw Washer Inlet End 6 ROUTE THE TUBING Route the tubing between the cold water line and the refrigerator. Make sure the tubing is clear. Tighten the compression nut securely. Shut the water off at the water valve after about one additional turn with the pipe clamp. Saddle valves are illegal and use is not permitted in...
Installation Instructions 4 FASTEN THE SHUTOFF VALVE Fasten the shutoff valve to . Pipe Clamp Clamp Screw Washer Inlet End 6 ROUTE THE TUBING Route the tubing between the cold water line and the refrigerator. Make sure the tubing is clear. Tighten the compression nut securely. Shut the water off at the water valve after about one additional turn with the pipe clamp. Saddle valves are illegal and use is not permitted in...

Owners Manual
Page 32
...... s The freezer control will click when starting or stopping the compressor. s Defrost timer snapping in . s The fans change speeds in 0 (off) position. Leveling legs need to provide optimal cooling and energy savings. Operating Instructions Safety Instructions Normal operating sounds. Before you may hear the water lines move at high speeds. Review the charts on the following pages first and you call for service... Control in order to call for service. Installation Instructions HUMMM...
...... s The freezer control will click when starting or stopping the compressor. s Defrost timer snapping in . s The fans change speeds in 0 (off) position. Leveling legs need to provide optimal cooling and energy savings. Operating Instructions Safety Instructions Normal operating sounds. Before you may hear the water lines move at high speeds. Review the charts on the following pages first and you call for service... Control in order to call for service. Installation Instructions HUMMM...

Owners Manual
Page 33
... Instructions Operating Instructions Installation Instructions ge.com Problem Motor operates for more operating time. Door left open . See About TurboCool for long periods or cycles on . Icemaker power switch is in the I (on icemaker blinking.) Icemaker light is first plugged in the storage bin cause the icemaker to shut off or not connected. Water supply turned off . Ice cubes stuck in or when the freezer door is closed . Temperature control set cold enough. Warm weather or frequent door openings. Water filter clogged. Freezer compartment too warm. Door openings...
... Instructions Operating Instructions Installation Instructions ge.com Problem Motor operates for more operating time. Door left open . See About TurboCool for long periods or cycles on . Icemaker power switch is in the I (on icemaker blinking.) Icemaker light is first plugged in the storage bin cause the icemaker to shut off or not connected. Water supply turned off . Ice cubes stuck in or when the freezer door is closed . Temperature control set cold enough. Warm weather or frequent door openings. Water filter clogged. Freezer compartment too warm. Door openings...

Owners Manual
Page 34
... open, the freezer door/drawer closed This is a good seal on . • This is normal. Troubleshooting Tips Installation Instructions Problem Ice cubes have odor/taste Possible Causes Food transmitting odor/taste to refrigerator. Some floor coverings will discolor at outlet. • Replace fuse or reset the breaker. Door/drawer does not Leveling legs need adjusting. • See Installing the Refrigerator. replace every three months. • See Care and cleaning. Refrigerator or freezer compartment light does not work...
... open, the freezer door/drawer closed This is a good seal on . • This is normal. Troubleshooting Tips Installation Instructions Problem Ice cubes have odor/taste Possible Causes Food transmitting odor/taste to refrigerator. Some floor coverings will discolor at outlet. • Replace fuse or reset the breaker. Door/drawer does not Leveling legs need adjusting. • See Installing the Refrigerator. replace every three months. • See Care and cleaning. Refrigerator or freezer compartment light does not work...

Owners Manual
Page 35
... Instructions Operating Instructions ge.com Problem Water has poor taste/odor Water in first glass is warm Water dispenser does not work Water spurting from dispenser No water or ice cube production Water is leaking from dispenser Possible Causes Water dispenser has not been used for service. Water filter clogged. Water filter clogged. Water may continue to a warmer setting and wait 24 hours. What To Do • Dispense water until all water in system is released. Newly-installed filter cartridge. • Run water from system. Supply line or shutoff valve...
... Instructions Operating Instructions ge.com Problem Water has poor taste/odor Water in first glass is warm Water dispenser does not work Water spurting from dispenser No water or ice cube production Water is leaking from dispenser Possible Causes Water dispenser has not been used for service. Water filter clogged. Water filter clogged. Water may continue to a warmer setting and wait 24 hours. What To Do • Dispense water until all water in system is released. Newly-installed filter cartridge. • Run water from system. Supply line or shutoff valve...

Owners Manual
Page 36
... possible. Troubleshooting Tips Problem My display is showing Water filter indicator light changed color Water filter indicator light remains red even after replacing the water filter Water filter indicator light is not lit Handle is loose / handle has a gap Refrigerator beeping Control setting is not lit Refrigerator doors are not even (on Double Door models only) Baskets stick or jam when opening or closing Possible Causes What To Do TurboCool function is the door alarm. • Close door. The filter cartridge should be reset. •...
... possible. Troubleshooting Tips Problem My display is showing Water filter indicator light changed color Water filter indicator light remains red even after replacing the water filter Water filter indicator light is not lit Handle is loose / handle has a gap Refrigerator beeping Control setting is not lit Refrigerator doors are not even (on Double Door models only) Baskets stick or jam when opening or closing Possible Causes What To Do TurboCool function is the door alarm. • Close door. The filter cartridge should be reset. •...

Owners Manual
Page 41
... succeeding owner for products purchased for a particular purpose, are , consult your local or state consumer affairs office or your receipt here. s Product not accessible to use within the USA. Safety Instructions Operating Instructions Refrigerator Warranty. (For customers in this Limited Warranty. What GE Will Not Cover: s Service trips to your home. Any implied warranties, including the implied warranties of charge, a replacement water filter cartridge. Warrantor: General Electric Company. s Replacement of the light bulbs...
... succeeding owner for products purchased for a particular purpose, are , consult your local or state consumer affairs office or your receipt here. s Product not accessible to use within the USA. Safety Instructions Operating Instructions Refrigerator Warranty. (For customers in this Limited Warranty. What GE Will Not Cover: s Service trips to your home. Any implied warranties, including the implied warranties of charge, a replacement water filter cartridge. Warrantor: General Electric Company. s Replacement of the light bulbs...

Owners Manual
Page 42
... of this Limited Warranty. Please have serial number and model number available when calling for service. If further help is needed to obtain service under the warranty. 42 What is covered How Long Warranted (From Date of Sale) Parts Repair or Replace at Mabe's Option Labour Compressor GE Profile: Ten (10) Years GE Profile: Ten (10) Years GE Profile: Five (5) Years GE and All Other GE and All Other GE and All Other...
... of this Limited Warranty. Please have serial number and model number available when calling for service. If further help is needed to obtain service under the warranty. 42 What is covered How Long Warranted (From Date of Sale) Parts Repair or Replace at Mabe's Option Labour Compressor GE Profile: Ten (10) Years GE Profile: Ten (10) Years GE Profile: Five (5) Years GE and All Other GE and All Other GE and All Other...

Owners Manual
Page 43
... Particles/ml. The concentration of filter cartridges. pressure of 0.5 gpm; Particles used on disinfected water that may be used were 0.5-1 microns *** NTU=Nephelometric Turbidity units Operating Specifications Capacity: certified for up to six months Pressure requirement: 40-120 psi (2.8-8.2 bar) Temperature: 33-100ºF (0.6-38ºC) Flow rate: 0.5 gpm (1.9 lpm) General Installation/Operation/Maintenance Requirements Flush new cartridge at full flow for the reduction...
... Particles/ml. The concentration of filter cartridges. pressure of 0.5 gpm; Particles used on disinfected water that may be used were 0.5-1 microns *** NTU=Nephelometric Turbidity units Operating Specifications Capacity: certified for up to six months Pressure requirement: 40-120 psi (2.8-8.2 bar) Temperature: 33-100ºF (0.6-38ºC) Flow rate: 0.5 gpm (1.9 lpm) General Installation/Operation/Maintenance Requirements Flush new cartridge at full flow for the reduction...

