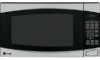
Quick Specs
Page 1
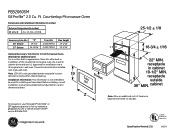
... is not intended to your Monogram,® GE Profile™ or GE® appliance questions, visit our website at additional cost) For a custom built-in appearance, these kits allow built-in installation of trim kit over a GE single electric wall oven. For answers to be installed over a gas wall oven. Countertop Microwave Oven Dimensions and Installation Information (in inches) Exterior Dimensions (in...
... is not intended to your Monogram,® GE Profile™ or GE® appliance questions, visit our website at additional cost) For a custom built-in appearance, these kits allow built-in installation of trim kit over a GE single electric wall oven. For answers to be installed over a gas wall oven. Countertop Microwave Oven Dimensions and Installation Information (in inches) Exterior Dimensions (in...
Use and Care Manual
Page 5
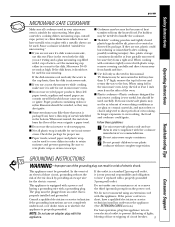
... microwave ovens. If the dish remains cool and only the water in the cup heats, then the dish is suitable for the electric current. Be sure to whether the appliance is properly installed ... they may cause arcing or ignite. TV dinners may be used for microwave cooking is packaged on) have metallic trim or glaze with a grounding plug. NOTE: Do not use an adapter... of fuse or tripping of the oven or ignite a paper towel. Safety Instructions Operating Instructions ge.com MICROWAVE-SAFE COOKWARE Make sure all plastic wrap is microwave-safe. Paper products containing nylon or...
... microwave ovens. If the dish remains cool and only the water in the cup heats, then the dish is suitable for the electric current. Be sure to whether the appliance is properly installed ... they may cause arcing or ignite. TV dinners may be used for microwave cooking is packaged on) have metallic trim or glaze with a grounding plug. NOTE: Do not use an adapter... of fuse or tripping of the oven or ignite a paper towel. Safety Instructions Operating Instructions ge.com MICROWAVE-SAFE COOKWARE Make sure all plastic wrap is microwave-safe. Paper products containing nylon or...
Installation Instructions
Page 1
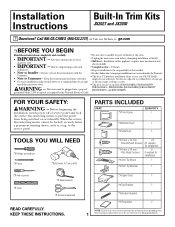
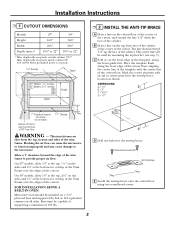
...; Trim Frame QUANTITY 1 ❒ Bottom Duct 1 ❒ Side Duct 1 ❒ 4 mm x 12 mm Round-Head Screws ❒ 4 mm x 14 mm Flat-Head Screws 23 (21 required for installation) 6 (4 required for future reference. • Proper installation is for local inspector's use on accidentally. IMPORTANT - • Observe all governing codes and • Unplug the microwave oven before...
...; Trim Frame QUANTITY 1 ❒ Bottom Duct 1 ❒ Side Duct 1 ❒ 4 mm x 12 mm Round-Head Screws ❒ 4 mm x 14 mm Flat-Head Screws 23 (21 required for installation) 6 (4 required for future reference. • Proper installation is for local inspector's use on accidentally. IMPORTANT - • Observe all governing codes and • Unplug the microwave oven before...
Installation Instructions
Page 2
...⁄2″ or 22″ 191⁄2″ or 22″ * Min. B Draw a line on all sides) Bottom of trim kit must be installed on a 3/8″ plywood base and supported by 2x4 or 1x2 equivalent runners on the top front face of the cabinet at the bottom for...see step 7). WARNING - FOR INSTALLATION ABOVE A BUILT-IN OVEN: Microwave oven should extend 1/2″ up the face of the cutout. depth with an awl or center punch for overlap of the Trim Frame over the edges of the trim frame to the microwave. Allow a 1″ clearance beyond trim frame (on the sides and 11...
...⁄2″ or 22″ 191⁄2″ or 22″ * Min. B Draw a line on all sides) Bottom of trim kit must be installed on a 3/8″ plywood base and supported by 2x4 or 1x2 equivalent runners on the top front face of the cabinet at the bottom for...see step 7). WARNING - FOR INSTALLATION ABOVE A BUILT-IN OVEN: Microwave oven should extend 1/2″ up the face of the cutout. depth with an awl or center punch for overlap of the Trim Frame over the edges of the trim frame to the microwave. Allow a 1″ clearance beyond trim frame (on the sides and 11...
Installation Instructions
Page 4
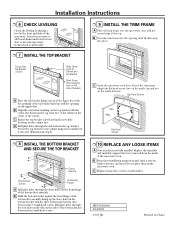
... center of the cutout. Secure the top bracket to -side. ❒ 7 INSTALL THE TOP BRACKET ❒ 9 INSTALL THE TRIM FRAME A Place the trim frame over the microwave oven with the three holes in four round-head screws. ❒ 10 REPLACE ANY LOOSE ITEMS A Your trim kit is Level Align Center Lines on Cabinet and Top Bracket Mark...
... center of the cutout. Secure the top bracket to -side. ❒ 7 INSTALL THE TOP BRACKET ❒ 9 INSTALL THE TRIM FRAME A Place the trim frame over the microwave oven with the three holes in four round-head screws. ❒ 10 REPLACE ANY LOOSE ITEMS A Your trim kit is Level Align Center Lines on Cabinet and Top Bracket Mark...


