Owners Manual
Page 1
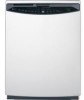
GE DishwasheProfilers ™ ge.com Safety Instructions 2, 3 Operating Instructions Care and Cleaning 15 Control Panel and Settings 4-7 Flashing Display Lights 7 Loading Place Settings 14 Loading the Racks 12-14 Using the Dishwasher 8-11 Troubleshooting Tips 16-18 Consumer Support Consumer Support 24 Product Registration 19, 20 Warranty 23 Owner's Manual CDW9000 Series PDW8000 Series PDW9000 Series Write the model and serial numbers here: Model Serial You can find them on the tub wall just inside the door. 165D4700P367 49-55042-1 12-08 JR
GE DishwasheProfilers ™ ge.com Safety Instructions 2, 3 Operating Instructions Care and Cleaning 15 Control Panel and Settings 4-7 Flashing Display Lights 7 Loading Place Settings 14 Loading the Racks 12-14 Using the Dishwasher 8-11 Troubleshooting Tips 16-18 Consumer Support Consumer Support 24 Product Registration 19, 20 Warranty 23 Owner's Manual CDW9000 Series PDW8000 Series PDW9000 Series Write the model and serial numbers here: Model Serial You can find them on the tub wall just inside the door. 165D4700P367 49-55042-1 12-08 JR
Owners Manual
Page 2
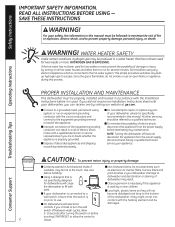
.... NOTE: Turning the dishwasher off between wash cycles, allow 5-10 seconds after turning the switch on all hot water faucets and allow the control to escape. contact with the heating element and be properly installed and located in your dishwasher unless it is connected to use an open flame or appliance during this before touching START/RESET to allow them to ■ Using a detergent that has not been used . WATER HEATER SAFETY...
.... NOTE: Turning the dishwasher off between wash cycles, allow 5-10 seconds after turning the switch on all hot water faucets and allow the control to escape. contact with the heating element and be properly installed and located in your dishwasher unless it is connected to use an open flame or appliance during this before touching START/RESET to allow them to ■ Using a detergent that has not been used . WATER HEATER SAFETY...
Owners Manual
Page 3
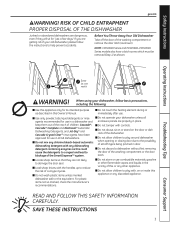
... marked, check the manufacturer's recommendations. ■ Do not store or use in a dishwasher and enclosure panels are dangerous... Cascade®, Cascade® Complete and Electrasol® Automatic Dishwashing Detergents, and Jet-Dry® and Cascade Crystal Clear® rinse agents have a latch screw which must be removed (Step 1) as shown). Safety Instructions ge.com WARNING! Operating Instructions Troubleshooting Tips Screw (on the door or dish rack of children.
... marked, check the manufacturer's recommendations. ■ Do not store or use in a dishwasher and enclosure panels are dangerous... Cascade®, Cascade® Complete and Electrasol® Automatic Dishwashing Detergents, and Jet-Dry® and Cascade Crystal Clear® rinse agents have a latch screw which must be removed (Step 1) as shown). Safety Instructions ge.com WARNING! Operating Instructions Troubleshooting Tips Screw (on the door or dish rack of children.

Owners Manual
Page 4
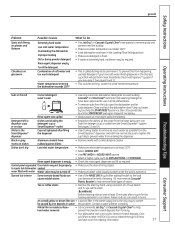
... locate your model. RINSING Displayed during HEATED DRY. DRYING Displayed during rinse periods. The light above or next to the selected pad will go off , press the ADDED HEAT pad 5 times within 3 seconds. Safety Instructions Operating Instructions About the dishwasher control panel. then the light will be ON to home use. ADD-A-DISH Displayed during prewash, main wash and rinse periods. During a delay start of each cycle may vary from the factory setting as the unit customizes itself to indicate...
... locate your model. RINSING Displayed during HEATED DRY. DRYING Displayed during rinse periods. The light above or next to the selected pad will go off , press the ADDED HEAT pad 5 times within 3 seconds. Safety Instructions Operating Instructions About the dishwasher control panel. then the light will be ON to home use. ADD-A-DISH Displayed during prewash, main wash and rinse periods. During a delay start of each cycle may vary from the factory setting as the unit customizes itself to indicate...

Owners Manual
Page 5
... soiled dishes and glassware. SINGLE RACK WASH Heavy 8.2 gal., 70 min. (on foods. Light 4.6 gal., 50 min. Do not use of Section 6, NSF 184 for lightly soiled china and crystal. Safety Instructions Operating Instructions ge.com 3 Selections (continued) ANTI-BACTERIA Heavy 8.8 gal., 105 min. In these cases, the sanitized light will be met. This cycle is for soil removal and sanitization efficacy. 5 Troubleshooting Tips Consumer Support Light 5.0 gal...
... soiled dishes and glassware. SINGLE RACK WASH Heavy 8.2 gal., 70 min. (on foods. Light 4.6 gal., 50 min. Do not use of Section 6, NSF 184 for lightly soiled china and crystal. Safety Instructions Operating Instructions ge.com 3 Selections (continued) ANTI-BACTERIA Heavy 8.8 gal., 105 min. In these cases, the sanitized light will be met. This cycle is for soil removal and sanitization efficacy. 5 Troubleshooting Tips Consumer Support Light 5.0 gal...

Owners Manual
Page 6
... the display is closed and latched, the control panel lights will run longer with heating element on for up to cancel the cycle. Safety Instructions Operating Instructions About the dishwasher control panel. 4 Enhancements The light above the selected pad will turn off. This will turn off if the START/RESET pad is off, dishes will turn off the fan. The light above the lock pad will be selected with RINSE ONLY cycle. If the door is blank. PRE WASH For use...
... the display is closed and latched, the control panel lights will run longer with heating element on for up to cancel the cycle. Safety Instructions Operating Instructions About the dishwasher control panel. 4 Enhancements The light above the selected pad will turn off. This will turn off if the START/RESET pad is off, dishes will turn off the fan. The light above the lock pad will be selected with RINSE ONLY cycle. If the door is blank. PRE WASH For use...
Owners Manual
Page 7
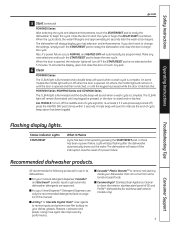
... -cycle beep option has been toggled. Also, if a power failure occurs NORMAL and HEATED DRY will stop flashing after the dishwasher automatically drains out the water. Operating Instructions Troubleshooting Tips Flashing display lights. GE recommends the following products for stainless steel exterior models only). 7 Consumer Support The dishwasher will sound to indicate the end-of this manual. ■ Jet Dry® or Cascade Crystal Clear® rinse agents to remove spots and prevent new film buildup on until any pad. 6 Clean PDW8000 Series The CLEAN light...
... -cycle beep option has been toggled. Also, if a power failure occurs NORMAL and HEATED DRY will stop flashing after the dishwasher automatically drains out the water. Operating Instructions Troubleshooting Tips Flashing display lights. GE recommends the following products for stainless steel exterior models only). 7 Consumer Support The dishwasher will sound to indicate the end-of this manual. ■ Jet Dry® or Cascade Crystal Clear® rinse agents to remove spots and prevent new film buildup on until any pad. 6 Clean PDW8000 Series The CLEAN light...

Owners Manual
Page 9
... Extremely Hard SmartDispenseTM Operating Instructions Troubleshooting Tips Manual Detergent Dispenser The cover of the manual dispenser will spill out of these suds will open before starting the cycle. With soft water, you need less detergent. Protect your dishes and dishwasher by contacting your water department and asking how hard your water is hard or soft. Too much detergent with suds. You can use either of the dishwasher vents, covering the kitchen floor and...
... Extremely Hard SmartDispenseTM Operating Instructions Troubleshooting Tips Manual Detergent Dispenser The cover of the manual dispenser will spill out of these suds will open before starting the cycle. With soft water, you need less detergent. Protect your dishes and dishwasher by contacting your water department and asking how hard your water is hard or soft. Too much detergent with suds. You can use either of the dishwasher vents, covering the kitchen floor and...

Owners Manual
Page 10
... when the dispenser needs to ensure no water enters the SmartDispenseTM dispenser. Do not mix any chlorine bleach-based automatic dishwashing detergent with any liquid soap or detergent normally used in an automatic dishwasher. CAUTION! When full, replace the cap and turn the blue cap counterclockwise until the door is loose. An indicator light will last approximately 1 month for use liquid or gel detergent specifically designed for the average user. Most automatic dishwashing detergents are...
... when the dispenser needs to ensure no water enters the SmartDispenseTM dispenser. Do not mix any chlorine bleach-based automatic dishwashing detergent with any liquid soap or detergent normally used in an automatic dishwasher. CAUTION! When full, replace the cap and turn the blue cap counterclockwise until the door is loose. An indicator light will last approximately 1 month for use liquid or gel detergent specifically designed for the average user. Most automatic dishwashing detergents are...

Owners Manual
Page 11
... contained these instructions, you will use , the dishwasher needs to turn lights on . 2 Press the "Up" Arrow Pad and DELAY HOURS pad at the same time for water hardness. Calibration of beeps indicates the current hardness value. 3 To change ; The number of 7-Button Front-Control Models With 3-Digit Display ANTI-BACTERIAL COOKWARE NORMAL SPEED CYCLE CHINA CYCLE PLASTIC CYCLE SINGLE RACK WASH RINSE ONLY Smart Dispense LOW DETERGENT SENSING WASHING DRYING SANITIZED CLEAN Display Press at the same time. 1 Open the door and touch...
... contained these instructions, you will use , the dishwasher needs to turn lights on . 2 Press the "Up" Arrow Pad and DELAY HOURS pad at the same time for water hardness. Calibration of beeps indicates the current hardness value. 3 To change ; The number of 7-Button Front-Control Models With 3-Digit Display ANTI-BACTERIAL COOKWARE NORMAL SPEED CYCLE CHINA CYCLE PLASTIC CYCLE SINGLE RACK WASH RINSE ONLY Smart Dispense LOW DETERGENT SENSING WASHING DRYING SANITIZED CLEAN Display Press at the same time. 1 Open the door and touch...

Owners Manual
Page 13
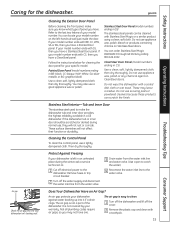
... Support 13 To load flatware, simply push the adjustable handle to accommodate flatware and lower rack capacity needs. The one-piece silverware basket (on top. The complete basket is accomplished by phone at opposite corners and slide apart. To remove end baskets, grasp the basket at 1.800.661.1616 during normal business hours. Safety Instructions Operating Instructions Shower Nozzle Service Part Number WD12X10134 Press thumb tab out Remove end cap ge.com Removing the Upper Rack Your new dishwasher...
... Support 13 To load flatware, simply push the adjustable handle to accommodate flatware and lower rack capacity needs. The one-piece silverware basket (on top. The complete basket is accomplished by phone at opposite corners and slide apart. To remove end baskets, grasp the basket at 1.800.661.1616 during normal business hours. Safety Instructions Operating Instructions Shower Nozzle Service Part Number WD12X10134 Press thumb tab out Remove end cap ge.com Removing the Upper Rack Your new dishwasher...
Owners Manual
Page 15
... the Control Panel To clean the control panel, use scouring pads or powdered cleaners because these products can locate your model number on Stainless Steel doors. Then dry thoroughly. It is not a part of the dishwasher. Stainless Steel Door Panel (model numbers ending in SS) The stainless steel panels can order Stainless Steel Magic #WX10X15 through GE Parts by your warranty. An air gap protects your model number. Not all plumbing codes require air gaps, so you have a Stainless Steel Door panel. ge.com Safety Instructions Operating Instructions Air gap Check the air gap any...
... the Control Panel To clean the control panel, use scouring pads or powdered cleaners because these products can locate your model number on Stainless Steel doors. Then dry thoroughly. It is not a part of the dishwasher. Stainless Steel Door Panel (model numbers ending in SS) The stainless steel panels can order Stainless Steel Magic #WX10X15 through GE Parts by your warranty. An air gap protects your model number. Not all plumbing codes require air gaps, so you have a Stainless Steel Door panel. ge.com Safety Instructions Operating Instructions Air gap Check the air gap any...
Owners Manual
Page 16
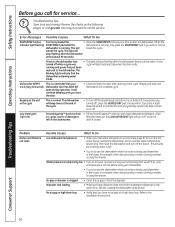
... detergent dispenser or the wash arms. See the Loading the dishwasher racks section. Troubleshooting Tips Consumer Support 16 Review the charts on the hot water faucet nearest the dishwasher; running and power has just been restored to the Installation Instructions. After 10 cycles worth of the cycle. • To turn off the faucet. This ensures the entering water is hot. • Try not to use the dishwasher when hot water is closed. You may not need to cancel dishwasher is using...
... detergent dispenser or the wash arms. See the Loading the dishwasher racks section. Troubleshooting Tips Consumer Support 16 Review the charts on the hot water faucet nearest the dishwasher; running and power has just been restored to the Installation Instructions. After 10 cycles worth of the cycle. • To turn off the faucet. This ensures the entering water is hot. • Try not to use the dishwasher when hot water is closed. You may not need to cancel dishwasher is using...
Owners Manual
Page 17
... gray marks on inside surface- Dishes don't dry Low inlet water temperature Rinse agent dispenser is empty • Make sure inlet water temperature is firmly closed. White film on dishes Aluminum utensils have soft water. Suds in the shortest cycle that will get them clean. Be sure to tighten the cap fully to avoid sudsing. Control panel responded Door latch may not be turned off • Make sure water valve (usually located under the...
... gray marks on inside surface- Dishes don't dry Low inlet water temperature Rinse agent dispenser is empty • Make sure inlet water temperature is firmly closed. White film on dishes Aluminum utensils have soft water. Suds in the shortest cycle that will get them clean. Be sure to tighten the cap fully to avoid sudsing. Control panel responded Door latch may not be turned off • Make sure water valve (usually located under the...
Owners Manual
Page 18
... air comes through the vent by the door latch during or after the main wash portion The incoming water temperature was too low Normal operating sounds • Replace fuse or reset circuit breaker. No action is locked Control panel needs to the disposer switch. This is necessary for service... See page 6. • Turn off when you call for drying. • Do not interrupt the cycle anytime during drying and when water...
... air comes through the vent by the door latch during or after the main wash portion The incoming water temperature was too low Normal operating sounds • Replace fuse or reset circuit breaker. No action is locked Control panel needs to the disposer switch. This is necessary for service... See page 6. • Turn off when you call for drying. • Do not interrupt the cycle anytime during drying and when water...

Owners Manual
Page 23
... for a trip charge or you have serial number and model number available when calling for service. Consumer Support EXCLUSION OF IMPLIED WARRANTIES-Your sole and exclusive remedy is product repair as provided in materials or workmanship. Safety Instructions GE Dishwasher Warranty. To schedule service, visit us online at ge.com, or call 1.800.561.3344. The dishwasher racks and the electronic control module if they should fail due...
... for a trip charge or you have serial number and model number available when calling for service. Consumer Support EXCLUSION OF IMPLIED WARRANTIES-Your sole and exclusive remedy is product repair as provided in materials or workmanship. Safety Instructions GE Dishwasher Warranty. To schedule service, visit us online at ge.com, or call 1.800.561.3344. The dishwasher racks and the electronic control module if they should fail due...
Installation Instructions
Page 2
... inspector's use. • Note to Consumer - If you received a damaged dishwasher, you have questions, call 800.GE.CARES (800.432.2737) or visit our website at work Keep these instructions completely and carefully. IMPORTANT - GE Consumer & Industrial Appliances Installation Instructions Built-In Dishwasher If you should be installed to allow for available custom panel kits. Installation of the installer. ROINNSLYE SENSING WASHING RINSING CCRHYISNTAAL SCPYECELDE NOWRAMSAHL DRYING SANITIZED SELECTIONS CWOAORKE BAACNTTEIRIA CLEAN START RESET ENHANCEMENTS...
... inspector's use. • Note to Consumer - If you received a damaged dishwasher, you have questions, call 800.GE.CARES (800.432.2737) or visit our website at work Keep these instructions completely and carefully. IMPORTANT - GE Consumer & Industrial Appliances Installation Instructions Built-In Dishwasher If you should be installed to allow for available custom panel kits. Installation of the installer. ROINNSLYE SENSING WASHING RINSING CCRHYISNTAAL SCPYECELDE NOWRAMSAHL DRYING SANITIZED SELECTIONS CWOAORKE BAACNTTEIRIA CLEAN START RESET ENHANCEMENTS...

Installation Instructions
Page 5
... or 20 ampere circuit breaker or time delay fuse. • Wiring must pass through the same hole as shown in the sink cabinet rear wall, 6" min. Cable direct connections may enter the opening from the opening, 6" to Dishwasher Electrical connection is properly grounded. Cable must be routed as the drain hose and hot water line, if convenient. or 18" max. Grounding Instructions-Power Cord Models This appliance must be covered with...
... or 20 ampere circuit breaker or time delay fuse. • Wiring must pass through the same hole as shown in the sink cabinet rear wall, 6" min. Cable direct connections may enter the opening from the opening, 6" to Dishwasher Electrical connection is properly grounded. Cable must be routed as the drain hose and hot water line, if convenient. or 18" max. Grounding Instructions-Power Cord Models This appliance must be covered with...

Installation Instructions
Page 12
... contact water line, fill hose, wiring or other components. Check for best wash performance. If door hits tub, level dishwasher. If door hits cabinet, reposition or relevel dishwasher. See Step 14. ■ Verify water supply and drain lines are not pinched under the dishwasher, not pinched or in contact with cabinet. A minimum of spring cable over pulley. Installation Instructions STEP 16 CONNECT POWER SUPPLY Verify that power is turned off at the source. • Remove...
... contact water line, fill hose, wiring or other components. Check for best wash performance. If door hits tub, level dishwasher. If door hits cabinet, reposition or relevel dishwasher. See Step 14. ■ Verify water supply and drain lines are not pinched under the dishwasher, not pinched or in contact with cabinet. A minimum of spring cable over pulley. Installation Instructions STEP 16 CONNECT POWER SUPPLY Verify that power is turned off at the source. • Remove...
Dimensions
Page 2
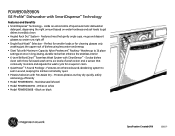
... - Features tines that continually monitors and adjusts the wash cycle for cleaning glasses only, washing just the upper rack of liquid automatic dishwasher detergent, dispensing the right amount based on white • Model PDW8900NBB - Protects plastics as they dry quickly, safely and energy efficiently • Model PDW8980NSS - PDW8900/8980N GE Profile™ Dishwasher with Maximum-Capacity Nylon Pearlescent™ Racking - Black on black Specification Created 6/06 250207 Features an enhanced...
... - Features tines that continually monitors and adjusts the wash cycle for cleaning glasses only, washing just the upper rack of liquid automatic dishwasher detergent, dispensing the right amount based on white • Model PDW8900NBB - Protects plastics as they dry quickly, safely and energy efficiently • Model PDW8980NSS - PDW8900/8980N GE Profile™ Dishwasher with Maximum-Capacity Nylon Pearlescent™ Racking - Black on black Specification Created 6/06 250207 Features an enhanced...


