
User Manual
Page 1
... andCare Guide With Installation Instructions Dryer Safety Instructions 3, 4 Installation Instructions Exhaust 5, 6 Electric Dryer 7 Operating Instructions, Tips Automatic Drying 10, 11 Drying Selection Guide 10 Knits Drying Tips 8, 10, 14 Lint Filter 12 Loading 9 Operating the Dryer 8, 9 Permanent Press Drying Tips 10, 14 Sorting Clothes 9, 10 Special Instructions 10, 11 Timed Drying 11 Care and Cleaning Dryer Exhaust 13 Exterior 12 Lint Filter 12 Problem Solver 14 Consumer Services Model and Serial Numbers 2 Repair Service 2 Warranty 16 www.geappliances.ca For service...
... andCare Guide With Installation Instructions Dryer Safety Instructions 3, 4 Installation Instructions Exhaust 5, 6 Electric Dryer 7 Operating Instructions, Tips Automatic Drying 10, 11 Drying Selection Guide 10 Knits Drying Tips 8, 10, 14 Lint Filter 12 Loading 9 Operating the Dryer 8, 9 Permanent Press Drying Tips 10, 14 Sorting Clothes 9, 10 Special Instructions 10, 11 Timed Drying 11 Care and Cleaning Dryer Exhaust 13 Exterior 12 Lint Filter 12 Problem Solver 14 Consumer Services Model and Serial Numbers 2 Repair Service 2 Warranty 16 www.geappliances.ca For service...
User Manual
Page 2
... a qualified installer, service agency, or the gas supplier. It is a well designed and engineered product. Keep it lists causes of fire or explosion or to Consumer Relations Manager, Camco Inc. 1 Factory Lane, Suite 310 Moncton, N.B. check the Problem Solver section, it handy for as long as possible. Write down the model and serial numbers. WARNING: For your dryer. do not use gasoline...
... a qualified installer, service agency, or the gas supplier. It is a well designed and engineered product. Keep it lists causes of fire or explosion or to Consumer Relations Manager, Camco Inc. 1 Factory Lane, Suite 310 Moncton, N.B. check the Problem Solver section, it handy for as long as possible. Write down the model and serial numbers. WARNING: For your dryer. do not use gasoline...
User Manual
Page 3
.... Do not use heat to the following instructions. It is used in published user-repair instructions that may melt or burn. Do not repair or replace any part of the appliance or attempt any servicing unless specifically recommended in this Use and Care Book. There are many highly flammable items used . - Do not install or store the dryer where it is extremely important that have been cleaned in...
.... Do not use heat to the following instructions. It is used in published user-repair instructions that may melt or burn. Do not repair or replace any part of the appliance or attempt any servicing unless specifically recommended in this Use and Care Book. There are many highly flammable items used . - Do not install or store the dryer where it is extremely important that have been cleaned in...
User Manual
Page 4
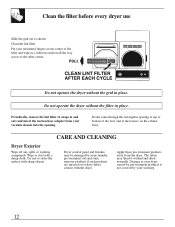
.... DO NOT OPERATE THE DRYER WITHOUT THE LINT FILTER IN PLACE. • Keep the area around the exhaust opening, and around your dryer. Before discarding a dryer, or removing from the power supply before each load to prevent lint accumulation inside the dryer should be picked up by a qualified service person. (see Care & Cleaning section) To Minimize the Possibility of the lint filter). • NOTE: Turning the Cycle Selector knob to...
.... DO NOT OPERATE THE DRYER WITHOUT THE LINT FILTER IN PLACE. • Keep the area around the exhaust opening, and around your dryer. Before discarding a dryer, or removing from the power supply before each load to prevent lint accumulation inside the dryer should be picked up by a qualified service person. (see Care & Cleaning section) To Minimize the Possibility of the lint filter). • NOTE: Turning the Cycle Selector knob to...
User Manual
Page 5
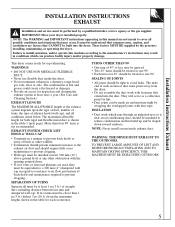
... not assemble the duct work which can be performed by the person(s) installing, maintaining, or operating the dryer. It must be equivalent to a 100 mm (4") dampered wall cap in the table for inspection and cleaning the exhaust system at least once a year. (See Care and Cleaning Section.) EXHAUST LENGTH The MAXIMUM ALLOWABLE length of the exhaust system depends upon the type of duct, number of turns, the type of duct...
... not assemble the duct work which can be performed by the person(s) installing, maintaining, or operating the dryer. It must be equivalent to a 100 mm (4") dampered wall cap in the table for inspection and cleaning the exhaust system at least once a year. (See Care and Cleaning Section.) EXHAUST LENGTH The MAXIMUM ALLOWABLE length of the exhaust system depends upon the type of duct, number of turns, the type of duct...
User Manual
Page 6
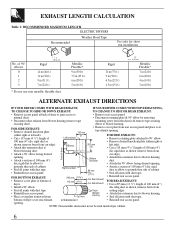
... mm • Remove cover plate from • Seal all joints with duct tape. • Reinstall rear access panel. FOR REAR EXHAUST: • Cut a 295 mm (11 5/8") length of 90˚ elbows 0 1 2 3 Rigid 14 m (46 ft.) 11 m (38 ft.) 9 m (31 ft.) 7 m (24 ft.) * Do not use non metallic flexible duct. opening . EXHAUST LENGTH CALCULATION Table 1: RECOMMENDED MAXIMUM LENGTH ELECTRIC DRYERS Recommended Weather Hood Type Use only for short run installations No. of...
... mm • Remove cover plate from • Seal all joints with duct tape. • Reinstall rear access panel. FOR REAR EXHAUST: • Cut a 295 mm (11 5/8") length of 90˚ elbows 0 1 2 3 Rigid 14 m (46 ft.) 11 m (38 ft.) 9 m (31 ft.) 7 m (24 ft.) * Do not use non metallic flexible duct. opening . EXHAUST LENGTH CALCULATION Table 1: RECOMMENDED MAXIMUM LENGTH ELECTRIC DRYERS Recommended Weather Hood Type Use only for short run installations No. of...
User Manual
Page 7
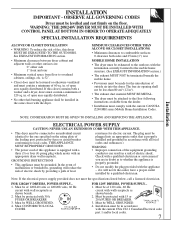
... CSA C22.1 Canadian Electrical code part 1 and/or local codes. 7 Check with a qualified electrician or serviceman if you are : 0" either side 1" front and rear • Minimum vertical space from the dealer. • Installation must be made for electric current. ELECTRICAL POWER SUPPLY CAUTION: NEVER USE AN EXTENSION CORD WITH THIS APPLIANCE. • This dryer must comply with 30A FUSES OR BREAKERS. 3. FOR 120/240 V DRYERS, POWER SUPPLY... 1.
... CSA C22.1 Canadian Electrical code part 1 and/or local codes. 7 Check with a qualified electrician or serviceman if you are : 0" either side 1" front and rear • Minimum vertical space from the dealer. • Installation must be made for electric current. ELECTRICAL POWER SUPPLY CAUTION: NEVER USE AN EXTENSION CORD WITH THIS APPLIANCE. • This dryer must comply with 30A FUSES OR BREAKERS. 3. FOR 120/240 V DRYERS, POWER SUPPLY... 1.
User Manual
Page 8
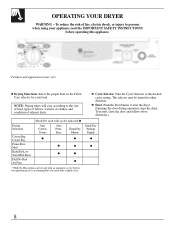
... restart, close the door and follow above directions.) Drying Selections Cottons Reg Cotons-Reg Perma Press Med Knits/Del-Low Tricots/Del.Basse Fluff-No Heat Air Frais Should be turned in either direction. 3 Start. Turn the Cycle Selector to start the dryer. (Opening the door during operation stops the dryer. Push the Start button to the desired cycle setting. OPERATING YOUR DRYER WARNING - To reduce the risk of exhaust ducts. 2 Cycle Selector. The selector...
... restart, close the door and follow above directions.) Drying Selections Cottons Reg Cotons-Reg Perma Press Med Knits/Del-Low Tricots/Del.Basse Fluff-No Heat Air Frais Should be turned in either direction. 3 Start. Turn the Cycle Selector to start the dryer. (Opening the door during operation stops the dryer. Push the Start button to the desired cycle setting. OPERATING YOUR DRYER WARNING - To reduce the risk of exhaust ducts. 2 Cycle Selector. The selector...
User Manual
Page 9
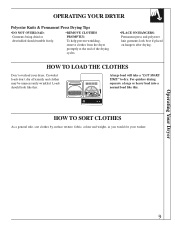
... would for your dryer. HOW TO LOAD THE CLOTHES Don't overload your washer. Loads should tumble freely. •REMOVE CLOTHES PROMPTLYTo help prevent wrinkling, remove clothes from the dryer promptly at the end of the drying cycles. •PLACE ON HANGERSPermanent press and polyester knit garments look like this : A large load will take a "LOT MORE TIME" to dry. OPERATING YOUR DRYER Polyester Knits & Permanent Press Drying Tips •DO...
... would for your dryer. HOW TO LOAD THE CLOTHES Don't overload your washer. Loads should tumble freely. •REMOVE CLOTHES PROMPTLYTo help prevent wrinkling, remove clothes from the dryer promptly at the end of the drying cycles. •PLACE ON HANGERSPermanent press and polyester knit garments look like this : A large load will take a "LOT MORE TIME" to dry. OPERATING YOUR DRYER Polyester Knits & Permanent Press Drying Tips •DO...
User Manual
Page 10
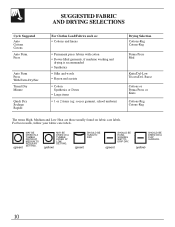
...your fabric care labels. (green) MAY BE DRIED IN A TUMBLE DRYER AT MEDIUM TO REGULAR SETTING. (yellow) MAY BE DRIED IN A TUMBLE DRYER AT LOW SETTING. SUGGESTED FABRIC AND DRYING SELECTIONS Cycle Suggested Auto Cottons Cotons Auto Perm. Press Auto Perm Press With Extra Dry/Sec Timed Dry Minute Quick Dry Sechage Rapide For Clothes Load/Fabrics ... or Knits Cottons-Reg Cotons-Reg The terms High, Medium and Low Heat are those usually found on fabric care labels. SHOULD BE HUNG TO DRY. (green) SHOULD BE HUNG SOAKING WET TO DRIP DRY. (green) SHOULD BE DRIED ON A FLAT SURFACE. (yellow) 10
...your fabric care labels. (green) MAY BE DRIED IN A TUMBLE DRYER AT MEDIUM TO REGULAR SETTING. (yellow) MAY BE DRIED IN A TUMBLE DRYER AT LOW SETTING. SUGGESTED FABRIC AND DRYING SELECTIONS Cycle Suggested Auto Cottons Cotons Auto Perm. Press Auto Perm Press With Extra Dry/Sec Timed Dry Minute Quick Dry Sechage Rapide For Clothes Load/Fabrics ... or Knits Cottons-Reg Cotons-Reg The terms High, Medium and Low Heat are those usually found on fabric care labels. SHOULD BE HUNG TO DRY. (green) SHOULD BE HUNG SOAKING WET TO DRIP DRY. (green) SHOULD BE DRIED ON A FLAT SURFACE. (yellow) 10
User Manual
Page 11
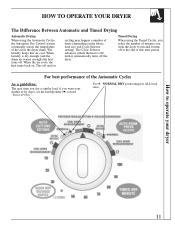
... air cools, the heat turns back on the fabric, load size and Cycle Selector setting). This off . Timed Drying When using the Automatic Cycles, the Automatic Dry Control system continually senses the temperature of the air in the dryer drum. How to operate your • clothes to run and it automatically turns off at the end of this air cool. HOW TO OPERATE YOUR DRYER The Difference Between Automatic and Timed Drying Automatic Drying When using the Timed Cycles, you select the number...
... air cools, the heat turns back on the fabric, load size and Cycle Selector setting). This off . Timed Drying When using the Automatic Cycles, the Automatic Dry Control system continually senses the temperature of the air in the dryer drum. How to operate your • clothes to run and it automatically turns off at the end of this air cool. HOW TO OPERATE YOUR DRYER The Difference Between Automatic and Timed Drying Automatic Drying When using the Timed Cycles, you select the number...
User Manual
Page 12
Periodically, remove the lint filter (it snaps in a sideways motion all the way across to strike the surface with a damp cloth. CARE AND CLEANING Dryer Exterior Wipe off any spills or washing compounds. Dryer control panel and finishes may then be damaged by your vacuum cleaner into the opening at top or bottom of the door and at one corner of the filter and...
Periodically, remove the lint filter (it snaps in a sideways motion all the way across to strike the surface with a damp cloth. CARE AND CLEANING Dryer Exterior Wipe off any spills or washing compounds. Dryer control panel and finishes may then be damaged by your vacuum cleaner into the opening at top or bottom of the door and at one corner of the filter and...
User Manual
Page 13
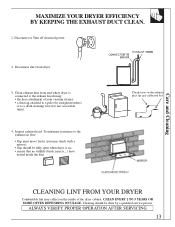
... the duct. Disconnect or Turn off electrical power. 2. Care and Cleaning MAXIMIZE YOUR DRYER EFFICIENCY BY KEEPING THE EXHAUST DUCT CLEAN. 1. Inspect exhaust hood. ALWAYS VERIFY PROPER OPERATION AFTER SERVICING 13 To minimize resistance to a drain cleaning wire (for straight stretches) or to the exhaust air flow: • flap must move freely (you may check with a mirror); • flap should be fully open when dryer is connected to the exhaust hood using: • the hose...
... the duct. Disconnect or Turn off electrical power. 2. Care and Cleaning MAXIMIZE YOUR DRYER EFFICIENCY BY KEEPING THE EXHAUST DUCT CLEAN. 1. Inspect exhaust hood. ALWAYS VERIFY PROPER OPERATION AFTER SERVICING 13 To minimize resistance to a drain cleaning wire (for straight stretches) or to the exhaust air flow: • flap must move freely (you may check with a mirror); • flap should be fully open when dryer is connected to the exhaust hood using: • the hose...
User Manual
Page 14
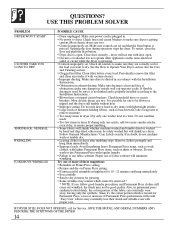
... they are set for Service, GIVE THE MODEL AND SERIAL NUMBERS AND DESCRIBE THE SYMPTOMS OF THE DRYER. 14 If drying only one washer load at a time. Do not wash or dry Permanent Press with lightweight articles. • Large loads of obstruction; USE THIS PROBLEM SOLVER PROBLEM DRYER WON'T START CLOTHES TAKE TOO LONG TO DRY SHRINKAGE, GENERAL WRINKLING TO REMOVE WRINKLES POSSIBLE CAUSE • Dryer unplugged. Most electric dryers use fabric softener. Make sure dryer is plugged in exhaust ducting. Dry only...
... they are set for Service, GIVE THE MODEL AND SERIAL NUMBERS AND DESCRIBE THE SYMPTOMS OF THE DRYER. 14 If drying only one washer load at a time. Do not wash or dry Permanent Press with lightweight articles. • Large loads of obstruction; USE THIS PROBLEM SOLVER PROBLEM DRYER WON'T START CLOTHES TAKE TOO LONG TO DRY SHRINKAGE, GENERAL WRINKLING TO REMOVE WRINKLES POSSIBLE CAUSE • Dryer unplugged. Most electric dryers use fabric softener. Make sure dryer is plugged in exhaust ducting. Dry only...
User Manual
Page 16
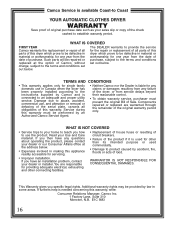
... of the dryer, or from the date of this warranty must be provided by Camco and is liable for other connecting facilities. Such parts will be repaired or replaced at the address below. • Expenses involved in making this appliance readily accessible for servicing. • Replacement of house fuses or resetting of circuit breakers. • Failure of the product if it is used for...
... of the dryer, or from the date of this warranty must be provided by Camco and is liable for other connecting facilities. Such parts will be repaired or replaced at the address below. • Expenses involved in making this appliance readily accessible for servicing. • Replacement of house fuses or resetting of circuit breakers. • Failure of the product if it is used for...


