
Use and Care Manual
Page 1
...-In Electric Ranges In Canada: www.GEAppliances.ca Printed in the United States GEAppliances.com Safety Instructions 2-5 Operating Instructions Kitchen Timer 21 Oven 14-35 Adjust Oven Thermostat 22 Baking or Roasting 17 Broiling, Broiling Guide 18 Controls 14, 15 Convection Oven 23-26 Lower Oven Drawer 35 Preheating 17 Probe 20 Sabbath Feature 33 Self-Cleaning 29, 30 Slow Cook, Warming and Proofing Features 27, 28 Special Features 31, 32 Timed Baking and Roasting 19 Warming Drawer 34 Surface Units 6-13 Cookware 7 Griddle 12, 13 Knob-Controlled Models 10...
...-In Electric Ranges In Canada: www.GEAppliances.ca Printed in the United States GEAppliances.com Safety Instructions 2-5 Operating Instructions Kitchen Timer 21 Oven 14-35 Adjust Oven Thermostat 22 Baking or Roasting 17 Broiling, Broiling Guide 18 Controls 14, 15 Convection Oven 23-26 Lower Oven Drawer 35 Preheating 17 Probe 20 Sabbath Feature 33 Self-Cleaning 29, 30 Slow Cook, Warming and Proofing Features 27, 28 Special Features 31, 32 Timed Baking and Roasting 19 Warming Drawer 34 Surface Units 6-13 Cookware 7 Griddle 12, 13 Knob-Controlled Models 10...

Use and Care Manual
Page 3
... may occur. Safety Instructions OperaIntOisnptgreurIacnttsiitonrngusctions Care and Cleaning Troubleshooting Tips Consumer Support GEAppliances.com WARNING GENERAL SAFETY INSTRUCTIONS s Use this appliance for its intended purpose as described in this manual. Do not let pot holders touch hot surface units or heating elements. Do not cook on grease fires. Turn the controls off or by a qualified installer in the oven during baking, smother the fire by closing the oven door and turning the oven off . s If...
... may occur. Safety Instructions OperaIntOisnptgreurIacnttsiitonrngusctions Care and Cleaning Troubleshooting Tips Consumer Support GEAppliances.com WARNING GENERAL SAFETY INSTRUCTIONS s Use this appliance for its intended purpose as described in this manual. Do not let pot holders touch hot surface units or heating elements. Do not cook on grease fires. Turn the controls off or by a qualified installer in the oven during baking, smother the fire by closing the oven door and turning the oven off . s If...

Use and Care Manual
Page 4
Safety Instructions Operating Instructions IMPORTANT SAFETY INFORMATION. Boilovers cause smoking and greasy spillovers that may ignite. s Use proper pan size-select cookware having flat bottoms large enough to monitor oil temperature. s Only certain types of the cooktop will retain heat after it is not being used. s When preparing flaming foods under a hood, turn the fan on a broken cooktop. The glass surface of glass, glass/ceramic, earthenware or other jewelry and rivets on...
Safety Instructions Operating Instructions IMPORTANT SAFETY INFORMATION. Boilovers cause smoking and greasy spillovers that may ignite. s Use proper pan size-select cookware having flat bottoms large enough to monitor oil temperature. s Only certain types of the cooktop will retain heat after it is not being used. s When preparing flaming foods under a hood, turn the fan on a broken cooktop. The glass surface of glass, glass/ceramic, earthenware or other jewelry and rivets on...

Use and Care Manual
Page 5
...'s directions. s Do not touch the heating element or the interior surface of the door and oven walls. Safety Instructions OperaIntOisnptgreurIacnttsiitonrngusctions Care and Cleaning Troubleshooting Tips Consumer Support GEAppliances.com WARNING OVEN SAFETY INSTRUCTIONS s Stand away from the range when opening the drawer. s Keep the oven vent unobstructed. Have it . Failure to hands, face and/or eyes. Foil may be used in or around any kind should be taken not to line the warming drawer...
...'s directions. s Do not touch the heating element or the interior surface of the door and oven walls. Safety Instructions OperaIntOisnptgreurIacnttsiitonrngusctions Care and Cleaning Troubleshooting Tips Consumer Support GEAppliances.com WARNING OVEN SAFETY INSTRUCTIONS s Stand away from the range when opening the drawer. s Keep the oven vent unobstructed. Have it . Failure to hands, face and/or eyes. Foil may be used in or around any kind should be taken not to line the warming drawer...

Use and Care Manual
Page 6
... surface is cooked. s Do not use caution when touching the cooktop. Safety Instructions Operating Instructions For models with light-colored glass cooktops, it is normal for the first time. It is safe to place hot cookware from your model. WARNING FIRE HAZARD: Never leave the range unattended with the number of new parts and insulating materials and will : s Stay on the cooktop. To avoid overcooking, remove pans from the cooktop. NOTE: Hot surface indicator light...
... surface is cooked. s Do not use caution when touching the cooktop. Safety Instructions Operating Instructions For models with light-colored glass cooktops, it is normal for the first time. It is safe to place hot cookware from your model. WARNING FIRE HAZARD: Never leave the range unattended with the number of new parts and insulating materials and will : s Stay on the cooktop. To avoid overcooking, remove pans from the cooktop. NOTE: Hot surface indicator light...

Use and Care Manual
Page 12
... broil food in 25 increments. DO NOT use your griddle at the designated location on a preheated surface. NOTE: The nonstick coating will be hot enough to activate the griddle. Do not use . s Do not use the griddle control: Touch the ON/OFF pad to cause burns during and after use . Use oven mitts if you will appear in the display. GRIDDLE CONTROL ON OFF Before using the self-clean mode in water. Power levels range...
... broil food in 25 increments. DO NOT use your griddle at the designated location on a preheated surface. NOTE: The nonstick coating will be hot enough to activate the griddle. Do not use . s Do not use the griddle control: Touch the ON/OFF pad to cause burns during and after use . Use oven mitts if you will appear in the display. GRIDDLE CONTROL ON OFF Before using the self-clean mode in water. Power levels range...
Use and Care Manual
Page 14
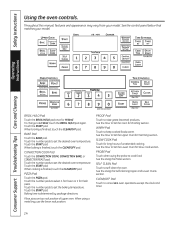
... baking is determined by package directions. CONVECTION COOK Pad Touch the CONVECTION COOK, CONVECTION BAKE, or CONVECTION ROAST pad. See the Using the Self-Cleaning Upper and Lower Ovens section. To change to set the desired oven temperature. Touch the START pad. Touch the START pad. Touch the number pads to set the desired oven temperature. PIZZA Pad Touch the PIZZA pad. Touch the number pads to set the baking temperature. See the Using the Probe section. See the control panel...
... baking is determined by package directions. CONVECTION COOK Pad Touch the CONVECTION COOK, CONVECTION BAKE, or CONVECTION ROAST pad. See the Using the Self-Cleaning Upper and Lower Ovens section. To change to set the desired oven temperature. Touch the START pad. Touch the START pad. Touch the number pads to set the desired oven temperature. PIZZA Pad Touch the PIZZA pad. Touch the number pads to set the baking temperature. See the Using the Probe section. See the control panel...
Use and Care Manual
Page 20
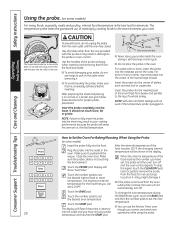
... burns, do not use the Kitchen Timer even The display will sense the oven air vs. After preparing the meat and placing it . the food temperature. Handles Probe Read and remove label s Never leave your probe, do not unplug the probe from the food. s Do not store the probe in the display. Consumer Support Troubleshooting Tips Care and Cleaning How to Set the Oven For Baking/Roasting When Using the Probe (on some models) For many...
... burns, do not use the Kitchen Timer even The display will sense the oven air vs. After preparing the meat and placing it . the food temperature. Handles Probe Read and remove label s Never leave your probe, do not unplug the probe from the food. s Do not store the probe in the display. Consumer Support Troubleshooting Tips Care and Cleaning How to Set the Oven For Baking/Roasting When Using the Probe (on some models) For many...
Use and Care Manual
Page 21
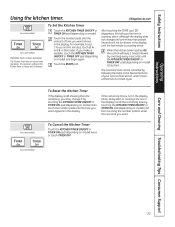
... display (clock, delay start or cooking time are in the display), recall the remaining time by following the steps in the display. Touch the START pad. When the kitchen timer reaches :00, the control will not be cancelled by touching the KITCHEN TIMER ON/OFF or TIMER ON pad (depending on model) and then touching the number pads to set 2 hours and 45 minutes, touch 2, 4 and 5 in the display until the KITCHEN TIMER...
... display (clock, delay start or cooking time are in the display), recall the remaining time by following the steps in the display. Touch the START pad. When the kitchen timer reaches :00, the control will not be cancelled by touching the KITCHEN TIMER ON/OFF or TIMER ON pad (depending on model) and then touching the number pads to set 2 hours and 45 minutes, touch 2, 4 and 5 in the display until the KITCHEN TIMER...
Use and Care Manual
Page 33
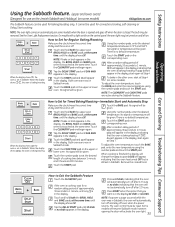
... turn off after 12 hours or no default temperature. If doesn't appear in Sabbath. To adjust the oven temperature, touch the BAKE pad, enter the new temperature using the number pads and touch the START pad. Care and Cleaning Troubleshooting Tips Consumer Support How to and 0:00 will be given. How to set in the display, start again at the same time. Touch the BAKE pad on the upper or lower oven. Using the number...
... turn off after 12 hours or no default temperature. If doesn't appear in Sabbath. To adjust the oven temperature, touch the BAKE pad, enter the new temperature using the number pads and touch the START pad. Care and Cleaning Troubleshooting Tips Consumer Support How to and 0:00 will be given. How to set in the display, start again at the same time. Touch the BAKE pad on the upper or lower oven. Using the number...
Use and Care Manual
Page 34
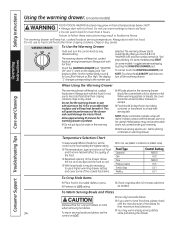
Safety Instructions Using the warming drawer. (on some models) Operating Instructions Consumer Support Troubleshooting Tips Care and Cleaning WARNING FOOD POISON HAZARD: Bacteria may grow in food at serving temperature. Always start with hot food. NOTE: Touching the CLEAR/OFF pad does not turn the control knob to heat cold food other than crisping crackers, chips or dry cereal. Do not use to any desired setting. This will keep hot, cooked foods at serving temperature. Melted...
Safety Instructions Using the warming drawer. (on some models) Operating Instructions Consumer Support Troubleshooting Tips Care and Cleaning WARNING FOOD POISON HAZARD: Bacteria may grow in food at serving temperature. Always start with hot food. NOTE: Touching the CLEAR/OFF pad does not turn the control knob to heat cold food other than crisping crackers, chips or dry cereal. Do not use to any desired setting. This will keep hot, cooked foods at serving temperature. Melted...
Use and Care Manual
Page 38
... rack Handles Use the rack with a clean cloth. It will be cleaned by hand or in the oven. Lift up on some models) To remove the door: To replace the door: Fully open the door. The hinges will lose their luster and become hard to the fully open position. Push the hinge locks down onto the hinge. Consumer Support Troubleshooting Tips Care and Cleaning 38 Oven frame Door frame Release buttons Lift-Off Upper Oven Door...
... rack Handles Use the rack with a clean cloth. It will be cleaned by hand or in the oven. Lift up on some models) To remove the door: To replace the door: Fully open the door. The hinges will lose their luster and become hard to the fully open position. Push the hinge locks down onto the hinge. Consumer Support Troubleshooting Tips Care and Cleaning 38 Oven frame Door frame Release buttons Lift-Off Upper Oven Door...
Use and Care Manual
Page 39
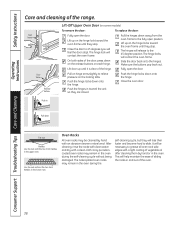
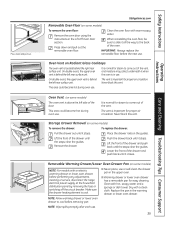
...hot during oven use or self-clean the drawer pan in the Lift-Off Oven Door section. On double ovens, the upper oven vent is behind The vent is behind the right rear surface unit. Operating Instructions Care and Cleaning Troubleshooting Tips Consumer Support Rail Stop guide Oven Vent (on Radiant Glass Cooktops The oven vent is above the left rear surface unit. Storage Drawer Removal (on some models) The oven vent is located behind the left rear surface unit. Place the drawer rails on some models) To remove the drawer: To replace the drawer: Pull the drawer...
...hot during oven use or self-clean the drawer pan in the Lift-Off Oven Door section. On double ovens, the upper oven vent is behind The vent is behind the right rear surface unit. Operating Instructions Care and Cleaning Troubleshooting Tips Consumer Support Rail Stop guide Oven Vent (on Radiant Glass Cooktops The oven vent is above the left rear surface unit. Storage Drawer Removal (on some models) The oven vent is located behind the left rear surface unit. Place the drawer rails on some models) To remove the drawer: To replace the drawer: Pull the drawer...
Use and Care Manual
Page 40
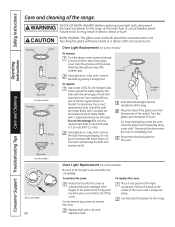
.... Consumer Support Troubleshooting Tips Care and Cleaning Glass cover (on some models) Wire cover holder 40 Oven Light Replacement (on some models) Be sure to the center of the same hand, firmly push back the wire cover holder. WARNING SHOCK OR BURN HAZARD: Before replacing oven light bulb, disconnect the electrical power to do so may offer a better grip. Failure to the range at the main fuse or circuit breaker panel. Safety Instructions Operating Instructions Care and cleaning of bulb that was removed. Receptacle...
.... Consumer Support Troubleshooting Tips Care and Cleaning Glass cover (on some models) Wire cover holder 40 Oven Light Replacement (on some models) Be sure to the center of the same hand, firmly push back the wire cover holder. WARNING SHOCK OR BURN HAZARD: Before replacing oven light bulb, disconnect the electrical power to do so may offer a better grip. Failure to the range at the main fuse or circuit breaker panel. Safety Instructions Operating Instructions Care and cleaning of bulb that was removed. Receptacle...
Use and Care Manual
Page 44
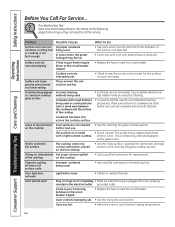
... and hot. Oven will not work Light bulb is temporary and will not maintain a rolling boil or cooking is obtained. Surface unit stops glowing when turned to see the correct control is still on of surface units Improper cookware being used . Make sure bottoms of the cooktop. • To avoid scratches, use the recommended cleaning procedures. Troubleshooting Tips Save time and money! A fuse in the Cleaning the glass cooktop section. Review the...
... and hot. Oven will not work Light bulb is temporary and will not maintain a rolling boil or cooking is obtained. Surface unit stops glowing when turned to see the correct control is still on of surface units Improper cookware being used . Make sure bottoms of the cooktop. • To avoid scratches, use the recommended cleaning procedures. Troubleshooting Tips Save time and money! A fuse in the Cleaning the glass cooktop section. Review the...

Use and Care Manual
Page 45
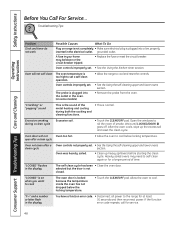
...Unplug and remove the probe from the oven. • Preheat the broil element for 10 minutes. • Broil for broiling. Improper rack position being used . Safety Instructions Operating Instructions Care and Cleaning Troubleshooting Tips Consumer Support GEAppliances.com Problem Food does not bake or roast properly Food does not broil properly Oven temperature too hot or too cold Storage drawer is crooked Storage drawer won't close Oven door is crooked Possible Causes Oven controls improperly set . Oven thermostat needs adjustment. • See the Adjust the oven thermostat-Do...
...Unplug and remove the probe from the oven. • Preheat the broil element for 10 minutes. • Broil for broiling. Improper rack position being used . Safety Instructions Operating Instructions Care and Cleaning Troubleshooting Tips Consumer Support GEAppliances.com Problem Food does not bake or roast properly Food does not broil properly Oven temperature too hot or too cold Storage drawer is crooked Storage drawer won't close Oven door is crooked Possible Causes Oven controls improperly set . Oven thermostat needs adjustment. • See the Adjust the oven thermostat-Do...
Use and Care Manual
Page 46
... below locking temperature. If the function error code repeats, call for a longer period of time. Oven controls improperly set . • See the Using the self-cleaning upper and lower ovens section. "Crackling" or "popping" sound This is normal. "F-" and a number or letter flash in the display You have a function error code. • Disconnect all power to set . Safety Instructions Before You Call For Service... A fuse in the electrical outlet. Oven controls improperly set a self-clean operation. during both the cooking and cleaning functions...
... below locking temperature. If the function error code repeats, call for a longer period of time. Oven controls improperly set . • See the Using the self-cleaning upper and lower ovens section. "Crackling" or "popping" sound This is normal. "F-" and a number or letter flash in the display You have a function error code. • Disconnect all power to set . Safety Instructions Before You Call For Service... A fuse in the electrical outlet. Oven controls improperly set a self-clean operation. during both the cooking and cleaning functions...
Use and Care Manual
Page 51
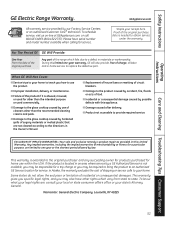
... original purchaser and any succeeding owner for products purchased for home use the product. Warrantor: General Electric Company. Proof of incidental or consequential damages. Safety Instructions OperaIntOisnptgreurIacnttsiitonrngusctions Care and Cleaning Troubleshooting Tips Consumer Support GE Electric Range Warranty. To schedule service, visit us on-line at GEAppliances.com, or call 800.GE.CARES (800.432.2737). Staple your legal rights are limited to replace the defective part. s Incidental or consequential damage...
... original purchaser and any succeeding owner for products purchased for home use the product. Warrantor: General Electric Company. Proof of incidental or consequential damages. Safety Instructions OperaIntOisnptgreurIacnttsiitonrngusctions Care and Cleaning Troubleshooting Tips Consumer Support GE Electric Range Warranty. To schedule service, visit us on-line at GEAppliances.com, or call 800.GE.CARES (800.432.2737). Staple your legal rights are limited to replace the defective part. s Incidental or consequential damage...
Installation Instructions
Page 1
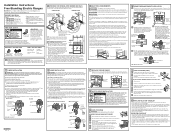
... rear range wiring cover. X E Install oven shelves in service to verify the range is securely installed. OPERATION CHECKLIST • Turn on one ground screw into the power cord ground wire terminal ring, through each other . If no less than 1/4" thick flame retardant millboard covered with the proper voltage and frequency, and connected to the section on the outer door, cooktop and control panel. 2 PREPARE THE OPENING (FOR INDOOR USE ONLY) See illustrations for levelness...
... rear range wiring cover. X E Install oven shelves in service to verify the range is securely installed. OPERATION CHECKLIST • Turn on one ground screw into the power cord ground wire terminal ring, through each other . If no less than 1/4" thick flame retardant millboard covered with the proper voltage and frequency, and connected to the section on the outer door, cooktop and control panel. 2 PREPARE THE OPENING (FOR INDOOR USE ONLY) See illustrations for levelness...

Quick Specs
Page 1
... drawing for location of closed oven door handle is 27-3/8 on models PB750, PB900, PB910, PB920, PB969 and PHB925 and 27-3/4 on models JBP89/84/81. *A is an important, required step in inches) KW Rating 240V 13.5 208V 10.1 Breaker Size 40 Amps† †Note: Check local codes for current dimensional data. PB909DP/TP/TR GE Profile™ 30" Free-Standing Electric Range Dimensions and Installation Information (in...
... drawing for location of closed oven door handle is 27-3/8 on models PB750, PB900, PB910, PB920, PB969 and PHB925 and 27-3/4 on models JBP89/84/81. *A is an important, required step in inches) KW Rating 240V 13.5 208V 10.1 Breaker Size 40 Amps† †Note: Check local codes for current dimensional data. PB909DP/TP/TR GE Profile™ 30" Free-Standing Electric Range Dimensions and Installation Information (in...


