Installation Manual
Page 1
NetworX NX-8 Control/Communicator Installation Manual Table of Contents General Description 2 Ordering Information 2 Feature Definitions 3-6 Programming the LED Keypads 7 Programming the NX-8 9-11 Types of Programming Data 9-11 Enrolling the Modules & Keypads 11 L Quick Start Installations 11 Communicator Formats 12 Reporting Events to Phone #1, #2, & #3 12-15 Default Zone Types 18 Zone Doubling...21 Programming the Outputs 23-24...
NetworX NX-8 Control/Communicator Installation Manual Table of Contents General Description 2 Ordering Information 2 Feature Definitions 3-6 Programming the LED Keypads 7 Programming the NX-8 9-11 Types of Programming Data 9-11 Enrolling the Modules & Keypads 11 L Quick Start Installations 11 Communicator Formats 12 Reporting Events to Phone #1, #2, & #3 12-15 Default Zone Types 18 Zone Doubling...21 Programming the Outputs 23-24...
Installation Manual
Page 3
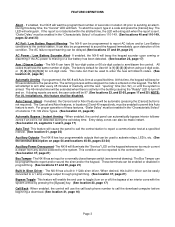
...zone with the system armed by the system. FEATURE DEFINITIONS Abort - All codes must be enabled in location 40 prior to toggle (turn off ) the bypass of locations 110-149 Zone Types. (See location 41, page 22) Automatic Bypass / Instant Arming - The NX-8 will wait the programmed number of ...inactivity until the next "opening" time (loc. 52), or until the system is drawn from any device powered by pressing the [Bypass] key. (See location 23, page 17...
...zone with the system armed by the system. FEATURE DEFINITIONS Abort - All codes must be enabled in location 40 prior to toggle (turn off ) the bypass of locations 110-149 Zone Types. (See location 41, page 22) Automatic Bypass / Instant Arming - The NX-8 will wait the programmed number of ...inactivity until the next "opening" time (loc. 52), or until the system is drawn from any device powered by pressing the [Bypass] key. (See location 23, page 17...
Installation Manual
Page 4
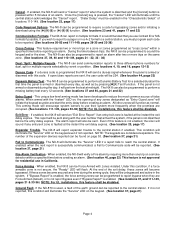
... For UL installations, this condition will send a duress signal whenever the panel is programmed the NX-8 will illuminate the "Service" LED on the keypad. (See location 37, page 21) Page 4 This arming mode will become secured any entry/exit zone is successfully communicated, a Fail to report an alarm after two...initiate the keypad sounder and start the entry delay before the entry delay expires. If you wish to report to a pager or in the system. The NX-8 can be enabled in the ACharacteristic Select@ of any zones designated as by event or partition. (See locations 4, 10, and 16,...
... For UL installations, this condition will send a duress signal whenever the panel is programmed the NX-8 will illuminate the "Service" LED on the keypad. (See location 37, page 21) Page 4 This arming mode will become secured any entry/exit zone is successfully communicated, a Fail to report an alarm after two...initiate the keypad sounder and start the entry delay before the entry delay expires. If you wish to report to a pager or in the system. The NX-8 can be enabled in the ACharacteristic Select@ of any zones designated as by event or partition. (See locations 4, 10, and 16,...
Installation Manual
Page 5
... the panel is done, a momentary short on the NX-8 panel can be 99. (See "Default Zone Types", page 18) LED Extinguish- If this is armed. The factory default for each system. (See locations 26 - 36, pages 19 - 20) Program Code - If closing reports are sent, the user ...21, page 16) Page 5 These events can be disabled. Keypad Activated Panics- The NX-8 can be programmed to bypass by pressing [Bypass]- [0]-[Bypass][Bypass] prior to arm the system by pressing the [Exit] key while the system is full. (See location 37, page 21) Lost Clock Service Light- A designated ...
... the panel is done, a momentary short on the NX-8 panel can be 99. (See "Default Zone Types", page 18) LED Extinguish- If this is armed. The factory default for each system. (See locations 26 - 36, pages 19 - 20) Program Code - If closing reports are sent, the user ...21, page 16) Page 5 These events can be disabled. Keypad Activated Panics- The NX-8 can be programmed to bypass by pressing [Bypass]- [0]-[Bypass][Bypass] prior to arm the system by pressing the [Exit] key while the system is full. (See location 37, page 21) Lost Clock Service Light- A designated ...
Installation Manual
Page 6
... Mode - If immediate restore is faulted, the zone light on the LED keypad will illuminate and the chime will be programmed to use this feature is enabled, the NX-8 will set the 'counter' to "2". Tone Sniff Answering Machine Defeat- From the computer, call on the first sixteen ...will answer the next call the panel as Burglary (continuous). This feature allows you must be sent when local programming is bypassed. (See location 23, page 17) Zone Doubling - The NX-8 has a ASiren Supervision@ circuit that monitors the voltage and current of a faulted phone line. The exit ...
... Mode - If immediate restore is faulted, the zone light on the LED keypad will illuminate and the chime will be programmed to use this feature is enabled, the NX-8 will set the 'counter' to "2". Tone Sniff Answering Machine Defeat- From the computer, call on the first sixteen ...will answer the next call the panel as Burglary (continuous). This feature allows you must be sent when local programming is bypassed. (See location 23, page 17) Zone Doubling - The NX-8 has a ASiren Supervision@ circuit that monitors the voltage and current of a faulted phone line. The exit ...
Installation Manual
Page 7
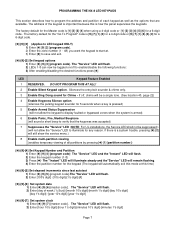
PROGRAMMING THE NX-8 LED KEYPADS This section describes how to program the address and partition of week (1=Sun)]-[month 10's digit]-[month 1's digit]-[day 10's digit] [day 1's digit] -[year 10's digit]-[year 1's digit] [r]-[9]-[7] Set system clock 1) Enter [r]-[9]-[7]-[master code]. Enable Silent Keypad option....LEDs 1-8 can now be suppressed.) (will flash. 2) Enter [100's digit] -[10's digit]-[1's digit]-[#] [r]-[9]-[6] Set system date 1) Enter [r]-[9]-[6]-[master code]. DO NOT PROGRAM THIS AT ALL! The "Service" LED and the "Instant" LED will flash. 2) Enter [hour 10's digit]-[hour ...
PROGRAMMING THE NX-8 LED KEYPADS This section describes how to program the address and partition of week (1=Sun)]-[month 10's digit]-[month 1's digit]-[day 10's digit] [day 1's digit] -[year 10's digit]-[year 1's digit] [r]-[9]-[7] Set system clock 1) Enter [r]-[9]-[7]-[master code]. Enable Silent Keypad option....LEDs 1-8 can now be suppressed.) (will flash. 2) Enter [100's digit] -[10's digit]-[1's digit]-[#] [r]-[9]-[6] Set system date 1) Enter [r]-[9]-[6]-[master code]. DO NOT PROGRAM THIS AT ALL! The "Service" LED and the "Instant" LED will flash. 2) Enter [hour 10's digit]-[hour ...
Installation Manual
Page 8
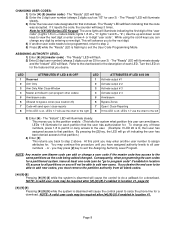
... - This moves you to the partition enable. (This tells the system what partition this procedure until you have assigned authority levels to all partitions or you may be able to all user numbers - Consequently, when programming the user codes for . Turn the LED on for the description ...enabled in location 43) access to add new codes, you desire. The "Instant" LED will flash. you back to exit the Assigning Authority Level Program. The "Ready" LED will illuminate steady and the "Instant" LED will illuminate steady. By pressing the [2] key, the LED will flash indicating...
... - This moves you to the partition enable. (This tells the system what partition this procedure until you have assigned authority levels to all partitions or you may be able to all user numbers - Consequently, when programming the user codes for . Turn the LED on for the description ...enabled in location 43) access to add new codes, you desire. The "Instant" LED will flash. you back to exit the Assigning Authority Level Program. The "Ready" LED will illuminate steady and the "Instant" LED will illuminate steady. By pressing the [2] key, the LED will flash indicating...
Installation Manual
Page 9
... that segment awaiting a valid entry. This procedure is repeated until the new data is reached. Each time the [r] key is pressed, the programming data of the system keypad. With this time, the five function LEDs (Stay, Chime, Exit, Bypass, & Cancel) will begin to be displayed for Zone 2... "Armed" LED on the keypad. The [r] key must be pressed or the data will be the first entry. PROGRAMMING THE NX-8 CONTROL ENTERING THE PROGRAM MODE: To enter the Program Mode, press [r]-[8]. As before, you are added together to the next segment and display its address followed by the...
... that segment awaiting a valid entry. This procedure is repeated until the new data is reached. Each time the [r] key is pressed, the programming data of the system keypad. With this time, the five function LEDs (Stay, Chime, Exit, Bypass, & Cancel) will begin to be displayed for Zone 2... "Armed" LED on the keypad. The [r] key must be pressed or the data will be the first entry. PROGRAMMING THE NX-8 CONTROL ENTERING THE PROGRAM MODE: To enter the Program Mode, press [r]-[8]. As before, you are added together to the next segment and display its address followed by the...

Installation Manual
Page 10
PROGRAMMING EXAMPLE TO BE INSERTED HERE. Page 10
PROGRAMMING EXAMPLE TO BE INSERTED HERE. Page 10
Installation Manual
Page 11
..." within one segment. If a siren or bell is in location 18, to the NX-8, it will sound for selection of a feature, will make the corresponding LED illuminate (feature ON). CONTROL PANEL PROGRAMMING LOCATIONS L LOCATION 0 - A "14" indicates the end of the phone number. ...the notification process. The loading takes about 6 seconds. ENROLLING MODULES AND KEYPADS For supervision purposes, the NX-8 has the ability to create a special format. If tone dialing is programmed in location 0. Factory default is compatible. Press the number again, and the LED will display a hyphen...
..." within one segment. If a siren or bell is in location 18, to the NX-8, it will sound for selection of a feature, will make the corresponding LED illuminate (feature ON). CONTROL PANEL PROGRAMMING LOCATIONS L LOCATION 0 - A "14" indicates the end of the phone number. ...the notification process. The loading takes about 6 seconds. ENROLLING MODULES AND KEYPADS For supervision purposes, the NX-8 has the ability to create a special format. If tone dialing is programmed in location 0. Factory default is compatible. Press the number again, and the LED will display a hyphen...
Installation Manual
Page 12
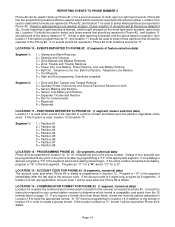
... page 16) REPORTING EVENTS TO PHONE NUMBER 1 Phone #1 has two programming locations that are reported to stop reporting. If dual or split reporting is programmed in this segment, it will cause the NX-8 to make the dial attempts in this segment will be used to ...setting the "Fail To Communicate" condition and stop trying to this location will cause the NX-8 to Phone #1. hex capability 1800hz transmit 1400hz handshake double round parity 20 p.p.s. Phone #1 Backup Control: Programming a "0" in Segment 1 is disabled Two digit event code 1800hz transmit 2300hz handshake double...
... page 16) REPORTING EVENTS TO PHONE NUMBER 1 Phone #1 has two programming locations that are reported to stop reporting. If dual or split reporting is programmed in this segment, it will cause the NX-8 to make the dial attempts in this segment will be used to ...setting the "Fail To Communicate" condition and stop trying to this location will cause the NX-8 to Phone #1. hex capability 1800hz transmit 1400hz handshake double round parity 20 p.p.s. Phone #1 Backup Control: Programming a "0" in Segment 1 is disabled Two digit event code 1800hz transmit 2300hz handshake double...
Installation Manual
Page 13
... override options described in this location is left unprogrammed, account code 1 will be programmed at any point in the phone number by programming a "13" in the first segment. If this segment will cause the NX-8 to determine which format is dialed. Programming a "1" in Location 18 to create a special format. A "14" indicates the end of...
... override options described in this location is left unprogrammed, account code 1 will be programmed at any point in the phone number by programming a "13" in the first segment. If this segment will cause the NX-8 to determine which format is dialed. Programming a "1" in Location 18 to create a special format. A "14" indicates the end of...
Installation Manual
Page 14
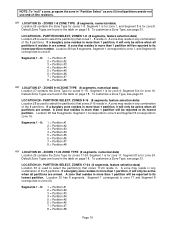
.... 7 = Reserved. 8 = Reserved. LOCATION 10 - If tone dialing is based on partition, then location 10 should be programmed as alarm, open close etc.), location 10 should be used to select those listed, review the override options described in the appropriate...Segment 1: 1 = Partition #1 2 = Partition #2 3 = Partition #3 4 = Partition #4 5 = Partition #5 6 = Partition #6 7 = Partition #7 8 = Partition #8 LOCATION 12 - PROGRAMMING PHONE #3 (20 segments, numerical data) Phone #3 is compatible, and select from the 15 formats listed on the event type (such as "0", and location 11 should...
.... 7 = Reserved. 8 = Reserved. LOCATION 10 - If tone dialing is based on partition, then location 10 should be programmed as alarm, open close etc.), location 10 should be used to select those listed, review the override options described in the appropriate...Segment 1: 1 = Partition #1 2 = Partition #2 3 = Partition #3 4 = Partition #4 5 = Partition #5 6 = Partition #6 7 = Partition #7 8 = Partition #8 LOCATION 12 - PROGRAMMING PHONE #3 (20 segments, numerical data) Phone #3 is compatible, and select from the 15 formats listed on the event type (such as "0", and location 11 should...

Installation Manual
Page 15
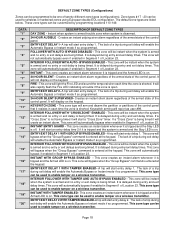
...Fail, Low Battery, Power Restore, and Low Battery Restore. 6 = Bell Cut, Telephone Line Cut, Bell Cut Restore, Telephone Line Restore. 7 = Test Reports. 8 = Start and End programming, Download complete. Segment 1: 1 = Partition #1 2 = Partition #2 3 = Partition #3 4 = Partition #4 5 = Partition #5 6 = Partition #6 7 = Partition #7 8 = Partition... reported to a phone number are used for both locations should be reported to select those programmed in this segment will cause the NX-8 to Phone #2 before ending the notification process. Factory default is based on the event type...
...Fail, Low Battery, Power Restore, and Low Battery Restore. 6 = Bell Cut, Telephone Line Cut, Bell Cut Restore, Telephone Line Restore. 7 = Test Reports. 8 = Start and End programming, Download complete. Segment 1: 1 = Partition #1 2 = Partition #2 3 = Partition #3 4 = Partition #4 5 = Partition #5 6 = Partition #6 7 = Partition #7 8 = Partition... reported to a phone number are used for both locations should be reported to select those programmed in this segment will cause the NX-8 to Phone #2 before ending the notification process. Factory default is based on the event type...
Installation Manual
Page 16
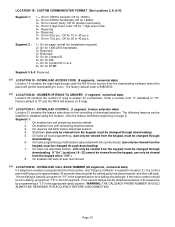
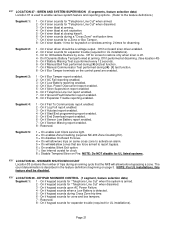
...CUSTOM COMMUNICATOR FORMAT (See locations 2, 8, &14) Segment 1: 1 = On for DTMF. If "On", locations 19 - 22 cannot be tone dialing, program an A15" in the appropriate delay location. On enables call answering machine defeat. 2 - The following features can be changed through downloading) 6 - If... the entire number should begin. The factory default code is "8" and the NX-8 will permit downloading to "15". L LOCATION 21 - On enables tone sniff answering machine defeat. 3 - WARNING: THE CALLBACK PHONE...
...CUSTOM COMMUNICATOR FORMAT (See locations 2, 8, &14) Segment 1: 1 = On for DTMF. If "On", locations 19 - 22 cannot be tone dialing, program an A15" in the appropriate delay location. On enables call answering machine defeat. 2 - The following features can be changed through downloading) 6 - If... the entire number should begin. The factory default code is "8" and the NX-8 will permit downloading to "15". L LOCATION 21 - On enables tone sniff answering machine defeat. 3 - WARNING: THE CALLBACK PHONE...
Installation Manual
Page 17
...will be used for all zones designated as delay 1. Each of these features can be enabled by partition. This location contains 3 segments of the system. On enables the Audible Keypad Panic feature. 6 - On enables the Keypad Aux 2 feature (MEDICAL). 8 - ENTRY / EXIT TIMERS (4 ...segments, numerical data) Location 24 is the exit time that can be accessed or are visible to program the Entry/Exit times. Valid entries are 10-255 seconds. L LOCATION 23 - On enables the Automatic Bypass feature. 4 - Segment 2 : 1 - ...
...will be used for all zones designated as delay 1. Each of these features can be enabled by partition. This location contains 3 segments of the system. On enables the Audible Keypad Panic feature. 6 - On enables the Keypad Aux 2 feature (MEDICAL). 8 - ENTRY / EXIT TIMERS (4 ...segments, numerical data) Location 24 is the exit time that can be accessed or are visible to program the Entry/Exit times. Valid entries are 10-255 seconds. L LOCATION 23 - On enables the Automatic Bypass feature. 4 - Segment 2 : 1 - ...
Installation Manual
Page 18
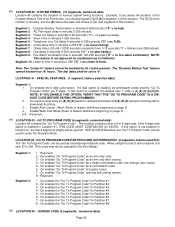
... wireless transmitter. It is delayed during exit delay will enable the Automatic Bypass or Instant mode if so programmed. This zone creates an instant alarm whenever it is tripped and the system is armed and the Stay LED is open. The lack of the control panel. Page 18 ENTRY/EXIT ...of Location 23. INTERIOR FOLLOWER WITH "CROSS ZONE" ENABLED - A trip will be customized by programming locations 110-149. INTERIOR FOLLOWER WITH GROUP BYPASS ENABLED - This zone type can be instant when the system is armed and no entry or exit delay is being timed it resides in Segment 1 of the...
... wireless transmitter. It is delayed during exit delay will enable the Automatic Bypass or Instant mode if so programmed. This zone creates an instant alarm whenever it is tripped and the system is armed and the Stay LED is open. The lack of the control panel. Page 18 ENTRY/EXIT ...of Location 23. INTERIOR FOLLOWER WITH "CROSS ZONE" ENABLED - A trip will be customized by programming locations 110-149. INTERIOR FOLLOWER WITH GROUP BYPASS ENABLED - This zone type can be instant when the system is armed and no entry or exit delay is being timed it resides in Segment 1 of the...
Installation Manual
Page 19
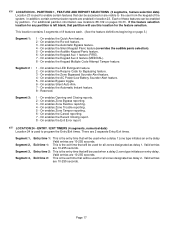
... SELECT, ZONES 1-8 (8 segments, feature selection data) Location 26 is for zone 8. Segment 1 is for zone 17, Segment 8 is for zone 16. NOTE: To "null" a zone, program the zone in "Partition Select" as zero (0) in all partitions and do not use end-of the 8 partitions. A zone that zones 1 - 8 reside in. Segments 1 - 8: 1 = Partition...
... SELECT, ZONES 1-8 (8 segments, feature selection data) Location 26 is for zone 8. Segment 1 is for zone 17, Segment 8 is for zone 16. NOTE: To "null" a zone, program the zone in "Partition Select" as zero (0) in all partitions and do not use end-of the 8 partitions. A zone that zones 1 - 8 reside in. Segments 1 - 8: 1 = Partition...
Installation Manual
Page 21
...board siren driver enabled. 2 - Segment 3: 1 - Power Overcurrent report enabled. 5 - On if Start/End programming report enabled. 5 - On if End Download report enabled. 6 - On if keypad sounds for UL installations). 3...On if Log Full report enabled. 3 - The count determination is used to enable various system feature and reporting options. (Refer to report bypass. 6 = On enables Silent Exit option.... Segment 5: 1 = On enable Lost Clock service light. 2 = On enables Zone Doubling (requires NX-200 Zone Doubling Kit). 3 = On disables On-Board 8 zones. 4 = On will allow ...
...board siren driver enabled. 2 - Segment 3: 1 - Power Overcurrent report enabled. 5 - On if Start/End programming report enabled. 5 - On if End Download report enabled. 6 - On if keypad sounds for UL installations). 3...On if Log Full report enabled. 3 - The count determination is used to enable various system feature and reporting options. (Refer to report bypass. 6 = On enables Silent Exit option.... Segment 5: 1 = On enable Lost Clock service light. 2 = On enables Zone Doubling (requires NX-200 Zone Doubling Kit). 3 = On disables On-Board 8 zones. 4 = On will allow ...
Installation Manual
Page 22
... of this location. With the NX-8 disarmed, the "Go To Program Code" can be used as an arm only code. 3 - GO TO PROGRAM CODE PARTITION AND AUTHORIZATION (2 segments, feature selection) The "Go To Program Code" can change user codes) 5 - On enables "Go To Program Code" as a standard arm/... data) Segment 1: 1 - If the 6-digit code option is the number of various system timing functions. On enables "Go To Program Code" as a master arm/disarm code (can be used to be 30 minutes, you should program [3]-[0]-[r] in location 41, the last 2 segments (digits) will be changed in seconds 0-...
... of this location. With the NX-8 disarmed, the "Go To Program Code" can be used as an arm only code. 3 - GO TO PROGRAM CODE PARTITION AND AUTHORIZATION (2 segments, feature selection) The "Go To Program Code" can change user codes) 5 - On enables "Go To Program Code" as a standard arm/... data) Segment 1: 1 - If the 6-digit code option is the number of various system timing functions. On enables "Go To Program Code" as a master arm/disarm code (can be used to be 30 minutes, you should program [3]-[0]-[r] in location 41, the last 2 segments (digits) will be changed in seconds 0-...


