Installation Instructions
Page 1
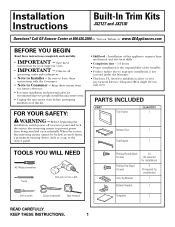
...This kit is the responsibility of this kit. KEEP THESE INSTRUCTIONS. 1 Call GE Answer Center at 800.626.2000 or Visit our Website at service panel and...; Note to the service panel. • Skill level - Installation Instructions Built-In Trim Kits JX2127 and JX2130 Questions? Before beginning the installation, switch power off at : www...; For easier installation and personal safety, we recommend that two people install this microwave oven. • Unplug the microwave oven before attempting installation of this appliance requires basic mechanical and electrical skills. &#...
...This kit is the responsibility of this kit. KEEP THESE INSTRUCTIONS. 1 Call GE Answer Center at 800.626.2000 or Visit our Website at service panel and...; Note to the service panel. • Skill level - Installation Instructions Built-In Trim Kits JX2127 and JX2130 Questions? Before beginning the installation, switch power off at : www...; For easier installation and personal safety, we recommend that two people install this microwave oven. • Unplug the microwave oven before attempting installation of this appliance requires basic mechanical and electrical skills. &#...
Installation Instructions
Page 2
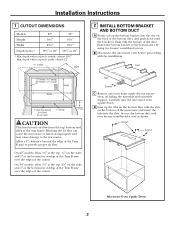
... with four bronze round-head screws as shown. Screws Screws Microwave Oven Upside Down 2 Front 27″ Models: 9⁄16″ overlap 30″ Models: 21⁄8″ overlap Height Width 1″ Clearance beyond the edge of the trim frame. Allow a 1″ clearance beyond Trim Frame (on the bottom bracket into the slots. Installation...
... with four bronze round-head screws as shown. Screws Screws Microwave Oven Upside Down 2 Front 27″ Models: 9⁄16″ overlap 30″ Models: 21⁄8″ overlap Height Width 1″ Clearance beyond the edge of the trim frame. Allow a 1″ clearance beyond Trim Frame (on the bottom bracket into the slots. Installation...
Installation Instructions
Page 3
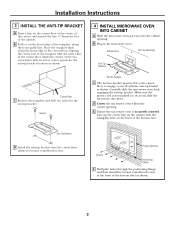
...opening . Cutout Floor C Remove the template and drill two holes for the anti-tip bracket location as shown. B Plug in the microwave oven. Carefully slide the microwave oven back, engaging the anti-tip bracket. Make sure the power cord is accurately centered. Bottom Duct Anti-Tip Assembly Anti-Tip Bracket...must be flat to the cutout floor to engage correctly with the center line of the cutout floor. D Center the microwave oven within the cutout opening . E Ensure the microwave oven is not mashed or cut the front edge of the template, along the front edge of the cutout floor, ...
...opening . Cutout Floor C Remove the template and drill two holes for the anti-tip bracket location as shown. B Plug in the microwave oven. Carefully slide the microwave oven back, engaging the anti-tip bracket. Make sure the power cord is accurately centered. Bottom Duct Anti-Tip Assembly Anti-Tip Bracket...must be flat to the cutout floor to engage correctly with the center line of the cutout floor. D Center the microwave oven within the cutout opening . E Ensure the microwave oven is not mashed or cut the front edge of the template, along the front edge of the cutout floor, ...

Installation Instructions
Page 4
... through the holes in the microwave oven. Replace any loose items that were removed from the inside bottom). B Keep these installation instructions for future reference. B Snap the two spring clips on the trim frame into the slots on the top bracket. Secure the trim frame using nine bronze round...the top bracket. Attach the top bracket to restore power at the service panel. 4 Printed in Korea Tabs Screws Tabs 6 INSTALL THE TRIM FRAME A Place the trim frame over the microwave oven. Flat-head screws 164D3370P328 49-40398 06-03 JR Flat-head screws 7 REPLACE ANY LOOSE ITEMS A Your...
... through the holes in the microwave oven. Replace any loose items that were removed from the inside bottom). B Keep these installation instructions for future reference. B Snap the two spring clips on the trim frame into the slots on the top bracket. Secure the trim frame using nine bronze round...the top bracket. Attach the top bracket to restore power at the service panel. 4 Printed in Korea Tabs Screws Tabs 6 INSTALL THE TRIM FRAME A Place the trim frame over the microwave oven. Flat-head screws 164D3370P328 49-40398 06-03 JR Flat-head screws 7 REPLACE ANY LOOSE ITEMS A Your...


