Installation Instructions
Page 1
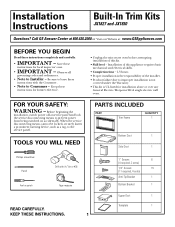
.... Call GE Answer Center at 800.626.2000 or Visit our Website at service panel and lock the service disconnecting means to leave these instructions for future reference. • Unplug the microwave oven before attempting installation of the installer. •...Phillips screwdriver Pencil Awl or punch Drill with the Consumer. • Note to Installer - Keep these instructions with 7⁄64″ bit or #35 Tape measure READ CAREFULLY. Installation Instructions Built-In Trim Kits JX1827 and JX1830 Questions? Observe all governing codes and ordinances. • ...
.... Call GE Answer Center at 800.626.2000 or Visit our Website at service panel and lock the service disconnecting means to leave these instructions for future reference. • Unplug the microwave oven before attempting installation of the installer. •...Phillips screwdriver Pencil Awl or punch Drill with the Consumer. • Note to Installer - Keep these instructions with 7⁄64″ bit or #35 Tape measure READ CAREFULLY. Installation Instructions Built-In Trim Kits JX1827 and JX1830 Questions? Observe all governing codes and ordinances. • ...
Installation Instructions
Page 2
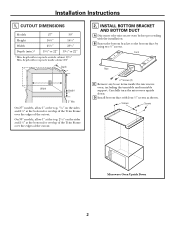
Installation Instructions 1. Front Rear Width Height 3″ Min. On 30″ models, allow 1″ at the top, 11⁄16″ on the sides and 13⁄8″ at the bottom for overlap of the Trim Frame over the edges of the cutout. 1⁄2″ Screws (2) C Remove any loose items inside cabinet 22″ Depth...
Installation Instructions 1. Front Rear Width Height 3″ Min. On 30″ models, allow 1″ at the top, 11⁄16″ on the sides and 13⁄8″ at the bottom for overlap of the Trim Frame over the edges of the cutout. 1⁄2″ Screws (2) C Remove any loose items inside cabinet 22″ Depth...
Installation Instructions
Page 3
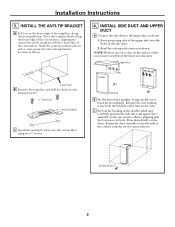
...aligning the center line of the cabinet with an awl or center punch for the anti-tip bracket. 1⁄2″ Screws (2) Anti-Tip Bracket C Install the anti-tip bracket onto the cutout floor using two 1⁄2″ screws. 4. C Peel off the backing of the microwave oven before the ducts... upper duct assembly on the ducts. Cutout Floor B Remove the template and drill two holes for the anti-tip bracket location as shown. 1. Installation Instructions 3. Bend the tabs up with the center line of the microwave oven. NOTE: Remove any oil or dirt on the surface of the double ...
...aligning the center line of the cabinet with an awl or center punch for the anti-tip bracket. 1⁄2″ Screws (2) Anti-Tip Bracket C Install the anti-tip bracket onto the cutout floor using two 1⁄2″ screws. 4. C Peel off the backing of the microwave oven before the ducts... upper duct assembly on the ducts. Cutout Floor B Remove the template and drill two holes for the anti-tip bracket location as shown. 1. Installation Instructions 3. Bend the tabs up with the center line of the microwave oven. NOTE: Remove any oil or dirt on the surface of the double ...
Installation Instructions
Page 4
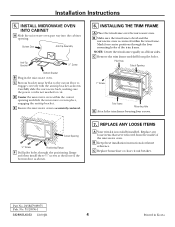
... Ensure the microwave oven is now fully installed. B Make sure the trim frame is level and the microwave oven is not mashed or cut. Installation Instructions 5. NOTE: Center the trim frame equally on all four sides. C Remove the trim frame and drill four pilot holes. Cutout ... Flange F Drill pilot holes through the four mounting holes of the microwave oven. B Keep these installation instructions for future reference. INSTALLING THE TRIM FRAME A Place the trim frame over the microwave oven. Carefully slide the microwave back, making sure the power cord is centered...
... Ensure the microwave oven is now fully installed. B Make sure the trim frame is level and the microwave oven is not mashed or cut. Installation Instructions 5. NOTE: Center the trim frame equally on all four sides. C Remove the trim frame and drill four pilot holes. Cutout ... Flange F Drill pilot holes through the four mounting holes of the microwave oven. B Keep these installation instructions for future reference. INSTALLING THE TRIM FRAME A Place the trim frame over the microwave oven. Carefully slide the microwave back, making sure the power cord is centered...

