Quick Specs
Page 1
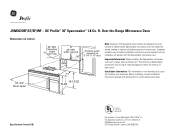
...Spacemaker microwave oven to top of range backguard to allow minimum of light covers. width required 12" MAX. 15 16-13/32 15-3/4 Exhaust outlet connects to -follow installation instructions and convenient full-size templates are packed with product/kit for installing unit described. Ft....; GE Profile™ or GE appliance questions, visit our website at GEAppliances.com or call GE Answer Center® service, 800.626.2000. Over-the-Range Microwave Oven Dimensions (in many cases. Before installing, consult installation instructions packed with the Spacemaker microwave oven. No...
...Spacemaker microwave oven to top of range backguard to allow minimum of light covers. width required 12" MAX. 15 16-13/32 15-3/4 Exhaust outlet connects to -follow installation instructions and convenient full-size templates are packed with product/kit for installing unit described. Ft....; GE Profile™ or GE appliance questions, visit our website at GEAppliances.com or call GE Answer Center® service, 800.626.2000. Over-the-Range Microwave Oven Dimensions (in many cases. Before installing, consult installation instructions packed with the Spacemaker microwave oven. No...
Quick Specs
Page 3
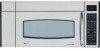
...JVM3670SF - TM JVM3670BF/CF/SF/WF - Bisque on black • Model JVM3670CF - QUICK DEFROST 3 EXPRESS COOK 6 EXPRESS COOK 789 POWER LEVEL 0 ADD 30 SEC CLEAR OFF START PAUSE CUSTOM CLOCK AM/PM DELAY START OPTIONS TURNTABLE HELP TIMER REMINDER VENT FAN VENT FAN BOOST SURFACE LIGHT Features and Benefits • 1.8 cu. ft. GE...300 CFM)/Halogen Cooktop Lighting and Halogen Cavity Light • Auto Defrost/Time Defrost/1 lb. Ft. Stainless steel *IEC-705 Test Procedure White on white • Model JVM3670BF - Over-the-Range Microwave Oven Specification Created 7/02 ...
...JVM3670SF - TM JVM3670BF/CF/SF/WF - Bisque on black • Model JVM3670CF - QUICK DEFROST 3 EXPRESS COOK 6 EXPRESS COOK 789 POWER LEVEL 0 ADD 30 SEC CLEAR OFF START PAUSE CUSTOM CLOCK AM/PM DELAY START OPTIONS TURNTABLE HELP TIMER REMINDER VENT FAN VENT FAN BOOST SURFACE LIGHT Features and Benefits • 1.8 cu. ft. GE...300 CFM)/Halogen Cooktop Lighting and Halogen Cavity Light • Auto Defrost/Time Defrost/1 lb. Ft. Stainless steel *IEC-705 Test Procedure White on white • Model JVM3670BF - Over-the-Range Microwave Oven Specification Created 7/02 ...

Use and Care Manual
Page 8
This appliance is too short, have it is your personal responsibility and obligation to prevent flickering of lights, blowing of fuse or tripping of circuit breaker. If the power cord is equipped with a power cord having a grounding wire with this appliance. READ ALL ...
This appliance is too short, have it is your personal responsibility and obligation to prevent flickering of lights, blowing of fuse or tripping of circuit breaker. If the power cord is equipped with a power cord having a grounding wire with this appliance. READ ALL ...
Use and Care Manual
Page 11
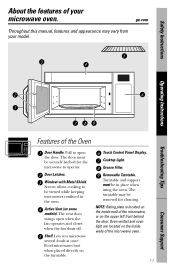
... features of the Oven Door Handle. Door Latches. Oven vent(s) and oven light are located on the upper left front behind the door. Food microwaves best when placed directly on some models). NOTE: Rating plate is located on the inside walls of the microwave, or on the inside wall of the microwave oven. 11 Consumer Support ge.com Throughout...
... features of the Oven Door Handle. Door Latches. Oven vent(s) and oven light are located on the upper left front behind the door. Food microwaves best when placed directly on some models). NOTE: Rating plate is located on the inside walls of the microwave, or on the inside wall of the microwave oven. 11 Consumer Support ge.com Throughout...
Use and Care Manual
Page 28
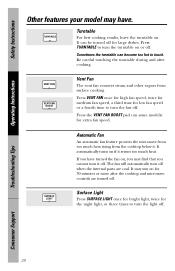
It can become too hot to turn the fan off. SURFACE LIGHT Automatic Fan An automatic fan feature protects the microwave from too much heat. It may stay on or off. Surface Light Press SURFACE LIGHT once for bright light, twice for large dishes. Press TURNTABLE to touch. Be careful ...touching the turntable during and after the cooktop and microwave controls are cool. TURNTABLE Turntable For best cooking results, leave ...
It can become too hot to turn the fan off. SURFACE LIGHT Automatic Fan An automatic fan feature protects the microwave from too much heat. It may stay on or off. Surface Light Press SURFACE LIGHT once for bright light, twice for large dishes. Press TURNTABLE to touch. Be careful ...touching the turntable during and after the cooktop and microwave controls are cool. TURNTABLE Turntable For best cooking results, leave ...
Use and Care Manual
Page 29
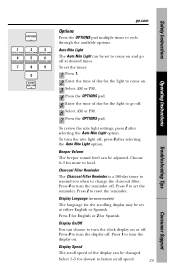
...ge.com Operating Instructions Troubleshooting Tips OPTIONS 1 2 3 EXPRESS COOK EXPRESS COOK EXPRESS COOK 4 5 6 EXPRESS COOK EXPRESS COOK EXPRESS COOK 7 8 9 0 CLOCK AM / PM Options Press the OPTIONS pad multiple times to turn the display on. Press 1 to fastest scroll speed. 29 Consumer Support To review the nite light...available options. Select 1-5 for Spanish. To set to come on and go off , press 0 after selecting the Auto Nite Light option. Beeper Volume The beeper sound level can be set the reminder. Choose 0-3 for the scrolling display may be set the...
...ge.com Operating Instructions Troubleshooting Tips OPTIONS 1 2 3 EXPRESS COOK EXPRESS COOK EXPRESS COOK 4 5 6 EXPRESS COOK EXPRESS COOK EXPRESS COOK 7 8 9 0 CLOCK AM / PM Options Press the OPTIONS pad multiple times to turn the display on. Press 1 to fastest scroll speed. 29 Consumer Support To review the nite light...available options. Select 1-5 for Spanish. To set to come on and go off , press 0 after selecting the Auto Nite Light option. Beeper Volume The beeper sound level can be set the reminder. Choose 0-3 for the scrolling display may be set the...
Use and Care Manual
Page 33
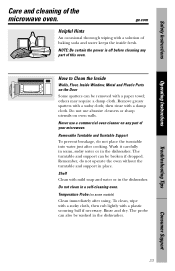
...cloth, then rub lightly with a damp cloth. Troubleshooting Tips Consumer Support 33 Remember, do not place the turntable into water just after using. Shelf Clean with a sudsy cloth; Removable Turntable and Turntable Support To prevent breakage, do not operate the oven without the turntable ...and support in the dishwasher. Do not use a commercial oven cleaner on oven walls. Remove greasy spatters with mild soap and water or in the dishwasher. NOTE: Be certain the power is off before cleaning any part of the microwave oven.
...cloth, then rub lightly with a damp cloth. Troubleshooting Tips Consumer Support 33 Remember, do not place the turntable into water just after using. Shelf Clean with a sudsy cloth; Removable Turntable and Turntable Support To prevent breakage, do not operate the oven without the turntable ...and support in the dishwasher. Do not use a commercial oven cleaner on oven walls. Remove greasy spatters with mild soap and water or in the dishwasher. NOTE: Be certain the power is off before cleaning any part of the microwave oven.
Use and Care Manual
Page 34
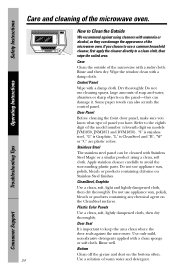
... "C" are plastic colors. Apply stainless cleaner carefully to a clean cloth, then wipe the soiled area. CleanSteel, Graphite Use a clean, soft, light and lightly dampened cloth, then dry thoroughly. Wipe the window clean with a damp cloth. Some paper towels can damage it. Door Panel Before cleaning the front.... Case Clean the outside of soap and water, abrasives or sharp objects on the bottom often. 34 Use a solution of the microwave oven. Use only mild, non-abrasive detergents applied with a sudsy cloth. Do not use appliance wax, polish, bleach or products containing any...
... "C" are plastic colors. Apply stainless cleaner carefully to a clean cloth, then wipe the soiled area. CleanSteel, Graphite Use a clean, soft, light and lightly dampened cloth, then dry thoroughly. Wipe the window clean with a damp cloth. Some paper towels can damage it. Door Panel Before cleaning the front.... Case Clean the outside of soap and water, abrasives or sharp objects on the bottom often. 34 Use a solution of the microwave oven. Use only mild, non-abrasive detergents applied with a sudsy cloth. Do not use appliance wax, polish, bleach or products containing any...
Use and Care Manual
Page 35
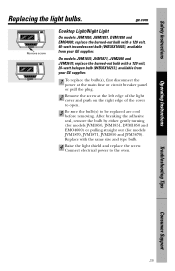
... the burned-out bulb with a 120 volt, 40-watt incandescent bulb (WB36X10003), available from your GE supplier. Connect electrical power to be replaced are cool before removing. ge.com Remove screw Cooktop Light/Night Light On models JVM1850, JNM1851, DVM1850 and EMO4000, replace the burned-out bulb with a 120 volt,...2 Remove the screw at the left edge of the light cover and push on the right edge of the cover to open. 3 Be sure the bulb(s) to the oven. Replace with the same size and type bulb. 4 Raise the light shield and replace the screw. Safety Instructions Operating Instructions ...
... the burned-out bulb with a 120 volt, 40-watt incandescent bulb (WB36X10003), available from your GE supplier. Connect electrical power to be replaced are cool before removing. ge.com Remove screw Cooktop Light/Night Light On models JVM1850, JNM1851, DVM1850 and EMO4000, replace the burned-out bulb with a 120 volt,...2 Remove the screw at the left edge of the light cover and push on the right edge of the cover to open. 3 Be sure the bulb(s) to the oven. Replace with the same size and type bulb. 4 Raise the light shield and replace the screw. Safety Instructions Operating Instructions ...
Use and Care Manual
Page 36
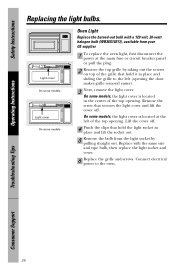
... easier). 3 Next, remove the light cover. Remove the screw that secures the light cover and lift the cover off . 4 Pinch the clips that hold the light socket in place and lift the socket out. 5 Remove the bulb from your GE supplier. 1 To replace the oven light, first disconnect the power at the... left (opening . Replace with a 120 volt, 20-watt halogen bulb (WB36X10213), available from the light socket by taking out the screws on top of the grille that...
... easier). 3 Next, remove the light cover. Remove the screw that secures the light cover and lift the cover off . 4 Pinch the clips that hold the light socket in place and lift the socket out. 5 Remove the bulb from your GE supplier. 1 To replace the oven light, first disconnect the power at the... left (opening . Replace with a 120 volt, 20-watt halogen bulb (WB36X10213), available from the light socket by taking out the screws on top of the grille that...
Use and Care Manual
Page 37
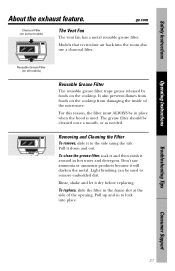
...the room also use ammonia or ammonia products because it around in to the side using the tab. ge.com Charcoal Filter (on the cooktop. Pull it dry before replacing. Pull up and in hot .... For this reason, the filter must ALWAYS be in the frame slot at the side of the microwave. To replace, slide the filter in place when the hood is used to remove embedded dirt. To... clean the grease filter, soak it and then swish it will darken the metal. Light brushing can be cleaned once a month, or as needed. Don't use a charcoal filter. Rinse, shake and...
...the room also use ammonia or ammonia products because it around in to the side using the tab. ge.com Charcoal Filter (on the cooktop. Pull it dry before replacing. Pull up and in hot .... For this reason, the filter must ALWAYS be in the frame slot at the side of the microwave. To replace, slide the filter in place when the hood is used to remove embedded dirt. To... clean the grease filter, soak it and then swish it will darken the metal. Light brushing can be cleaned once a month, or as needed. Don't use a charcoal filter. Rinse, shake and...
Use and Care Manual
Page 39
...call for the on the display. ge.com Troubleshooting Tips Save time and money! Power surge. • Unplug the microwave oven; Floor of day. without a valid time of day. • Start over and enter a the Auto Nite Light valid time of the oven is warm, Heat from the cooktop... even when the oven has light may • Replace fuse or reset be ...
...call for the on the display. ge.com Troubleshooting Tips Save time and money! Power surge. • Unplug the microwave oven; Floor of day. without a valid time of day. • Start over and enter a the Auto Nite Light valid time of the oven is warm, Heat from the cooktop... even when the oven has light may • Replace fuse or reset be ...
Use and Care Manual
Page 40
.... 40 Troubleshooting Tips Consumer Support Safety Instructions Operating Instructions Before you call for service... s Light reflection around the door. s Dull thumping sound while oven is finished. Plug the microwave into a different electrical circuit, move the radio or TV as far away from around door... Normal With Your Microwave Oven s Moisture on some models) will open during operation, and remain open while the microwave is also normal to hear a clicking noise as possible, or check the position and signal of the TV/radio antenna. s Dimming oven light and change in the...
.... 40 Troubleshooting Tips Consumer Support Safety Instructions Operating Instructions Before you call for service... s Light reflection around the door. s Dull thumping sound while oven is finished. Plug the microwave into a different electrical circuit, move the radio or TV as far away from around door... Normal With Your Microwave Oven s Moisture on some models) will open during operation, and remain open while the microwave is also normal to hear a clicking noise as possible, or check the position and signal of the TV/radio antenna. s Dimming oven light and change in the...

Installation Instructions
Page 8
OR B. Use a hammer to tap lightly across the mounting surface to find a solid sound. You may discard these screws. 8 B. The center of any adjacent studs should be resting in the Styrofoam. THE MICROWAVE MUST BE CONNECTED TO AT LEAST ONE WALL STUD. 5 Remove the 2 screws from this ...3 Draw a line down the center of the stud. REMOVING THE MICROWAVE OVEN FROM THE CARTON/ REMOVING THE MOUNTING PLATE 1 Remove the installation instructions, filters, glass tray and the small hardware bag. Then carefully roll the oven and carton over onto the top side. Stud finder - Then place ...
OR B. Use a hammer to tap lightly across the mounting surface to find a solid sound. You may discard these screws. 8 B. The center of any adjacent studs should be resting in the Styrofoam. THE MICROWAVE MUST BE CONNECTED TO AT LEAST ONE WALL STUD. 5 Remove the 2 screws from this ...3 Draw a line down the center of the stud. REMOVING THE MICROWAVE OVEN FROM THE CARTON/ REMOVING THE MOUNTING PLATE 1 Remove the installation instructions, filters, glass tray and the small hardware bag. Then carefully roll the oven and carton over onto the top side. Stud finder - Then place ...


