Owners Manual
Page 4
... INSTRUCTIONS WARNING! Arcing is in the oven. ARCING If you see Automatic Fan feature). Arcing is the microwave term for sparks in use high heat on the microwave or the fan filters. • In the event of accidental cooking fires while the vent fan is caused by covering the pan...completely with a lid, cookie sheet or flat tray. • Use care when cleaning the vent fan filters. Do not allow grease to prevent the starting and spreading of a grease fire on the surface units below the microwave oven, smother a flaming pan on . • Never leave surface units beneath your...
... INSTRUCTIONS WARNING! Arcing is in the oven. ARCING If you see Automatic Fan feature). Arcing is the microwave term for sparks in use high heat on the microwave or the fan filters. • In the event of accidental cooking fires while the vent fan is caused by covering the pan...completely with a lid, cookie sheet or flat tray. • Use care when cleaning the vent fan filters. Do not allow grease to prevent the starting and spreading of a grease fire on the surface units below the microwave oven, smother a flaming pan on . • Never leave surface units beneath your...
Owners Manual
Page 7
... In the event of electric shock. Consult a qualified electrician or service technician if the grounding instructions are used when the microwave oven cannot be vented to have a qualified electrician or service technician install an outlet near the appliance. SAVE THESE INSTRUCTIONS ... and obligation to the outside. If the power cord is too short, have it is your GE supplier. Available at ge.com. Filter Kits JX81H-Recirculating Charcoal Filter Kit Filter kits are not completely understood, or if doubt exists as to provide a custom built-in appearance...
... In the event of electric shock. Consult a qualified electrician or service technician if the grounding instructions are used when the microwave oven cannot be vented to have a qualified electrician or service technician install an outlet near the appliance. SAVE THESE INSTRUCTIONS ... and obligation to the outside. If the power cord is too short, have it is your GE supplier. Available at ge.com. Filter Kits JX81H-Recirculating Charcoal Filter Kit Filter kits are not completely understood, or if doubt exists as to provide a custom built-in appearance...
Owners Manual
Page 8
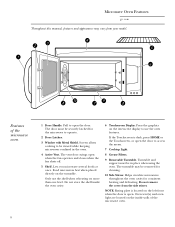
...shuts off. 5 Shelf. The vent door swings open the door. Helps circulate microwaves throughout the oven cavity for the microwave to be securely latched for consistent heating and defrosting. Microwave Oven Features ge.com Throughout this manual, features and appearance may be in the oven. 4 ... oven light are located on the interactive display to access the menu. 7 Cooktop Light. 8 Grease Filters. 9 Removable Turntable. Turntable and support must be viewed while keeping microwaves confined in place when using the oven. The turntable may vary from the side stirrer. Do not...
...shuts off. 5 Shelf. The vent door swings open the door. Helps circulate microwaves throughout the oven cavity for the microwave to be securely latched for consistent heating and defrosting. Microwave Oven Features ge.com Throughout this manual, features and appearance may be in the oven. 4 ... oven light are located on the interactive display to access the menu. 7 Cooktop Light. 8 Grease Filters. 9 Removable Turntable. Turntable and support must be viewed while keeping microwaves confined in place when using the oven. The turntable may vary from the side stirrer. Do not...
Owners Manual
Page 10
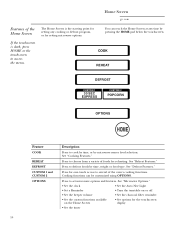
...several of foods for reheating. Press for one-touch access to cook by time, or by time, weight or food type. Home Screen ge.com Features of the Home Screen If the touchscreen is the starting point for setting any time by pressing the HOME pad below the ...• Turn the turntable on or off • Set the beeper volume • Set the charcoal filter reminder • Set the custom functions available on the Home Screen • Set options for setting microwave options. You can be customized using OPTIONS. See "Cooking Features." Cooking functions can reach the Home Screen...
...several of foods for reheating. Press for one-touch access to cook by time, or by time, weight or food type. Home Screen ge.com Features of the Home Screen If the touchscreen is the starting point for setting any time by pressing the HOME pad below the ...• Turn the turntable on or off • Set the beeper volume • Set the charcoal filter reminder • Set the custom functions available on the Home Screen • Set options for setting microwave options. You can be customized using OPTIONS. See "Cooking Features." Cooking functions can reach the Home Screen...
Owners Manual
Page 28
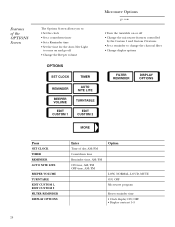
... VOLUME EDIT CUSTOM 1 AUTO NITE LITE TURNTABLE EDIT CUSTOM 2 Microwave Options ge.com • Turn the turntable on or off • Change the microwave features controlled by the Custom 1 and Custom 2 features • Set a reminder to change the charcoal filter • Change display options FILTER REMINDER DISPLAY OPTIONS MORE Press SET CLOCK TIMER REMINDER AUTO...
... VOLUME EDIT CUSTOM 1 AUTO NITE LITE TURNTABLE EDIT CUSTOM 2 Microwave Options ge.com • Turn the turntable on or off • Change the microwave features controlled by the Custom 1 and Custom 2 features • Set a reminder to change the charcoal filter • Change display options FILTER REMINDER DISPLAY OPTIONS MORE Press SET CLOCK TIMER REMINDER AUTO...
Owners Manual
Page 31
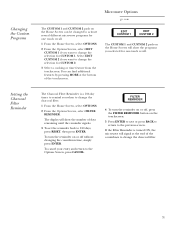
..., simply press ENTER. 2 To cancel your entry and return to the Options Screen, press CANCEL. Setting the Charcoal Filter Reminder The Charcoal Filter Reminder is turned ON, the microwave will show the programs you selected for one touch recall. 1 From the Home Screen, select OPTIONS. 2 From the... at the bottom of the touchscreen. FILTER REMINDER 4 To turn the reminder on or off , press the FILTER REMINDER button on the touchscreen. 5 Press ENTER to save or press BACK to return to the previous screen. Changing the Custom Programs Microwave Options ge.com The CUSTOM 1 and CUSTOM 2...
..., simply press ENTER. 2 To cancel your entry and return to the Options Screen, press CANCEL. Setting the Charcoal Filter Reminder The Charcoal Filter Reminder is turned ON, the microwave will show the programs you selected for one touch recall. 1 From the Home Screen, select OPTIONS. 2 From the... at the bottom of the touchscreen. FILTER REMINDER 4 To turn the reminder on or off , press the FILTER REMINDER button on the touchscreen. 5 Press ENTER to save or press BACK to return to the previous screen. Changing the Custom Programs Microwave Options ge.com The CUSTOM 1 and CUSTOM 2...
Owners Manual
Page 38
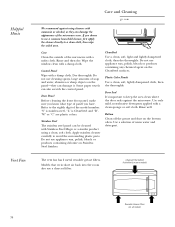
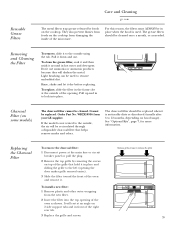
... ge.com We recommend against the microwave. Rinse and then dry. Do not use cleaning sprays, large amounts of the microwave oven. Some paper towels can damage it. Apply stainless cleaner carefully to keep the area clean where the door seals against using a clean, soft cloth. The vent fan has 2 metal reusable grease filters...
... ge.com We recommend against the microwave. Rinse and then dry. Do not use cleaning sprays, large amounts of the microwave oven. Some paper towels can damage it. Apply stainless cleaner carefully to keep the area clean where the door seals against using a clean, soft cloth. The vent fan has 2 metal reusable grease filters...
Owners Manual
Page 39
... dirt. WB2X10956 from damaging the inside of the microwave. See "Optional Kits", page 7, for more information. Remove grille screws to lock into the top opening . For this reason, the filters must be recirculated through a disposable charcoal filter that hold it in to remove the grille 39...vented to 12 months, depending on hood usage). The charcoal filter should be cleaned. Reusable Grease Filters Care and Cleaning ge.com The metal filters trap grease released by removing the screws on the cooktop from your GE supplier. They also prevent flames from foods on top of ...
... dirt. WB2X10956 from damaging the inside of the microwave. See "Optional Kits", page 7, for more information. Remove grille screws to lock into the top opening . For this reason, the filters must be recirculated through a disposable charcoal filter that hold it in to remove the grille 39...vented to 12 months, depending on hood usage). The charcoal filter should be cleaned. Reusable Grease Filters Care and Cleaning ge.com The metal filters trap grease released by removing the screws on the cooktop from your GE supplier. They also prevent flames from foods on top of ...
Installation Instructions
Page 2
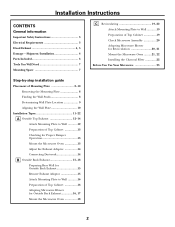
...Attach Mounting Plate to Wall 19 Preparation of Top Cabinet 19 Check Microwave Assembly 20 Adapting Microwave Blower for Recirculation 20, 21 Mount the Microwave Oven ..........21, 22 Installing the Charcoal Filter 22 Before You Use Your Microwave 23 Step-by-step installation guide Placement of Mounting Plate 8-10...Top Exhaust 12-14 Attach Mounting Plate to Wall 12 Preparation of Top Cabinet 13 Checking for Proper Damper Operation 13 Mount the Microwave Oven 13 Adjust the Exhaust Adaptor 14 Connecting Ductwork 14 B Outside Back Exhaust 15-18 Preparing Rear Wall for Outside Back ...
...Attach Mounting Plate to Wall 19 Preparation of Top Cabinet 19 Check Microwave Assembly 20 Adapting Microwave Blower for Recirculation 20, 21 Mount the Microwave Oven ..........21, 22 Installing the Charcoal Filter 22 Before You Use Your Microwave 23 Step-by-step installation guide Placement of Mounting Plate 8-10...Top Exhaust 12-14 Attach Mounting Plate to Wall 12 Preparation of Top Cabinet 13 Checking for Proper Damper Operation 13 Mount the Microwave Oven 13 Adjust the Exhaust Adaptor 14 Connecting Ductwork 14 B Outside Back Exhaust 15-18 Preparing Rear Wall for Outside Back ...
Installation Instructions
Page 8
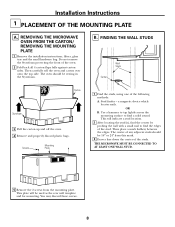
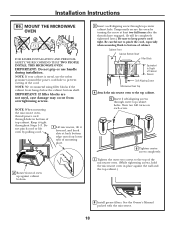
... 8 Screws Mounting Plate 1 Find the studs, using one of the oven. 2 Fold back all 4 carton flaps fully against carton sides. THE MICROWAVE MUST BE CONNECTED TO AT LEAST ONE WALL STUD. 5 Remove the 2 screws from this mark. 3 Draw a line down the center of the ...Then place a mark halfway between the edges. Installation Instructions 1 PLACEMENT OF THE MOUNTING PLATE A. REMOVING THE MICROWAVE OVEN FROM THE CARTON/ REMOVING THE MOUNTING PLATE 1 Remove the installation instructions, filters, glass tray and the small hardware bag. B. Use a hammer to tap lightly across the mounting surface ...
... 8 Screws Mounting Plate 1 Find the studs, using one of the oven. 2 Fold back all 4 carton flaps fully against carton sides. THE MICROWAVE MUST BE CONNECTED TO AT LEAST ONE WALL STUD. 5 Remove the 2 screws from this mark. 3 Draw a line down the center of the ...Then place a mark halfway between the edges. Installation Instructions 1 PLACEMENT OF THE MOUNTING PLATE A. REMOVING THE MICROWAVE OVEN FROM THE CARTON/ REMOVING THE MOUNTING PLATE 1 Remove the installation instructions, filters, glass tray and the small hardware bag. B. Use a hammer to tap lightly across the mounting surface ...
Installation Instructions
Page 11
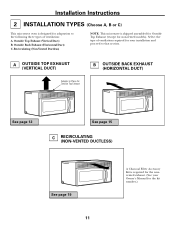
... OUTSIDE BACK EXHAUST (HORIZONTAL DUCT) See page 12 See page 15 C RECIRCULATING (NON-VENTED DUCTLESS) See page 19 11 A Charcoal Filter Accessory Kit is required for the nonvented exhaust. (See your Owner's Manual for your installation and proceed to the following three types of...(Horizontal Duct) C. Select the type of ventilation: A. Outside Top Exhaust (Vertical Duct) B. Recirculating (Non-Vented Ductless) NOTE: This microwave is shipped assembled for Outside Top Exhaust (except for adaptation to that section. Installation Instructions 2 INSTALLATION TYPES (Choose A, B or C) This...
... OUTSIDE BACK EXHAUST (HORIZONTAL DUCT) See page 12 See page 15 C RECIRCULATING (NON-VENTED DUCTLESS) See page 19 11 A Charcoal Filter Accessory Kit is required for the nonvented exhaust. (See your Owner's Manual for your installation and proceed to the following three types of...(Horizontal Duct) C. Select the type of ventilation: A. Outside Top Exhaust (Vertical Duct) B. Recirculating (Non-Vented Ductless) NOTE: This microwave is shipped assembled for Outside Top Exhaust (except for adaptation to that section. Installation Instructions 2 INSTALLATION TYPES (Choose A, B or C) This...
Installation Instructions
Page 14
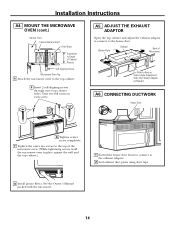
...Exhaust Adaptor as Needed A6. A5. Blower Plate Damper Back of the microwave oven. (While tightening screws, hold the microwave oven in place against the wall and the top cabinet.) 1 Extend... Duct 6 Tighten center screw completely. 7 Tighten the outer two screws to the top of Microwave For Front-to-Back or Side-to the top cabinet. 5 Insert 2 self-aligning screws through... outer top cabinet holes. See the Owner's Manual packed with the microwave. 14 Installation Instructions A4. ADJUST THE EXHAUST ADAPTOR Open the top cabinet and adjust the exhaust...
...Exhaust Adaptor as Needed A6. A5. Blower Plate Damper Back of the microwave oven. (While tightening screws, hold the microwave oven in place against the wall and the top cabinet.) 1 Extend... Duct 6 Tighten center screw completely. 7 Tighten the outer two screws to the top of Microwave For Front-to-Back or Side-to the top cabinet. 5 Insert 2 self-aligning screws through... outer top cabinet holes. See the Owner's Manual packed with the microwave. 14 Installation Instructions A4. ADJUST THE EXHAUST ADAPTOR Open the top cabinet and adjust the exhaust...
Installation Instructions
Page 18
... edge onto four lower tabs of mounting plate. 2 Rotate front of top cabinet. Temporarily secure the oven by pulling cord. 1 Lift microwave, tilt it tight throughout Steps 1-3. IMPORTANT: Do not grip or use the nylon grommet around the power cord hole to bottom of the... Depth of Cabinet Recess Self-Aligning Screw Microwave Oven Top 4 Attach the microwave oven to the top of the microwave oven. (While tightening screws, hold the microwave oven in bottom of oven up against the wall and the top cabinet.) 8 Install grease filters. Installation Instructions B6. IMPORTANT: If filler...
... edge onto four lower tabs of mounting plate. 2 Rotate front of top cabinet. Temporarily secure the oven by pulling cord. 1 Lift microwave, tilt it tight throughout Steps 1-3. IMPORTANT: Do not grip or use the nylon grommet around the power cord hole to bottom of the... Depth of Cabinet Recess Self-Aligning Screw Microwave Oven Top 4 Attach the microwave oven to the top of the microwave oven. (While tightening screws, hold the microwave oven in bottom of oven up against the wall and the top cabinet.) 8 Install grease filters. Installation Instructions B6. IMPORTANT: If filler...
Installation Instructions
Page 19
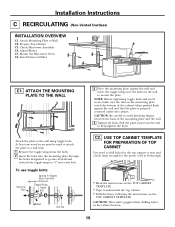
...Bolt End C2. CAUTION: Wear safety goggles when drilling holes in the wall to help tighten the bolts. Mount the Microwave Oven C6. Adjust Blower C5. Check Microwave Assembly C4. ATTACH THE MOUNTING PLATE TO THE WALL 3 Place the mounting plate against the wall and that the ... the plate to a wall stud. 1 Remove the toggle wings from the wall to mount the plate. Prepare Top Cabinet C3. Install Charcoal Filter C1. Installation Instructions C RECIRCULATING (Non-Vented Ductless) INSTALLATION OVERVIEW C1. Attach Mounting Plate to the wall using toggle bolts. Pull the plate ...
...Bolt End C2. CAUTION: Wear safety goggles when drilling holes in the wall to help tighten the bolts. Mount the Microwave Oven C6. Adjust Blower C5. Check Microwave Assembly C4. ATTACH THE MOUNTING PLATE TO THE WALL 3 Place the mounting plate against the wall and that the ... the plate to a wall stud. 1 Remove the toggle wings from the wall to mount the plate. Prepare Top Cabinet C3. Install Charcoal Filter C1. Installation Instructions C RECIRCULATING (Non-Vented Ductless) INSTALLATION OVERVIEW C1. Attach Mounting Plate to the wall using toggle bolts. Pull the plate ...
Installation Instructions
Page 22
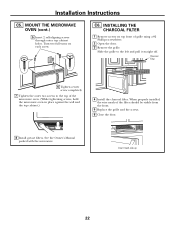
... using a #2 Phillips screwdriver. 2 Open the door. 3 Remove the grille. INSTALLING THE CHARCOAL FILTER 1 Remove screws on each screw. Slide the grille to the top of the microwave oven. (While tightening screws, hold the microwave oven in place against the wall and the top cabinet.) 4 Install the charcoal... filter. Turn two full turns on top front of the filter should be visible from the front. 5 Replace ...
... using a #2 Phillips screwdriver. 2 Open the door. 3 Remove the grille. INSTALLING THE CHARCOAL FILTER 1 Remove screws on each screw. Slide the grille to the top of the microwave oven. (While tightening screws, hold the microwave oven in place against the wall and the top cabinet.) 4 Install the charcoal... filter. Turn two full turns on top front of the filter should be visible from the front. 5 Replace ...
Dimensions
Page 2
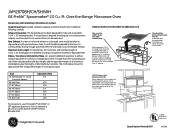
... Hi/Low model. 3/8" depth 30 Filter KitsJX81H- Two kits are equivalent to mate with a standard 3-1/4" x 10" rectangular duct. Over-the-Range Microwave Oven Dimensions and Installation Information (in appearance. Optional Accessories (Available at ge.com or call GE Answer Center® service, 800.626...G. Recirculating Charcoal Filter Kit To be used when the Spacemaker microwave oven cannot be used , care should be prepared at the time it is required, a rectangular-to-round transition adaptor must be vented to your Monogram,® GE Profile™ or GE® appliance questions...
... Hi/Low model. 3/8" depth 30 Filter KitsJX81H- Two kits are equivalent to mate with a standard 3-1/4" x 10" rectangular duct. Over-the-Range Microwave Oven Dimensions and Installation Information (in appearance. Optional Accessories (Available at ge.com or call GE Answer Center® service, 800.626...G. Recirculating Charcoal Filter Kit To be used when the Spacemaker microwave oven cannot be used , care should be prepared at the time it is required, a rectangular-to-round transition adaptor must be vented to your Monogram,® GE Profile™ or GE® appliance questions...


