Owners Manual
Page 1
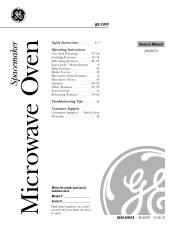
Back Cover Warranty 42 Owner's Manual JVM2070 Write the model and serial numbers here: Model Serial Find these numbers on a label on the left front when the door is open. DE68-02561A 49-40478 01-06 JR Spacemaker Microwave Oven ge.com Safety Instructions 2-7 Operating Instructions Care and Cleaning 37-40 Cooking Features 12-18 Defrosting Features 21-27 Easy Guide™ Menu System . . . . .9 Help Features 34 Home Screen 10 Microwave Oven Features . . . . . .8 Microwave Terms 36 Options 28...
Back Cover Warranty 42 Owner's Manual JVM2070 Write the model and serial numbers here: Model Serial Find these numbers on a label on the left front when the door is open. DE68-02561A 49-40478 01-06 JR Spacemaker Microwave Oven ge.com Safety Instructions 2-7 Operating Instructions Care and Cleaning 37-40 Cooking Features 12-18 Defrosting Features 21-27 Easy Guide™ Menu System . . . . .9 Help Features 34 Home Screen 10 Microwave Oven Features . . . . . .8 Microwave Terms 36 Options 28...
Owners Manual
Page 3
... openings on the same food portion. If materials inside the oven while cooking. - If food is UL listed for additional cooking time. • See door surface cleaning instructions in the Care and Cleaning of the microwave oven section of fire in succession on the appliance. • Use this manual. When using electrical appliances, basic safety precautions should be replaced by General Electric Service or an authorized service agent using a power cord available from heated surfaces. • Do not immerse power cord...
... openings on the same food portion. If materials inside the oven while cooking. - If food is UL listed for additional cooking time. • See door surface cleaning instructions in the Care and Cleaning of the microwave oven section of fire in succession on the appliance. • Use this manual. When using electrical appliances, basic safety precautions should be replaced by General Electric Service or an authorized service agent using a power cord available from heated surfaces. • Do not immerse power cord...
Owners Manual
Page 4
... covering the pan completely with a lid, cookie sheet or flat tray. • Use care when cleaning the vent fan filters. VENT FAN The fan will operate automatically under the microwave, turn the fan on the surface unit by : • The metal shelf not installed correctly so it touches the microwave wall. • Metal or foil touching the side of the microwave often. Arcing is operating. ARCING If you see Automatic Fan feature). IMPORTANT SAFETY INSTRUCTIONS...
... covering the pan completely with a lid, cookie sheet or flat tray. • Use care when cleaning the vent fan filters. VENT FAN The fan will operate automatically under the microwave, turn the fan on the surface unit by : • The metal shelf not installed correctly so it touches the microwave wall. • Metal or foil touching the side of the microwave often. Arcing is operating. ARCING If you see Automatic Fan feature). IMPORTANT SAFETY INSTRUCTIONS...
Owners Manual
Page 5
...'t defrost frozen beverages in the microwave oven for use of 180°F. Stir the liquid both before removing the container. - After heating, allow steam to escape during cooking. • Hot foods and steam can cause the container to at least an INTERNAL temperature of the microwave oven could result in injury. • Do not boil eggs in glass jars, even with no food inside...
...'t defrost frozen beverages in the microwave oven for use of 180°F. Stir the liquid both before removing the container. - After heating, allow steam to escape during cooking. • Hot foods and steam can cause the container to at least an INTERNAL temperature of the microwave oven could result in injury. • Do not boil eggs in glass jars, even with no food inside...
Owners Manual
Page 6
... microwave- IMPORTANT SAFETY INSTRUCTIONS WARNING! MICROWAVE-SAFE COOKWARE Make sure all cookware used in the microwave oven, keep the foil at least partially uncovered because they form a tight seal. If the dish heats, it is safe for a microwave-safe dish with plastic wrap, remove covering carefully and direct steam away from the heated food. When using foil in your microwave oven is suitable for use a meat thermometer while cooking...
... microwave- IMPORTANT SAFETY INSTRUCTIONS WARNING! MICROWAVE-SAFE COOKWARE Make sure all cookware used in the microwave oven, keep the foil at least partially uncovered because they form a tight seal. If the dish heats, it is safe for a microwave-safe dish with plastic wrap, remove covering carefully and direct steam away from the heated food. When using foil in your microwave oven is suitable for use a meat thermometer while cooking...
Owners Manual
Page 7
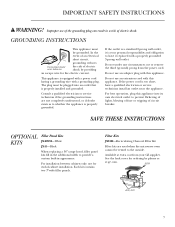
... microwave oven cannot be vented to the outside. For best operation, plug this appliance into an outlet that is properly installed and grounded. not for the electric current. Available at ge.com. If the power cord is too short, have it is equipped with a power cord having a grounding wire with this appliance. SAVE THESE INSTRUCTIONS OPTIONAL KITS Filler Panel Kits JX40WH-White JX41-Black When replacing a 36″ range hood...
... microwave oven cannot be vented to the outside. For best operation, plug this appliance into an outlet that is properly installed and grounded. not for the electric current. Available at ge.com. If the power cord is too short, have it is equipped with a power cord having a grounding wire with this appliance. SAVE THESE INSTRUCTIONS OPTIONAL KITS Filler Panel Kits JX40WH-White JX41-Black When replacing a 36″ range hood...
Owners Manual
Page 8
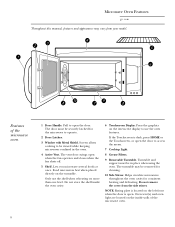
... the fan shuts off. 5 Shelf. Turntable and support must be in the oven. 4 Active Vent. Do not remove the cover from your model. The door must be securely latched for the microwave to be removed for consistent heating and defrosting. Helps circulate microwaves throughout the oven cavity for cleaning. 10 Side Stirrer. NOTE: Rating plate is open the door. Food microwaves best when placed directly on the inside the oven cavity. 6 Touchscreen Display. Screen allows cooking to operate. 2 Door Latches...
... the fan shuts off. 5 Shelf. Turntable and support must be in the oven. 4 Active Vent. Do not remove the cover from your model. The door must be securely latched for the microwave to be removed for consistent heating and defrosting. Helps circulate microwaves throughout the oven cavity for cleaning. 10 Side Stirrer. NOTE: Rating plate is open the door. Food microwaves best when placed directly on the inside the oven cavity. 6 Touchscreen Display. Screen allows cooking to operate. 2 Door Latches...
Owners Manual
Page 9
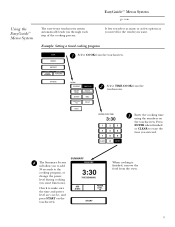
.... SUMMARY COOK TIME 3:30 TIME REMAINING ADD 30 SEC POWER LEVEL 10 START When cooking is finished, remove the food from the touchscreen. Check to erase the time you entered. EasyGuide™ Menu System ge.com It lets you select as many or as few options as you need for the results you through each step of the cooking process. Example: Setting a timed cooking program COOK REHEAT DEFROST CUSTOM...
.... SUMMARY COOK TIME 3:30 TIME REMAINING ADD 30 SEC POWER LEVEL 10 START When cooking is finished, remove the food from the touchscreen. Check to erase the time you entered. EasyGuide™ Menu System ge.com It lets you select as many or as few options as you need for the results you through each step of the cooking process. Example: Setting a timed cooking program COOK REHEAT DEFROST CUSTOM...
Owners Manual
Page 10
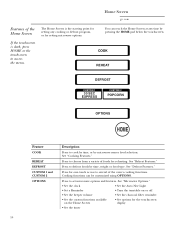
See "Cooking Features." See "Microwave Options." • Set the clock • Set the Auto Nite Light • Set a Reminder • Turn the turntable on or off • Set the beeper volume • Set the charcoal filter reminder • Set the custom functions available on the Home Screen • Set options for the touchscreen display • Set the timer 10 Press to cook by time, or by time, weight or food type. See "Defrost Features." Press to...
See "Cooking Features." See "Microwave Options." • Set the clock • Set the Auto Nite Light • Set a Reminder • Turn the turntable on or off • Set the beeper volume • Set the charcoal filter reminder • Set the custom functions available on the Home Screen • Set options for the touchscreen display • Set the timer 10 Press to cook by time, or by time, weight or food type. See "Defrost Features." Press to...
Owners Manual
Page 11
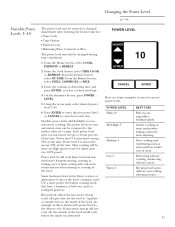
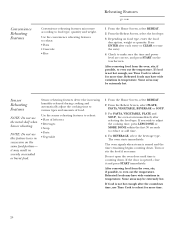
... the microwave energy cycles off , the outside of the food would cook before the inside of the food. baking casseroles and reheating. From the Defrost Screen, select BY TIME. A lower setting will cook faster but food may also be changed immediately after entering the feature time for: • Time Cook • Time Defrost • Express Cook • Reheating Pizza, Casserole or Rice The power level may need more evenly and need less...
... the microwave energy cycles off , the outside of the food would cook before the inside of the food. baking casseroles and reheating. From the Defrost Screen, select BY TIME. A lower setting will cook faster but food may also be changed immediately after entering the feature time for: • Time Cook • Time Defrost • Express Cook • Reheating Pizza, Casserole or Rice The power level may need more evenly and need less...
Owners Manual
Page 14
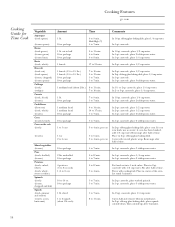
...In 1-qt. Pierce with 1/2 cup water. casserole, place washed spinach. In 1-qt. sliced 1 to 7 min. Cut in center of time. Cooking Features ge.com Cooking Guide for Time Cook Vegetable Asparagus (fresh spears) (frozen spears) Beans (fresh green) (frozen green) (frozen lima) Beets (fresh, whole) Broccoli ...glass baking dish, place squash cut into 1 inch cubes. In 11⁄2-qt. casserole, place 1/4 cup water. casserole, place 1/2 cup water. per ear 5 to 6 min. 3 to 7 min. oblong glass baking dish, place corn. if corn has been husked, add 1/4 cup water. Cover with vented...
...In 1-qt. Pierce with 1/2 cup water. casserole, place washed spinach. In 1-qt. sliced 1 to 7 min. Cut in center of time. Cooking Features ge.com Cooking Guide for Time Cook Vegetable Asparagus (fresh spears) (frozen spears) Beans (fresh green) (frozen green) (frozen lima) Beets (fresh, whole) Broccoli ...glass baking dish, place squash cut into 1 inch cubes. In 11⁄2-qt. casserole, place 1/4 cup water. casserole, place 1/2 cup water. per ear 5 to 6 min. 3 to 7 min. oblong glass baking dish, place corn. if corn has been husked, add 1/4 cup water. Cover with vented...
Owners Manual
Page 15
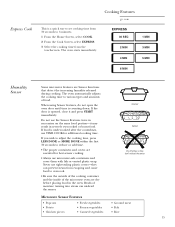
... Express Cook This is a quick way to set cooking time from 30 seconds to reduce or add time. • The proper containers and covers are essential for additional cooking time. The oven automatically adjusts the cooking time to overcook. • Be sure the outside of the cooking container and the inside of food. When using Sensor features, do not open the oven door until time is undercooked after the countdown, use the Sensor Features...
... Express Cook This is a quick way to set cooking time from 30 seconds to reduce or add time. • The proper containers and covers are essential for additional cooking time. The oven automatically adjusts the cooking time to overcook. • Be sure the outside of the cooking container and the inside of food. When using Sensor features, do not open the oven door until time is undercooked after the countdown, use the Sensor Features...
Owners Manual
Page 17
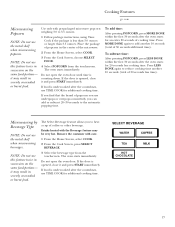
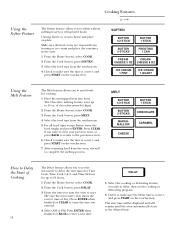
... burnt food. it may be very hot. Use only with prepackaged microwave popcorn weighing 3.0 to add another 10 seconds (total of cooking time. The oven starts immediately. If you find that the brand of coffee or other beverage. Press MORE DONE again to 3.5 ounces. 1 Follow package instructions, using Time Cook if the package is undercooked after the countdown, use TIME COOK for additional cooking time. Drinks heated with care. 1 From...
... burnt food. it may be very hot. Use only with prepackaged microwave popcorn weighing 3.0 to add another 10 seconds (total of cooking time. The oven starts immediately. If you find that the brand of coffee or other beverage. Press MORE DONE again to 3.5 ounces. 1 Follow package instructions, using Time Cook if the package is undercooked after the countdown, use TIME COOK for additional cooking time. Drinks heated with care. 1 From...
Owners Manual
Page 18
... sure the time is correct, and press START on the touchscreen. 7 After removing food from the touchscreen. 5 For all food types except Butter, enter the food weight and press ENTER. DELAY 5 Select the cooking or defrosting feature you wish to delay, then set the microwave to delay the start time will be displayed and will remain until the oven automatically starts at the delayed time. of day...
... sure the time is correct, and press START on the touchscreen. 7 After removing food from the touchscreen. 5 For all food types except Butter, enter the food weight and press ENTER. DELAY 5 Select the cooking or defrosting feature you wish to delay, then set the microwave to delay the start time will be displayed and will remain until the oven automatically starts at the delayed time. of day...
Owners Manual
Page 20
... the time and power level are correct, and press START on food type, enter the food description, weight or quantity. Press ENTER after selecting the food type. it and press START immediately. The oven starts immediately. Do not open the oven door until time is sensed and the time remaining begins counting down . Reheated foods may result in temperature. If food is not hot enough after the countdown time, use Time Cook to...
... the time and power level are correct, and press START on food type, enter the food description, weight or quantity. Press ENTER after selecting the food type. it and press START immediately. The oven starts immediately. Do not open the oven door until time is sensed and the time remaining begins counting down . Reheated foods may result in temperature. If food is not hot enough after the countdown time, use Time Cook to...
Owners Manual
Page 37
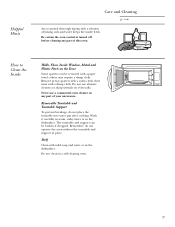
... not place the turntable into water just after cooking. Be certain the oven control is turned off before cleaning any part of baking soda and water keeps the inside fresh. Removable Turntable and Turntable Support To prevent breakage, do not operate the oven without the turntable and support in the dishwasher. Helpful Hints Care and Cleaning ge.com An occasional thorough wiping with a solution of your microwave. Remove greasy spatters with...
... not place the turntable into water just after cooking. Be certain the oven control is turned off before cleaning any part of baking soda and water keeps the inside fresh. Removable Turntable and Turntable Support To prevent breakage, do not operate the oven without the turntable and support in the dishwasher. Helpful Hints Care and Cleaning ge.com An occasional thorough wiping with a solution of your microwave. Remove greasy spatters with...
Owners Manual
Page 39
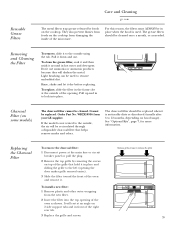
... the main fuse or circuit breaker panel or pull the plug. 2 Remove the top grille by foods on some models) The charcoal filter cannot be used . Reusable Grease Filters Care and Cleaning ge.com The metal filters trap grease released by removing the screws on 2 side support tabs and in hot water and detergent. To clean the grease filter, soak it and then swish it to remove the grille 39 Light brushing can be cleaned. Remove grille screws to the outside , the...
... the main fuse or circuit breaker panel or pull the plug. 2 Remove the top grille by foods on some models) The charcoal filter cannot be used . Reusable Grease Filters Care and Cleaning ge.com The metal filters trap grease released by removing the screws on 2 side support tabs and in hot water and detergent. To clean the grease filter, soak it and then swish it to remove the grille 39 Light brushing can be cleaned. Remove grille screws to the outside , the...
Owners Manual
Page 40
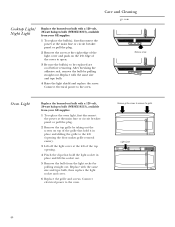
Care and Cleaning ge.com Cooktop Light/ Night Light Replace the burned-out bulb with a 120 volt, 20-watt halogen bulb (WB36X10213), available from your GE supplier. 1 To replace the oven light, first disconnect the power at the main fuse or circuit breaker panel or pull the plug. 2 Remove the top grille by pulling straight out. Connect electrical power to the oven. After breaking the adhesive seal, remove the bulb by taking out the screws on the...
Care and Cleaning ge.com Cooktop Light/ Night Light Replace the burned-out bulb with a 120 volt, 20-watt halogen bulb (WB36X10213), available from your GE supplier. 1 To replace the oven light, first disconnect the power at the main fuse or circuit breaker panel or pull the plug. 2 Remove the top grille by pulling straight out. Connect electrical power to the oven. After breaking the adhesive seal, remove the bulb by taking out the screws on the...
Owners Manual
Page 41
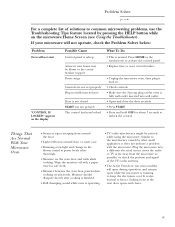
... control panel. • Replace fuse or reset circuit breaker. • Unplug the microwave oven, then plug it does not indicate a problem with a paper towel or soft cloth. • Moisture between the oven door panels when cooking certain foods. Moisture should dissipate shortly after cooking is finished. • Dull thumping sound while oven is operating. • TV/radio interference might be blown or the circuit breaker tripped Power surge Controls are not set...
... control panel. • Replace fuse or reset circuit breaker. • Unplug the microwave oven, then plug it does not indicate a problem with a paper towel or soft cloth. • Moisture between the oven door panels when cooking certain foods. Moisture should dissipate shortly after cooking is finished. • Dull thumping sound while oven is operating. • TV/radio interference might be blown or the circuit breaker tripped Power surge Controls are not set...
Owners Manual
Page 42
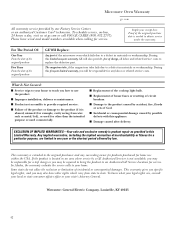
... possible defects with this Limited Warranty. I Replacement of the cooktop light bulb. I Damage caused after delivery. Any implied warranties, including the implied warranties of merchantability or fitness for example, cavity arcing from wire rack or metal/foil), or used commercially. In Alaska, the warranty excludes the service calls to obtain service under the warranty. Warrantor: General Electric Company. I Replacement of house fuses or resetting of circuit breakers. Louisville, KY 40225...
... possible defects with this Limited Warranty. I Replacement of the cooktop light bulb. I Damage caused after delivery. Any implied warranties, including the implied warranties of merchantability or fitness for example, cavity arcing from wire rack or metal/foil), or used commercially. In Alaska, the warranty excludes the service calls to obtain service under the warranty. Warrantor: General Electric Company. I Replacement of house fuses or resetting of circuit breakers. Louisville, KY 40225...


